
Today we’re featuring a reader guest post from William. You’ll remember William from his article about restoring a scratch-and-dent Gladiator tool chest, and we’re really excited to share his fire hydrant table.
Pro-Follow Update: Look for a brand new Pro-Follow update on Monday. If you keep up with OPC on Facebook and Twitter, you’ll know that Steve recently replaced a patio door, and we bumped into some unexpected problems with the header. Stay tuned to see how he tackled this latest challenge. For now, here’s William.
I’m a fireman. I don’t wear silly firefighter shirts with slogans like, “We Fight What You Fear,” and I don’t have a bunch of stickers on my truck proclaiming the fact that I’m a fireman. I do have a bonus room that is firefighter-themed, but not in a cheesy way. For instance, I like normal household items made from re-purposed fire equipment like old breathing apparatus bottles or old soda-acid extinguishers. In my bonus room, I used old, worn out 1-3/4″ fire hose as crown molding. I’ve got a couple vintage reproduction Texaco Fire Chief metal signs, and a few black and white photos taken over the years at work. No flames on the walls or anything ridiculous like that.
To add to the theme, I wanted to make a table out of a fire hydrant.
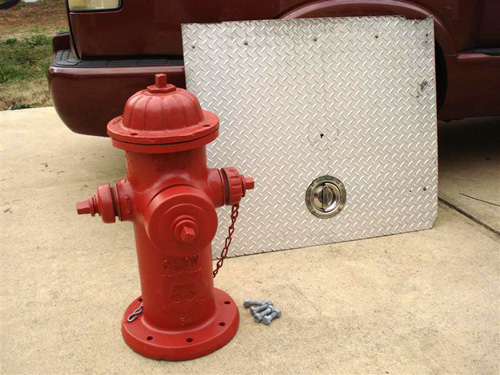
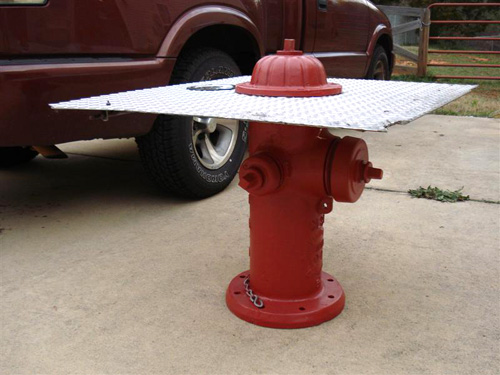
Initially, I had planned to have a glass tabletop cut, but that proved to be too expensive (and fragile) for this project. Luckily, more fitting materials popped up anyway. The design called for a fire hydrant with a tabletop sandwiched between the bonnet and the barrel. For those of you who aren’t intimate with typical fire hydrants and their anatomy, the barrel is the vertical, round part that sticks up out of the ground. The bonnet is the curved top that bolts down to the barrel. Through the bonnet runs a vertical stem that connects to a valve underground that allows water to enter the hydrant from the main. By turning the stem nut on top of the hydrant, the valve is opened or closed.
I started on this journey years ago, when I was still a rookie at my department. I made a trip to the county water department scrap yard, where all sorts of scrap water mains and hydrants were kept, in various states of brokenness. I had to search for a while to find a hydrant that wasn’t broken in half or missing pieces. It was also a hunt to find one that wasn’t bolted to a 12-foot or larger section of water main. I finally found one in good shape that was connected to a 6-foot section of 5-1/2″ steel pipe that would’ve connected to a main. I found someone to help me load this monstrosity into my truck, and I went home to apply heat to my back and Advil to my belly. Fire hydrants are heavy! They’re around 250 pounds of cast iron, and my suggestion to anyone following along is to bring a couple 18″ pipe wrenches for the bolts and a couple of friends. Friends with their own pipe wrenches are even better.
I took the hydrant and 6′ pipe to the fire station where I worked and unbolted the pipe section. It was fairly light for its size, and it fit in a large dumpster. If I had it to do over, I’d have unbolted it before leaving the scrapyard and left it there. If you can find a place that will give you a hydrant, you might NOT find a hydrant you can actually take without removing a water main so take tools with you. I’d recommend taking the caps off, and removing the bonnet before moving the hydrant. You want as much weight off that thing as possible when waddling around with it. Secure it very well in your vehicle because 250 lbs. of cast iron has a lot of concentrated inertia. Even if it moves a little, it can put a large dent or bend in the bed of a truck, and if it slides from one side to the other in a turn, you can feel it move the back tires around on you.
A coworker with a large sandblasting setup sandblasted the entire hydrant, inside and out, then primed it for me. My hydrant was covered in over a decade of rust, paint, more rust, and more paint. Hydrants where I work get painted once every year or two, and they never get stripped. The crud-crust just builds up, and the best way to remove that down to a paintable surface is sandblasting. I tried a wire brush and a wire wheel on a drill- no dice. A wire wheel or cup on a grinder would certainly get a good amount of work done, but there are too many tight spaces on a hydrant where a grinder wouldn’t reach like inside the 2-1/2″ discharges. There are plenty of steel, iron, machine, and sandblasting shops that have a large blasting chamber and will strip a fire hydrant for $50 or less. It’s worth it.
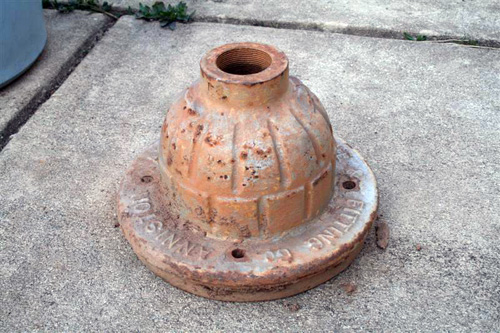
The condition of this bonnet is about how my entire hydrant looked before sandblasting
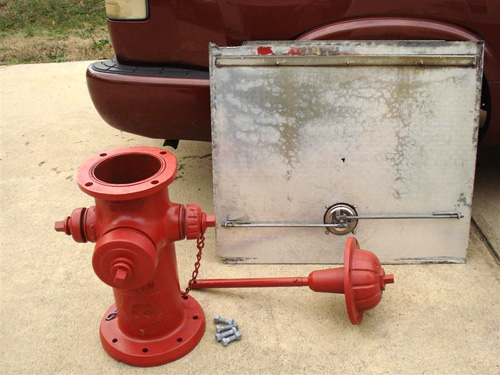
So, blasted and primed, I put some rust inhibitor paint on the hydrant and started thinking about a tabletop. While considering glass and wood options, I stumbled upon an old ladder truck compartment door. This was a giant piece of diamond plate aluminum that had just been lying around the fire station for years and no longer actually fit any apparatus still in service. The door was in rough shape, but it seemed to have the look and character I wanted for this project. Even better, it even still had the D-handle and locking mechanism on it. The challenge for using this sheet of diamond plate for this table was that the hydrant’s bonnet extended downward inside the barrel. This meant that anything used as a tabletop would have to have a hole in the middle to allow the bonnet and a piece of the stem to pass through.
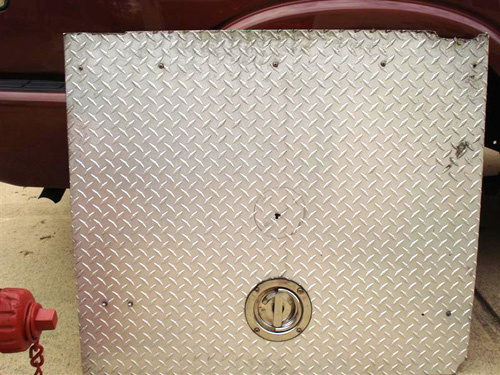
Old compartment door
Note the underside of the bonnet is still cast iron, and projects downward into the barrel, and attaches to the shaft of the stem
I don’t have the kind of tools that would make this part super-easy. A Dremel or Rotozip type of tool with the right bit would make quick work of aluminum plate, but instead I used a reciprocating saw. I found the center of the tabletop and used that point to draw a circle large enough to fit the bonnet’s protrusion. Around the circle, I drilled a series of connecting holes that formed slots big enough through which to fit a metal-cutting blade for the reciprocating saw. Using a drill to make connecting holes in metal is harder than it sounds. The holes have to be far enough apart that the bit won’t just skip off into an existing hole, and the holes have to be close enough to use the bit to expand the holes until they connect into one long hole. Three connecting holes were big enough to fit the blade. After that, I just cut a square out of the center of the table top. When it’s all bolted up and finished, it won’t matter how ugly the center hole is; it’ll be covered by the bonnet. In the meantime, I had to work with and around that ugly, jagged hole, so I took a file to it and smoothed out all the burrs and edges until they were hand-safe. I did the same thing on the outside edges, only I spent a little more time rounding corners and eliminating jagged spots, because the thought of sutures and tetanus shots kind of ruin the appeal of a cool piece of furniture.
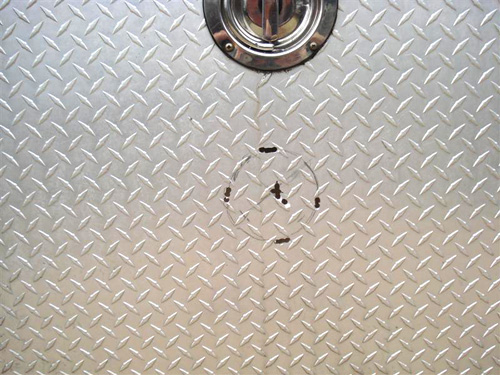
Center circle with connecting drilled holes
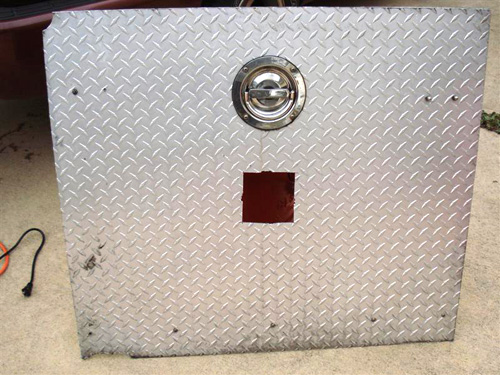
Center square cut out, jagged edges ready to be filed.
Finding a bit large enough to make the holes for the bonnet bolts may be tough. My bolts are 5/8″, which is close to the largest regular drill bit you’ll find for metal. A metal-cutting hole saw would be simpler, but it costs more. I’m a simple guy, but I’m a cheap simple guy, and cheap always wins that fight. So I just placed the tabletop on the hydrant, and centered the bonnet on top. I used the bolt holes in the bonnet to mark the locations for the holes in the tabletop.
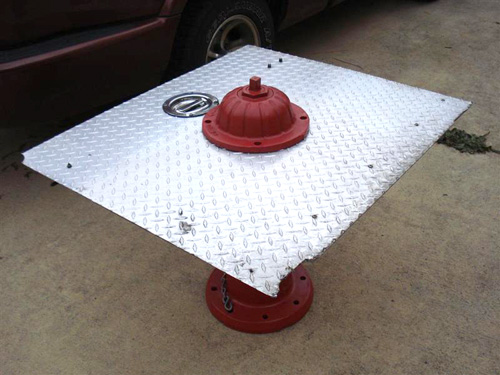
Centering and marking bolt holes
Drilling holes in diamond plate is more difficult than it sounds, especially with a very large bit. If you can find a metal-cutting bit with some sort of brad-type tip, you’ll help yourself a ton. Large drill bits have very flatly angled noses, and they walk a LOT on metal. It’s even worse on diamond plate, because of the raised texture that’s already trying to push the bit to a flat spot. Simply using a spring-loaded punch won’t give this kind of bit the purchase it needs to stay put and get started. What I had to do was center punch the hole locations five or six times each to get a nice, deep punch in the aluminum. Then I used a 5/16″ metal bit to make a pilot hole where the center was punched. The pilot hole was sufficiently large to keep the 5/8″ bit from walking until it made its own hole. When drilling metal with a large bit, it’s important to keep the RPM up on the drill. Don’t push too hard, as the friction will slow the bit down and make it bind, and every time the bit binds, it kicks the drill. Let the bit do the work. The larger bit takes longer to eat the same depth hole than the smaller pilot bit. When the large bit finally starts to break through, ease way off the pressure behind the drill, and hold on tight. I could not prevent the drill from binding on any of the four holes as it broke through the other side, but it got better as I learned to control the pressure applied.
After making the holes, I mocked up the whole deal and test-fit the bolts into the holes. Three of the four passed with ease. However, the fourth required a little touch with a rat-tail file on the diamond plate to open up the hole on one edge which took about 5 seconds.
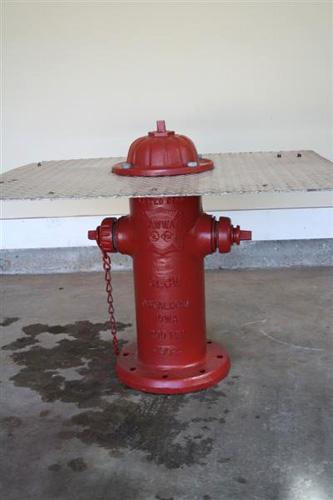
Mocked up
The only other steps are paint and assembly. If you do a project like this, you can paint the hydrant any way you like so get creative! I’ve seen hydrants done ornately where discharge caps and chains were actually chromed. You can paint it to match the room it’ll be in, or the outdoor space it’ll occupy. Consider painting it to match hydrants in your area. The hydrants where I work are all yellow, and I didn’t want a yellow hydrant in the bonus room so I picked red (RustOleum Professional High Performance Enamel in Safety Red, to be exact). I’ve used it before to paint fire apparatus wheels and leather fire helmets, and it’s a strong paint that holds up to heavy abuse. Take off the bonnet and discharge caps to paint them separately, and don’t forget to paint the bolts. Allow everything to cure for about a week before assembly, longer if it’s cold or humid. Any less than that, and if you bolt it all up, you could rough up the paint, or the paint could end up sticking severely if you ever go to take it apart again.
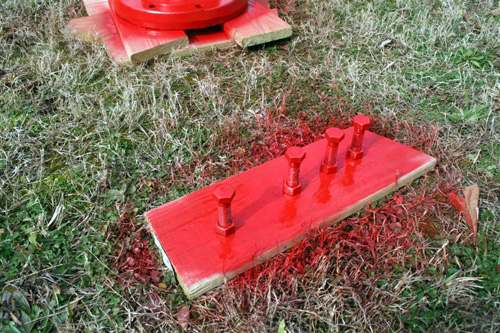
Painting bolts
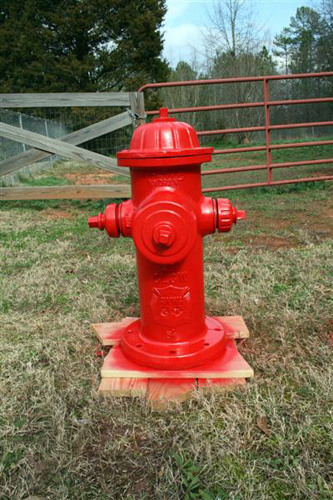
Safety Red
Carry your pieces to their final resting place, and start bolting things together with more excitement than when you got your first Erector Set.
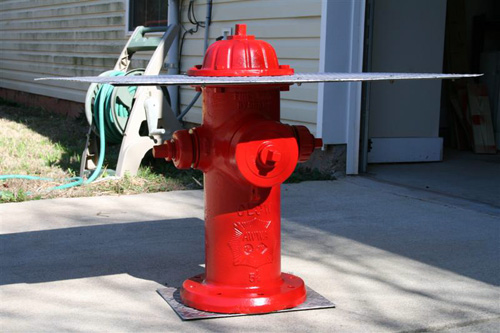
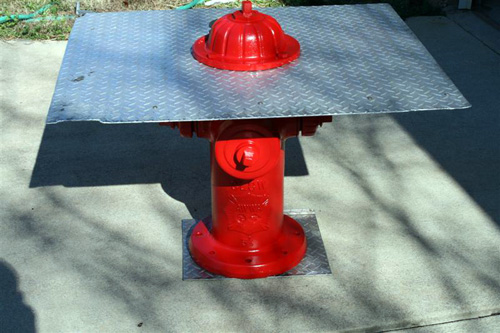
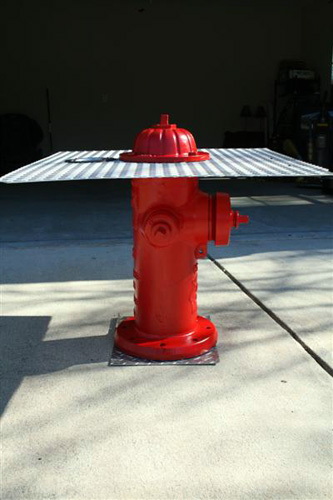
I still need to put another coat of paint on the hydrant, but it’s basically how it’ll look in my bonus room. I found a piece of diamond plate trim on which to sit the hydrant. This will keep any horrible impressions and future rust stains off the carpet. All the edges of the tabletop are smoothed, and the rough hardware that used to protrude from the top has been removed. The bolts are only hand tight, and the table top is solidly secure. It’s got some flex in it, but it’ll hold drinks, food, or propped up feet for entertaining. The table could be braced in many different ways to make it stiffer, but it’ll work just like this for a bonus room. If it were going in the day room at a fire station, I’d brace it like I expected someone to jump on it, because eventually someone would. The only other thing I MIGHT change is going over the lettering on the front and rear of the hydrant with some gold paint. Gold accents on Safety Red paint just bring up the image of hand-laid gold leaf on a classic fire truck. So, we’ll see.
Some tips if you want to tackle a project like this for your home or fire station:
- Safety first. If you’re the one sandblasting, take all the standard precautions for doing so. If you work with metal like this, even on something unrelated to this project, wear eye protection and gloves. It’s a nice day out today, and I want you to be able to see all the pretty days after this one. Wear gloves because aluminum is TERRIBLE about making razor-sharp ribbons when drilled, and angry filings when filed. If you’re like me and Charlie Sheen, you’ve got tiger blood coursing through your veins, and you want it to stay there so wear gloves and shoes. I’m a country boy at heart, and I have a terrible habit of not putting on shoes until AFTER I step on something sharp.
- Fire hydrants are all over the place. Mine was free from the water department so check there first. Craigslist, eBay, and plenty of other places have listings. Find one in your area, because shipping a 200-lb chunk of iron won’t be cheap, and lots of people have fire hydrants with which they, too, intended to do something cool, but never did.
- Table top options are limitless. The big home improvement stores actually sell hardwood tabletops, round and square. They’re thick, which might require you to purchase longer bolts to assemble everything, but the tabletops are sanded and just about ready to paint or stain.
- If you have the hydrant sandblasted, ask them if they’re able to prime it there, too. That’ll keep it from beginning to rust between the blasting and whenever you get around to painting it. For me, that time frame was over a year.
- When you paint the nuts and bolts, prime the entire things. Final paint, however, needn’t cover areas that won’t be seen like the surfaces underneath the bolt heads and the nuts. Thread the bolts just into the nuts so that they stand up like pictured above. You can paint all the visible surfaces, then flip the nuts over for assembly so the painted side is out. You may need to paint the tips of the bolts if they stick out when assembled.
- I’ll reiterate that fire hydrants are heavy (even small ones). This one, with two 2.5″ discharges and one 5″ discharge, is about as big as normal hydrants get. There are smaller ones out there, skinny ones with single discharges and whatnot. If you wanted a smaller table, like an end table or night stand, look for those.
- An angle grinder with a medium grit flap disc would’ve made extremely quick work of smoothing the edges of this tabletop. Unfortunately, I don’t have a grinder. I used a flat cross-cut file to get the big stuff evened out, and a single cut file to smooth it all down. It took a while, and working from the tailgate of a truck isn’t the easiest platform. Do yourself a favor and build the workbench that OPC built for their shop.


I love this! I was glued on every word. Thanks for sharing! I’m seriously DYING to see the game room though. I was really hoping you’d have a picture of the table in your room and all the other cool fire themed decor you’ve got (crown made from a water hose? I’ve got to see this!)
Do you have your room posted anywhere so I can go see it?
Oh, and also I pinned this post b/c it is seriously so stinkin’ cool. Granted, I will probably never make one b/c it’s too heavy and a lot of work! But still, I loved reading about it. Thanks for sharing with us.
SWEET! as a former volunteer firefighter I highly approve! I might suggest that you use the holes in the bonnet as a drill guide, it might help keep your drill bit straighter, and should help with wandering. also, I am sure a plasma cutter would be a much more fun way to modify the diamond plate.
An even better table top would be the diamond plate with glass over it, so you get the nice flat surface of the glass, and the look and support of the diamond plate. then again, I now feel a need to get glass cut for basically any wood table I have (nightstands, dresser, kitchen table, etc.) I just like the protection and surface they provide, as well as the ease of cleanup.
Cool! Never seen this done before. Do u have issues with dogs peeing on ur table? 😉
Very good idea/job. However, I would make two suggestions. 1) Round the table edges. Bumping into it with squared edges will make some nasty cuts. 2) Attach a plywood base. Maybe you won’t need it now, but someday kids may come into the picture and if anyone can knock it over, they can. And the way it is currently, that’s just an accident waiting to happen. But I do like it.
Thanks for the comments, everyone, and big thanks to OPC for posting another of my ramblings. I don’t have any pictures of our bonus room, mainly because it’s in complete disarray. It’s an unused room at this point, and mostly used to hold things that we’re too lazy to actually put into the attic. We’ll eventually get it straightened out, because I’m going to donate some of the space to my wife for scrapbooking space.
The square edges are an issue. It would hurt to take a corner to the leg. I may just give the corners a broad radiused cut, maybe a 3″ radius or so. As for knocking a hydrant over- won’t happen. No kid will tackle this 200-pound behemoth and knock it over without causing serious bodily harm or death. The other thing I might do is add some angle iron or channel iron to the edge, even though I filed it fairly smooth. It’s still not perfect, and an extruded piece of iron might give it more of a finished look. That’s the great thing about this kind of project- there are eleventy billion directions in which to take it. It’d be hard to copy this one completely even if you tried.
Thanks to this post I started noticing all the different styles of hydrants in my community.
Currently the one in front of my house is a very unique one, it’s orange and cone shaped… because someone sheared it off over the winter. Crossing my fingers that no one on my half block has a fire or we’ll all be out with garden hoses!
The three closest to my house spent about a year wrapped in fire scene tape to indicate that they were out of service. As for different styles, there are a TON. The county for which I work has ordered probably at least 10 different kinds of hydrants from at least three different manufacturers over the last 50 years.
I never paid much attention to the fire hydrants I drove past, but I found myself taking a closer look this week too!
The 2 digit numbers on some indicate the year they were made. I’ve got 2 old hydrants, a 1943 and 1936. I noticed Savannah, GA had some dated in the 1890s.
So clever. I am glad to see that you are taking into account the corners of the tabletop. They look pretty wicked to me, especially for children or pets.
Isn’t it satisfying to have an idea come to fruition?
How do you keep your dog from “inappropriately utilizing it”?
I marked it as mine before they could.
That’s hilarious…but gross! You should make another one for your station as a coffee or end table. Then all the other fire stations would be jealous! 🙂
A “faux dalmatian skin skirt” at the base of the table might add to the novelty!