
I’ve been installing the baseboard molding, and it’s going up pretty quick. I completed about half of the molding last Saturday, and plan to finish the rest this weekend. The toughest part about installing any molding (baseboard, shoe molding, chair rail, crown molding) is getting all those corners to line up nicely. It’s common to find walls out of square making it even more challenging. Outside corners have to be miter joints unless you chose to use decorative corner blocks. Inside corners can be miter joints or cope joints. Here’s how to cope cut an inside corner and why it’s the better choice.
Editor note: This post originally ran after I installed hardwood floors in September of 2008. The topic of cope cutting inside corners has come up a few time recently so I thought it was time to revisit the topic. I’ve updated the post and added more pictures, and I hope you find it helpful.
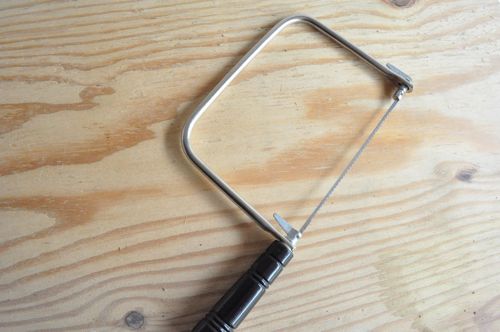
Cope Cutting Baseboard Inside Corners
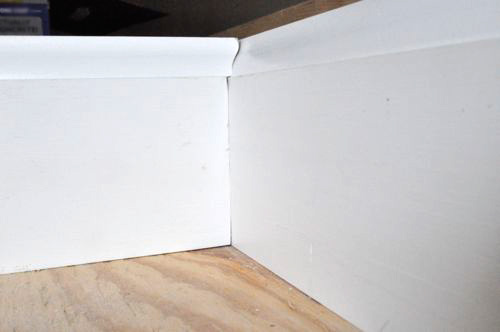
Cope cutting inside corners takes a little more time and some practice. The benefit is that cope joints better eliminate gaps between adjacent pieces of molding especially if the corner isn’t square. Plus, wood that is not fully dried will expand and contract with changes in moisture. If that occurs, cope joints will remain tighter than miter joints.
How to Cut Baseboard with a Coping Saw
If you plan on cope cutting your molding, you’ll need to grab a few extra items including a coping saw, sand paper and/or wood file. As one reader points out, a jig saw can be used in lieu of the coping saw when you have the right attachment.
The directions are pretty straightforward but this technique takes a little skill. Practice a few corners before you begin your project, and I’d suggest keeping a test piece nearby.
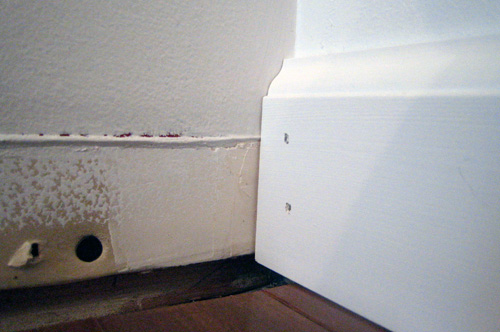
Step 1: Butt the First Board
Lay your first piece of baseboard in the inside corner. This piece should be cut square (0°) and fit snug against the opposite wall.
Step 2: Bevel Cut the Second Piece
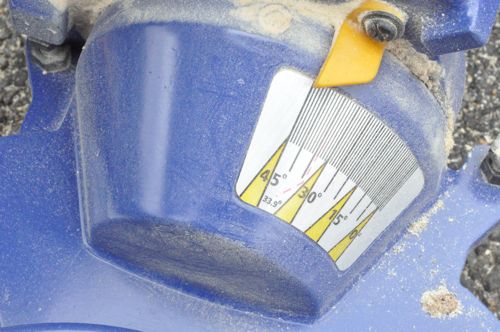
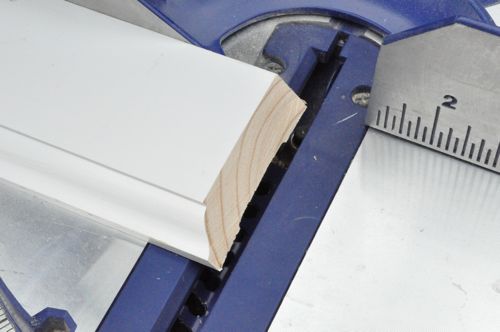
Take your next piece of baseboard and make a 45° bevel cut with a miter saw. This reveals the profile of your baseboard.
Step 3: Cope Along the Profile
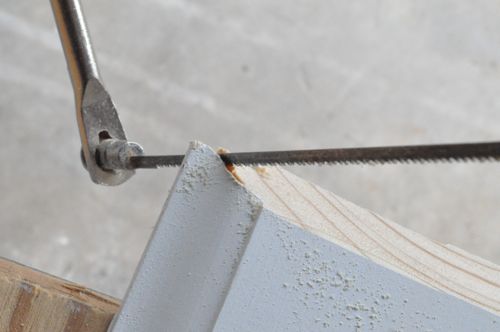
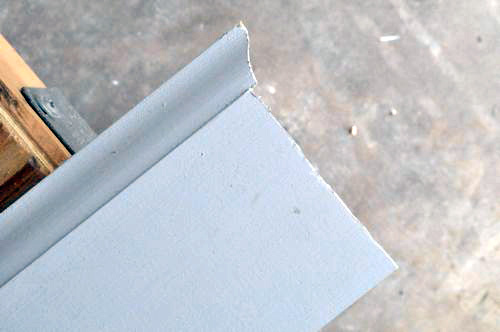
With a coping saw, cut along the profile. Slightly angle the blade so as to cut away more from the backside of the baseboard. Angling the blade will create a point ensuring the baseboard face fits tightly against the adjacent piece.
Step 4: Sand for a Tight Fit
Sand the edge and try out the piece. Note any places that need to be sanded or filed down further.


Cope Cutting Tips
There are a few things to keep in mind.
- Make sure you account for the 45° bevel when you measure the length. You don’t want to go through coping one end to find the other is too short.
- If you are right-handed, I suggest moving around the room counter-clockwise (lefties move clockwise). This will orient you more comfortably when using the coping saw.
- Some profiles will be difficult to follow with just one cut. Make several cuts rather than trying to twist the coping blade.

What do you think? Any tips you want to pass along?


There’s a nifty foot attachment for some jig saws called a Collins Coping Foot that makes coping a breeze.
http://www.collinstool.com/collins_coping_foot.htm
@Steve, That is a nice attachment. It still takes some skill and practice, but the foot can make coping faster in the long run. Did you use the foot on your paneling?
Hi Ethan,
I used the Collins Foot on a restaurant bar I built a few years ago, mainly because the crown and baseboard my partner bought cheap were pine and of questionable seasoning. I assumed there was gonna be “shrinkage” (tip o’ the hat to Seinfeld) so I didn’t want to take any chances with inside miters.
It took a little while to get the technique. What seemed to work best was cradling the molding in an upside down miter box and clamping it in place. That way you can use both hands to control the saw (a Bosch barrel saw in this case).
I’ve done no coped joints on my house renovation. With kiln-dried oak over hundred year-old framing, this problem is pretty rare. The miters have thankfully remained tight.
If that is 6″ board, it is the same kind I have been installing throughout my house. Good stuff and easy to work with.
I have a really nice Dewalt dual-bevel, compound, sliding mitre saw. Possibly the most expensive powertool I own. I use it for all my trim work. On baseboards, my usual tactic is:
1) measure the length required two or three times
2) And 1/4″ – 1/8″ to the measurement, meaning I know I will have to cut it again.
3) I generally cut it at least one to three more times, maybe a kerf-width per cut.
Yeah, it is more work but it hasn’t failed me yet. I’m allergic to manually coping angles. Just too much work and too easy to get it wrong. Burns me every time if I do it with a coping saw. So I stick with the monster mitre saw.
-Jon
After looking around a lot of sites/video I found your advice most helpful:
“2) And 1/4″ – 1/8″ to the measurement, meaning I know I will have to cut it again.
3) I generally cut it at least one to three more times, maybe a kerf-width per cut.”
Yes it is a little more work but with a compound miter it is still fast to fine tune your cuts. For a DIY I ended up with beautiful tight corners. It also takes a heck of a lot less time than going back to the store for more wood (not to speak of money saved on wasted materials due to mis-cuts).
Gold star advice ***** 🙂 Thanks!
Jon,
That’s pretty much my technique as well. I wrote a blog thing about it:
http://www.brooklynrowhouse.com/mitering
I enjoyed reading about coping. It is a clever method that I did with my Dad when I was young. It is slower and not for a speed freak, but important to note is that it may yield much better results in homes with bad walls and non-90 degree corners (e.g.; 92 degree corner) In bad corners (say, a 92 degree inside corner) if you use a regular chop saw set at 45 degrees, your joint will have an open gap and you will scratch your head, cut a new piece, and the same thing will happen!! In this case, you needed to be aware of the bad corner, and needed to have set your saw at 46 degrees for each cut, not 45 degrees! To my point, if you use a coping technique, this will not happen. Hope this is helpful. Any comments?
Can I use this cope cutting method if I’m using particleboard (MDF) moulding and not solid wood?
Hey Joe, I don’t have any experience coping MDF but I hear it’s fairly easy. You need to be careful of thin edges chipping away but caulk should cover it. I’ve also read that cheap MDF will chip and dent regardless. Hope this helps. Do us a favor and leave a comment with how things turned out.
I have coped MDF and it works just the same. As Ethan mentioned the cut isn’t quite as clean with MDF as with wood, but you can finish the edge so that no one can tell the difference.
Another tip I picked up recently was to get out the dremel for coping. The coping saw and I have been buddies ever since my pinewood derby days but I’m going to try the dremel out next time.
One other tip is to have a scrap piece handy wherever you’re coping so that you can fine tune the joint right there instead of dragging it in the house only to see you have a few high spots.
Good thoughts. I didn’t even consider using a Dremel. If you’re up for it- I’d love to feature a guest post. I’ll even throw some Project Rewards in there.
I used both the techniques Jeff mentioned recently with great success. I installed a built-in bookcase in my basement and trimmed the top out with crown molding. I used the Dremel to cope all the pieces, but I had a scrap piece of crown outside with me to test fit and see where I needed to remove any additional material. Both good tips that are time-savers.
I was reading Hammerzone, and his suggestion on laying out the joints made a lot of sense.
http://www.hammerzone.com/archives/finishcarp/baseboard/traditional/install_colonial_base.htm
Basically, you want to make sure that when people come into the room, they look down the coped piece of trim, that way they’re not looking into the joint, but onto a full piece of trim.
His tutorial (and site) is pretty good in general, I think.
This is the first I’ve seen HZ but that is a great tutorial. Very thorough. Thanks for pointing that out.
They’re all like that on his site, he might not cover every project, but the ones he does cover are done VERY well.
http://www.hammerzone.com/archives/finishcarp/baseboard/traditional/coped_cut.htm
Here is the more in depth coping tutorial, I like how he shows how to speed it up with a miter saw, and also how he cuts the back at an angle to reduce the sanding needed. also, files are MUCH more effective than sandpaper
So, are you saying that we shouldn’t miter the baseboards? I’m a tad confused. That is what we did when we added baseboards and shoe molding.
Miter outside corners, cope inside ones.
That was a fast response! I’m impressed…
For inside corners, it’s better to cope cut them. Sometimes you can get away with miters but you risk gaps opening up over time.
thanks for revisiting this topic, all the links in the comments will come in handy if I ever attempt to tackle this sort of project
Wow! I had no idea. Thanks for the info. We just finished installing baseboards in three rooms. We’ll know better next time!
Those are good tips to read before taking on this project… this can definitely be a tricky diy project if you’ve never done it before. Thanks for sharing!
I would definitely have been too intimidated to try this project, but now I’m more open to trying to do it ourselves!
I have tried this and it works well with base molding. Now let’s try it on 45 degree crown molding around the ceiling of a dining room with ten foot ceilings. Great display. You can also use a small router to cut the thin parts. It make for a better cut then a saw. This is something you have to work on for a while.
Wish we would have seen this before we installed our base molding. We mitred them, and the gaps are more visible.
I am installing a 3-1/2″ base board, using my miter saw and the boards on the flat side (horizontal), all my cuts are not coming at 90 degrees with respect to the long side of the board. My question is: Can I cut my 45 with the board in a vertical position?
Hey Fred,
It sounds like the fence on your miter saw is out of square. If that’s the case, it won’t matter how you orient the boards. Grab a square and check the blade and the fence. To answer your question, you can make 45 degree miter cuts with the stock up against the fence.