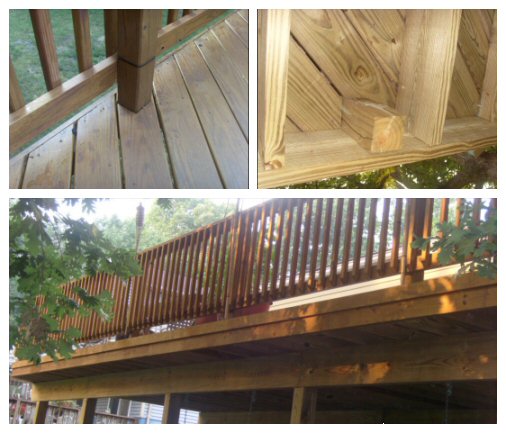
When we designed and contracted to have our deck built last year, I did’t think too much about the railings. We knew we wanted traditional rails without any special features like a sunburst. We ended up with traditional 2×2 pressure treated southern yellow pine balusters fixed between parallel 2x4s at the top and bottom. It’s plain, but it’s just what we were looking for.

This simple design works well because the balusters are fixed close enough together that there’s no chance of the kids’ heads getting stuck between them. And, the 3″ gap between the bottom 2×4 and the deck surface makes it much easier to sweep debris off the deck vs. if the balusters were attached directly to the rim joist. (Our previous deck was constructed that way).
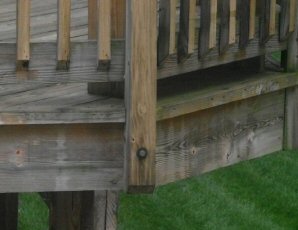
 One thing we were pleasantly surprised with was how our contractor attached the deck railing posts to the rim joist (a.k.a header board, or fascia). Instead of the posts being attached on the outside, as shown to the right, our contractor cut holes in the deck surface and installed the railings on the inside of the rim joist. This creates a much cleaner look on the face of the deck. It also means the bottom of the 4×4 doesn’t have to be cut to sit partially on top of the deck, making it stronger.
This style of installing deck rail posts was popularized by composite decking companies because it is impossible to sheath a 4×4 post with a vinyl slip when it is installed on the outside. Even though initialily popularized by the CDCs, this works just as well with traditional pine, redwood, and cedar decks, and is pretty easy to do yourself if you’re building your own deck. Here’s the steps:
- Finish the deck up to, and including, laying the decking surface. This includes mounting the rim joist and laying the decking boards, but not any additional trim (our deck as a 1×4 piece of trim over the rim in the picture above)
- Plan out the railing post locations. In most cases, railing posts should be spaced no more than 6′ apart; but local codes vary. If you install the posts too far apart, the railing may sag over time. Remember that when installing posts on the inside of the rim joist, you’ll need to avoid the joists underneath.
- Mark out the 3.5″ x 3.5″ hole location on the top side of the deck. Using a drill with a 1/4″ drill bit, drill four holes down through the surface of the deck inside the corners of the square marking. Note that drilling the holes completely inside the marking is important, otherwise you may end up with odd looking rounding gaps at the corners where the 4×4 will be inserted.
- Use a jig saw to cut out the hole in the surface decking boards. Insert the jig saw into one of the drill holes and follow your marking line to the next hole. When finished, you should have a perfect 3.5″ x 3.5″ hole. (An alternative to the drill-and-jig method is to use a rotary tool with a sharp bit to trace the line).
- Insert the post into the hole and lag screw through the header board from the front into the post.
- Attach railings the same as if the boards were attached on the outside.
What do you think? Do you have a preference for railing posts? Did your deck have any railing innovations?


Mounting the 4×4’s on the inside is certainly much stronger and a cleaner look. I also like to install a block behind the 4×4, between the two adjacent joists, which creates a sandwich effect for the 4×4.
One thing I’d point out, in my opinion it’s easier to install the 4×4 prior to installing the decking. You can deck right up to the railing location, then install the posts, then finish the decking.
Great post Fred!
Todd-the block idea is a v. good one, indeed. That would certainly create additional strength for the 4×4 post.
I’m 50/50 on the 4×4 before/after the decking. I would need to experience both to make a good decision. On decks where the decking boards run perpendicular to the joists, I can see this being a fairly straightfoward and easier method. With diagonal decking boards, the cuts get a little more complicated and ensuring no significant gap between the 4×4 and the decking would be harder.
I don’t know about it…I too would have to experience it. Just to note, I live in the city, so my postage stamp yard makes me miserly about giving up space…even a mere three inches lost to a railing on the inside of the rim joist might make me feel “crowded” on the deck. 🙂
Case in point: I’m furious about the POs at my place having put up the privacy fences BACKWARD (posts facing out, away from the yard)…that’s four inches of garden space I could be using!!!! 🙂