
December’s workbench construction project generated a good number of comments and questions from many of you. Based on the great ideas from the conversations on that article, we upgraded our existing bench and constructed two new benches for our workshop. We haven’t had a chance to address all your ideas yet (there were many good ones!), but rest assured we continue to make improvements.
1. Bench-Mounted Power Strip
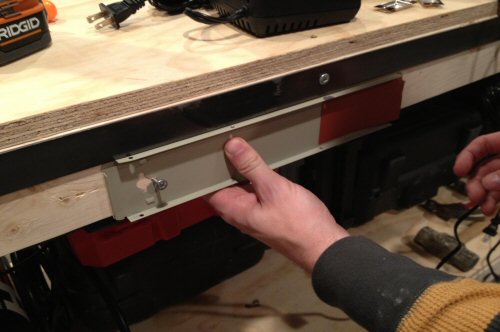
Icarus suggested adding a power strip to the benches for more convenient power access. This quick and simple addition made it much easier to manage the (ever growing) number of battery chargers we have lying around. We purchased a typical workshop-grade power strip from Home Depot and mounted it to the back side of the bench.
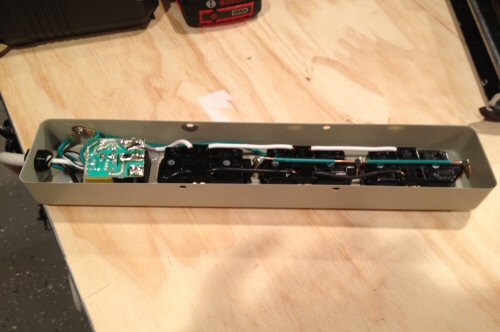
It’s interesting to see that the inside of this power strip is a simple electronic breaker with three typical household receptacles mounted one next to the other, connected together with standard 14 gauge wire.
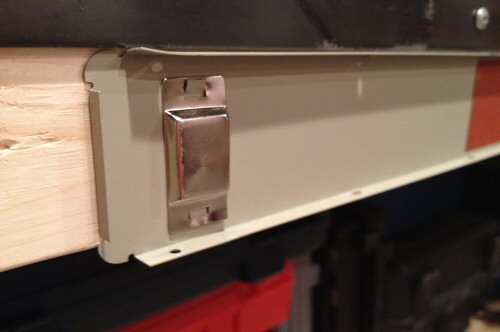
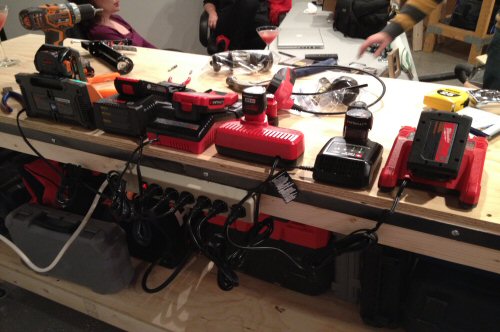
For benches that sit fairly snug against the wall, mounting to the back side of the bench might restrict placement. In our shop, the perimeter foundation keeps our mobile benches four inches off the wall already, so this posed no problem. An alternative mounting location would be on the surface of the bench (we don’t recommend, in case of spills), or upside-down underneath the top shelf.
For convenient hand tool access, a front or side-mounted strip might also be desirable, but with outlets lining three sides of our workshop, convenient power hasn’t been an issue.
2. Box Beam / Torsion Box Top Shelf Design
Sean @ SLS Construction chimed in almost immediately after we posted the original workbench article, suggesting we add further rigidity on the top shelf by gluing the top piece of 3/4″ plywood (which was already fastened with screws), and also gluing and screwing a second piece of 3/8″ plywood to the bottom of the shelf, creating a torsion box. This modification had such a huge impact on the stiffness of our work surface, we’ve decided to build all future benches using this technique.
Here’s the pictures using this technique on the bottom of the top shelf of our second bench (the top is already glued and screwed to the surface). (Note: The bench is flipped upside-down for these pictures).
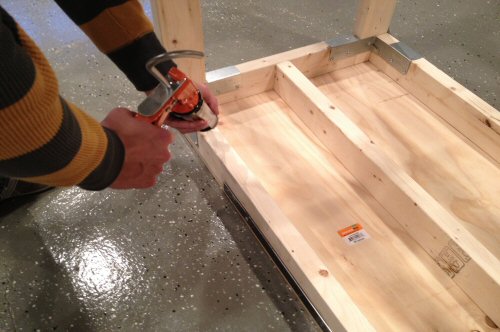
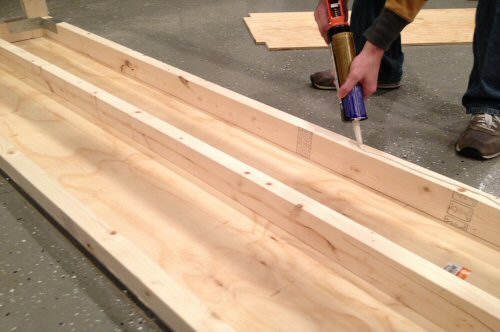
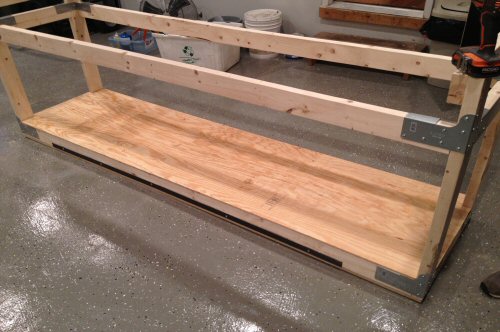
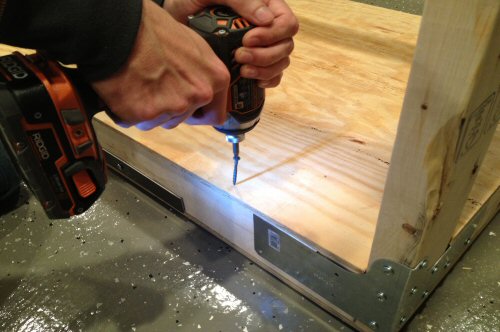
The strength and rigidity of the top shelf surface is notably improved over our first bench, and can easily hold my 250 lb. frame without any perceptible deflection. Now that’s impressive!
3. Mitre Saw Bench with Height-Matched Work Surface
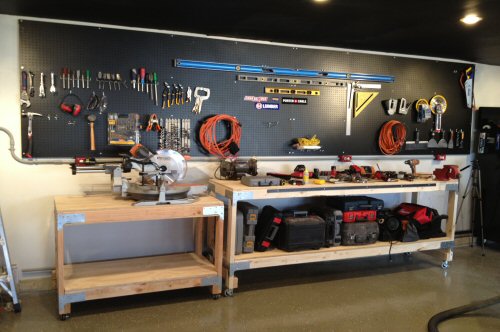
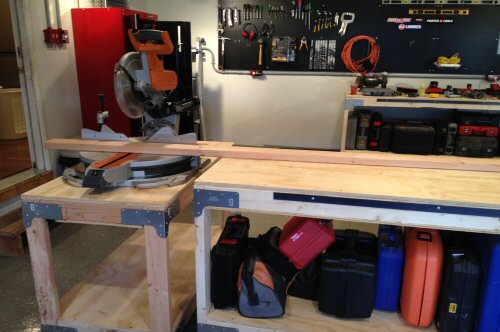
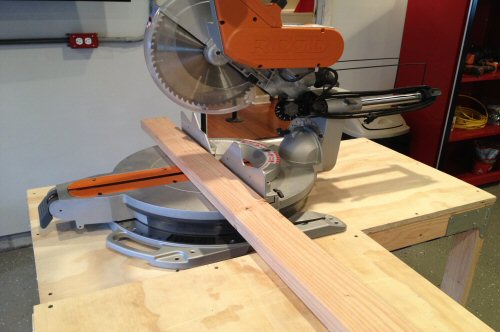
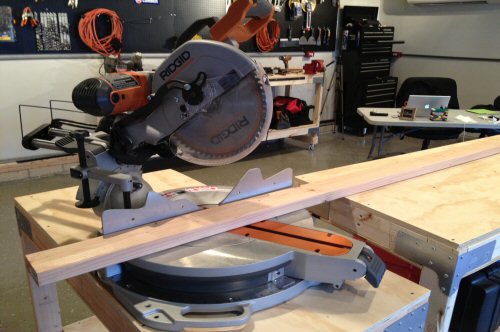
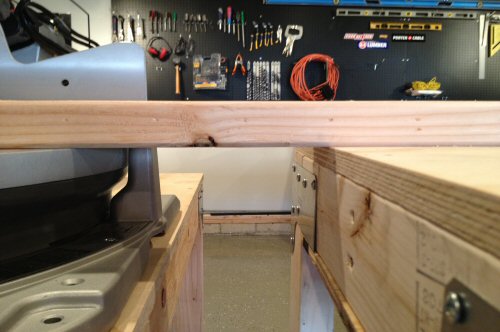
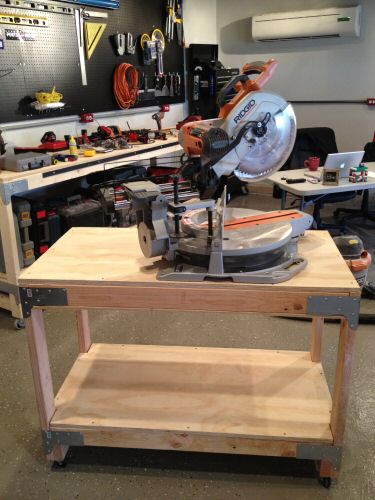
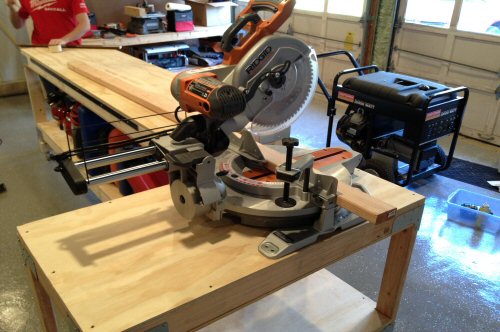
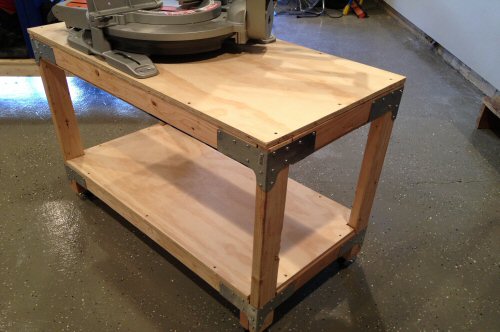
After considering a wide range of designs for mitre saw and table saw workbenches (including ideas as elaborate as an adjustable-height table), we settled on a plan for building two mobile free-standing tables, one for each saw. We constructed the mobile table for our mitre saw first, designing it to put the mitre saw cutting surface at the same height as our other mobile benches. This allows the others to be used as support tables. Here’s some shots of the new mitre saw table.
4. All Purpose Lego-Prototype Bench for Idea Generation
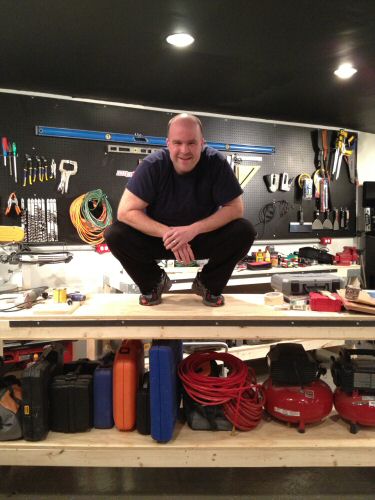
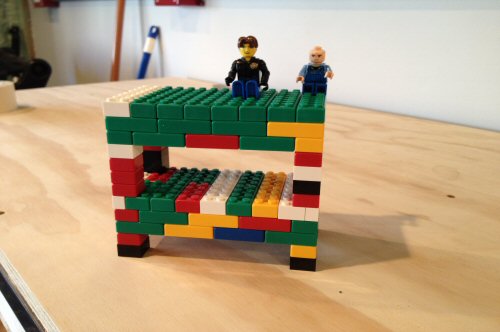
The holidays around our house always bring fresh Lego sets, inspiring all types of creativity in our boys. My son, Bear, decided he needed to build a bench just like ours using the spare pieces bucket. After a few iterations, I think he did pretty well. Clearly it’s built with the torsion box design, because it’s holding Ethan and me without noticeable deflection 🙂
(I’m the one with the fabulous hair. Ethan’s still bald.)
Up Next for Our Workshop?
- We’re going to build a fourth mobile table for our table saw using the same technique as we used for the mitre saw.
- We’re looking at various router table designs. With little experience in this area, we’ll be looking to the experts for help.
- Insulated garage doors are forthcoming. We’re experiencing biting cold weather here in Maryland, and our old wooden doors just aren’t cutting it anymore.


What table saw do you have? I’m picking up a Rigid r4512 this week and am going to build the router table between the front and back fence rails. You could do something similar if you have a contractor or hybrid style saw. Do a quick google image search for 3650 router table to see what I’m talking about. Maybe your only TS is the Bosch in the background of one of the pictures.
Love the rest of the benches. Especially the lego one. I keep a bin of old legos in the garage for rapid prototyping or quick mock ups.
Jeff, I will take a look at that this evening. The only table saw we have right now is the Bosch portable model. It’s a great portable saw, but can only rip an 18″ width, which means any wide rips we have done at the local Home Depot.
I should have added this to my original comment, but we would LOVE you to take pics and review that Rigid here, Jeff. We were considering asking for a demo model of that saw for review ourselves but just haven’t gotten around to it. We’re also pretty enamored with our portable Bosch, but the 18″ rip capacity is a little bit of a downer.
Wow, so honored that my suggested got implemented, as well as many of the others. It just goes to show some of the positive things that can happen when you create an forum like One Project Closer.
Awesome mods! I need to add some power outlets to (or near) my bench. I really like the miter saw bench, did you have difficulty getting it to be the perfect height and level all the way around? or did the casters help with that?
Did you try building the torsion box without the extra metal supports on them? Do you really need the flat steel anymore?
I love the Lego bench but please forgive me for geeking out about LEGO for a bit 🙂
Those aren’t LEGO bricks at least, not all of them, some of them look to be kinex (the ones with rounded corners). I have been going through all of my old bricks, sorting and preparing for cleaning, hopefully I will get some of my old favorite sets put together again (Black Seas Barracuda <3 ). My wife gave me the diagon alley set for Christmas, I am super excited to get that together as well.
Hey Joe,
I put the miter bench together and followed the “measure five, cut once” philosophy. I took a couple different workbench height measurements, and made sure all my cuts were exact.
The miter bench turned out beautifully, except that there are a couple places in the workshop were the floor isn’t 100% even. If we avoid those, everything works as planned.
We didn’t try the benches without the metal supports so I’m not sure how necessary they are.
Joe, you are so right! There are a bunch of impostor blocks in the “spare” bin. Rest assured, though, that the kids do get mostly genuine LEGO sets for the holidays 🙂 This year Bear got one of the City Shuttles, and both he and Jose each got a Ninjago set.
My dad made a workbench in his basement decades ago and installed a power strip. Who knew he was so cutting edge?
Love, love the Lego model. Starting the kids early! 🙂
We were. I think on a prior comment you mentioned you’re in Iowa. Happy to have the media attention scatter a bit! Things must be crazy there every 4 years.
I personally love Bears workbench he did a great job. Love the hair. :0)
Great timing on these two projects. An idea and a question.
The Miter/Table saw is an awesome Idea. You got me thinking ( a dangerous thing) about making a dual saw table or just a platform for the end of my work bench still deciding . One stores the table saw on the shelf below the miter saw. Since the cutting platform of table saws are higher than the miter saws. I am thinking of using a drop leaf platform, If you have seen the old sewing machines/ dinner tables with drop leafs. Making the table saw platform, using a box beam / torsion box with 2″x4″ on the short dimension. I would use bench dogs for securing it while in use. I plan on building it with a square opening under the saw for dust collection using an inexpensive Table Saw Dust Bag (item 45794 HF). It might be just as easy and more efficient to buy a shop vac hose attachment and attach on the underside. The Platform is box frame within a box frame. The inner frame is rigid and you drill the bench dogs through the 2″x4″ . Both of the box stores carry drop leafs supports.
Digression before the question.
I was looking for wheels at the local HF store last night for the workbench . In the section with the wheels. The aisle that had the wheels also had a 1′ Roller and Bracket Set (it is a one foot metal rolling pin like the wood one used in the kitchen ). It was $5 (item 30026) and the captive roller ball bearings ( look like eyeball in a eye socket) just under $1 (item 67067). If you have seen the support stands with rollers and ball bearing rollers, this is the system I was thinking about Incorporating it into the work bench as a support surface.
I am wondering on how to incorporate a roller/ball bearing support into the work bench.
Any thoughts on how to incorporate in to the work table either permanently or adjustable/temporary setup.
-Thanks!
Jonathan
Jonathan, I had to read through your comments a few times to get my head around the project. I think I’ve gotten it.
For the bench: I like the drop-leaf idea for the table saw mount. Are you suggesting that the table saw would be attached to the drop leaf like the sewing machine, or would you put the table saw on the shelf only when using it? How would you mount the mitre saw? Would it be permanent? Only concern I have would be hanging the table saw sideways for extended periods of time. It shouldn’t through the blade out of align, but it might, depending on the mounting.
One idea we originally toyed with was mounting the mtire saw and table saw each to roughly 2’x2′ sheets of 3/4″ plywood, and then building an adjustable height work surface using a scissor jack. We got to thinking that we were probably over-thinking it, but if you’re considering a more elaborate design, a scissor-jack raised bench is a wicked cool idea.
Awesome comment. Hope we’ll see you back frequently! Also, I would LOVE to see a picture!
Thanks for the shout-out & glad the idea helped (though I was thinking both shelves due to all the weight being left on the second one)
Now I just cant resist the Lego one – you did good on the bottom shelf, but that top one…
In all seriousness, I love the surge strip idea, but you do need to let the top sheet run long to no only protect the cords but also prevent any fluids or saw dust from being able to create a nasty surprise.
Routers – you might want to check out Rockler wood working tools as they sell some you can drop in & last i checked had kits so you could create your own. I know John aka @BirminghamPoint is working on creating one with some tracks that are found in many of those systems – http://birminghampoint.co/blog/2011/12/17/historic-windows/golden-ratio-benchtop-design-in-sketchup/
Sean, thanks for the link – will definitely check it out. As for supporting both shelves, definitely not a bad idea, we’re just not worried about a little deflection on the bottom shelf. If it becomes a problem at some point in the future, well swap out the 2x4s and rebuild that shelf….
I do like allowing the plywood to hang over the edge for the surge strip – that’s a good safety tip. When I eventually go back and make mods to our heavy duty workbench article, I will add that suggestion in for the power strip.
This is more of a suggestion for another project but after looking at the pictures of your garage it would be nice to know the proper way to run electrical to create plug outlets like you did. I just bought a house and the only plugs that it has in the garage is one on the back wall and one next to each garage door opener on the ceiling. This makes it very difficult to work as I have to run extension cords all over the place. Have plugs setup on my main wall next to my work bench would be ideal.
I’ve always been a fan of screwing down a sheet of masonite as the finishing surface on all my worktops. It saves you from having to spend the extra $$ on cabinet grade plywood, while giving a totally smooth work surface. Additionally, as the work surface get gouged up from projects, the masonite can be replace quickly and cheaply increasing the longevity of your bench.
i definitely like pete’s suggestion. furthermore, have you ever considered adding drawers/more shelves? what about at least putting cabinets on the front to make things look even tidier?
I am going to undertake this project or a similar one in the next few weekends… I am planning right now on making a few modifications for it to fit my space better and whatnot, but I am excited to see how it goes!
This looks great. I have a few questions:
1. I compared this set of instructions to the simialr one you had in the Art of Manliness. This one has the underlying boards 93″ instead of 90″, I think the 93″ is correct?
2. In both articles you mention the notches whihc need to be cut to accomodate the legs, but never do you mention that both pieces of the 3/8″ plywood or the 3/4″ plywood piece used for the bottom of the torsion box need to be shortened. These do need to be cut down since the overhang is 3″ longer than the length of the bench, is that correct?
3. Why is there no support in the middle of the shelf as in the top; is it not needed for additional support and strenght to the shelf?
1. It depends on the size of the workbench you are building. In the AOM version we made the top extend over the outlet strip; in this version we did not. The dimensions are correct on both posts.
2. Again, differences in the AOM version vs. the version described in the main post on our site.
3. We opted against it only for anticipated load. On the top shelf we really wanted to have a sturdy shelf. Upon further review, the BEST possible thing you can do is make the top the torsion box that is described in the main post on our site (meaning glue and screw plywood to the bottom of the shelf as well. We cared a lot about deflection on the top shelf but not so much on the bottom. With the torsion box design, I can stand atop my bench with no perceptible deflection and I’m about 270 lbs.
Whoops – should have said the torsion box design described in *this* post – our original post did not have the torsion box.
thanks
Is it possible to put up the plans for the miter saw bench to use with your workbench? I love the idea, but new to building, and not sure of the height in regards to the height of the bench. I love the workbench feeding the miter saw. Even just some general
Thanks,
Steve
Love these modifications. Question on the torsion box. I would need top notch the underside plywood piece for the bench top, so that it will fit, right? Seems like that makes sense, but wanted your thoughts before I went too far. For the record, this is my first real building project. Thanks!!
I am one of the unfortunate individuals that do not have a garage or other enclosed area for my tools. Consequently I keep tools I am concerned about rusting, like my Ridgid Table Saw and Milwaukee 12″ SCMS, inside the house much to my wife’s chagrin. I do have a covered back porch and would like to build one for outside. The question I have is would you use different material for this and what would you use to weather proof it?
Tim
I’m no pro, but if this was going to live outside, I’d say build the whole thing out of pressure treated lumber, use coated exterior deck screws, and paint the Simpson strong ties with a weatherproof enamel. You might have to ditch the casters unless you can find exterior grade ones or are willing to replace them if they get rusty. You might also want to consider adding a back and doors to the tool storage shelf – turn it into a cabinet.
Basically – approach building this workbench as if you were building yourself a deck.
Great idea and information. What are the dimensions on the miter saw table? It is hard to tell from the perspective in the photographs.
A couple of comments:
1. For a true torsion box you should have cross members added and half lap them before adding the plywood skins. Using glue and screws makes this incredibly stiff, especially if you’re using 2x4s as in this project.
2. For your miter saw table you might consider modifying one of your 8′ long tables in the middle to add your miter saw. This would give support on both sides of the saw. Or just make another regular table to place on the other side.
I use 5″ neoprene locking casters purchased from Rockler and sometimes Harbor Freight (when they are available).
Hope this helps…
Are the plans for the miter saw table available?
With the addition of another plywood sheet for a torsion box, has anyone seen if that removes the need for the iron plate reinforcement?
I’ll be building one this weekend, so if no one answers I’ll give it a shot and let you know what happens 🙂