
Last week I had the opportunity to help a friend build the foundation for a new shed that will be delivered in a couple of weeks. His back yard has a bit of a slope, and it would take too much concrete to pour a slab (read how to pour a concrete shed foundation here). For that reason, we decided that building a post and beam foundation would be the best way to go. This article is a step-by-step guide for how we built it, and if you’ve read our article for building a deck, you’ll see some similarities.
Editors update: The shed has been delivered, and I’ve updated this post with some additional pictures. Dave from Maryland’s Best Sheds (who delivered the shed), was very pleased with the foundation, and I’m pumped with how this project came together.


Materials
- (3) 6 x 6″ pressure treated posts (see below)
- (1) 4 x 4′
- (6) 2 x 10″
- (8) 2 x 8″
- (3) 80 lbs bags of concrete
- (3) Pea gravel
- String line
- Stakes
- Spray paint
- (12) 1/2″ Carriage bolts
- (12) Washers
- (12) Nuts
- (3) Lag screws
- Galvanized nails
- Galvanized hanger ties
6 x 6″ Posts: We were able to use each 6 x 6″ for two holes. However, this may not be the case for everyone.
Tip: Pressure-treated lumber is infused with chemical and rated by the amount per cubic foot of wood. Ground-contact lumber has .40 pounds of preservative per cubic foot, and above-ground rated lumber has .25 pounds.
Tip: When purchasing dimensional lumber, pick through the pile to find straight boards.
Tools
- Shovel
- Digging bar
- String level
- 8′ level
- Post level
- Tape measure
- Large mixing tub
- Circular saw
- Reciprocating saw
- Drill / driver
- Spade bit
- Quick clamps
- Speed square
- Framing nailer
- Crescent wrench
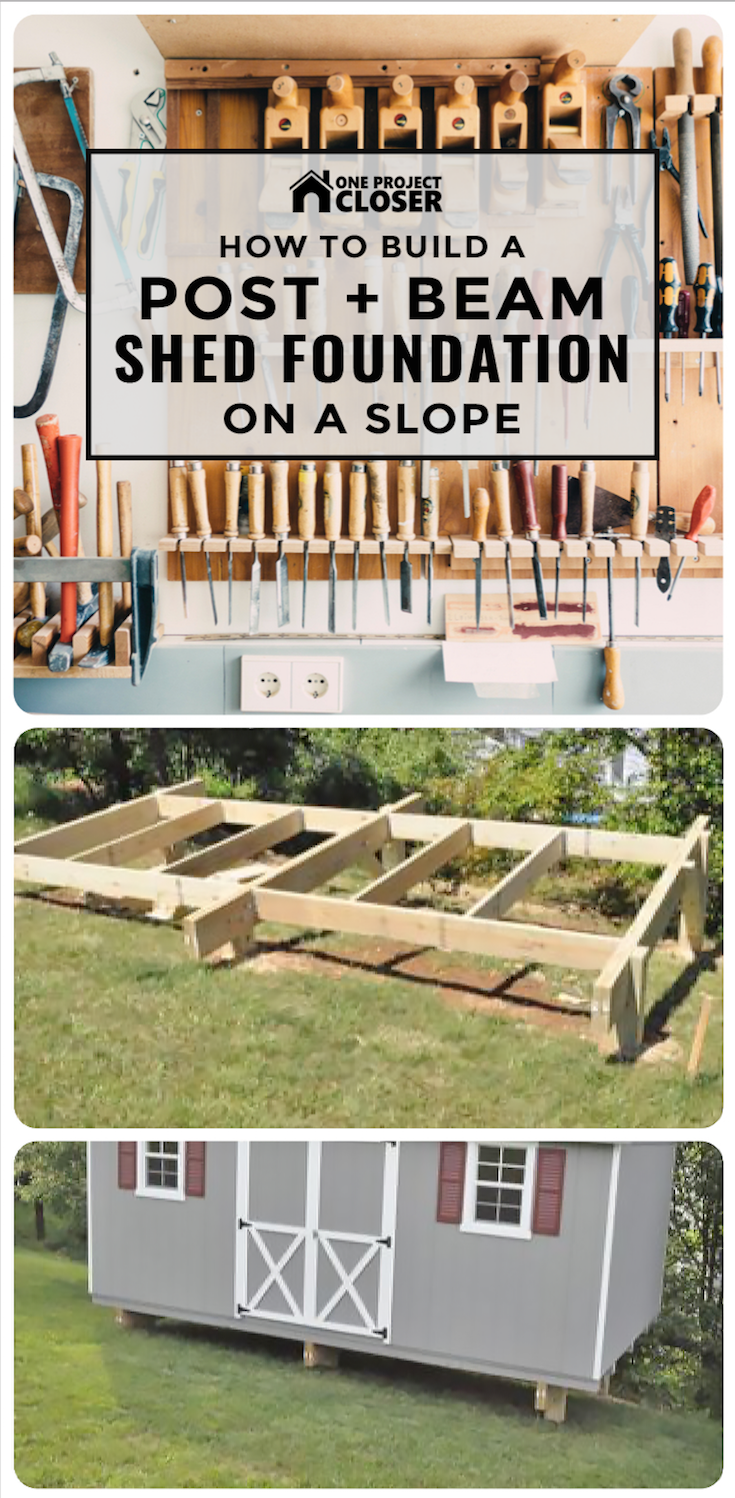
Step 1: Plan the Layout
The shed measures 10 x 18′, and we started planning the layout by marking the corners of the shed with stakes. To keep everything square, we measured the diagonal distances to make sure they were equal.

The shed will be constructed on a skid of 4 x 4’s running left-to-right along the length. For that reason, we want our support beams to be perpendicular and run front-to-back. For this project, we decided that 6 posts, (2 rows of 3 posts) would give us a solid foundation.

Step 2: Run String Guides
We ran several string guides set 16″ in from the corners. The string guides were useful for determining the slope of our site, finding the high-point and marking the locations for our post holes. If you look closely, you’ll see the front, far-left corner was our high point, and the back, right corner was the low point. The height difference between these corners is roughly 3′.

When you’re using a string level, make sure the string is very taught. Otherwise, you won’t get an accurate measurement.

Where the strings intersected, they just barely touched so as to not interfere with each other.

Step 3: Mark Hole Locations
From our string guides, we determined the locations for our post holes and marked them with spray paint. The holes measured about 16″ across.

Step 4: Dig Holes
We dug all the holes below the frost line, and here in Maryland that means 30″ deep. We were careful not to dig too deep because we wanted the concrete footers to rest on undisturbed ground.
Tip: Before you start digging, have underground lines (water, gas, power, communication, etc.) located. Call the North America One Call Referral Service (1-888-258-0808). It’s free and required by law.


Step 5: Pour Concrete Footers
Next, we mixed up several bags of concrete and poured 5 – 6″ in each hole.


We let the concrete set for a couple of days.

Step 6: Rough-cut 6×6 Posts
Knowing the approximate height for each post (from our string guides), we rough-cut our 6 x 6″ posts and put them cut-side-up into each hole. The posts are oriented this way because the cut sides will have slightly less pressure-treated chemical in the center.

Step 7: Square and Plumb Posts
We setup a string to mark the front edge of our posts and began leveling each one. A post level is really useful for this step.

As we leveled the posts, we used a small amount of pea gravel and dirt to temporary hold the posts in place. This allowed us to go back and make adjustments if necessary.


In this picture you can see that I placed my pencil between the post and the string (and another pencil on the far post). This is a helpful trick to make sure that each post is the same distance from the string. Otherwise, it’s tougher to check that each post is right in line.

Step 8: Fill and Tamp Holes
When we were satisfied that all the posts were in-line with each other, equidistant and completely level, we began filling in around each post, tamping the dirt as we worked.


Step 9: Mark Support Beam Level
We want to keep the shed as low to the ground as possible while still keeping everything level. Starting at our highest point and using an 8′ level, we marked the bottom of our support beam just a few inches off the ground and then scribed this line across all of the other posts.

Step 10: Cut Posts to Height
Since we’re using 2 x 10″ boards for our support beams, we measured 9-1/4″ (2 x 10″ boards actually measure 1-1/2″ x 9-1/4″) up from our line. Using a quick-clamp and speed square as a straight-edge, we cut each post to the right height. To make this cut, we used a circular saw on each side of the posts and a reciprocating saw to cut through the center.


Step 11: Notch Posts
Each support beam is a double 2 x 10″, and we notched each post where the support beam will sit. We cut our notches to measure 3-1/8″ x 9-1/4″.


Step 12: Build Support Beams
Using a framing nailer, we put rows of 5 nails every 24″ or so on both sides of the support beam. The nails are 3-1/4″ long so driving them at an angle ensures they don’t protrude through the opposite side.


Step 13: Through-bolt Support Beams
After using a string to line up the front of each support beam, we quick-clamped them in place and drilled 5/8″ holes with a spade bit.

Next, we placed our carriage bolts, washers and nuts and used a wrench to tighten everything down.

Step 14: Add Joists
For additional support and to keep our foundation from racking, we added 2 x 8″ joists between the support beams. You can see each joist is secured with hanger ties and sits flush with the top of our support beams.


Step 15: Install Lateral Braces
We also installed lateral braces on the backside posts using a combination of carriage bolts and lag screws.

Step 16: Cut Support Beams to Length
Lastly, we cut the back of the support beams to the appropriate length.

Finished
Here are some pictures of the finished product. I’m really pleased with how everything turned out. The foundation is very solid, completely level, and I’m excited to see the shed delivered. I’ll be sure to add pictures when it arrives.

Here are some additional pictures now that the shed has arrived!


That’s fantastic. How long did it take to do that? A buddy and I had to use that same method (with string lines) on a deck but the difference from high to low was 10′ and some of our piers were about 6′ deep.
Does your friend have any plans to skirt it with lattice to keep out critters?
Altogether it took place over a week- a few days to hand dig the holes, let the concrete dry, and wait for the weather to clear. The bulk of the work we completed in one full day.
Yep, he’ll be adding lattice too.
Hi, I am trying to buy a home. Wish you lived nearby because I’m very new to such projects. I’ll have to build one of these on a steep slope, so thank you for the instructions, and wish me luck!
I know you guys have done and watched a lot of projects like this, but how much drawing and planning went into this foundation before the first piece of lumber was cut?
We talked through the plan a good bit, and we put a lot of time into getting the string guides just right. From that, we knew where to dig and how (roughly) how tall each post would be. I don’t think we had any drawing at all.
Looks great! My slope isn’t that big, but will likely end up going this route. That’s!
I have to say you guys are awesome. I have some many of these articles “favorited” because you keep coming out with how-to’s of things on my to-do list. The deck, the shed, the workbench… all this stuff I am planning on doing, and these articles are a MAJOR help. Thanks for your hard work.
Question, for anyone who could answer: my shed would be on a slope, too. However, unlike the slope in this article, I’d be putting the shed at the *top* of the incline, at the back of my property. So the question is: where should I put the entrance? It can’t be on the back side (the highest point of the slope) because that’s the back of the property. The front side seems like it’d be steep. The sides would be weird angles. What to do?
Tom
You could do a couple of different things. Side entrance could use a retaining wall either above or below the entrance to create a level spot for an entrance. You could build a side platform and then come at it from above. Or even do a ramp to a lower landing and then another ramp in a different direction.
Good thoughts. It sounds like, though, that only the ramp to a lower level option prevents me from somehow approaching the shed from the back. Unless I want to build up land to support a true side entrance, approaching from the side. I see what you are saying with the side platform (I think) but it still forces me to approach from the back — and if I’m going to do that, I might as well make a rear entrance to the shed.
It might be worth it to move the shed down the slope a little bit to buy some room to approach from the back. I’ll lose some space in my yard — but beggars can’t be choosers. I’m hoping one day to store a ride lawn mower in it.
Thanks for your thoughts, Jeff.
Tom
also, you could just cut into the hill to level things out. then just put the entrance on the side or back (whichever you want)
I know this is the way quick foundations are done, but you didn’t mention that, eventually, the pressure treated wood will rot because it is in contact with the dirt. Yes it’s pressure treated, but that doesn’t mean it won’t rot eventually.
The foundation should be concrete poured into sonotube so that the concrete is at least 6 inches above ground level. The pressure treated wood should then be anchored to concrete above the ground. A foundation done in this manner will last forever, whereas the foundation described in the article will last for 20 years or so.
Hi Derek,
All the contractors I’ve talked to say this is a good way to set a foundation. Also, they can point out decks built the same way that are 25+ years old and still in great shape (much like my own deck). Furthermore, local code offers three acceptable ways to construct supports and this is one of them.
Derek, one thing to make sure of with this type of foundation is that you’ve purchased ground contact pressure treated wood. With a great deal of moisture, even this type of wood will rot over time; however, with good drainage I think you can expect at least 25-30 years. I would think that in the case of the slope here, you’re probably going to get pretty good drainage around the footers. I personally would be OK with this setup for a shed, but obviously wouldn’t use it for my house.
Hey Ethan,
I have a couple of questions:
1) Did you just place your 6×6 directly onto the concrete? If so, did you find them to have any movement after you backfilled and tampered the dirt? I’d think that once you finished your framing, you’d have no movement so as long as you staid true, you were good, right?
2) I’m not familiar with (local) building code. Would you need to get your concrete footers inspected or does that not apply for a shed?
Hey Simon,
1) We put the 6×6’s right on top of the concrete, and they had no movement after we backfilled and tamped the soil. While my friend was shoveling, I was constantly making changes to keep everything level, and good thing because after backfilling, we couldn’t budge the posts at all.
2) In this area and for this size of a shed, we didn’t need to get anything inspected. If the shed was any bigger, it would have been a different case.
Well technically the 5-6″ base in the holes of concrete looked like a good idea but I believe you are supposed to use gravel to deal with drainage down in the hole itself after having concrete and the post in it. I could be wrong on that, I don’t know but that is how I did it. I also put in rebar as well. Now one issue that did occur is, settling issues. I think because I used gravel in the bottom of the hole, it wasn’t a solid enough base and the shed house of mine sunk a little. So I like this guys idea of putting concrete, I should of thought of that!
Cool post. This sounds like a great way to go. I share some of Derek M’s concerns about burying the wood posts, but agree that you’ll probably get many many years out of this before experiencing any problems.
Wish I could have been there for this project. This looks great!
Good post. I kinda wondered why sometimes people pour a foundation and other times they just go with a Post & Beam instead. I guess slope and amount of effort are the key factors.
how is the shed actually secured to the support beams?
It’s not actually secured to the beams. The shed just sits on top of the foundation. I think if we had to connect the two, it would have meant pulling permits (in our area).
You can always attach a few Simpson ties the next time you’re forecast for an Irene-esque storm.
You’re exactly right, and fortunately for us we don’t get very many “high wind” storms that could actually move that shed.
Very nice job? Can you tell me where your friend got the shed? I a looking into a shed and live in the MD area, the size you have here is perfect!
Glad you liked it! My friend got the shed through Maryland’s Best Sheds, and the link is at the beginning of the article. I hope to see you around OPC again.
How to Build a Post for Garage Foundation on a Slope?
Hi Mehrdad,
I don’t think this sort of foundation would be acceptable for any sort of garage. For that, I believe you’ll need a block and concrete foundation.
I’m planning to build a foundation and platform for a 10’x8′ resin-steel core shed. However, my slope is steeper than the one in this example. The shed manufacturer says that the platform for the floor needs to be absolutely level and shows a diagram of 2×4’s with 16″ centers. I’m in northern New Jersey. Questions:
(1) I would like to bring the footings above ground, so the entry side (on higher ground) could be at the proper height for the frame, but the rear, lower side wouldn’t, so I’d need posts there. How would I fasten the frame or posts to the footings?
(2) Would I be better off using 2×6’s for the frame for more stability? I think the shed diagram is assuming a level base, not one elevated above ground.
(3) Do you think I’d be better with 6 footings, not 4?
Thanks, Pete
Hey Pete,
I would do footings and posts on the high side and low side. Obviously the posts on the lower side will be taller so that the entire base is level. I wouldn’t use 2×4. Go with 2x6s or even 2x8s. For a foundation of that size, I’d suggest 6 footings. Remember, I’m not an expert so these are just my suggestions. Hope this helps.
Thanks for the advice; it’s very helpful. Follow-ups:
1. In the case of an above-ground footing that doesn’t need extension by a post, how is the frame fastened to the footing?
2. In the case of an above-ground footing that needs a post for more elevation, how is the post fastened to the footing?
In view of the kind of wind that we’ve had in the past few years, I want to fasten these things, rather than just rest them on the footings.
Thanks again.
Hey Pete,
I believe manufacturers (like Simpson) make ties for connecting above-ground footings to posts or directly to PT framing. Unfortunately, I’m not sure what to specifically recommend.
Hi. Looks great! I have very rocky soil on my sloped property and instead of digging for concrete footings, would digging a 1-2 foot hole filled with tamped aggregate and then placing pre-cast concrete piers that accept 4×4 posts on top of the aggregate work for this project also (assuming it meets code and all that)?
I have similar slope, but I want to put in a 12′ x 36′ shed in. I imagine I can do the exact same thing only twice as many posts and 2′ wider. I noticed you didn’t concrete in the posts. Is ther a reason not to concrete in the posts and only need footer? Also I was wondering if every post is different length, since the ground is lower on one side versus the other. Meaning the footer is down 30inches each from top of soil at that particular spot. I imagine I need to go deeper since I am PA.
Scott, you don’t want to pour concrete around pressured treated footings. The ground has moisture in it – which will be absorbed by the concrete and held against the wood. When wood gets wet it expands and will crack the concrete, which can create an area where water sits against the post in large quantities without draining, which promotes premature wood rot. Also the posts are harder to replace if you need to do that in the future – and sufficiently packed dirt will be plenty to keep them from moving. You are correct that the posts are different lengths to get below the frost line. Depending on your area of PA you may need to go deeper – look up local building codes.
how will you complete the entry into shed. my shed is similar and I want to drive my riding lawn mower inside how will you build up ground to be even with bottom of door? thank you.
We are not able to build a post & beam foundation ourselves so do you have a recommendation for someone in the Washington Metropolitan area that could do the job?
Thank you for the detailed instructions. I do have a few questions:
1. What length are your boards? You stated that you used (3) 6×6 posts and (8) 2x8s, but didn’t specify the length. Is there a standard size, say 8 foot?
I am building on a slope that borders protected wetlands. It occasionally gets damp and stays for a few weeks. Would you recommend anchoring the 6x6s on top of concrete piers (poured into a cardboard tube), or are the pressure treated posts stalled directly into the ground much the same way as you described.
Thanks!
I typically see the beams running the full length of the shed with the floor joist running perpendicular to the beams. In this case you would have 2 beams 18ft long (4 2x10s). Is there a reason you have the joist running parallel to the beams? Seems like your beams are not really carrying the load with the way you have it.
My first time on this site. . I just collected some used treated material to build a greenhouse, and decided I needed a shed.
Your site makes it look easy for movies like me. I am going to to try the shed foundation, and the basic sawhorse.
I am on Montserrat in the Caribbean, so I need to consider hurricane season
Thanks always
Nicely illustrated project. I would not, however, recommend setting these posts in a hole on top of a concrete pad. Water will get trapped by the concrete and speed up the rate of decay. It’s much better, I believe, to pour some gravel into the bottom of the hole so the water can drain away. You can then either backfill with dirt or concrete. I think this will last longer.
Bill
I am looking at getting a 14′ x 20′ pre made shed and have a slope as well and thinking of doing this post and beam structure. How many posts would be recommended to use for the 14 x 20? Is there a recommended max distance between posts?
How would I modify this plan for building my own shed where I would be nailing the flooring directly to this?
So that means I would need floor joists every 16″. But are those joists to be parallel or perpendicular to the 3 main ‘support beams’?
Thanks!
I will be getting a 12’by20′ same slope as your. what do you thing about post I would need. 8 of them or 6 and how did you get shed up on foundation>
thanks
gary
Great write up! We’re going to put in a 10×10 shed with about a 12-inch total slope. Would you recommend 6 posts like here or do you think we could get away with just 4 at the corners?
The overkill is strong in this video.
No need for bolts as the half lap (6×6) takes all the shear factor.
Structural screws would have been sufficient to hold the 4×6 beam in place.
All should be sure to get the foundation below the frost line in your area.
Is this type of foundation suitable for a residential application?
Will hopefully be doing 8×12 shed..Already have sonar tubes columnsinstalled.what would be the best floor prep..and how to anchor pressure treated boards to the existing columns for floor base
Looks like a strong yet economical method of building a foundation.
Excellent presentation!
Curious: What was the (1) 4×4 used for in this project?
Disregard…. I see now you used the 4×4 for additional corner bracing.