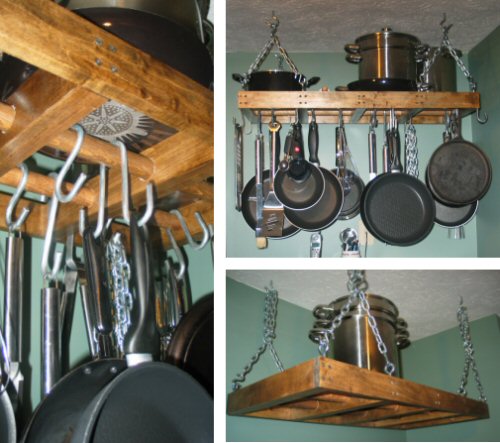
In our prior house, we had an awkward nook in the corner of our small 10′ x 10′ rectangular kitchen — a 2′ x 3.5′ space that was completely empty. The area was in the corner opposite the cabinets (which were laid out in an ‘L’ shape on the other two walls). It was screaming for some type of storage… base and wall cabinets perhaps. But we didn’t have the money to install new cabinets and a countertop, and we were skeptical of our ability to match or compliment the existing layout. So I looked for other options.
And then one day landed on this idea… I’d design and build a wooden pot rack that had a country style and could be stained to match our existing cabinets. Below the rack, we’d put a cheap-o cabinet from Walmart or Target for some extra storage. The cabinet below ended up being not-so-fabulous, but I absolutely loved the pot rack. It liberated 2 of our base cabinets from more than a dozen pots and pans, handing us back the equivalent of at least 10 cubic feet of storage. Here’s the rack:

Instructions for Building a DIY Wood Pot Rack
The concept for this pot rack is pretty simple and requires very few materials, all of which are available at the big blue or orange stores. You can build the rack in about 3 hours and have it holding pots in just a few more. The best part: this design is very flexible to accommodate whatever space you have available!
Materials for this Pot Rack
- 1″x3″ solid maple (or any other hardwood).
- Two (2) 1″ wood dowels.
- Eight (8) screw-in eye hooks for rack (look for 125 lb. rating).
- Eight (12) S-hooks (look for 125 lb. rating).
- 4 screw-in open hooks for ceiling (look for 250 lb. rating).
- 300 lb.-rated chain
- Wood glue or construction adhesive
Pot Rack Plan
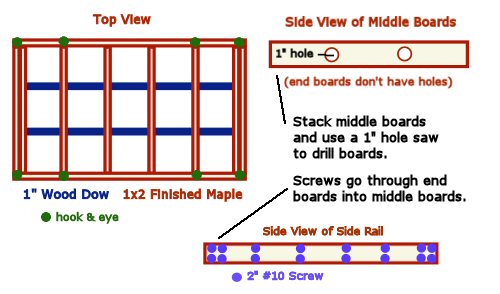
Here’s a simple schematic of the pot rock. I’ve left out length and width measurements because you should use measurements that best meet your space requirements. If you need to make the rack longer, you can add more cross-members, if you need to make it wider, you can increase the length of the cross members.

Steps to Build a Wood Pot Rack
Step 1: Determine the desired length of the pot rack and cut two (2) identical lengths of 1×3 maple. These will be the side rails of the rack. Precision is very important in this and all cutting steps. You are shooting for precision within 1/32 of an inch.
Step 2: Determine the desired width of the pot rack. Cut as many horizontal cross members (labeled above as middle boards in the drawing), taking into account the width of the side rails since these middle boards will sit between the side rails. In our design, we doubled-up the middle boards both in the interior and on the ends of the pot rack to provide additional strength. Again, precision is important. You want all the middle boards to be exactly the same length.
Step 3: Based on the width of the pot rack, determine the number of dowel rods you’d like to run down the center of the rack. For our 18′ wide rack, we decided on two dowel rods, one at 6″ and one at 12″ (shown in blue in the layout above).
Step 4: (This is the hardest step). Since you are going to be sliding the dowel rod through the middle boards after assembly, you must be extremely accurate in drilling holes in the middle boards since they all must line up. We measured each board three times, and used a 1″ hole saw to drill through. Even with our care, it still took a little bit of effort at final assembly to get the dowel rods in place. Note that each of the end middle boards on our rack we decided not to drill. We put the last end board on after the dowel rods were slid into place for a clean finish.
Step 5: Mark and assemble the side rails and the middle boards. We used two #10 countersunk wood screws for each middle board (see the light blue colors in the layout drawing). For added strength, we applied a sturdy wood glue between the middle boards and the side rails since we effectively ‘butt-joined’ the two pieces together.
Between the wood glue and the 2 #10 wood screws, our pot rack was very sturdy; however, if you’re a woodworker, you might also consider routing complimentary edges into the middle and end boards for added strength. Since we didn’t drill out the ends of our pot rack for the 1″ dowel, we left the final cross member off until Step 7.
Step 6: Insert the dowel rod(s) down through the middle boards. The rods will fit very snugly since you have 1″ holes and a 1″ wide rod. This is why measurement and accuracy in step 4 is crucial.
Step 7: Add the final cross member (middle board) to the pot rack on the end, covering the end of the dowel.
Step 8: Screw in eye hooks into the top edge of the frame. We pre-drilled the holes and used 1″ hooks. To make a more interesting look, we used 8 hooks instead of 4, and made a triangle pattern with the chain. Make sure you get hooks with at least 1.5″ screw depth to ensure a solid hold.
Step 9: Screw hanging hooks into the joists in the ceiling. For our installation, the joists weren’t located where we needed to screw in the hooks, so we installed 2×4 blocking between the joists (by climbing in the attic). The goal is to get the ceiling hooks directly above the eye hooks in the rack. You can see this in the picture above.
Step 10: Cut the chain to length and use S-hooks to connect it to the screw eyes and the ceiling hooks. To get the most out of your pot rack, we recommend hanging it a few inches off the ceiling so you can put big pots on top.
Step 11: Make hooks for rack. You can buy standard metal stock at big orange or blue. Use a metal bender to bend the hooks into the right shape and a hack saw to cut them. This step is actually a lot of fun as you can make all different kinds of hooks with different metal stock.
Step 12: Have fun with your new pot rack!
Safety Concerns
As with all of our instruction materials, you should use caution and you assume all risks. This design has a few areas of concern to keep in mind:
- This design uses wood glue and screws to make a butt-joint between the side rails and cross members. You could make a stronger joint using a router to make a tongue and groove-type joint. Make sure to use enough cross members to ensure sufficient strength. Consider doubling-up the cross members on the ends and in the middle.
- The eye hooks on the rack, hooks in the ceiling, and chain will all have weight ratings. We recommend building the rack at least twice as strong as you think it needs to be. You could be storing more than a hundred pounds of pots on this rack (particularly if you cook with a lot of cast iron).
- Make sure the pots are out of reach of children. You don’t want kids swinging from the pot rack.
What do you think? Have you built your own pot rack? We want to know about it! Tell us in the comments or submit your plan to diyprojects@oneprojectcloser.com so we can share it!


Great idea Fred! That’s a great DIY project.
Man I love to cook, and I love these racks! Don’t have the space for one in my current house, but I will make sure I do in the next one. Thanks for the “how to” on this one, I would have spent hundreds to just buy one! LOL
Great Job! Love the look of a great pot rack in the kitchen.
Thanks for the kind words, folks. We really miss our pot rack and are looking for a way to incorporate one into our new kitchen design for this home!
ANOTHER GREAT HOW TO PROJECT THANKS
You could potentially make this stronger by slightly cutting a stopped dado in the side rails, and then a lap joint in the cross members. In this manner, you’d have more than just the glue and screws working against the shearing force. You could potentially simplify your accuracy problem, too. If you clamp all your cross members together, you could cut them all to the same length and create exact and repeated lap joints on both ends. Then, when you go to drill them, keep them clamped and run a spade bit through all of them at once (longer reach. A long 1″ drill bit would work, too), instead of a hole saw. Even if you cut at a very slight angle, because they’re all together, as long as you assemble them in that same order that they’re stacked, the angle should have very little effect.
If you wanted to make the rods stronger, and maybe decrease your cross members, include the end cap cross members in this. Again, the spade bit or 1″ pilot-tipped drill bit (like a SpeedBor or something) would really help. Clamp all your middle boards together, and the end board with them. Mark the depth on your bit such that you only cut deep enough to get halfway through the end cap. Remove the end cap from the stack, flip the stack over and clamp it to the other end cap, making sure it’s all aligned well. Do the same thing to the other end cap. Running through the same holes for each end cap makes sure your holes all line up.
I would, however, sand the insides of the holes out just a touch. Somewhat for ease of passing the rods, but mostly for expansion. Unless you’re using the same type of wood for the entire project, you’ll have different expansion and contraction rates. If the rods are REALLY tight in their holes, and they expand more than the cross members, you could be asking for splitting. Likewise on the lengthwise expansion. Leave just a smidgeon of room in the pocket on each end cap for the rods to expand lengthwise.
William, you are absolutely right with these suggestions. I’ve actually added this to our ideas for wood crafts to do in our new shop. We will very likely rebuild this pot rack with better documentation going forward. Very good tips.
Fred
Great post. What did it cost in terms of materials versus buying an already assembled rack from someplace like Crate & Barrel?
I think the material cost was around $50 including the chain… I’m not sure what a pre-assembled unit goes for, but I would think it would be hard to save money building it yourself.
Building it yourself is better. You can make it the way you want. Nice article
This would be very nicely used over a kitchen island. I could also imagine this for use in a garage, suspended above the front of a parked vehicle, providing extra storage space.