
Baseboard and shoe molding dress up a new hardwood flooring installation. After you’ve put in the time installing the new floor, trimming it out frames the floor, showcasing the hardwoods just like a quality frame showcases quality art.
Baseboard comes in many different shapes and sizes and should be picked based on a balanced approach to style and money. The simplest builder-grade primed white baseboard can be purchased at Home Depot or Lowes for around $0.30 / linear foot, while stain-grade elaborate baseboards can cost as much as $4.00/linear foot.
While most baseboards consist of a single board, elaborate baseboards can have 2 separate components installed on top of one another to give a deeper look, with shoe molding tacked on top of that. Of course, most modern homes will have the traditional–and ubiquitous–single board 3.5″ molding that we cover in this article.
This article is part of our series on hardwood flooring installation. To follow along, subscribe using the RSS and e-mail buttons on the right. For a complete list of the articles in the series, see this main article on installing hardwood floors.
Measuring For Baseboard and Shoe Molding and Selecting Size
 In most installations, baseboard will cover every linear foot of wall space with the exception of door jambs. Measure the wall space and add 20% to your calculation for waste–less if you are purchasing precise lengths.
Baseboards are available in 12 foot and 16 foot lengths, and the big box stores will allow you to cut pieces of baseboard to exact lengths. You’ll notice that contractor packs of baseboard available at the big boxes (usually containing 120 linear feet — ten 12-foot boards) are significantly cheaper than buying piecemeal–as much as 50% less. The disadvantage of these packs is that (1) you must buy in bulk; and (2) you are limited to 12 foot lengths.
When considering whether 16 foot lengths are worthwhile, you should assess whether any of the walls in your house are between 12 and 16 feet long. The reason being, if the walls are 12 feet or less, 12 foot lengths will do just fine. If they are larger than 16 feet, but smaller than 24 feet, you’ll have to use two pieces regardless of whether you purchased 12 foot or 16 foot lengths. (A similar rules applies between 24 and 32 feet, where 16-foot lengths can reduce the number of joints — but at 33 feet you’d need 2 joints regardless of 12 or 16 foot selection). In any case, even for 14 foot walls, a good joint will be invisible to the casual observer, so 12 foot boards can be used throughout.
Simple Joints – Along a Long Wall
When a wall is too long to use a single piece of baseboard, two boards must be joined end-to-end. The right way to do this is to cut opposing 45 degree angled mitre cuts. To ensure the baseboard stays tight against the wall, find a stud and end the top mitre cut just beyond it, sinking a finish nail near the end of the board. This ensures the baseboard stays tight against the wall. In the drawing below, the left piece of baseboard will hold the right piece snugly against the wall.

It is helpful to find a spot on the wall that isn’t particularly bowed to do the join. Here’s a quickly done joint in our installation. For maximum results, it could be sanded and painted to make the joint virtually invisible.

Inside Corners: Coping with Pain or Mitre and Run
Inside corners are the most common in a home. Most regular rooms have four inside corners. There are two ways to cut molding for inside corners: coping and 45/45 mitres. Let’s start with the easier of the two: 45/45 mitres.
 Method One: 45/45 mitre cuts join baseboard by cutting opposing 45 degree angles into the baseboard. These joints can look perfect if the wall makes an exact 90 degree angle or is really, really close to it and you have a very good mitre saw.
If the wall isn’t 90 degrees, a 45/45 cut will leave a big gap, or it simply won’t fit. It is possible to use a sliding protractor to measure the exact angle of a wall and adjust the mitre angle to compensate, but this can be tedious.
With this method, paintable caulk (elastomeric sealer) is used to close any apparent gaps. Note that since caulk is a primary ingredient in this method, it isn’t the best approach for stained baseboard. For stained baseboard, cope cutting provides better results. Read here for more thoughts about painting vs. staining molding.
Here’s a picture of a 45/45 cut going into place on an inside corner.

If you use the 45/45 method, it can be helpful to cut the wood just slightly long and bend it into place (this is easier if you’re using contractor grade materials built from MDF.
And finally, here’s the finished product (with shoe molding):

Method Two: The harder method for joining inside corners is cope cutting. Coping consists of laying one baseboard flush against the wall and cutting the other baseboard to match the curvatures of the first. True carpenters will argue that coping produces better, longer lasting joints. We’ve already written extensively on cope cutting baseboard in the article linked above. If you’re interested in this method, start there for instructions.
Outside Corners: 45 Degree Joins

Outside corners work similarly to inside corners and are joined at 45/45 degree angles. They are functionally similar to inside 45/45 mitres except that they work in reverse. Again, when a wall is 90 degrees square, these work great.
When the wall is out of square, some adjustment may need to be made to get the boards to look current. If you’re planning to stain baseboard, extreme care should be taken with the outside mitres as there is no room for error.
Here’s a picture of an outside corner in our installation.

Fastening Baseboard to the Wall
Most baseboard can be fastened to the wall on the studs using a 16 gauge finish nailer with 1.5 inch nails. We used the DuoFast Floormaster 250BN for this job. A stud finder comes in handy for locating the studs.

Tip: Baseboard should not be fastened to the floor, which inhibits floor expansion beneath the baseboard.
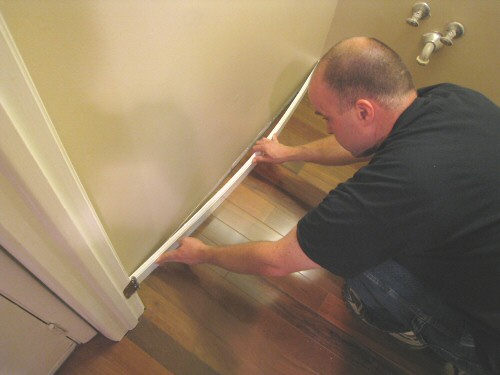
Installing Shoe Molding
Shoe molding follows all of the same principles as baseboard in terms of cuts and placements. The only difference is that the measurements are shorter because shoe sits inside the perimeter of the baseboard.
Note that while baseboard is dimensionally stable vertically, shoe molding is designed to be very flexible in 2 dimensions, allowing it to “hug the floor”, closing any visible gaps due to dips in the subfloor that are transmitted to the surface. This is one major advantage of using shoe molding along with baseboard — it hides both vertical and horizontal gaps.
You should fasten shoe molding using an 18 gauge finish nailer with 1 inch nails. 16 gauge nails are likely to split shoe molding and will be more easily visible on the small surface.
Tip: Shoe molding should be tacked to the baseboard, not the floor, which inhibits floor expansion beneath the shoe molding.
Tool to Cut Baseboard and Shoe Molding
For most baseboards, a simple 10″ mitre saw that can make 45 degree cuts is sufficient. For baseboards taller than 4.5″, you’ll likely need to lay the baseboard flat and use a compound mitre saw (and preferably a dual-compound mitre that can rotate 45 degrees toward either side).
We used our Kobalt Sliding Compound Mitre saw for the entire job, but we didn’t make use of either the compound or sliding features.

What do you think? Do you have any baseboard or shoe molding tips to add?
P.S. Stay tuned tomorrow for the final “after” shots of the entire installation!

I think you just about covered everything! I’ve also used plain wall spackle to fill nail holes with great success. I find the ‘wood fillers’ can be hard to work with, and caulk cannot be sanded, so spackle does a fine job for painted trim if allowed enough dry time, for very small holes. I’m quite excited to see the final project!
We use spackling for nail holes on our trim – we use white-primed pine – as well. So long as the nail is set at proper depth and the spackling has enough area to adhere to, it’s an easy, durable solution. We’ve used wood fillers for other tasks and found they release a strong chemical odor.
This is a best practice, I think, and we should update this article. Spackling sands better than caulk and works pretty much just as well. We never inspect our molding closely enough to detect problems, but if I look closely the caulk does show.
The great thing about white base and shoe is that the nails disappear when using a tube of the white wood filler.
Also, if there is a slight gap between the wall and base in between studs, one can either drop in another fastener in the bottom portion of the base into the bottom plate to suck in the trim or float the gap with a little caulk.
Fred,
Looks great! I would tend to do one of those steps a bit differently though. I try to break the 45 degree curf joint (joining two pieces on a long run) directly over the stud and shoot the nail closer to the joint, on an angle so that it penetrates both pieces. Otherwise the joint seems to open up too much with temperature changes.
That’s just my preference and the way I see most of our trim carpenters do it. The other method will work ok if the wood is pretty stable.
Tood, good tip, thanks for adding. I will likely update the article to reflect that method as an option. Only concern I would have is splitting stain-grade oak trim by shoot a nail through so close to the edge… I guess that’s not as big a problem as I imagine?
For stain grade material I would actually pre-drill and use an old fashioned finish nail! Nail guns are great…but there are still times when the good old fashioned way is best.
Why do you prefer this?
Fred,
Nice work, I’d put the scarf joint over the stud and nail thru both.
well done,Thumbs up, and keep it going!
I have a base cabinet that is rounded on one corner. Are there any tips on how to install shoemodling around that rounded corner?
Eric, this is definitely a tough one. I’m not sure of a good solution for that.
When trimming out a radius, use Flexable Molding. (www.flextrim.com) They make most profiles you will find in wood. It is stainable.
One thing not mentioned here is the proper orientation of shoe molding which is NOT quarter-round (i.e., which does not have equal width and height for the profile). I’ve always been taught to put the longer dimension vertically, and have always witnessed installations like that. Our hardwood floor installer just used the opposite orientation, which looks terrible, and I can’t even find a definitive resource which backs up my contention, so they won’t tear it up and re-install it.
Mark, sorry to hear this. But you are correct, shoe molding should be installed with he long side toward the baseboard. Your installer ought to know this. They probably hired a substandard installer and don’t want to pay to redo the work, even though they know its wrong. Suggest you could look in a hardwood flooring book at home depot to get an “expert” reading on it that the installer might agree with.
What scares me a bit about your situation Mark is that they probably nailed the shoe to the floor given the orientation of the piece. Depending on the type of wood used they would have a good chance of splitting it nailing through the wrong dimension using anything larger than a pin nail.
Wish my son and I would have read this before doing some baseboard/ shoe molding work at our home. The 45 mitre overlap done near a stud really should have been obvious to us.
I know this may sound scary to you guys but I am an Electrical Contractor doing some carpentry work, lol. I am doing a small bedroom remodel for my Mom so she won’t have to pay someone else to do it. It’s a fairly simple job putting 32″ paneling panels from the floor up 32″ with chair rail on top of it and base plus shoe mold at the floor.
I have been around this type of work all my life but it’s been as an observer while doing my own thing in the electrical trade. Anyway, the panels, the chair rail and the base went fine but I can not seem to get this shoe mold to fit right on the inside corner cuts. I have cut and turned it every which way but loose and I can’t seem to find the right cut to make it fit…. Help!!
Hey Tim,
The easiest would be setting the shoe molding up on the saw and doing 45 degree cuts. If you don’t have perfect corners, the little bit that may show when you put them together then is easily filled with paintable caulk. I like the DAP caulk myself for this job. I cope everything nowadays except for 1/4-round as I find it’s so small that it’s just easier to cut either measured angles or 45 degree angles. I would apply the same reasoning to shoe molding.
Hth,
Simon
Hey Simon,
I appreciate the response. I started out with the cuts at 45 degrees but where the problems started was when I angled or tilted both pieces of shoe mold so one edge would hit the base and the other edge touch the floor it seems to throw the 45 cuts off.
I think I will just butt them up together with the 45 cuts and fill in any gaps in it with spackling or caulk like you said. My patience has run out on trying to make the cuts fit together perfectly. The only thing I haven’t tried yet is butting a straight cut in there on one piece and then coping the other piece to fit right over it.
Hey Tim,
If you have a picture of your situation, we may be able to give more suitable advice. Don’t worry about making the molding fit perfectly. Walls never seem as straight as they should be, and molding in itself is never perfect. Fortunately, the shoe molding is very flexible and bends any way you need it. If it were me, I would focus on a) making it stand straight and visually right, and b) making it nice and snug with your floor because you can caulk the shoe molding to the baseboard but not to the floor. Often times I push my 1/4-round down onto the floor to ensure it’s snug and gap-less. You should see some of the gaps I have had between baseboard and walls, but once you caulk and paint everything, you’ll never know the difference. Definitely use caulk instead of spackling in anything that has any movement to it which are all your joints. I only spackle the nail holes. Also – and this is more than you asked for in a reply, I’m sorry – definitely paint your caulk afterwards as it’s sticky and especially caulk near the floor will attract anything and everything in its vicinity.
Hth,
Simon
I just moved into a new house and noticed something that I’ve never seen elsewhere. The baseboard is mounted on top of the shoe molding. In addition the baseboard is painted white and the shoe is a natural stain – not my preference since the shoe is much grainier than the floors. Has anyone heard of or seen this installation before? It’s odd because it’s a well-built house and they used nice wide baseboard throughout. All other finishing work is well done too. However, because of this installation, there are some areas (cabinets, base of steps, etc.) where they didn’t use any molding (probably because it would have stuck out and looked “odd.” It must have been a pain because they were able to eliminate all gaps with the flooring.
Hi MJ,
It’d be interesting to see a picture of this. I’m no expert on the matter, but if they installed the baseboard above the shoe molding, I suspect there’s a good bit of a gap below the baseboard and the top of the shoe molding. What then is the shoe molding nailed into? Is the house consistent in this type of installation or just some rooms? If the latter, maybe it was a DIY project. Just wild guesses here…
Simon
i replaced all the baseboards after hardwood installation. I found out the hard way that simply putting the old baseboards back on tends to tear up the baseboards. My hardwood floors meets the tile in the entryway. They are 2 different heights, which has caused huge gaps between the baseboards and floor at the transition. How do you fix this? Is the only way to add shoe molding?
You will need to create a diagonal piece of molding that “steps down” to the tile, or replace the tile molding (putting it higher, most likely). There is no other easy solution, unfortunately.
Is there an accepted standard/tolerance for how much space can exist between shoe and floor? Our carpenter-installed shoe is “floating” above the floor in areas. If there is an accepted standard, can you give me the source?
The purpose of the shoe is to cover the gaps that the base has to float over. The shoe should be pushed down in those areas. How big are the gaps?
I had my floors redinished. I am having a hard time getting the shoe molding to lie flush against the floor and the wall. It’s all natural so i can’t cailk and paint.
Any tips? I’m thinking about chamfering off the back corner of the shoe molding to see if it will fit better.
Agree with Jeff. The shoe and 1/4-round bend easily into place and is meant to cover all gaps. Your carpenter’s approach seems to be a good bit more work to me, and I’m not certain I understand the purpose. If it’s too bad, you can pry it off carefully, remove the old caulk and nails, reinstall, caulk, and paint. This is a bit of work, so I’d only consider it if whatever situation you have is just really bothersome.
We recently had our smaller bathroom gutted and updated. The shower area consists of L-shaped glass enclosure sitting on a curb topped with a small marble slab. The curb has sections of the porcelain floor tiles cut to form the outside vertical face below the marble top. The remainder of the room has a white wood baseboard and I will add stained oak shoe molding at the bottom the baseboard around the perimeter of the room. We like that look. Nailing the shoe on the baseboard is no problem but we also would like the shoe trimmed around the curb. I’m not sure how I might fasten the shoe molding to the porcelain curb face. Gluing seems to make sense, with maybe a pin fastener securing the shoes at the outside miter. What do think? Any suggestions?
Hello,
I don’t know if you’re still answering questions on this page as the last question was posted some time ago; I’m a newbie at this part of do-it-yourselfing. Most things I can figure out, My house was built 1898-1900, (It has a decade or two on it) I just fixed up the walls-in one room(!) and painted. Haven’t painted any woodwork yet because I want to cover the big gaps I filled with caulking between the floors & baseboards. I didn’t even know that shoe molding (a new term for me) was a commonly done thing until I started looking around. This site has already taught me more than the last four altogether. The wood I bought is not quarter-round. It’s 1 1/4″ tall. The bottom is 3/8″ wide. That part is about 1″ tall, then 1/4″ narrows down, with a curve, to almost nothing at the top. I realize this is a lot of info. It looks like I should cope it, I think. I’m not quite sure what I’m suppose to do with the 2nd piece, and what the ‘gap’ is. I would appreciate any advice you can give me, but understand if you can’t. Thank you.
We are having a house built. Where the shoe molding meets the door trim it looks horrible! It looks like wine corks glued to the wall. Is there a certain way to cut the shoe molding near door trim so that it blends in better?
Nice!!
Is it necessary when installing base over an engineered hardwood floor to leave a gap between the floor and the base for expansion? I don’t want to see a gap and I am not using a shoemold as I am installing 1’x8′ base. I have always held the base tight to the floor but the manufacturer is say there should be a space for upward expansion. This does not make sense to me
Just had commercial grade luxury vinyl put throughout the entire house. Installers laid stained 1/4 round on top of our natural wood baseboards. Didn’t caulk so there are gaps between the 1/4 round & baseboards, baseboards are original- house built in 1978 so the stain doesn’t even match but worst of all is 1. The raw edge (not sanded or stained)45 cuts left & huge gaps around posts where paneling is on walls. I paid more for this than I could really afford & would have gladly pulled the existing baseboards & replaced to not have 1/4 round had I any idea this was going to happen. Very tacky & unprofessional job by our #1 flooring company in a 4 state area. If I knew how to add photos to this comment I’d love for you to see the shabbiness & give advice on what to do.
Howdy, another option that apply to rental houses only is rubber base trim. Rentals you tend to see a lot of mystery stains and tremendous damage (for whatever reason) on base trim. Rubber base cleans exceptionally easy and resists dings and dents far superior than decretive soft painted woods. With the rise of covid a clinic or hospital style look is becoming more widely acceptable.