
There’s no better way to learn how to tackle home improvement projects than straight from an experienced professional, and this Project Guide on How to Install Carpet was created by shadowing professional carpet installers on an actual job site. These guys have decades of experience, and in today’s article you’ll find the tips and tricks they used for a beautiful carpet installation.
The guys are laying approximately 800 sq. ft. of berber carpet in a basement here in Maryland, and regular readers will recognize this is one of the final phases in the basement remodel with general contractor Joe Bianco.
Already have carpet? Check out these great tips on how to clean carpet stains.
Step 1: Clean the Floor
Before unpacking tools or materials, the guys gave the floor a once over to clean up any debris. They scraped away bits of drywall compound on the floor and swept up any dust.
Step 2: Install Tack Strips

The installers distributed tack strips around the perimeter of the basement, in the closet, around support columns, stairs, and the HVAC closet located in the center of the room.
Pro-Talk: Sometimes tack strips are also called tackless.

For this carpet the guys are using a regular width tack strip with two rows of pins.

Pro-Tip: The pins are angled for gripping and securing the carpet after stretching.
The installers nailed the tack strips in place with the angled pins pointing toward the wall. All the strips are set 1/4″ off wall otherwise carpet doesn’t tuck in well.


When necessary, the guys used heavy snips to cut the tack strip to length.


Around the tile, the installers laid a double row of tack strip because it’ll be a high-traffic area, and they wanted to ensure the carpet wouldn’t pull away while vacuuming. Doubling-up also helps reinforce the tack strip to better prevent it from breaking.


Unlike the bathroom threshold pictured above, the transition to the unfinished parts of the basement (like the HVAC closet) are open, and in these instances the guys installed a binder bar that will provide a finished edge and secure the carpet.


After the binder bar was in place, the guys laid tack strip behind it.

On the stairs the guys nailed tack strip in the corners where the tread and risers meet, and the pins on these strips are angle into the corner.

The only exception was that the very first riser did not get any tack strip, and you’ll see why when the carpet goes on.

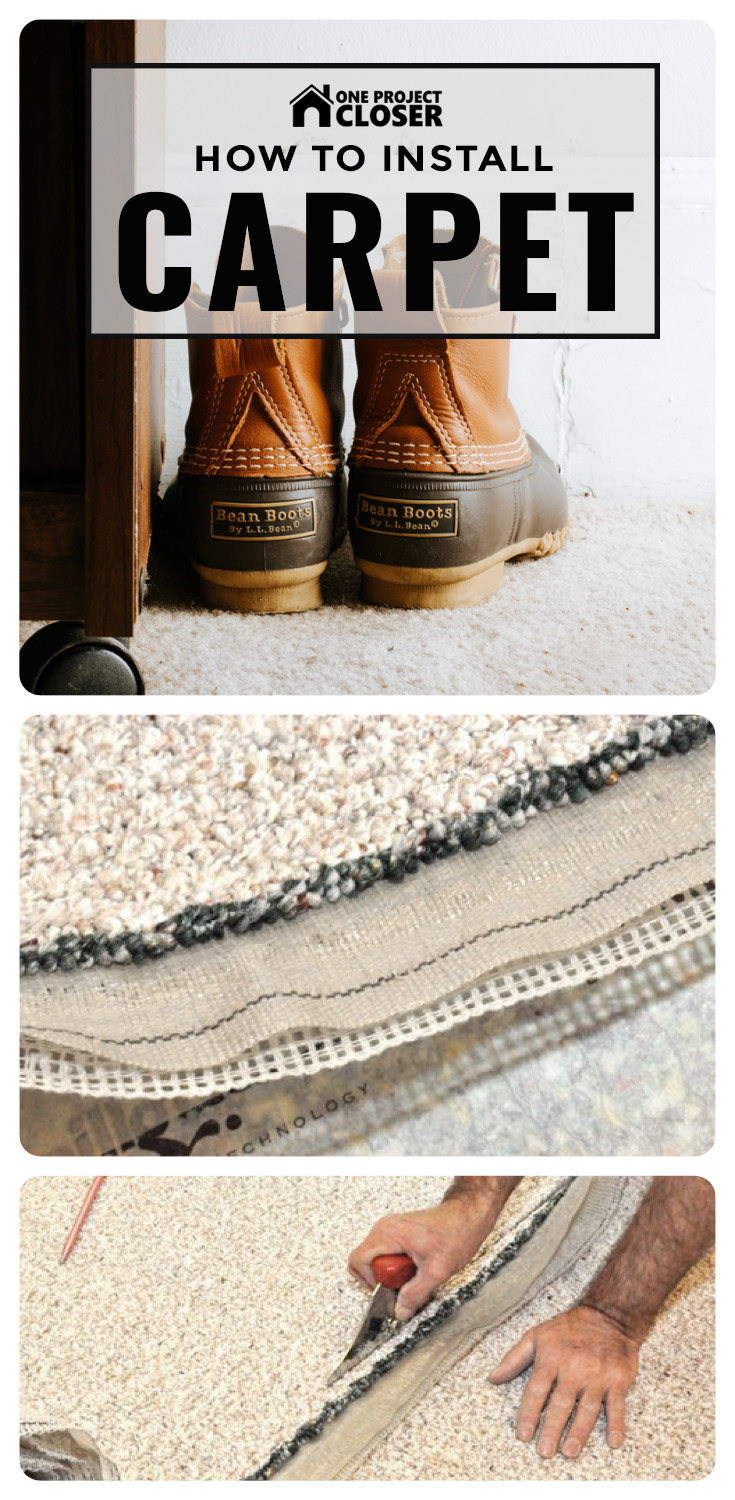
Step 3: Install Carpet Pad
For this project the guys installed an 8 lb. 3/8″ pad which is fairly standard for berber carpet.
Pro-Tip: The padding height should not excess the tack strips because it can cause the carpet to come loose.

The guys started laying the pad by unrolling it and cutting it to length leaving a generous 3-5″ of excess.


The installers taped all the seams to ensure adjacent pieces stayed tight against each other.

The guys trimmed excess length with carpet knives, using the tack strip as a guide.

Here’s a look at a carpet knife and the double-sided blade.

Pro-Tip: It’s important to make cuts with a sharp blade, and the guys said they go through 6-8 knife blades for a carpet installation of this size.


On the stairs the installers used 20 gauge, 9/16″ staples to secure the pad to the risers and treads.


Lastly, the installers spread an adhesive on the concrete around the perimeter of the basement to prevent the carpet pad from moving.


Step 4: Unroll the Carpet
These sections of carpet are 12′ wide and 30′ long, and the guys took some quick measurements to minimize the number of seams. After they had a plan, they started unrolling the first section of carpet.

Although the edges will be trimmed to fit, the guys worked to keep the carpet parallel to the longest continuous wall. This is important because it’ll make gluing the seams easier.
Pro-Tip: If the carpet and/or ambient room temperature is below (roughly) 65°, the carpet can become very stiff and difficult to maneuver.

The green line is a protective edge that needs to be removed during installation.
Pro-Tip: Although it may not look like it, this berber carpet does have a pattern, and it’s important to orient each section of carpet in the same direction. To help, manufacturers mark one edge of the carpet backing with a black stripe.

Step 5: Rough Cut the Carpet
Just like with the carpet pad, the installers starting cutting the carpet to size by measuring and leaving a generous excess to be trimmed later.

Most of the rough cuts were accomplished with a carpet knife, and you can see how they cut the carpet to move around corners.


In this way the installers laid out three sections of carpet, taking care to keep each piece parallel and cutting around corners and columns.

Step 6: Cut Carpet Seams
Along a seam, the two pieces of carpet must be cut very carefully so as to create an indistinguishable transition. To cut one side of a seam, the guys would first use a knitting needle to clear a path for the top cutter.

Once the needle was in a channel between carpet fibers, it was easy to move in a straight line (no straight edge required), and in the picture below you can see the faint groove left by the needle.

Next, the guys would set their top cutter (pictured below) with a blade on the appropriate side. In this example, the remaining section of carpet is on the installer’s right-hand side, and the blade is set on the right side of the top cutter.

The top cutter slices the carpet creating a perfect edge for the seam.

In this picture you can see how tightly the two sections of carpet butt against each other.

Step 7: Glue Carpet Seams
After the guys were satisfied that both sides of a seam were perfectly parallel, butted tight together and had a good cut edge, they went about gluing the seams. To do this they started by cutting a length of seaming tape and positioning it underneath the seam.


The guys set a seaming iron on the tape and let it sit for about 30 seconds.

Moving slowly along the seam, the installers pressed the two carpet edges tightly together and down on the tape.

The guys used a seam roller to press the glue into the carpet backing and also blend the carpet pile. The installers also used a toilet tank lid (any wide flat object would suffice) to put pressure on the seam as it dried.

Lastly, the guys went over the seam with napping shears to cut away loose or irregular fibers.

The result is a seam that is completely invisible.

Step 8: Stretching and Cutting the Carpet to Size
Working on opposite walls, the installers used knee-kickers to pull the carpet tight and press it onto the tack strips.
Pro-Tip: Wool is one of the toughest types of carpet to install because it only stretches in one dimension.

A wall trimmer (pictured below) runs along the wall and cuts the carpet leaving enough to be tucked underneath the baseboard trim.


The guys trimmed around door jambs by hand and tucked the excess underneath.

It was a similar process to cut and stretch the carpet up to the binder bar.

After the carpet was in place, the guys hammered the binder bar closed.


Along the transition to the bathroom and wet bar, the installers neatly tucked the carpet down over the tack strip and cut away any loose fibers.


Step 9: Lay Carpet on the Stairs
The guys began laying carpet on the stairs by cutting a piece of carpet to the necessary width. Starting at the bottom of the stairs, they stapled the carpet to the stair riser.

Next, they used a knee-kicker to pull the carpet tight over the tread.

The chisel-like tool is called a stair tool, and the guys used it to press the carpet into the corner and over the tack strips.

In this way the installers carpeted the stairs (with two separate pieces of carpet).

Finished
Eight hours later the carpet installation was done. It really makes the basement look like a finished space, and the carpet one of the last components before the basement is completely done.


Very nice article. I’d love to try and tackle that project. My only question is how did they nail the tack boards into the concrete with only a hammer?
I didn’t even think about it at the time. These guys pounded the nails in, and they made it look easy!
I was going to ask about that feat of unabashed manliness as well.
those nails ARE sharp though
I was wondering the same thing about the concrete floor.
This is one project I would not consider DIY’ing. They did a great job.
You couldn’t pay me enough to use a knee kicker. Sure it’s fast but time in the industry would be short. I’d use a pole stretcher if given a choice. My knees hurt just thinking about the shock of those kickers. Installation looks great, good follow.
Yeah ur right,been doing floors for 16 years and I love just using a kicker but installing carpet on concrete, use be better off with a kicker cause even though the tackstrip should be secure, it is concrete and a powerstretcher can rip the tackstrip up if u stretch it to hard
Very nice article. Great pictures by the way. I think I’d also be a bit scared to try this on my own. Was it wool carpet? Your sentence made it seem like it was, but I wasn’t sure.
This carpet was berber, not wool. Sorry for the confusion.
making those seams invisible like that seems like it would be very difficult for a DIY’er. Better try it a few times on somebody else’s house before you give it a shot in your own house.
I view this as one of those articles that is more useful to make sure your contractor is doing thing right (since this looks like a great install).
It’s funny the different responses to the article. After I read it I definitely got the feeling that this IS something I’d like to try myself. Obviously the pros make it looks easy but I feel like if I took my time I’d be able to do this…and it’d be fun!
Very cool to see the process step by step since we just had new carpet put in our house, as well! It’s always interesting to see how a job is done professionally!
i echo the sentiments of others… perhaps above my abilities, but cool to see nevertheless!
Great photos and explanation of all steps!
As someone in the industry, I would definitely suggest leaving this to the pros. Carpet is one item that is incredibly easy to tell when done improperly. If you do it yourself, you have to fix it yourself, but if a pro does it and screws up, it’s their problem and they have to fix it.
Another thing that this article leaves out is the initial prep work. Before installing carpet, you need to be sure the ground is a good place to install the carpet. Especially when working in a basement, you need to measure the moisture content in the concrete and humidity in the air. You need to be careful when it comes to moisture in contact with carpet.
Hi Vanduima,
Thanks for the comment and the tip about the prep work. Do you happen to know what range is acceptable for moisture in a slab?
CRI (The Carpet and Rug Institute) has an installation tips document which outlines a lot of information in it (http://carpet-rug.org/documents/publications/CRI_Carpet_Installation_Standard_2011.pdf).
From what I could find in section 9, the moisture vapor emission rate must be below 3 lbs per 1000 sq ft, relative humidity <75%, and pH < 9, but refer to the specific manufacturer's specifications for more accurate information.
I’d definitely pay for a pro to do this. After seeing the skills needed, I’d be careful and cautious about the ” Buy the carpet and the installation is FREE!” hypes. You’ll probably get the installer that gave the carpet seller the low bid for the work, which could lead to poor- quality work.
That is most definitely true. Been there myself but I don’t do poor work.lol
I enjoyed watching the install, it was very professional but why put the tack strip in front of the binder bar? (gripper bar). I’m an installer myself and in my experience it will leave a slight hump and wearing no shoes could cut u if stepped on unlike along walls were ull never see or step near.
One more thing:
you are absolutely right. The metal has more and better teeth on it than the tack strip. Put the metal in with screws and you won’t hammer down any of these teeth & you will get max bind and long lasting great looks of the kind that make people say: ” Wow!!! This got installed five years ago? You got his phone #? This is who I want to install my carpet!
Tack strip in front of naplock is totally unnecesary and produces exactly the results you described.
Keep the faith.
Dan
Two things come to mind:
1. The manufacturer of the seaming tape will not guarantee the tape unless the seam is installed with a board between the padding and the seaming tape so that, when you roll it from the top, the board pushes the glue up into the rough mesh of the backing thereby making the strongest seam possible.
2. The manufacturer of the carpet will not honor any of their warranties unless the carpet has been “professionally installed with a power stretcher”.
Yes, the job does look nice; however, if it ever gets nice & warm there will be ripples all over it and someone will trip and possibly become injured. When that happens, the customer will own you forever. Also, you will pay for the carpet you just installed plus pay ANOTHER installer to install the new carpet.
Take the extra trouble and use these methods & your great reputation will follow you to retirement.
Dan
i have been a carpet fitter for over Thirty years & I have never ever seen carpets fitted on stairs using a knee kicker!!!!
The gripperods are supposed to be 10/15cm away from the skirting boards , not in the next room!!
I do not know where or who showed these people how to fit carpets but i would not let them near any carpet in any room & certainly nowhere near any staircase. Cowboys pure & simple !!!!
One man built the hanging temples
And yeah its okay to use a kicker on stairs it’s not their fault you got tricked into buying some overpriced stair stretcher