
Many modern homes have heating and air conditioning vents located on the edges of floors in the room, as opposed to ceilings or walls. When this is the case in a hardwood installation, you must remove wood in the shape of the vent.
In every case, except with the widest hardwood boards (5 inches or greater), this will involve cuts in at least 2 of the boards to accommodate the flooring. If you get lucky, one board may end exactly on the edge of the vent, but this isn’t the usual circumstance.
Perhaps the most difficult situation is when only 1/2 inch of a board will fit around one side of the vent. In this case, you must take great care in cutting the board to ensure it doesn’t break during the cut. Let’s walk through the steps to see how it’s done.
We’re installing Brazilian Walnut flooring across the first floor of our home. If you’d like to follow along with the series, subscribe using the RSS or e-mail buttons at the right. For the complete list of articles, see the main How to Install Hardwood Floors article at that link.
Tools Required for Working Around Vents

- Jigsaw with wood blade*
- Drill Driver with 3/8 inch bit
- Tape Measure
- Vice or clamp-downs to prevent the wood from moving while working
- Pencil
*It is possible to substitute a table saw for the jig saw if you must cut the floor without a jigsaw; however, jig saws offer the optimal solution for working with boards. See the bottom of the article.
Working Around Vents in a Hardwood Flooring Installation
Step 1: Start with a hardwood board the spans the vent at least 6 inches on both sides.

Step 2: Mark the edge of the board at the left and right edges of the vent. Note that you want to use the actual inside wall of the vent as the measurement point. Most vents will have a flange that covers a part of the floor. You want the hardwood flooring to cover that flange. (Kim is skilled with a Sharpie and knows to use the outside edge of the Sharpie mark for cutting; but you may want to use a wood pencil to get a more precise mark).

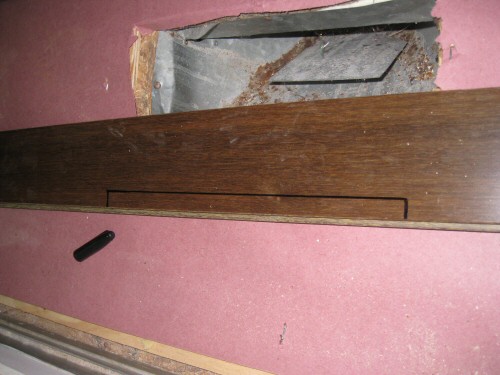
Step 3: Remove the board and measure the distance from the last installed board to the edge of the vent. This will tell you how much depth you need to cut out of the board. In the picture below, we need 2-3/4 inches of wood, so we’ll be cutting off about 1/2″ at our marks.

Step 4: Mark the hardwood flooring board for the vent depth. Again, Kim used a Sharpie for the pictures. We’ll be cutting at the outside edge of the Sharpie mark.
Step 5: Secure the board on a work surface. We used a clamp down on the side of our Skil Hardwood Flooring Saw and allowed the board to hang over the edge. A similar clamp on a mitre saw or a vice may work as well.
Step 6: Use a 3/8-inch bit to drill a pilot hole inside the corner of the board for the jig saw blade. Jig saws have great difficult making plunge cuts or turning sharp corners. If you don’t have a drill-driver available, you can use other strategies to work the jig saw to make perfect right angles (for instance, cutting in at a sloped angle and straightening up). We find this method to be quick and easy.

Step 6: Insert the jig saw blade into the hole and follow the board marking accurately. Note that you can use masking tape over the cutting location to help avoid tear out. We had a good blade on the jig saw and since we aren’t using flush mount vents, the vent edges will cover gaps.

Step 7: Dry fit the board in place. If your cuts are accurate and successful, fasten the boards on both sides using a hardwood stapler or nailer. If you’re too close to the wall, you can also use your hardwood flooring finish nailer.

Step 8: Check to see if another full board can fit on either side of the installation without special cuts. In our case, this was possible. Kim cut a single board and stretched it across each side of the vent. Fasten these boards into place.

Step 9: Follow the steps 1-7 for the outside board, carefully matching the cuts and location on the original board.

Step 10: Fasten the final board in place. It’s worth noting that in our installation, the final board is beyond the area where toe nailing is possible because it is so close to the non-opening side of the sliding glass door. Accordingly, we had to top nail this board into place using our DuoFast Floormaster 250BN.

Vent Cover Types
The method described in this post works very well for 97% of homes that use surface-mount vent covers. In very exotic installations, the hardwood vent covers are flush with the floor and manufactured from the same species wood as the floor. In this case, high-precision cuts are required.
Matching Vent Covers on the Cheap
We’re installing Brazilian Walnut floors, and as such the trim components tend to be very expensive. We considered using black vent covers, but they seemed to detract from the brilliance of the floor. At a trip to Home Depot, we landed on these stained American Cherry vent covers that get pretty close to the color of our floor – and at $14/each are a steal compared the same made from Brazilian Walnut, which run > $30/each + shipping online.
In many hardwood installations you can ‘cheat’ with the trim components. In another hardwood installation we matched stained pine quarter round to Brazilian Walnut successfully. This works well for installations-on-a-budget where the looks are important but the “authenticity” of every component is not.

Using a Table Saw Instead of a Jigsaw

If you absolutely don’t have access to a jig saw and cannot borrow one, working around vents can be accomplished with a table saw.
See the drawing to the right. Essentially, instead of routing out a board to the shape of the vent, you use two boards on each side of the vent. In most cases, this doesn’t result in as clean of a look, but if done carefully it can be virtually invisible to a casual observer.
If you don’t already own a jig saw, the can be useful on a wide array of projects. Perhaps your hardwood installation is a good time to pick one up!

Great step by step! Thanks for sharing this with us.
If you do not own a Jig Saw, I would highly reccomend purchasing one. They are not very expensive and handy to have, as well as making the job easier for you and it will look more like a professional install. If you are doing your own hardwood floors, you will most likely find it to be well worth the investment and you will wonder what you did without it.
Bret, good comment for folks who don’t own a jigsaw. They are worth the investment! Thanks for visitng OPC – hope we’ll make you a regular reader!