
It’s been a little quiet around OPC recently; however, that doesn’t mean I haven’t been busy. A lot of my time has been tied up with hurricane Sandy and working to complete my shed. I’ve also been writing articles for other publications. Despite all that, I’ve just finished another woodworking project, and I’m really excited to share it with you.
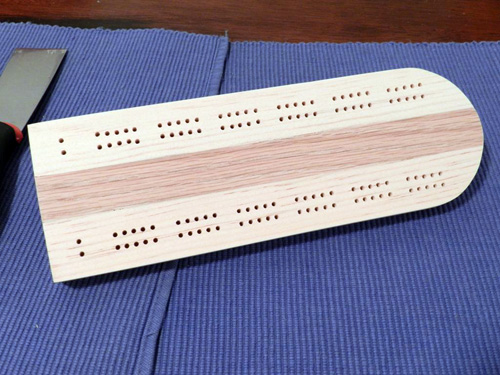
Brett from Art of Manliness challenged me to build a cribbage board, and although I’ve never played, I thought it would be fun. After reading up about cribbage (did you know people have been playing since the early 17th century) and figuring out the rules, I got to work. My “classic style” cribbage board follows the basic design I found on other woodworking sites, and it’s perfect for a moderately skilled woodworker like myself.

Tools and Materials
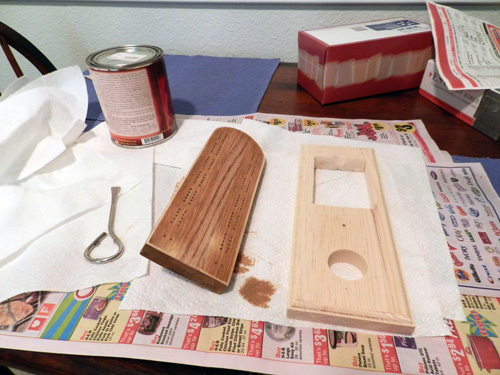
For this project I used some scrap 3/4″ pine, 1/4″ plywood, and I purchased a strip of oak from the local HD. I also found a cribbage hole template which I modified to suit my purposes. The pegs are made from double-headed nails, and I happened to have leftover stain and magnets from other projects.

I used a lot of different tools for this cribbage board (listed below). One nice thing about pine is that it’s relatively soft, and that means it wouldn’t be too crazy to make this board using mostly hand tools. The drill press is practically a necessity because otherwise it would be extremely difficult to accurately drill all the holes.
- Table saw
- Dado stack
- Coping saw
- Router (palm and table)
- Drill press
- Sandpaper
- Angle grinder
- Bench grinder
Step 1: Cut to Size
I ran my piece of pine through my table saw and cut the top to 4 x 12″ and the base to 5-1/8 x 13-1/4″. I also ripped the 1/4″ to match the base.

Step 2: Make a Template
One end of the top is rounded into a half circle, and to cut that I started by making a template.

After a lot of tweaking, I had a really good 1/2 circle so I clamped it below my work piece.


Step 3: Cut the Curve with a Router
This router bit has a bearing on the end that follows the template, making it easy to cut a perfect match.

After a little bit of sanding I have beautiful curve.

Step 4: Rout the Base
The base seemed a little bland so I cut an eased-edge with a table-mounted router.


Step 5: Mark Locations for Cutouts
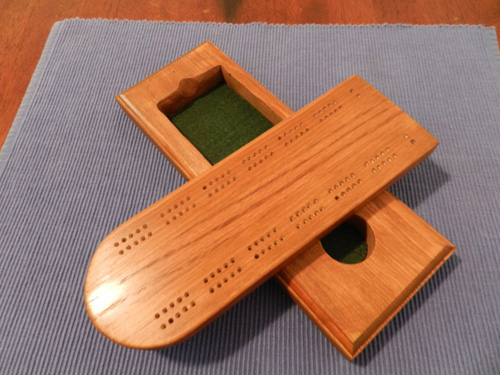
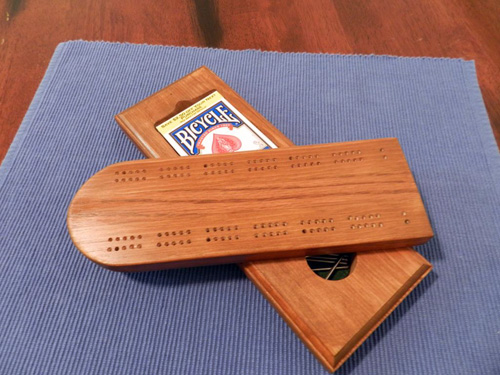
I mapped out the locations for the playing card holder and peg holder. There’s a pair of magnets that help align the top and base, and everything swivels on a pin. All of these elements are concealed by the top.

Step 6: Cut Holes for Pegs and Playing Cards
I drilled a starting hole and cut out the playing card and peg holders with my coping saw.


Step 7: Cut Magnet Holes
I grabbed my palm router again and set the depth to match the magnets. Next, I carefully routed the magnet holes on the base and underside of the top.

Step 8: Drill Hole for Pin
The top swivels on a pin or modified machine screw in my case. I cut the screw to length and ground the head as thin as possible. I drilled a hole through the base, and for the top, I carefully drilled to the necessary depth.

Step 9: Inlay the Oak
To cut out the oak “racing stripe” I setup a dado stack on my table saw. After a couple passes it was the correct depth and width.

For the oak, I made a rough cut with my coping saw and sanded each end flush with the pine top.

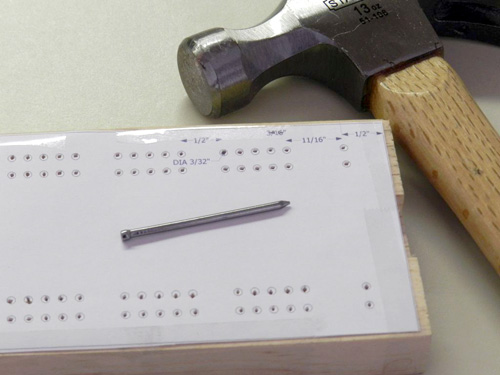
Step 10: Make the Cribbage Pegs
I grabbed some double-headed nails that are typically used for making concrete forms, and I cut off the end with an angle grinder. Next, I cleaned up the cut with my bench grinder.


Step 11: Drill the Holes
I taped the hole template over the cribbage board top and borrowed a drill press. After aligning the fence and setting the correct depth, things moved pretty quickly. I used a 11/64″ bit to drill all the holes.
Step 12: Glue it Together
With all the separate pieces ready to go, I glued the racing stripe to the top and the thin plywood base to the underside.
Step 13: Apply Finishing Touches
I gave all the surfaces a good sanding to remove any dings, pencil marks or glue. Next, I applied a Walnut stain to the entire cribbage board, letting the two different species of wood create some visual interest. To distinguish the pegs, Jocie painted one pair a dark red.


A Reader Cribbage Board
One of our regular readers made a similar cribbage board following these basic instructions, and I asked him to send in pictures when it was finished. I want to extend a big thanks to Ross and congratulate him on a great looking crib board. If you decide to take on this project, send me some pictures so I can add them here too!

That is really pretty! Our first wedding gift was a Cribbage board.
Looks nice! I haven’t played cribbage in forever. It looks like the only thing you had to buy for this project was a strip of oak. I love when projects require minimal investment.
If one wanted to make a board but didn’t have a drill press Rockler has a plastic drill guide and centering bit as well. What drill press did you use? Was it a floor or bench-top model?
My wife and I keep a running tally of games on the back of our board. We just mark the wood with pen.
I haven’t seen that guide before. How well does it keep the drill bit straight?
The drill press I used was an old Craftsman benchtop model that my father-in-law has. I’ve been eyeing a Ridgid model. Any suggestions?
I haven’t used the guide myself but it’s the same as a shelf pin guide. Comes with the centering bit too. http://www.rockler.com/product.cfm?page=31446
As far as drill presses go, I know Todd loves his Delta but it’s also twice the cost. I’m not sure what Rob R has in his shop but that RIDGID seems like a really nice unit. PC has a floor standing model as well and is only $300 with many positive reviews on lowes.com.
I did not know that you were an artisanal game maker!
Hehe! I didn’t know either 🙂
That’s came out great! I just got a router table and may have to try this for a little practice. It looks challenging enough for a beginner without the concern of scrapping a lot of wood if I mess it up
It was a really fun project, and I may try to build some other game boards. Ever seen those fancy Settlers of Catan game boards?
Oh man. I haven’t played that in years. That would be awesome to make
I like the idea of making other game boards. If you do any it would be awesome to see a step by step for them too. Especially one for Catan with some of the expansions.
I love this, probably especially so because I am a huge cribbage player. My grandma taught me to play when I was young and I still play with her whenever I get a chance, so I have a lot of memories associated with the game. I’m adding this to my list of definite projects to do in the future.
Send in some pics when you make it!
Love the game, play it all the time. I’m currently taking an intro to wood working class at school and decided to make a board for my final project. How did you do the bottom piece under the card/peg holder piece?
also what size nailes did you use
What thats not battleship? .. jk looks great although I have no idea how to play.
Not bad. It’s good to learn games that don’t require any fancy electronics
I saw this artice originally on AoM and instantly decide to check this website out next thing i know im writing down the materials i need to make this and googling how to play thank you
Hey Mat,
Glad you found us! I hope the crib board works out for you, and feel free to email me if you bump into problems. Welcome to OPC, and I hope to see you around again.
this looks like a fun gift idea for some friends i know…. if only i had the time ha
This would make a really nice hand made gift. Thanks for the great tutorial Ethan. My hubby used to play cribbage so I’m thinking I just may have to head to the local woodworkers shop and get some fancy wood and make him one of these.
Very nicely done. I could see this becoming a family heirloom, whether you know how to play cribbage or not! Looks like you spent a good amount of time making it.
This is beautiful! My son used your directions to make a board for his aunt. The only he and I could not figure out are the directions to “attach” the two boards with the peg. We are both NOVICE woodworkers – if you have time, could you please elaborate on how the top board is attached to the one below it? The magnet we can figure out, it was the screw part we couldn’t. Thank you!!
I would like you to elaborate on how to attach the top piece with the bottom base with a pivot pin.
I used a machine bolt/ screw and found a drill bit that was the same size as the screw then drilled through the the center of the top and bottom piece then inserted the screw so it fit snugly then i drilled a hole in the bottom about an inch and a half wide so i could attach the bolt to the screw by hand. On the top the screw is hidden by the inlay.
I don’t understand any of this step. If there had been photos I might be able to figure it out, but even after your explanation, I still just don’t get it. Is there another way to do it that would be easier to explain? I really want to make this, but this step is holding me up. Thanks.
Great board! but wheres the link to the hole template? Would be great as I cant find this style of template anywhere online. thanks!
You can find them on Rockleer site. Not cheap comes with drill bit. I bought one but plan on making 5 or 6 for gifts, so I am going to use the purchased guide to make a disposable version since multiple uses may cause the pexiglass to chip.
Can you tell me where you got the template for the board pictured here? With just the two rows of holes? Trying to make for a Christmas gift. Thanks so much!
What beautiful work… Would you be willing to share the template for cutting the peg holes?