
This is a great tutorial that I put together in March of 2012 on How to Repair a Medium-Size Hole in Drywall, and you can find this along with other top-notch articles in the Best of OPC section found in the right sidebar. If you read through the comments, you’ll find some alternative drywall repair suggestions, and some of them are valid options. However, the method I describe here is tried-and-true, and it results in a flawless, durable patch every time. Furthermore, a number of drywall contractors confirm that this is how they tackle a medium sized repair.
Repairing drywall is a great do-it-yourselfer task because tools and materials are cheap, and there’s very little risk (to you or the house). Plus, if you can master the repair, it’s a skill that will serve you well no matter if you own or rent. So before you call the local handyman next time, give yourself a chance to tackle this basic, home improvement project.

Materials List
- Drywall (see below)
- Mesh tape (see below)
- Setting compound (see below)
- Backer boards (see below)
- 1-1/4″ Drywall screws
Drywall: Also called sheet rock or gypsum board, drywall is available in several sizes and thicknesses. Purchase a piece bigger than the hole because you’ll be squaring it out (and making it slightly larger). Home improvement centers often sell 2 x 2′ sections which are great for making repairs. Drywall is commonly available in 1/4″, 1/2″, 3/8″, 5/8″ and 3/4″. Most interior walls have 1/2″ drywall, and ceilings are typically 1/2″ or 5/8.” The thickness of the new piece should match the existing drywall.
Mesh tape: I used a fiberglass mesh tape for this repair. Paper tape is another alternative, and it results in a stronger joint. If you expect any sort of movement or stress on the joint, paper tape will better resist cracks. If you use mesh tape, I recommend avoiding the pre-mixed joint compound (more on that next).
Setting Compound: Setting compound (or hot mud) is a powder that comes in a bag and needs to be mixed with water. Unlike joint compound which dries through evaporation, setting compound dries through a chemical reaction, shrinks very little and dries very hard. Setting compound is differentiated by drying time (in minutes), and you’ll find 5, 20, 45, 90, etc. Setting compound is nice because you’re able to apply a second coat without waiting too long. I purchased an easy-sand, 5 minute compound. If you’re a novice to patching drywall, go with a longer drying time.

Backer Boards: Repairing a medium-sized hole in drywall calls for adding a new piece of drywall. To secure this new piece, you’ll need some sort of backer boards, and I used small pieces of 1/4″ plywood.
Tools
- Utility knife
- Drywall saw
- 6″ Drywall knife (pictured)
- Drill / driver
- 100 grit Sandpaper

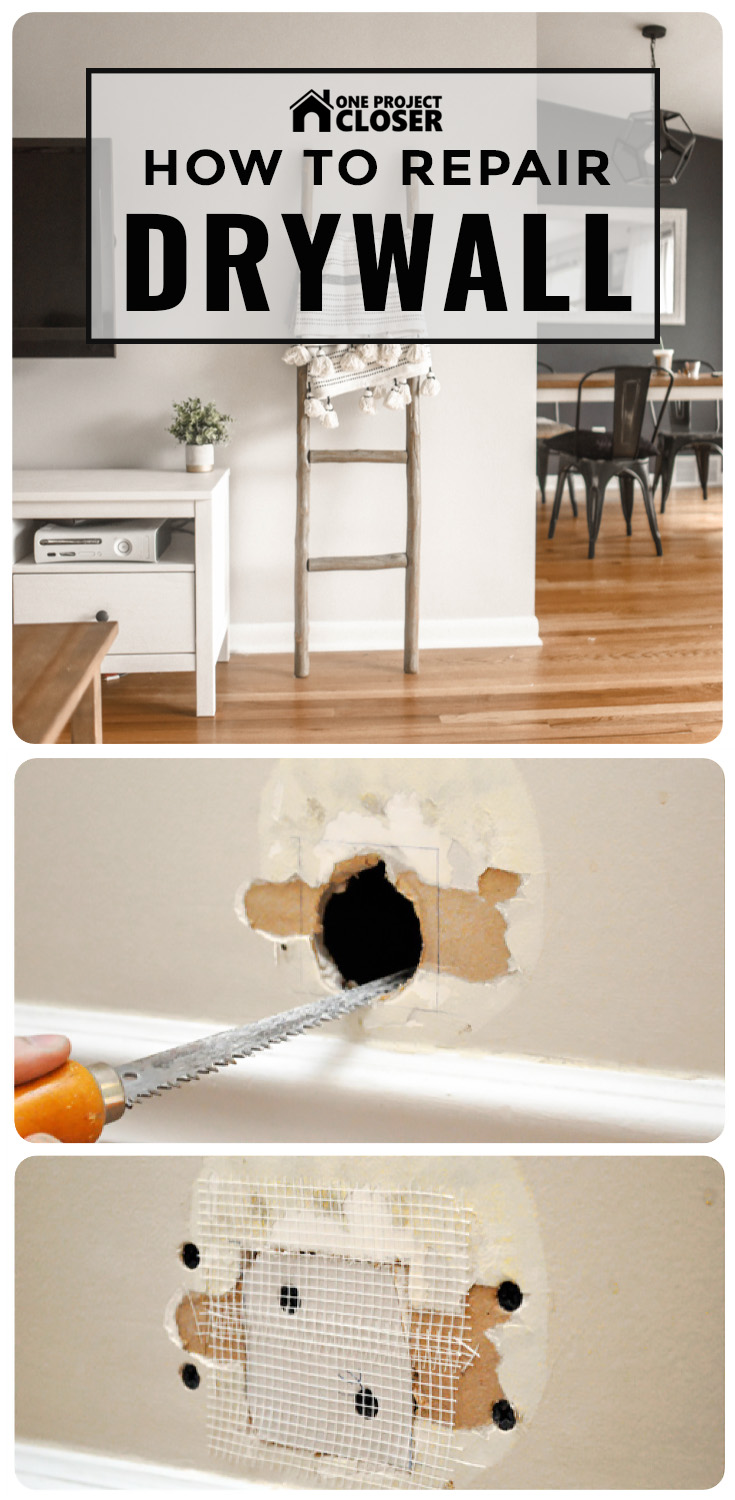
Step 1: Square the Hole
This is the hole right by my front door. I’d guess the previous owner opened to door too hard, and instead of repairing the damage, covered it with a plastic wall bumper. Cutting a circular (or other oddly shaped) piece of drywall is tedious. Instead, I like to widen the hole into a square or rectangle.

I recommend scoring the edges with a utility knife before you start sawing.


Step 2: Secure the Backer Board
This is a medium-sized hole, and it’s impossible to simply fill the void with compound. I need to add a new piece of drywall, and to fasten the drywall, I need some sort of backing or furring strip. To accomplish this, I slide a piece of 1/4″ plywood into the hole.

Carefully, I start a drywall screw that allows me to easily hold the plywood across the opening.

Next, I put in four drywall screws to hold my backer in place.

Screws should be countersunk just below the surface of the drywall.


Alternate Method
It just so happens that I have a second hole in my basement. For this hole, there is a stud nearby so I cut the drywall to expose half the stud. This gives me a nice nailing surface of the left side. Now I just secure my backer board to the right side.


Step 3: Cut a New Piece of Drywall
Use your utility knife and/or drywall saw to cut a new piece of drywall that fits into the hole.

Step 4: Cover the Joints with Tape
I covered the entire new piece of drywall and all the edges with mesh tape. Often you’ll see people cover the screw heads too (which is fine but I didn’t).
Step 5: Mix Compound and Apply First Coat
It doesn’t take much compound to cover a hole like this. I mixed a little powder and water until the compound had a thick, “mashed-potato” consistency. This is important because if the compound is too wet, it’ll result in a poor bond. Sloppy mud is also a pain to work. Keep adding powder (or water) as necessary until your satisfied.
Using the 6″ drywall knife, I applied the first coat. Make sure you embed all the mesh tape, and try to eliminate any air pockets.


Step 6: Second Coat
While the first coat dried, I mixed up another small batch of compound. I didn’t bother to sand in between the first and second coat, using my knife to check for any high points. If you’re really good at patching, you can finish everything off in two coats. I fully expected to need a third coat. After the second coat dried, I used 100 grit sandpaper to feather the edges. The goal is to create a seamless transition so you’ll never know the wall was damaged.

Step 7: Final Coat
When you apply the final coat, try to make it as smooth as possible. It’ll save you from having do a lot of sanding.

Step 8: Sand Smooth
Feather all the edges by sanding them smooth, and give the rest of the patch a once-over to eliminate any dimples or ridges. Feel everything with your hand to make sure it’s all even.

Step 9: Prime
It’s really important to prime your drywall repair because compound will absorb paint differently, and even if you did a good patch job, without primer it’ll be obvious.

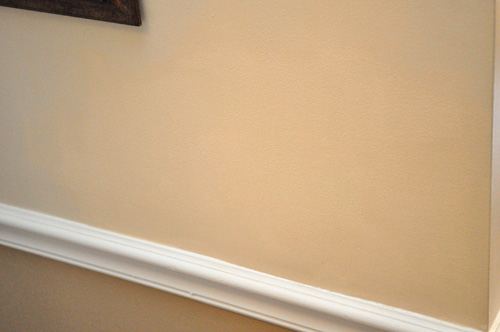
Step 10: Paint
We keep a little leftover paint for each room for just this purpose. I like to roll the paint because I can notice brush strokes, and again that’s a giveaway that you patched the drywall. Rolling the paint gives it the same texture as the rest of the wall.
If you enjoyed this project, why don’t you check out the other home improvement how-tos available in the Project Guides section.

Are there any advantages to using joint compound for patches? Why do you recommend against using it with mesh tape but not paper tape?
There are lots of people that debate mesh tape vs. paper online. Here’s my take:
Mesh tape is weaker than paper so it’s important to use hot mud because it won’t shrink (and pull away from the fibers) and it dries super hard.
Paper tape is being phased out for the most part. Where it was very fitting for corners, mesh tape is stronger (hate to contradict you Ethan, drywall is my job), easier to apply since you do not need to lay down a bead of mud before attaching it and reinforced by the mud that is pressed in between the mesh. The only issue I truly have is the little extra work I am forced to do in concealing it. Thank goodness for factory edges!
As for the joint compound, straight from the container you are going to have issues of it shrinking and cracking, that is why I prefer to use a hot mud mix (15 minute for small projects) although the hot mud mix is more difficult to sand down than joint compound.. Of course when I say “more difficult” I mean an extra 30 seconds of sanding work, not that detrimental. Now ..If you were fanning out the joint compound to finalize your job with that last little skim coat just to conceal the trace lines of the patch that works. Just make sure you are careful to not wipe away too much excess and end up having to do it all over again. If you do not keep both types in your work rig or workshop then stick to just the hot mud, 45 minute mixes should be perfect if you are starting out.
I should clarify (and if you happen to see this response, I’d love to get your take). The joint will be stronger b/c mesh can flex and shift more than paper. For instance, pull paper tape and it says the same size / shape until it tears. That’s not the case for mesh. It can move laterally.
Great DIY article, Ethan. I’m not often in a situation where I need to do a patch as most our holes are your basic nail or anchor holes, but we got one room that’s to be painted down the road that needs a patch about the size you had. I’ll be using this as a reference.
Have you also looked into any of the kits stores sell? Just on a quick look, they seemed to be a lot more topical and a lot less substantial. I don’t recall whether they have much of a backer, just a piece of drywall pre-attached to mesh, I think. I’d be curious if there are times when those may be more applicable, or should you always just use a backer?
If it’s big enough to patch, it’s big enough to use a backer. Otherwise, there’s nothing supporting the new patch other than mud. The mud will crack too easily without some support and structure.
Yeah, that makes sense. I wonder if there’s thus ever a time when it’s not big enough but too big for spackling. Go by feel and experience and if it doesn’t look right to begin with, just make the hole bigger and use a backer?
I know DAP makes a kit for patching walls, and I’m sure there are plenty of alternatives. I haven’t used any of them though. Call me stubborn, but I’m just more comfortable doing it this way.
Sadly the price for those kits can be pricier than a patch size piece of drywall a 1×4 (or any scrap lumber) and a little mud. You will end up with a less secure patch.
Good on you for taking the high road Ethan.
Stipple on your primer with a brush and it will duplicate years of roller texture.
That’s a good tip. I’m always a little concerned about the patching looking “newer” than the rest of the wall.
Most of the DIY things I do are self-taught. So it’s nice to learn the right way to do this. 🙂
Glad you like the article!
is it always necessary to use mesh tape?
It’s important to tape (paper or mesh) the joints otherwise the compound will crack and potentially come away from the wall.
so.. other than not having any, my thought was the netting adds bulk? can you just paper / tape the area? would spackle go over / under / both? thanks
You can just use the tape over the hole, the mud skimmed over however will follow the laws of gravity. The end result will be a thinner top and a bubble at the bottom. It is essential to use a backer board and patch for medium sized holes. Now, if you have a smaller hole, just put in a backer, grab some hot mud, use a slightly less amount of water in the mix, plug the hole, tape over then let sit. Once it is dry you can proceed to blend it into the wall as they describe above.. Remember, Small Holes Only!
Are your walls untextured? Any suggestions for walls that have some texture?
What kind of texture? Orange peel or knock down can be bought in a spray can at the big box now days. I’ve seen it on the shelf but have not used it.
I haven’t ever worked with textured walls so I’m not really sure. It seems like Jeff’s suggestions are a good option though. Thanks for commenting!
I have never heard of using a backer board for holes, but it makes sense…if the door created the hole once, it is sure to happen again and if there isn’t anything behind the dry wall it will eventually just knock the patch loose and into the wall.
It would, except I’ve since put a door stop down at the base of the wall.
Good tutorial. I agree with others that this becomes much more difficult when existing walls are textured. How do you feather edges into a textured wall? How do you use a flat knife to spread the mud onto a textured wall? How do you re-apply a new texture and make it match the texture everywhere else?
Tricky stuff. It’s the reason i never use texture on any new walls – I wouldn’t ever be able to re pair them…
We have a stippled ceiling in our house and have had to have several very large repairs done (one, for example, to run wiring for recessed lighting, which was very invasive). The pro dry wall guys that came to the house did something I thought was interesting. They started by sanding down the pattern adjacent to the patch, then doing the patch work smooth, and then re-applying the pattern. Unfortunately, even with what I would consider to be a very “professional” job, they were not able to completely hide the repair, although it’s really only visible to the few of us who know it’s there.
One of the challenges of this method is getting the backboard into the hole. I happen to know that in this case, the wall being repaired is framed with 2x6s, which have a 5.5 inch depth. With 2x4s, and the associated 3.5 inch depth, inserting the backer piece can be challenging with a very small hole. Sometimes the compromise is to cut away until you get to the next stud, and then put the backer board only on one side, as Ethan showed in the “alternative method”.
Fred,
One thing most homeowners fear is opening the hole larger than it is. I have found that sometimes finding the stud centers, cutting down the middle of each side, then just using blocking for the top, and bottom works much easier, a little more tape work, but well worth it in many instances. I have also found the larger dimensions help blend the new work to the old, but then I have been doing it for quite some time, and experience does help.
Yours looked good to me though, I don’t doubt that you can’t see it, and that’s the whole point of the exercise!
For backer board, I found that 1×4’s are ideal. Thin enough to slide into most holes and wide enough to secure both patch and wall.
hmm I can kinda see where you patched it. Are you satisfied with that or did you do another light coat of paint after the last picture?
This is a good step by step its like my father taught me. Except we didnt use the mesh tape(we had it) but he didn’t need it. LOL the hole he patched that I learned from was the one he punched in the kitchen wall when I was 4 years old and my leg got impaled on an unfished deck that had a nail sticking out. Probably why that repair stuck so good in my mind!
I know what you mean. I took that last picture just after painting it. Now that the paint has dried, you can’t see it at all. I’m very pleased with how everything turned out.
I’d probably remember that too if I impaled me leg…. ouch!
oh and he punched it because he was upset . Pent up anger lotsa family drama (wife died) and now his baby girl got hurt. *sniff* so the hole he punched was not some psycho dad moment. It was out of anger/frustration in life.
Also, here’s a little info about hot patches. I’ve used them when a hole was too small for backer:
http://www.youtube.com/watch?v=Ub1aQ8-nnCE
I’m not sure I’d recommend using any “patch” on a door. All the movement + a hard / brittle material = problems. I think that person who “could exactly describe their problem” needed a repair or “security” strike. Check those out on amazon.
I’ve used “water putty” to repair hollow core doors. It just depends on how the hole is orientated in the door. Drill tiny holes in and around the hole to give the water putty a place to grip. Water putty dries as hard as plaster but I don’t think it is as brittle. It actually seems to behave like wood itself. You can drill it and set screws to it after it dries. Remarkable stuff.
I also cut the paper of the surrounding sheetrock and peel it off in the area equal to the size of the mesh tape and peel the paper off the square plug that fills the hole. This eliminates additional “build out” or mounding of the patching compound. If you have say eggshell type paint the gloss of the paint will show the repair when seen from a side view angle. Otherwise you would need to feather the repair with wider and wider knives to blend the repair. Nice DIY, thanks for sharing.
A must know if you have a son in college!
With 3 new puppies and 10 new chew marks, I will surely be using this guide for my craftroom walls!
This is a great tutorial. I appreciate the step by step photos as well. megan
Thanks for this great tutorial. It’s very timely for us because we need to patch a hole in our bedroom wall made by the door knob.
this is a nice tutorial… hopefully i dont get any holes needing repair too soon ha!
This is a great step by step. Bookmarked as an email forward for all my friends who keep asking me to come over and do this.
Very nice step-by-step illustration with clear descriptions. No holes in our walls at this time- hopefully won’t need this info!
I like to just cut the piece of drywall to the approximate size and then trace it on the wall then cut the opening to that size. simplifies fitting the patch to the hole. Good job on that patch! A lot of people don’t seem to have the patience to do patches and mudding in general right.
I needed this info for a job nextweek, thanks
This is a great tutorial. I noticed it on the front page, but is there anyway it could come through RSS again when you repost things for those who weren’t around at the time of original posting?
I think refreshing the RSS feed after “re-publishing” an article will have it show up in your reader. I’ll do that now. Let me know if it shows up then.
Hmm no I didn’t see anything in my reader (Google Reader) but looking directly at the RSS I see it is updated. I’ll keep my eye on it and if you wouldn’t try doing it one more time in the future too I’ll see if it happens.
Thanks for your help, Ethan!
This was amazingly helpful. My wife about ripped me a new one when she saw the job I did on the hole in our bedroom. I think I am going to tear my old job out and start over with this guide. One question though…
Will it also work on plaster? I’ve got some plaster walls in another part of my house that could use some work….
-Brandon
Great detailed tutorial Ethan. Hoping I don’t need it, but if I do I’ll be sure to check back here. Thanks.
Could you do this again for ceiling cracks that have been textured
I just followed this and it worked great, gained some skill and saved myself some money! Thanks!
couple of quick comments.
you don’t show taping off the trim or covering the floor around the area where you are patching and sanding. trust me, scraping mud off trim especially profile trim is not recommended unless you like making extra work for yourself .
Mesh Tape is the go to product for patching flat areas. Because of the adhesive backing it sticks when applying mud. Paper tape has a tendency to slide around.
As others have mentioned Mesh tape resists cracking over time. In smaller repairs where a corner is involved mesh tape can be used for re-establishing the corner, like in this repair
http://www.lemurzone.com/rfg/index.php/2011/04/21/textured-drywall-patch/
but depending on the length a good rule of thumb is that if the run is over 16” you should apply the mesh on the flats, and then cover the corner ends with the paper tape.
For matching texture, spray on textures work fine for ‘orange peel’ and other original sprayed textures. One thing to do is to practice on scrap drywall to match your texture. To blend your work, use a scotch brite pad to scuff and round down your sprayed texture to blend it into the original finish, as most repairs take place on houses that have had a number of coats of paint on them.
The larger textures like knock down and some small santa fe styled textures can be done with the same spray on texture products. (read the label to select the correct product) and remember to sand down the surface before priming and painting.
From my experience (being the guy they call when things have already ‘gone south’) I must say that mesh tape should never be sold to novice DIYers. Every beginners patch with mesh that I’ve seen looks a total mess since the mesh is just sooooo thick. To make it invisible you have to cut back the existing drywall or you get the inevitable bump that even a 24″ trowel can’t spread out.
Giving yourself a handle (with a d/w screw) is perhaps the most valuable step in this process. … though I wonder if any comments above warn of over-driving screws. For me, the repair here is really no different than installing new drywall … the goal always being to have your fastener just barely break the paper. Still an invaluable procedure and great tips. Thanks for sharing Ethan.
Revising my earlier statement. I should have said dimple, not “break paper”. Thanks again guys.
Another great DIY repair tutorial. I have done these types of repairs and did it your way
Awesome DIY tutorial! I have a couple holes that my wife has been badgering me to fix, will have to try it your way.
This is a great DIY repair tutorial, Thanks for sharing!
Great tutorial! We once had a large hole that we hired a handyman to repair, but the next time, we can try the repair ourselves! Thanks for posting.
Hi Ethan,
Great DIY. Perhaps this is a dumb question, but I’ll ask anyway: what is the exact purposes of the mesh tape being placed there before applying the compound?
Whenever there are holes in the house, we always pay for other people to do it for us. Not until I come across your blog, I found out many DIYs fixes that can be done by either me or by my husband..Thanks so much for putting all these together!!!
Awesome tutorial! I’ve tried repairing holes in my wall myself before it did not turn out well, but now I have this tutorial, thanks!
This brings back a bad childhood memory. My sister and I were arguing about who knows what and I slammed open a our bedroom door. The doorknob went right through the door. It was when my family first moved to Omaha and was renting. Luckily my Daddy was handy and was able to fix it. I had no clue what trouble/work I caused him by letting my temper get the best of me.
Cool DIY! I always wondered how that was done. I might even try tackling the project myself, seems very simple.
thanks a lot for the tutorial, very clear for a clueless guy like me. i will follow all the steps and tips provided by rest of people, thanks again
Wonderful tutorial! I have a hole in my living room that has been needing fixing for sometime. Now I know how to do it, Thanks!
Great tutorial! This is the correct way to patch a dry wall. I have done it this way and the lazy way without the support. There is a big difference in the way it looks and lasts. The texture walls get me though, they never come out quite the samel texture patterns.
Markierte Nachrichten: Du kannst jetzt in einem Chat Nachrichten tippen und halten, um sie zu markieren, so dass du sie später einfach wiederfinden kannst.
It’s very useful tips, But with the larger hole, can we use this tip to repair the hole?
Great article! It looks like there was never a hole in that wall!
Awesome DIY piece. This is one DIY project I do know very well as I tripped and kicked a hole in my parents wall. Thanks for the share!
Thank you so much for posting the article. I’ve been searching online for a solution like this. My daughter always plays with a hole on one of the bedroom walls at home. Once her hand was caught inside and tried to get her hand out with so many bruises.
Thank you so much for this. I have been trying to fix a hole I made in my wall for a while now but was afraid to screw it up. This is very helpful thank you.
I had to do this for a range plug put in the wrong place. This is such a useful post for everyone.
[…] oneprojectcloser […]
BSNL Speed Test:- Today the high-speed internet is considered as the most important requirement of an internet connection. It ensure comfort Bsnl speedtest.