
How to Install Board and Batten Wainscoting (White Painted Square over Rectangle Pattern)
January 1, 2015 | by Fred (email) |
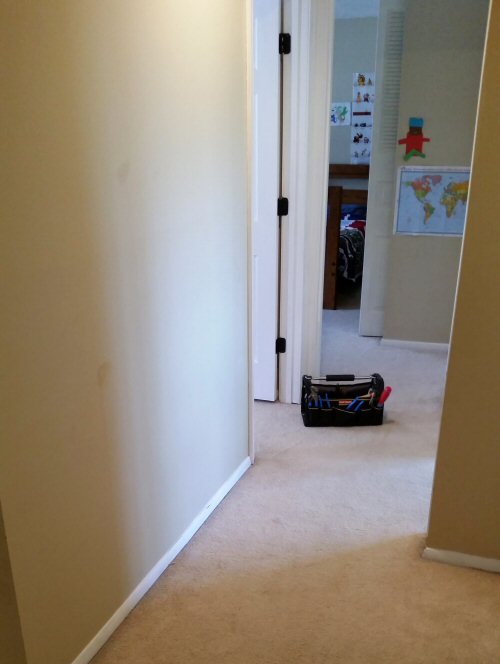
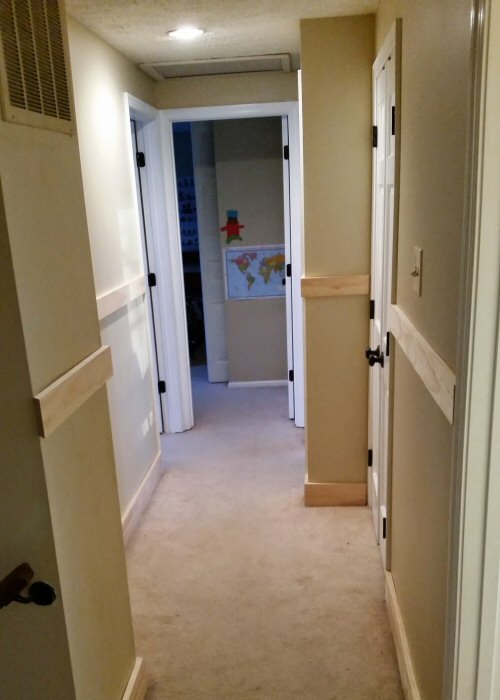
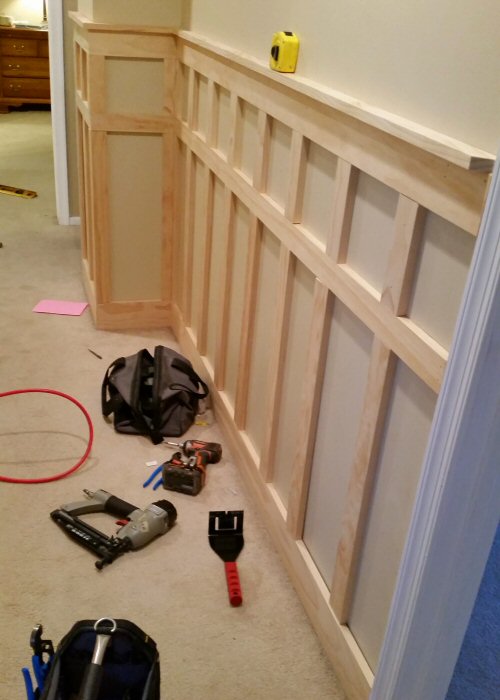
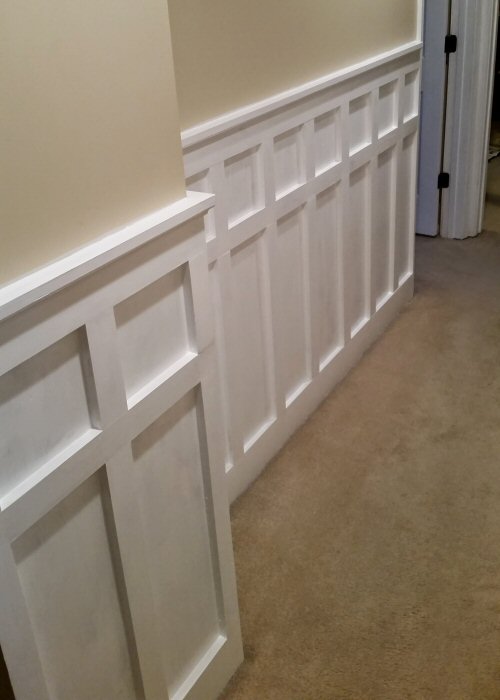
For the last few months, we’ve been contemplating how to spruce up our relatively small upstairs hallway (below). We had installed wainscoting in our prior home’s living room, and thought that might add the visual interest we were looking for here. Then, inspired by Wilker Do’s recent board and batten video tutorial, I started gathering ideas on Pinterest for an elegant but simple design that could take this space up a notch. We settled on a 48″ high square-over-rectangle board and batten design. We didn’t find anything exactly like it on Pinterest, but many other wainscoting pins helped us come up with this design. If you’re interested in our starting point, check out my board and batten pin board for some ideas to get you started!
Step 1: Plan the Design on Graph Paper
Obviously, if you’re really good you can skip this step, but I found it helpful to actually draw the design to scale on graph paper. Here’s a graph paper site that’ll let you quickly size and print paper if you don’t already have some around.
Step 2: Plan and Purchase Materials & Tools (if needed)
Our design includes the following wood components:
- 1 x 6 – Select Pine (Base Rail). (Note: 1×6’s are actually 3/4″ x 5.5″)
- 1 x 4 – Select Pine (Top Rail). (Note: 1×4’s are actually 3/4″ x 3.5″)
- 1 x 3 – Select Pine (Middle Rail & Vertical Stiles). (Note: 1×3’s are actually 3/4″ x 2.5″)
- 1 x 2 – Select Pine (Horizontal Cap). (Note: 1×2’s are actually 3/4″ x 1.5″)
- Inverted Quarter Round – MDF (Installed on top of Top Rail to add design between the top rail and cap)
For our room, we were able to use all 8′ lengths. For larger areas, you’ll want to purchase the longest material available for the rail components to minimize cuts.
It’s worth noting here that we used 1 x 4 for the top rail (as opposed to 1 x 3) because we planned on the inverted quarter round covering a small portion of the top rail, and figured that visually it would be closer to 1 x 3 when finished.
You’ll also need the following finishing materials:
- Finish Nails (We used two different Porter Cable finish nailers. See below.)
- Wood Glue
- Wood Putty
- Painters’ Caulk
- Liquid Nails (We didn’t end up using liquid nails in our install, but afterwards we think it would have made things easier).
- Paint, paint brushes, mini-roller, etc.
- Sand paper – 80, 150, 220 grit (we used a Milwaukee orbital sander and a Black and Decker Mouse Detail Sander)
And here’s the list of tools required:
- 10″ Compound Miter Saw
- Table Saw (Must be capable of 45 degree rips)
- Sander – at a minimum you’ll want some type of orbital sander.
- 4′ level
- Tape measure
- Chalk line (or you can measure and mark if you don’t have one)
- Hammer & nail set
- Pry Bar (or, even better, a specialized moulding removal tool like we use below)
- Finish Nailers – We used a 16-gauge 2″ finish nailer and an 18-gauge 1″ brad nailer.
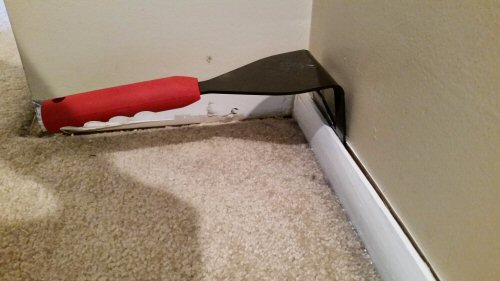
Step 3: Remove Existing Baseboard
Do your best not to damage the drywall. We used an innovative new trim puller tool Zenith provided us and really liked it. It worked way better than the typical hammer and pry bar approach.
Note: If we were to do this project again, we would insert a step here to paint the wall the ultimate color of the installed board and batten before proceeding. That would have made our painting step easier.
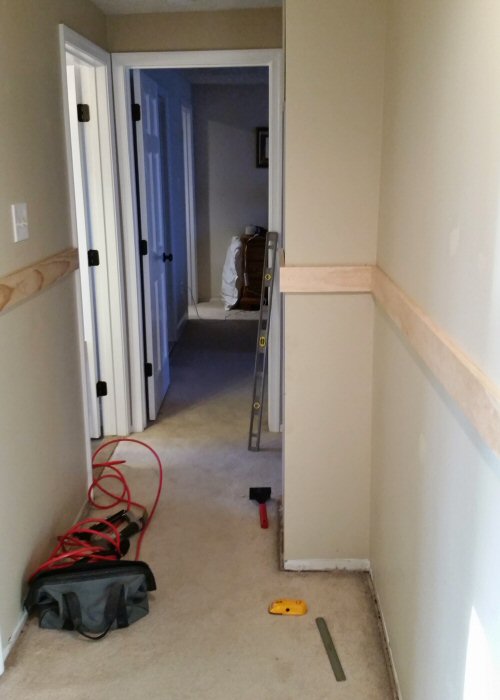
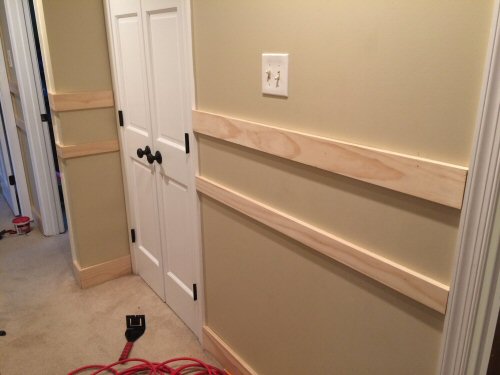
Step 4: Measure, Cut, and Install the Top, Bottom, and Middle Rails
For this step, measure either from your ceiling or floor, but be consistent. For very tall designs, we recommend going from the ceiling. For short and mid-height designs, the floor is best.
We used the following measurements:
- The baseboard (1 x 6) is installed at floor level.
- The top of our top rail sits 48″ off the floor.
- The top of our middle rail sits 8″ below the bottom of the top rail. By measuring and installing the middle rail last, we were able to ensure the top row of squares would be visually uniform.
Fastening: Use a stud finder to find studs on the wall and fasten with finish nails. We used 16 gauge 2″ finish nails.
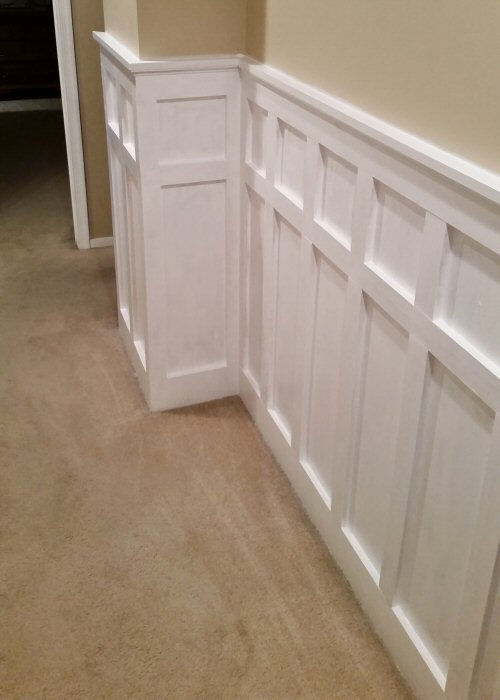
Inside corners: Inside corners require no special cuts for the rails. A simple butt joint will appear to be a 45 degree cut after installation.
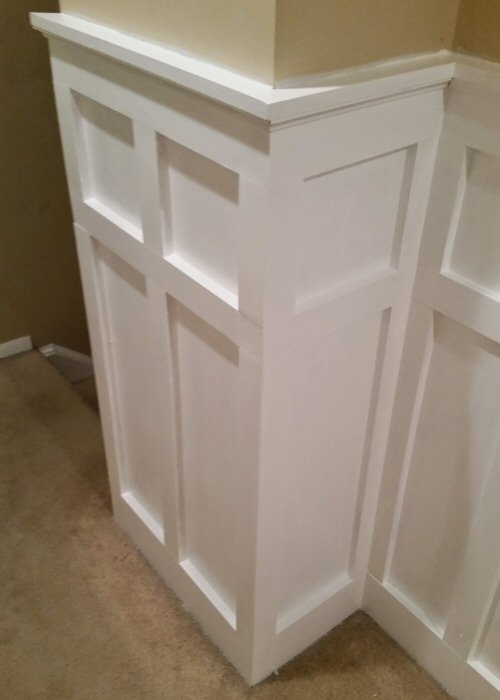
Outside corners: Outside corners require matching 45 degree angle cuts. Unfortunately, most drywall corners are not exactly 90 degrees. We have found that getting a corner perfect can be a bit of trial and error. One solution is to cut one rail at 45 degrees and match the second rail through a trial and error process.
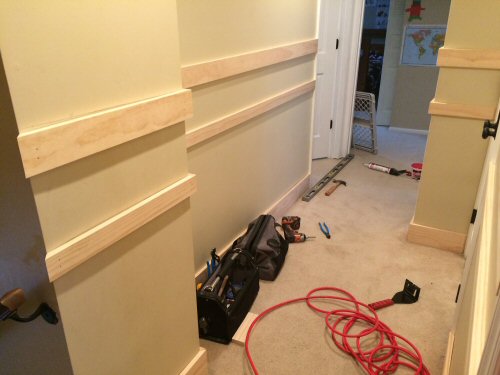
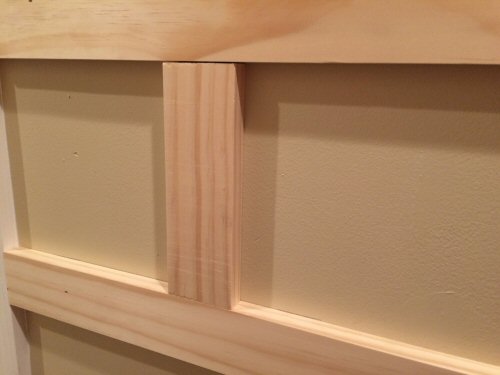
Step 5: Plan, Measure, and Install the Stiles
Stile placement is entirely up to you. We think the most visually pleasing stile configuration follows these best practices:
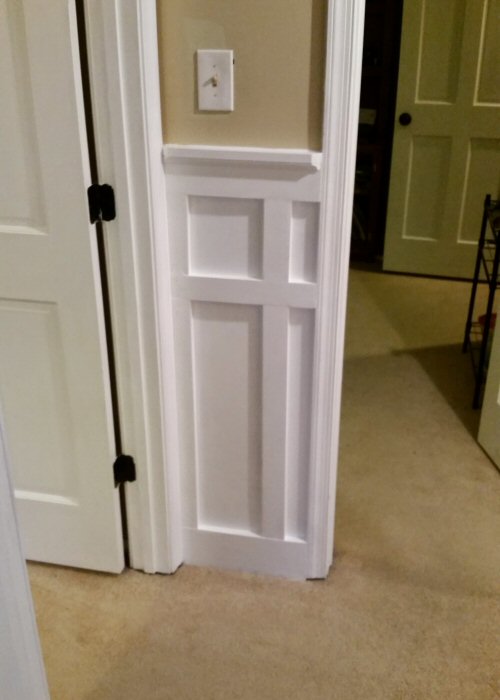
- Don’t place stiles directly against door mouldings. Instead, allow the door moulding to serve as the visual end for the run.
- Do place stiles on all inside corners.
- Do place stiles on all outside corners.
- Use consistent spacing between stiles.
- Layout stiles such that end spaces are always greater than 1/2 of the width of the gap between the stiles.
Fastening: Use liquid nails to fasten stiles to the wall. (We actually used finish nails fired at 45 degree angles (think of a criss-cross pattern). This worked, but liquid nails would have been better and most other online tutorials suggest liquid nails.
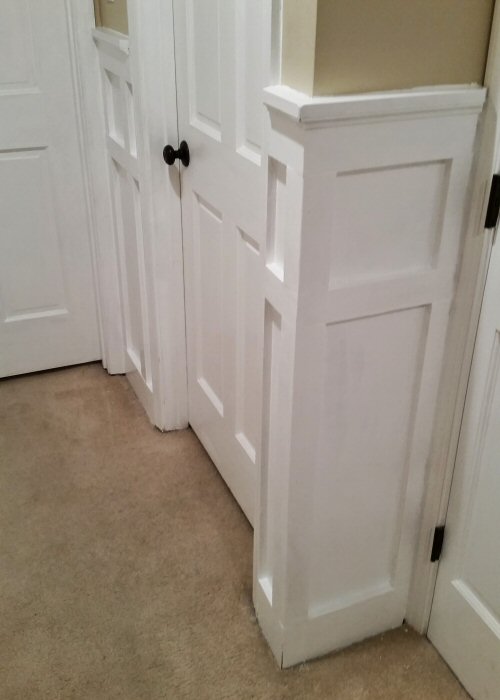
Inside Corners: Just like rails, inside corners require very little work. You will need to rip 3/4″ off of one of the stiles, and butt the other stile against the wall.
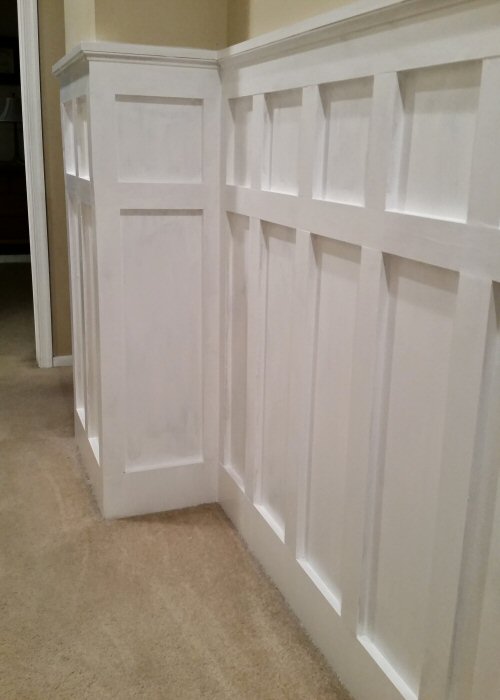
Outside Corners: Outside stiles are probably the trickiest part of the installation. You will need to rip two 1 x 3 boards each with a 45 degree angle, so that they can be joined to form the outer stile. We found that the easiest approach was to build the corner stile separately (by gluing and brad nailing the corner) and then installing the finished piece on the wall. Getting the corner stile square will be a challenge, and in our installation this required a lot of sanding.
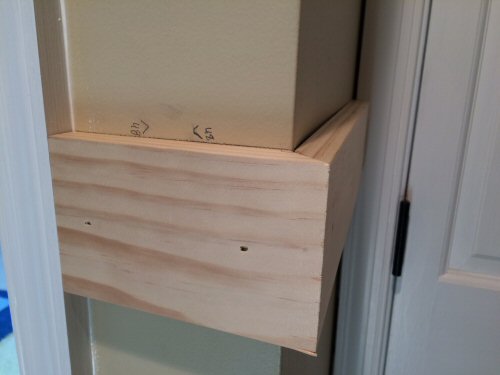
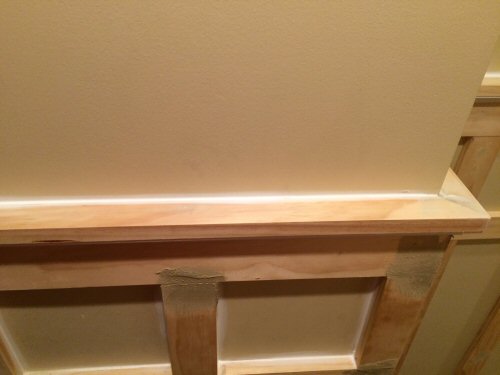
Step 6: Plan, Measure, and Install the Cap
We used 1 x 2 installed horizontally for the cap.
Fastening: We fastened the 1 x 2 downwards into the top rail using 2″ finish nails.
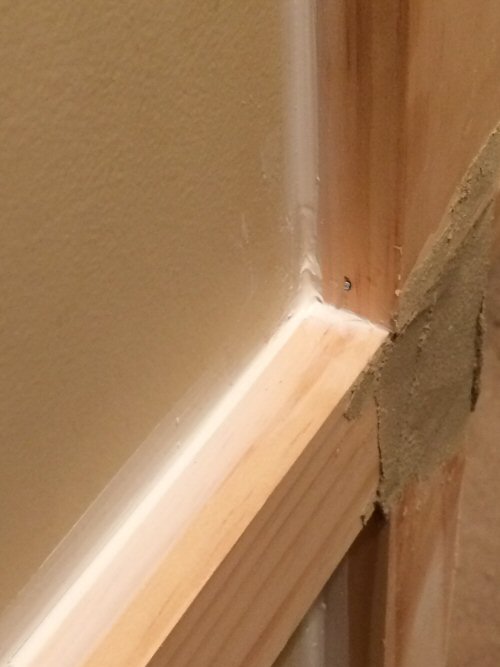
Inside Corners: Since the cap rail inside corners will be exposed, they should be cut and joined at 45 degrees.
Outside Corners: Just like inside corners, the outside corners should be cut and joined at 45 degrees.
Approaching Moulding: Since the 1 x 2 will be stick out further than mouldings at doors, we cut a 45 degree beveled return to merge the top rail with the door moulding.
Step 7: Plan, Measure, and Install the Inverted Quarter Round
We installed an inverted quarter round to add some visual interest between the cap and the top rail. (Unfortunately, I didn’t snap a picture of that… but it’s a pretty simple addition and you can see the inverted quarter round in the final shots at the end of this post.)
Fastening and Filling: We fastened the quarter round using small brad nails. Then we filled them with wood putty.
Step 8: Caulk Seams Between Boards & Drywall
Use painter’s caulk between any wood seams and drywall. We recommend *not* caulking wood-to-wood joints. Instead, use wood putty, per Step 9.
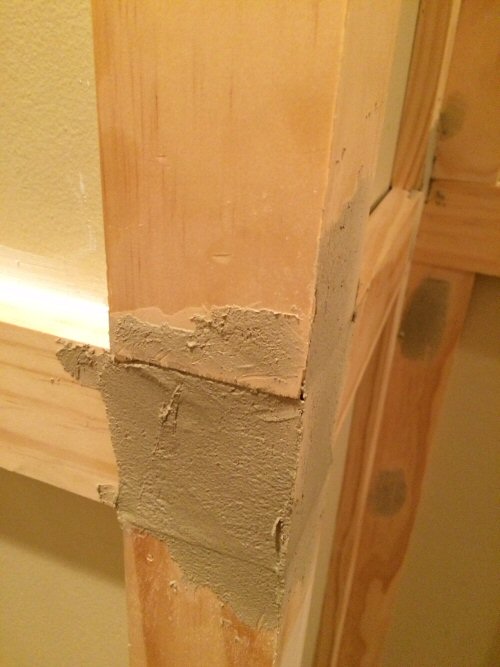
Step 9: Wood Putty All Joints
Apply wood putty to all wood joints and to fill all nail holes. You may have to apply two coats, possibly sanding between coats, depending on the amount of variance you have between your wood joints. The picture below shows a particular challenging joint that required three rounds of putty.
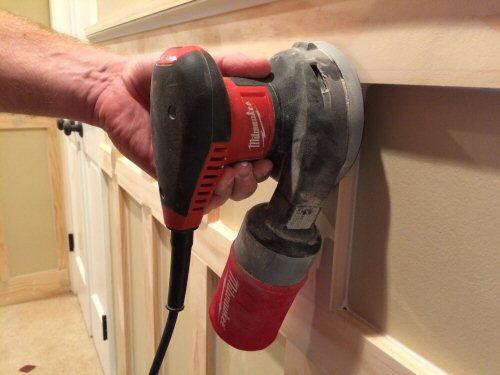
Step 10: Sand, Sand, and Sand
We used a Milwaukee random orbit sander for major areas of unevenness. This occurred primarily at joints between the wood boards and existing door mouldings. Sanding required several passes as we worked the wood into a tight joint with the nearby moulding. We used 80, 150, and 220 grit paper in succession.
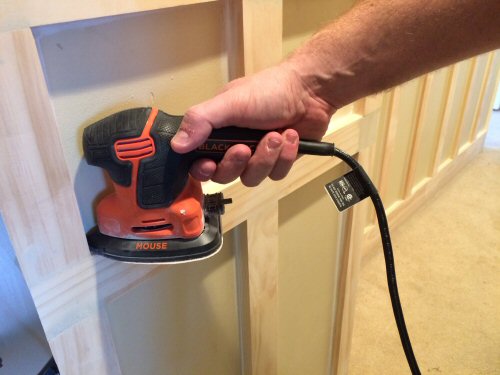
For areas where the random orbit sander wouldn’t fit, we used Black and Decker’s Mouse Sander, which really came in handy for hard-to-work spots. The random orbit sander moves a lot more dust, but it simply can’t fit in tight corners.
Tip: Don’t skimp on the filling and sanding. Paint will make flaws all the more obvious if you don’t get everything smooth and uniform first.

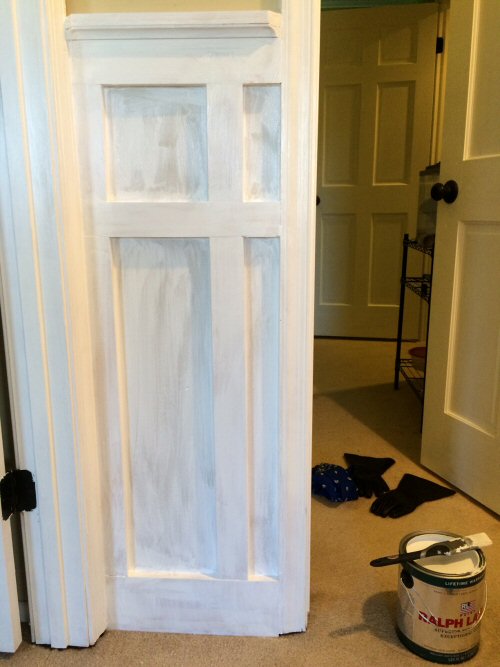
Step 11: Prime & Paint
The one thing we would have changed in our approach to this project, would have been painting behind the board and batten before we started the project. That would have allowed us to roll behind all the rails and stiles and would have made the job of painting easier. As it is, most everything has to be brushed or rolled with a mini-roller. We chose Ralph Lauren’s primer+paint. It worked great on the wood elements, but actually struggled to cover the existing Ralph Lauren tan on the walls.
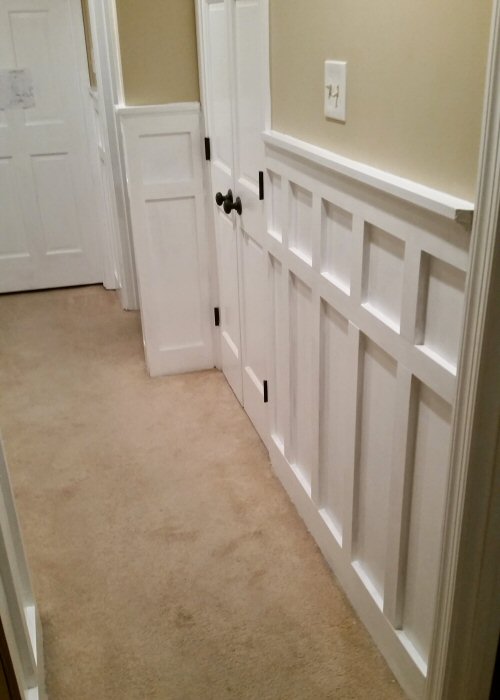
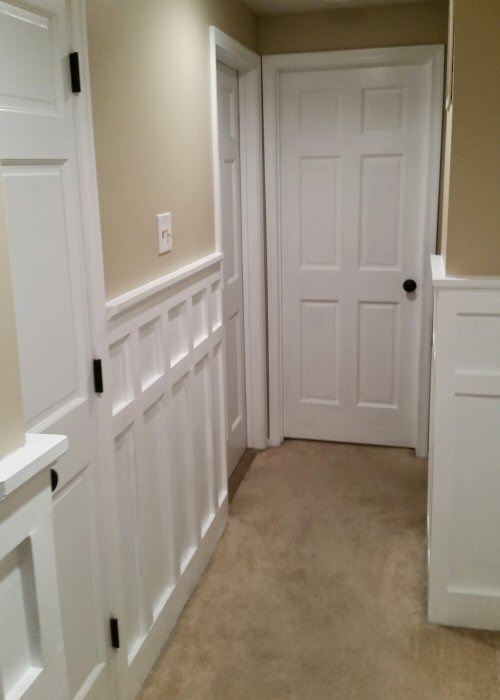
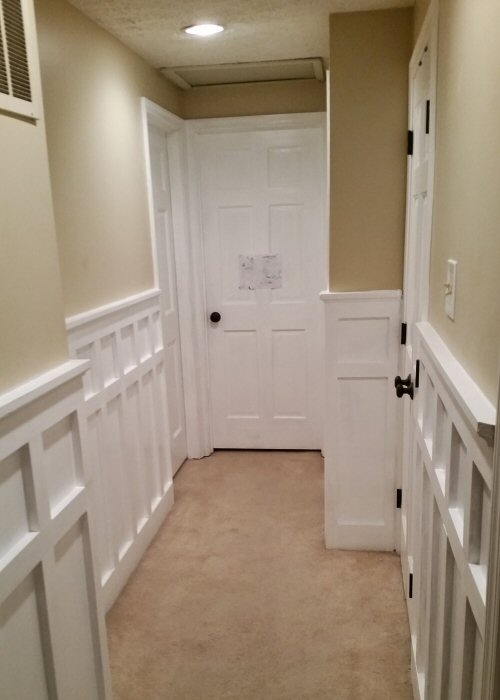
Finished Square & Rectangle Board and Batten Pictures!
We’re really happy with how the board and batten turned out! Thanks for reading!

So, where might one get a Zenith TrimPuller? I’ve searched high and low and it doesn’t appear to be available from any online retailer that I can find.
Zenith reached out to us in November with the product. I think at that point they were in a prototyping mode on the handle and were still working out some of the materials. I had thought they would be in stores by now but it looks like not. I will add another comment here when I start seeing them in stores. I really liked the trim puller – made the task easier.
Hi, really nice job! How do you decide the width between the verticle stiles? Is there a max or minimum spacing rule or is it just a visual choice?
Thanks
Here is more info about Trim Puller: http://trimpuller.org/
What a difference! I have thought about doing this in my hallway…quite a transformation!
Thanks!
That is SUCH a great feature to add to your hallway! Love the step by step tutorial!
Looks great! What a huge difference 🙂
Great post! I really needed this as I have plans!!
Love it! I have wanted board and batten for forever! But now our house is so open (which is awesome!) that there aren’t really enough walls anywhere for it to make sense! But I’m still going to try to make it work somewhere cuz I love the look. Thanks for the awesome tutorial!
Looks great done in a bathhroom
Looks beautiful! I’ll definitely be following this when we finally get to redoing our dining room!
This looks awesome! Thanks for the advice.
Looks like you can purchase a Trim Puller on the site now.. TrimPuller.com
Looks great and thanks for the thorough DIY instructions. I’m considering doing this in my dining room, which I already have hardwood flooring. However, eventually I’ll be taking that flooring up and replacing the whole downstairs with a different type of hardwood.
My question is, would it be counterproductive to put this board and Batten up now? Or, could I put it up and still be able to have new hardwood flooring installed without ruining the wainscoting?
I’ve done some wainscoting for a children’s bedroom in a house I was staging for a listing of mine and a lot of prospective buyers like the idea of wainscoting with wallpaper. But just with the white painting looks very polished. Congrats.
Love this. I am going to try for my hallways and a staircase between the 2. Your instructions are great but I get stuck on stile placement. Do I treat each wall as one and place stiles evenly based on that wall measurement or do I look at the entire wall/hallway as a whole? For example, the upstairs hall has a 4 foot wall that then bends for another 4 foot section, both end at doors. It is not 90 degrees, more like 145. So at that bend would I put a stile on both sides at the 145 corner or a stile at the first bend then in 12 inches another stile as a continuing wall? Does that make sense or does it really matter? I have never done anything to do with wood working before and I don’t want this to show that. Another scenario. When a wall has a door. If I start at one end, and it is a short wall, I box off 12 inches and then have 6 left, when I get to the wall on the other side of the door, do I then measure 6 inches to finish the box on the other side or start new from the door casing? thanks.
Addison, it is hard for me to picture, but my general rule is that I put stiles at every corner (both inner and outer) and I try to make the box sizes as close to identical across the room as possible. I do not put stiles next to the door frame as it serves as a visual placeholder for the stile anyway.
Perhaps to answer your question more directly – I also treat each wall area more or less on its own – you can see that in some of the pictures above where I’m dealing with a really small wall segment.
Awesome, been seeing a lot of stuff for sprucing up hallways lately. I think adding in this board and batten style really takes the cake. I do also like some of the other molding options out there, but this is truly unique. Thanks for the step by step instructions and all of the helpful pictures. I do think that hallway would really pop with some hardwood floors too. Would definitely like to see a comparison of the two.
Cheers!
Dan
Nice job! My only critique would be to use 1/2″ thick boards instead of 3/4″ OR use 1/2″ trim molding on the inside of every coffer. Also a more decorative chair rail and base molding would really embellish your wainscot.
Excellent directions!! Finished my project this weekend and it looks great! All I can say is that I greatly underestimated the time and effort needed for this project!
Wonderful post! What a awesome look. Thank you for sharing this DIY. I have learn a lot from you. Thanks for the advice.
Did you have smooth finish walls or did you smooth the texture out of the walls for this project?
Looks great!
What sheen of paint did you use on the battens and the wall behind the battens?
The white is all semi-gloss.
I agree with Mike, it makes it look like a project I can tackle.
Great post! Thank you for sharing! I decided to try it on a main TV wall in the mancave and it’s coming along really nicely. Thanks for the inspiration!
Hey thanks for letting us know! Hope it turns out awesome!
Looks really good…came across this on pinterest. One question, why wood putty vs using caulking or even spackle since it is all getting painted? I’ve used spackle with painted trim in the past and seems to work fine, so I was curious on your wood putty recommendation. Thanks!
What are the dimensions of the recessed panels and the height of the 1/3 rail that separates the top and bottom panels? Thanks!
Hi looks great. Could this be done up the stairs too?
Looks great. What is the thickness of the boards?
Nice idea. Thank you for sharing it.
It looks amazing. I would like to do this on my entire hallway going up the stairs to the second floor. I have a 4″step baseboard that is very thin at the top. Others have suggested inverting another molding above it to give you a base for your rails? I don’t want to remove it as it ties into the rest of the home. Thoughts?? I am also nervous about how to tie all of this in going up the stairs. I have searched so many sites but no one really discusses what the do’s and don’ts are for starting the pitch line up the stairs and how to tie in the stair bridge at the bottom.
So, your post inspired me to do this in my entry hall. I’m at my first outside corner and I’m wondering if the only way to cut the beveled edge along the batten pieces Is with a table saw. I have a mitre saw and a circular saw and I can’t see a way to do this with either of them.
Beautiful job, by the way!
Can’t wait to do my hallway this way. Next trying to figure out the stairway!
What if you have textured walls?
Why did you wait until everything was nailed and caulked to sand, prime and paint?
Wouldn’t it have been easier to at least sand and prime everything before hand?
WOW…little bit of trolling eh?
Just how many DIY’ers do you honestly think have the tools to do this on a bench? And unless an earth quake hits it, how is this going to come apart?
Boobs like us attempt to do the work ourselves because contractors like you overcharge people like us to do a simple job. We may not have the proper tools, or the knowledge to attach wood to a wall. But, we sure do save tons of money doing it ourselves, & realizing contractors like you are nothing more than thieves praying on others lack of skill.
Fred. Great job. I just remodeled my bathroom using your tutorial. Worked like a charm & looks beautiful. You saved me & many other people thousands of dollars by doing this tutorial. Screw JMP’s Contracting. I know I’ll never use this company for a damned thing. I guess this person doesn’t realize these types of negative/offensive comments will cause JMP to lose business. But then again… you have to consider the source of the comments.
Hi you did a great job with your project and inspired me to do mines. Thanks for the step by step!