
Using electric radiant floors as a supplemental heating source in a room has become very popular in the last few years. We’ve decided to install 1000 sq. ft. of electric radiant heat in the basement of our house to take the cold edge off the concrete slab, which otherwise stays a brisk 55 degrees all year round.
When installing electric heating wires on to a slab (or really any substrate), a professional installer (read: DIYer) has a vested interest in keeping the radiant heating wire and any mesh bonded tightly to the slab. A close, secure bond to the slab ensures:
- The heating wire maintains a very low profile, making it easier to cover with a thin layer of thinset or self-leveling mortar. This is advantagous because wires that stick up through the initial layer of thinself or self-leveler can be easily cut or knicked, rendering the entire heating mat useless. Also, since both SLM and thinset are expensive, the lower profile of the wire ensures a minimal amount of SLM/thinset is required, thus reducing overall cost.
- The wire doesn’t “come loose” while spreading thinset or SLM, which might move the wire in a way that compromises the installation. For instance, all electric radiant heating systems require that the heating wires never cross. Crossed wires create an unsafe condition and will likely cause the mats to overheat when they are operated. Gluing down the wires ensures they don’t move.
Most radiant heating wires are approximately 1/16″ – 3/32″ thick. Hot gluing the mats allows thinset or SLM used to cover the mats to be poured at a mere 1/8″ – 1/4″ thick.
Steps for Hot Gluing Radiant Heated Flooring Mats
 Lay out the mat according to your plan for the room. (All radiant heating flooring vendors will provide you a plan for how to lay out the radiant wire if you first give them a drawing of the room).
- Plug in and heat up an electric glue gun. You’ll want to use a “professional glue gun” that can take 1/2″ glue sticks. Hobby models that use 1/8″ sticks will go through glue sticks too quickly).
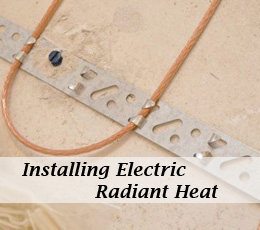
- Drop a pool of hot glue onto the slab under where the wire will go. Press the wire into the glue. If your slab is below-grade, it is probably 50-60 degrees. The hot glue will begin to freeze quickly, creating a tight grasp around the wire. (Note that in some places you may have to cut the radiant heating wire out of the mesh, as shown in the picture above).
- Move down the wire hot gluing the wire every 12-18″ or wherever the wire protrudes from the flat plain of the surface of the slab.
- After you finish the install, carefully recheck all the wire to ensure it is tightly bonded to the floor. Be careful walking with shoes on across the wire, as a stone or other object caught in the treads could nick the wire.

I’m preparing to install a electric heating system in my master bath on a cement slab. the mfg suggests putting down a insulating layer before putting down the heating elements.
@ Greg,
You probably don’t need the insulating barrier with this type of installation. The reason is based on thermal resistance. Radiant heat will travel the path of least resistance. If you have a thick concrete slab below, and a thin layer of self leveling mortar above the heating elements, the heat should travel through the thin layer more easily than the thicker layer.
Greg, There are differing opinions on the insulating layer. If you go with anything, you’re looking at something that will reflect the radiant heat.
I’ll make a few observations:
1) An insulating layer does not change the overall efficiency of the system. That is to say, any heat you put down into the slab eventually finds its way back up into the room. There is a small exception here for heat that leaks out the side of the slab, but in general, this is minimal.
2) An insulating layer DOES make the floor heat up quicker because you are essentially bouncing the heat from the bottom of the floor up to the room without waiting for the slab to heat up to achieve the same thing. So, in some sense, a floor with an insulating membrane might heat up in 10 minutes, where one without might heat up in 20 minutes.
There is a potential draw back of an insulating layer: you must get it fastened VERY tightly the slab and it must be easy to fasten the wire and the next layer of substrate to the insulating membrane. The vendor that I worked with reported that some folks had problems with this type of installation due to the bond between the insulating layer and the slab. If you don’t get a good bond, you rish the ultimate surface of the tile slowly cracking.
Let me add one more thing here. Realize that not all slabs are perfectly flat (they will vary as much as 1/4″ over a large pour). You must ensure that your insulating membrane can handle any imperfections in the floor; because otherwise, it will delaminate and cause trouble.
Best of luck!
Not to complicate matters any more, but the whole argument about insulation under radiant heat has and still is a very hot topic in the construction industry. In fact, there are some people that believe you can’t really ‘reflect’ or change the direction of radiant with insulation. I’m not choosing sides…I actually still don’t really think I’ve come to a conclusion. What I do know is the law of thermo dynamics tells us the heat will go where the path of least resistance is. This is certainly an issue that will play out for years to come I think.
I thought the second law of thermodynamics was “heat travels from a warm place to a cold space”. The higher the temperature difference is the faster the heat will travel. ie. a 50 to 55 degree cold basement floor verses 68 degree room temperature.
Thanks for the great tips, here’s what I got done this weekend!
http://foresthall.blogspot.com/2008/12/making-some-progress.html
Would this system work for snow and Ice removable outside? If it will, please
send all information that wll be needed. This will be needed before October. Thank you for all information and help you can give.
Sam
Sam, no this wouldn’t work for that. You’ll need to install heated plumbing… do a google search and you should be able to find some info.
Where do you get the heating wires? What kind of wire is it and Where do you buy it?
How do you connect it to the power source?
David – there are a lot of options for radiant heating wire:
WarmlyYours
ThermoTile
WarmZone
more… just google and you’ll find a ton.
We used ThermoTile.
I have a 250 sq. ft. room with a concrete floor. I would like to raise the floor about 4″ to eliminate a step. What is the maximum depth of concrete on TOP of an electric wire system? I guess I’ll have to pour the filler, let it cure and then lay the wire and pour again over the top. Correct?
will this post be referenced/updated when you get to the new post about putting radiant flooring in your basement?
Summer is a great time to think about floor heat. Any time BEFORE you install your tile. When Winter comes ( and it will ) you will be glad you thought ahead.
Oops. I did not realize that I needed to install a floor sensor for the sun touch radiant flooring. So, I am wondering what my options might be. I have a sun sys pro thermostat. I saw the idea of having a room sensor. Can I use the floor sensor for that function, if positioned correctly?
Always install two in cane one fails.