
Drip… Drip… Drip… It really can drive you crazy!
Fixing a leaky kitchen faucet can seem like a big job, but even if you are not much of a plumber, there are some simple things you can try before calling the cavalry. Replacing a faucet can cost upwards of $250, and a simple repair might be all that’s needed to return you faucet to like-new condition.
The most common cause for small leaks is mineral deposits building up over time inside the faucet housing. A simple cleaning is the right fix. This post shares the steps to disassemble a kitchen faucet, give it a good cleaning, and put it back together. We’ve got a Delta brand kitchen faucet from about 6 years ago for the instructions, but these same steps with a few variations work on just about any modern faucet.
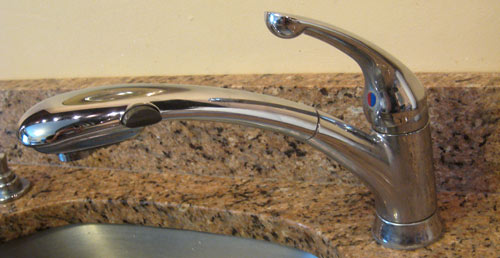
Steps to Fix a Leaky Faucet
Step 1: Shut off the water supply; drain excess water from the lines
Start by shutting off the water supply and turning on the faucet to drain any excess water from the lines.
Step 2: Find and remove the set screw
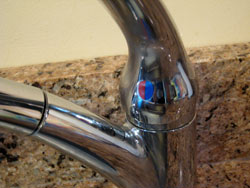
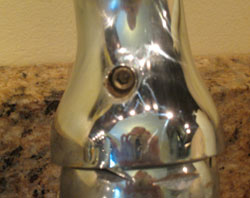
Delta hides a little set screw behind the blue/red button on the lever handle. Gently pull off the button with a small screwdriver, and remove the set screw with an Allen wrench. The handle lifts up and off.
Step 3: Remove the Chrome Handle
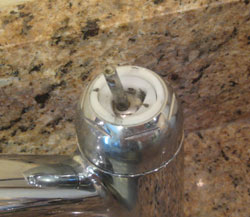
See that? That’s called a V-Ring, and the stick poking through is part of the valve assembly. All of this is held in place by the chrome cap with the small grooves around the perimeter. Use a large wrench or pliers to remove the cap- preferably something without grooves (aka smooth). Try not to damage or scuff the cap.
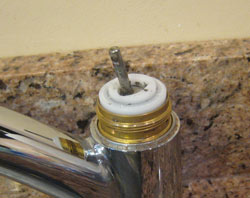
Step 4: Remove Inner Components
Pull up on the V-Ring, and it will lift straight out. Check out the notches on the sides for alignment. The ball valve also lifts straight out, and has a small knob used to align the ball valve.
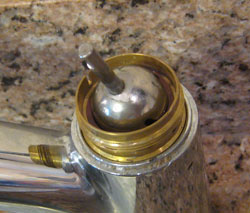
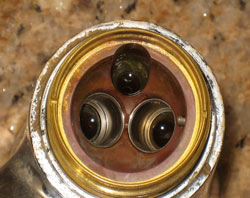
Step 5: Remove the rubber seals and springs
Beneath the V-Ring and ball valve are three holes, two of which are occupied by small springs and rubber seals. Hot and cold water enter the faucet through the left and right holes. The third hole leads to the spout. Using a small screwdriver, gently remove the rubber seals and springs behind them.
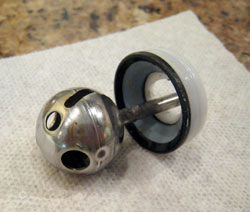
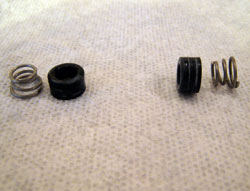
Step 6: Scrub all components. Replace components that are too worn
Take all the parts and scrub them in warm water. Remove any build-up and water deposits. Be sure to check around the rubber seals, and both sides of the V-Ring. Clean up the hub assembly (rest of the faucet) including the cap threads. Sometimes it’s necessary to replace the rubber seals and springs. Examine the ball valve for any defects too. Replacement parts can be found at most Big-Box stores.
Step 7: Reassemble inner components. Take care on alignment
Begin reassembling the faucet by working in reverse order. Make sure to align the long hole in the ball valve with the small knob. Likewise, align the V-Ring with the small notch.
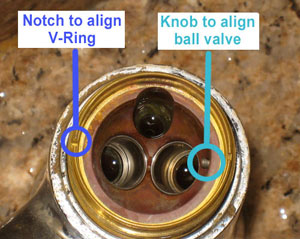
Step 8: Reassemble outer components
Finish assembling your faucet and turn on the water. Presto! Our faucet is working, and hopefully yours is too.


Wouldn’t it just make more sense to replace the parts while you are in there? Even if its just the rubber bits (which ARE going to wear). Sure, it costs a few bucks (less than $10 for most faucets), but how much is the time you spend disassembling and reassembling the faucet worth?
Some kits even have new balls for only a few bucks more.
Hey Joe, Good thoughts but after doing it once, this is a 15 minute project. I’d rather clean things up than automatically replace em with toilets being the exception. When I work on a toilet, I usually spring for a new set of bolts / rubber washers every time.
This is a great article to bookmark for future reference!
Excellent directions overall but I found it helpful to center the spring and seal around my Allen wrench, and use the Allen wrench to guide them back into position.
Incidentally do you know how to recenter it so that it closes at 90 degrees. My faucet closes at about 100 degrees.
Sincerely yours,
Michael
re: Joe vs. Ethan opinions above
All of my 15 minute projects seem to end up taking hours and a few trips to a store, so I’d probably side with Joe on this. ( no offense Ethan- really appreciate all of the work all of you put in to teach us and save us money)
Do you have any How-to article about replacing a faucet?
Hi Roberto, We don’t have anything for installing a faucet right now, but I’ll add that to the list. Thanks for stopping by!
Maybe I can do it for you. I bought a new faucet kit and will attempt to install it soon. I’ll take pictures as I go along and try to write something up.
my problem is the screw that goes into the front….my handle is all loose and wiggly..I cannot find a screw set or screw that goes into the very front…to stabilize the knob that controls the water…any suggestions?
Great idea…ours just started a little leak. We’ll have to take a look at it this weekend. Will this also help with slow turn off? The water continues to flow (slowly) after we have turned it off for a short period before stopping.
ok fine, 10 minutes and my circa 1985 delta faucet works like new! it is still a current model and during my kitchen remodel it was not something i wanted to replace. i like the style and none of the new reasonably priced ones were made in USA. this one is.
this article recently came in an email during this project. talk about timing! i had just finished completely redoing the plumbing, both copper and pvc, and just wasn’t going to reinstall a leaky faucet.
thanks OPC!
by the way, NONE of the parts were worn at all. turns out the chrome cap was loose, which is why it was leaking in the first place.
I have the same faucet, but with brushed nickel finish. The hose to the handle is leaking. Can I buy just that part and where? Do you know model ID info?
Thank you so much for this instruction! I went to hardware , got Allen wrenches , came home, took me a total of 20 minutes to finish the job! Soaked everything in vinegar to scrub off corrosion from hard water. Re assembly was in a jiffy and no leaks, Pretty good for a femme huh? Only problem was little red & blue logo covering the allen screw was brittle and can’t be used again Think I’ll e mail the Delta company and see if they can send me another one. You’re a real winner .
I have a single handle delta kitchen faucet. The handle is getting very loose, nothing is leaking. Feels like it may snap off! The faucet is probably 3 years old. Should I take off the handle and replace the valve?
Thanks for the information about the screw set hiding behind the logo. I should have figured that out, but I didn’t. I had the same problem as a few other commentors: the faucet wasn’t leaking but the handle was loose. Tightening the screw set behind the logo with an Allen wrench did the trick.
Thanks – good info. I purchased the Delta repair kit part RP3614-3 at Home Depot for $12.00 it has all the parts but the ball. Took about 20 minutes and no leaks and now the faucet handle moves with one finger (hand pressure required before).
whats the name of that faucet with that blue and red mark . Mines leak when I pull it out to spray . i cant find it any where
This is a great article How to Repair Leaky Kitchen Faucet, thanks a lot Ethan for sharing the valuable information.
I personally like the steps you explain it is very simple to understand and easy to repair the kitchen faucet.
Thank you so much once again.
Does it apply to all faucet models?