My vacuum cleaner broke a little while ago. And the evidence was beginning to show. It’s not like our house had slipped into the hazmat category, but it was time to fix the vacuum or replace it. FYI, I have a Hoover Savvy Vacuum (model number U8174900).
Required Materials
For this project, you’ll need a screw driver, and new belt. Amazon sells the Hoover Savvy Belt for $5.89. I recommend changing the HEPA Filter too. Amazon also sells the HEPA filter for $12.99. This is a great deal as these filters usually run about $30.
How to Replacing a Hoover Vacuum Timing Belt
There’s only a short list of vacuum problems I am capable of fixing. Fortunately, replacing the timing belt is one of them. This seems like it would be included in the manual, especially because they recommend replacing the belt every 3 – 6 months, but it isn’t. Take care when removing screws. My vacuum is plastic and a few screw housings have broken over time.
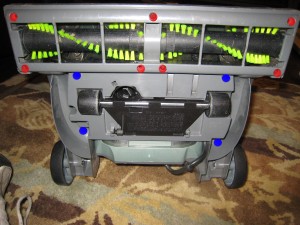
Step 1: Several screws secure the agitator brush in place. Remove these screws and the bottom plate. These are marked in the picture with red circles.
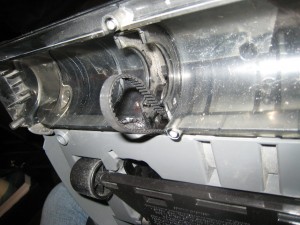
Step 2: The agitator brush will slide out. Observe how the brush was housed. Normally the timing belt helps keep it in  place. Locate the broken timing belt and remove that too.
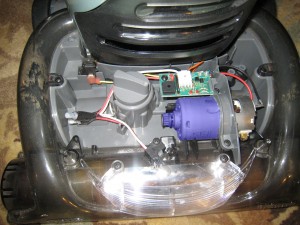
Step 3: Next, we need to remove the cover on the opposite side (that goes over the height adjustment knob). There are 5 screws to remove. Hoover placed 4 screws on the underside (marked in blue) and the last screw underneath the red Hoover emblem on the top side.
Step 4: Feed the new timing belt through the gap and around the cog that drives the agitator brush (highlighted in blue).
Step 5: Put the agitator brush through the remaining loop. Make  sure the belt sits on the grooves/teeth in the brush, and push the brush back into place. Put all screws back into their original position.
New HEPA Filter
We’ve had our vacuum over two years and haven’t replaced the HEPA filter yet. I thought it was probably overdue. All I had to do was remove the waste canister and pull out the filter. The plastic top and bottom snap off. Easy as pie.
___
What do you think? Ever needed to work on a vacuum?


Thank-you for instructions on how to install timing belt on hoover vacuum. We’re so thankful we found you!!!
@Natalie, I’m so glad you found it useful! Is your vacuum working again?
Thank you so much! My husband told me to search Google for how to instructions and I didn’t think it would be so easy. I think your site was the second one I looked at. I am so glad you explained the screw on the top I was wondering why the thing wasn’t coming apart. I now don’t have to load up the vacuum and the kids to get it fixed. I can just wait for the part to come in and do it myself. Thank you again!
Squeaky
Thank you so much for the easy instructions. After searching the hoover site and several others we were under the impression that we would have to take it in to be fixed. We are so appreciative for your very easy instructions…seriously who would have thought to look under the Hoover sticker? Anyway, THANKS AGAIN!
Hi
Does anyone know how to take apart a Hoover Windtunnel 2 in order to replace the agitator belt – I am about to break apart some palstic housing in desperation!!!!!!
Thank you, Thank you, Thank you!!! You just saved me a service call and about $75!! I love my Savvy and haven’t used it in about three months because of the broken “lifetime” (ha!) belt. It’s fixed now, thanks to you. Only took about 15 minutes. You rock!
Don’t know how I would have fixed my vacuum without this site. LOVE the photographs. Thank you!!!
I think I <3 you a little bit. This allowed me to fix my piece of junk within minutes. Too bad I didn’t find you about an hour (and many curse words) earlier.
You rock!!!
One question. When putting the belt back on does it lay on the metal spool or around it.
Thanks
Ethan — thank God for your post! I would never have figured out how to replace the timing belt without your helpful, step-by-step instructions — like the hidden screw under the red Hoover decal (thanks Hoover!).
I’m back in business now thanks to your help!
Thank God for this information, we would NEVER have been able to get this
belt replaced. Book that comes with vacuum is useless. It tells you to take it to
a dealer – the nearest one to us is 60 miles away.
thanks so much. i was close to throwing the vac. against the wall in frustration before i found your easy to understand instructions. you rule
Thanks A MILLION for your post on replacing this belt! You saved us from frustration and like the other folks said, the Savvy was up and running in 15 minutes thanks to you. I found your info just in time before my husband almost broke the top off b/c couldn’t find that last 5th screw under the emblem! Your great!
Thanks for the informative post. I ordered the belt from a repair center; thinking it was easy to replace then I removed screw after screw and could not get to the drive. I had planned my tomorrow to go back to the repair shop and pay more money to them to replace the belt. The secrect 5th screw under the hoover emblem solved that problem and if it wasn’t for your pictures I would have destroyed the little wheel thing (I tried pulling it out). But the belt lies underneath the thing. ANYWAY…………..thanks it’s back to normal.
um, the vacuum repair place said the whole belt needed to go atop the pulley (some guy called it a spool above i think). you seem to be saying to just drage the belt under the pulley…how would the pulley be of any use then. i have struggled mightely to get the whole belt over the pulley?
For heaven’s sake it’s really loud with the shop vac on.
Thanks for posting belt replacement instructions… I was starting to lose credibility with wife 😉 I like to think I’m pretty savvy (!) but no way would I have found the secret emblem screw… By the way don’t forget to support your local sew & vac stores, I found the right belt for $5 right in town.
Glad people are still finding this useful! Great point Jeffrey about buying local. At least the Amazon link shows you what you’re looking for.