Editors Note: This article originally published in July of 2009.
Installing a new electric water heater (or replacing an old one) may seem like a task reserved for a seasoned plumber…
But for the motivated do-it-yourselfer, this project is actually relatively simple and can be accomplished in less than half a day with tools and materials available at the local big box. Not only will you feel great about doing it yourself, you’ll save about $150-200 on installation.
If you’re about to tackle this project yourself, read on for the complete list of what you’ll need and the instructions to get it done.
(A quick disclaimer: we’re not professional plumbers. Use this advice at your own risk. Your jurisdiction may require a licensed plumber to perform this work. Check local regulations before starting the project. Follow all instructions with the new heater).
Tools & Materials Required to Replace a Water Heater
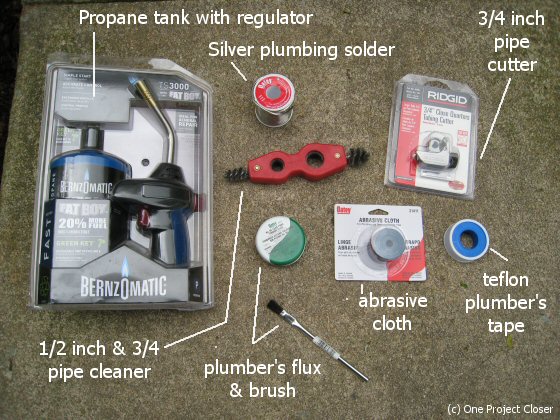
These tools are basically the same as those required for most copper plumbing jobs, including replacing a copper valve (which we wrote about last week).

Tools
- Propane torch with regulator & sparker
- Low profile 3/4-inch pipe cutter
- Fiberglass heat-stop pad (-not shown, but useful for blocking heat in tight spaces-)
- 3/4-inch pipe cleaner
- Abrasive plumber’s cloth
Materials
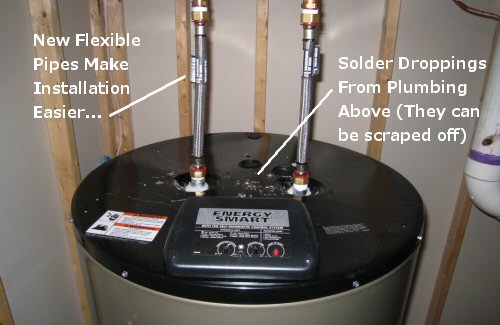
- New 3/4″ threaded, flexible water heater connectors (-shown in the pictures below-)
- Appropriate threaded-to-sweated connectors (3/4″ threaded to 3/4″ sleeve-size)
- Silver solder
- Plumber’s flux (& disposable brush)
- Teflon plumber’s tape.
Steps to Replace an Electric Water Heater
Step 1: Turn off the breaker or remove the fuse for the water heater.
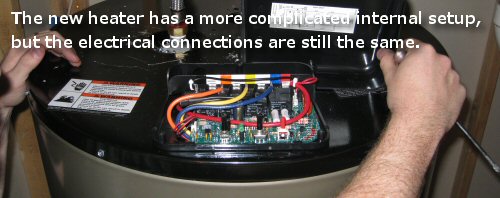
Step 2: Disconnect the wiring from the water heater. Usually, romex enters the heater and is concealed behind a plate. The picture below shows the plate removed.

Step 3: Close the valve close to the water heater on the cold line. If there’s no valve or the valve is broken, you can turn off the main water to the house (either inside, or at the street, as a last resort). You should also install a new valve on the cold line with the new heater.

Step 4: Drain the water heater. You can connect a standard garden hose to most heaters and drain into a sump or outside.

Step 5: Unsolder or cut the nearest copper joints on the hot and cold pipes. You can find instructions for soldering a copper pipe at that link. To unsolder, simply heat up the joint until the solder flexes, and then pull the pipes apart. We prefer the low-profile cutter to cut away the pipes…

Step 6: Unsolder, cut, or unscrew the copper pipe from the overflow valve (pictured below)…

Step 7: At this step, the water heater should be completely disconnected from the existing plumbing and electrical infrastructure. Remove the old water heater. Now it’s time to get ready for the new heater!
Step 8: Place the new heater in the old heater’s spot. Make sure the hot and cold lines are aligned with the existing plumbing.
Step 9: Measure and cut new pipes to plumb the new heater in place. Flexible hoses will give you some leeway here. Make sure you consider the threads when measuring the length. Dry fit all components first!.
Step 10: Solder all connections after successful dry fitting. Follow the instructions in these two articles for installing new copper plumbing (how to sweat solder copper pipes) (how to replace a copper pipe valve).
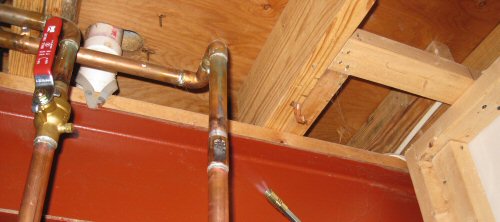
Here’s a shot of the copper pipes during soldering (you can see we decided to install a new ball valve joint on the cold water line to replace the old one).

Step 11: Connect the flexible pipes to the new copper and to the heater. Notice that we used the Teflon Plumber’s Tape to make the final connections from the flexible hoses to the water heater and the pipes above.

Step 12: Reinstall the copper pipe on the pressure release valve. If possible, avoid soldering near the water heater. If it is impossible to avoid close-proximity soldering, be sure to use a fireproof pad as a backstop for the flame.

Step 13: Connect the wiring the the heater according to the manufacturer’s instructions. Some fancier heaters have settings that can be adjusted to achieve maximum energy savings and comfort for your home. If you don’t have the instructions or are looking for some generic instructions, our friends over EZ DIY Electricity have a great tutorial for wiring an electric water heater.

Step 14: Open the cold water valve (and all valves) and allow the tank to fill. Check for leaks.
IMPORTANT! Make sure the tank is completely full before turning on the power. Starting the heater dry can seriously damage the heater and potentially render it unusable.
Step 15: Install pipe insulation on the hot water pipes close to the heater. 3/4″ pipe insulation usually ships with new water heaters, and can be purchased at the local home improvement store.
Step 16: Flip the breaker to begin heating water. You’re done!
What do you think? Got a question, leave it in the comments below!


Great tutorial Fred! I’ve never seen the flexible hose connections before but that looks like a great time saver! Makes me wonder though if there are any code issues with it? Very cool idea at any rate.
I know you said it above but it bears reminding your readers. BE SURE THE TANK IS FULL before you turn the power on. You can severely damage the heater if you turn on the elements before the tank is filled with water.
Todd, believe the flexible pipes meet code (they are steel reinforced, and marketed at HD and Lowes with the water heaters… I didn’t check)…
As for the warning, it’s a good one so I added it to the article. Thanks!
You should add to your tool list plumbers pliers or adjustable wrench to tighten fittings that are threaded and also a pair of wire strippers.
Allen, thanks for the tip!
Very great Instructions and very detailed pictures. id like to add tho before u drain water heater make sure u turn on a hot wateer facuet or u can damage ur pipes from it creating a vacuum. especially on older homes with older piping. and to tell if the water heater is full to turn on power u can also turn on hot water faucet and once water comes out. it is full.
When I did my first hot water heater I used a propane torch. My solder joints were very poor. I enlisted the help of a plumber friend who told me to toss the propane can and instead use a can of MAP gas.
The MAP gas burns much hotter and made sweating pipes a breeze compared to trying to do it with propane.
Just FYI it’s MAPP gas, and if you’re doing a lot of soldering, it’s a worthwhile upgrade. Otherwise, with propane you just need to give it a little more time. You can still get good joints with propane.
Thiking about moving electric water heater from kitchen to garage. How far does heater have tobe from circuit box. By code. Any help would be great. Live in NM
Depends on a lot of factors – including gauge and grade of cable being run between the breaker panel and the unit. You should get an electrician to give you an estimate for your particular situation.
I havea new electric hotwater heater my question is on the wTER HEATER THERE IS 2 WIRE black and red the feed wire 10/3 so my question is black to black and red to red so do i tried the white and ground together and pig tail yhem to green screw them to the top of the heater
thank you
I want to caveat this answer with you should definitely consult a licensed professional for any electrical work and you take this advice at your own risk. That said, you can probably wire nut off the white wire. The Red and Black wires should be 110v legs out of phase with one another (giving you 220 volts across them). Sounds like your water heater only requires 220 volts, not 220 and 110, which would require a white neutral wire which would allow 1 leg to be used. Do not wire the neutral (white) and ground (bare) wires together.
When installing a new electric water heater, does the high-density foam insulating pad go inside the drip pan or underneath it?
I have never installed the type of pad you describe and I’m not sure it’s really necessary with new water heaters. The heater is pretty well insulated (it has an outer shell and an inner shell with insulation already installed). I would say skip any exterior foam insulating pad, but that’s just my $0.02.
I’d recommend everyone replace their traditional shut-off valve with a ball valve. They last much longer.
I’d also mention a few things in the update to this article. First is a drip pan. If you do not have one I would suggest installing one. Small leaks can be detected early with one of those inexpensive electronic water detectors in the pan instead of dripping on the floor, hidden, and rotting it.
There may also be code implications on the length and diameter of the pressure relief pipe.
Most new water heaters have what looks to be a color coded plastic plug inside the top threaded connection. As the manual that comes with the water heater will tell you, these are insulators, and you should not attempt to remove them. This is also why the braided flexible connection hoses are a good idea – you do NOT want to apply heat to the threaded connections at the top of the water heater and damage those plastic insulators. Sure, it is possible to solder it safely using heat sinks, but it is not worth the risk for a newbie. Grab a couple of those flexible braided hoses. Also, if you replace the hot water heater again, or if you already have braided hoses, I believe the recommendation is to replace them.
One other thing not mentioned is to check for and install a thermal expansion tank, and if you do not have one consider installing one. I believe it is code everywhere nowadays, and a great idea for prolonging the life of your water heater and other household plumbing. Basically, when water gets hot it expands. Since all of your faucets are closed and not leaking (I hope!), the pressure in your plumbing system builds up. These tanks have a membrane with pressurized air on one side of it and water on the other, and when the pressure slightly increases, it moves the membrane instead of adding pressure to the system. With too much pressure in your system, things like toilet valves, ice makers, washing machines, washing machine hoses, etc. tend to break. If your pressure relief valve is dripping, that is a sign of thermal expansion issues, and the expansion valve will get calcium deposits on it from the dripping, damaging it and its ability to protect you. You will need a water pressure gauge to install the expansion tank, as you need to inflate the bladder to the pressure of your system before installation (which you can do as a gas station if you do not have a pump or compressor).
I’d suggest purchasing and using a water pressure gauge regularly (and check washing machine/dishwasher hoses for bulges), like twice a year when checking your smoke detectors when the time changes in the spring and fall. Check the initial pressure, and leave the gauge pressurized for an hour without using any water. 80 PSI is the maximum you want to be at, 40 PSI at the minimum. If the reading creeps up check your expansion tank PSI, or in a worst case scenario, the pressure reducer that is (or should be) by your meter is broken or bypassing.
The last thing worth mentioning is maintenance. Water heaters could last a very long time if maintained. I drain and fill my tank twice a year (spring and fall). Before draining, turn off the electricity or gas to the heater, turn off the cold water valve on top of the tank, open a hot faucet somewhere, then drain as per the directions in the article. When drained I give it a couple of quick shots of cold water to further blast out any residual material in the bottom of the tank. Close the drain and turn on the cold supply, wait for the faucet that you left on to stop spitting air, keep it partially open until the rest of the tank is filled, then close your faucet and turn the gas/power back on to your tank.
Every couple of years, check the sacrificial anode rod (screwed into the top of the heater) after you drain the tank. A replacement aluminum rod will run you about $25 – check them out at a home improvement store to see what they look like, the diameter, etc. You will probably need to buy a socket to fit it (1-1/16″, 1/2″ drive), and you will need a 1/2″ breaker bar for leverage (these are tough to remove). If the rod in your heater is half or more gone, replace the rod. If your rod is worn, your heating elements and tank are the next things that will start degrading, which is likely why you are looking to replace your tank in the first place. Use Teflon tape or anti-seize lubricant when re-installing the rod.
Lots of great suggestions here. Good adds….
Thanks for bringing this one back. I believe I found OPC through a water heater story on another blog (cited below) so it comes full circle.
http://www.brooklynrowhouse.com/boiler_estimate
I’m also not certain about the flex hoses here in MN. I’ve never seen that done around here. Great article, though. You make it seem easy!
Reuben, I’ll bet they’re legit. Makes the install much quicker and from just a layman’s look at them, they seem exceptionally sturdy. Only issue might be if sediment were to build up in them more quickly – and that I can’t speak to.
Did you reinsulate the hot water pipe after the heater was installed?
What do you do with the old heater? Can that be brought to the dump? Or are you able to give that back to wherever the new one was bought?
Hey trebor,
We took the old one to the metal recycling center in our county. They were happy to take it.
My previous water (Reliance) was not installed with a copper release pipe. The valve just sat where it is untouched. The water heater lasted 14 years. Do I really need to add one on the replacement?
Al
how do the normal electrical supply looks like?
I have a electrical problem with my hot water heater. I have 120 voltage on both sides of my thermostat and heating element, but when I used my multimeter and touch the 2 screws I don’t get 240 so my water is not heating. Can anyone help me with this problem. Please email me at rrwood55@yahoo.com. I don’t have any money so I can’t get a electrician. Please help. I have replaced everything from the circuit breaker to the heating element and still can’t get hot water.
Thanks for the great tips ( and moneysavers) re: the need to fill the tank before powering on, and to check “full” by having the hot tap on.
Do you have to drill a hole in the floor with pipes to send water to the outside from the electric Water heater for drainage if it blows? Can using the drain pan with the long pipe from the downspout on the water heater to the drain pan under the tank work?
I think you can run it to a drain but you are not allowed to connect it to a long system of pipes (and I don’t think this is advisable). More than likely, that valve with never blow off over the life of the tank.
I run my house on Generator. Will an electric hot water heater work on this 5000 watt generator?
Depends on how big the water heater is… A water heater that is 30 amps on 120 would take 30×120=3600 watts. That’s probably in the safe range with the generator but you wouldn’t be able to run much more. Also you might want to check whether the generator is truly 5,000 watts or just 5,000 surge watts. You need to make sure the water heater is below whatever the constant run rate for the generator is. Just my $0.02. I’m not an electrician.
can i use cpvc pipe
hi , I have a os smith electric water heater that takes 208 v.my circuit is 220 v ,why is the heater 208 and not 220 ,will it matter if I hook it to a 220 v? 2 wire red and black ?