In almost every hardwood flooring job, you’ll be required to lay hardwoods under at least one side of a door. In many cases, the flooring that is being replaced is not as tall as the hardwoods that are being installed, and the door trim and stops will need to be cut to accommodate the width of the hardwood floors.
This article is part of our series on Hardwood Flooring Installation. We’re installing 1100 square feet of Brazilian Walnut flooring across the first floor of our house. If you’d like to follow along, subscribe via RSS or e-mail using the buttons at the right.
Determining Where to Stop the Hardwoods
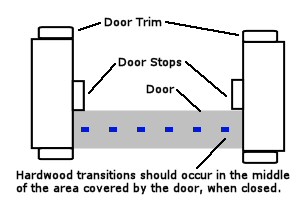
 If hardwoods are going to be laid in a room that transitions to another surface in an adjacent room separated by a door, the hardwood should stop half way under the door when the door is closed . This prevents a room from appearing to have another surface “creeping” under the door.
The picture at the right shows the proper hardwood transition location. You should consider any transition molding or other component that may be required to the new surface. For example, if you’re transitioning to ceramic tile, you may have to leave space for a rubber joint, a tile edge, or a T-molding made out of hardwood (the latter is a less optimal choice because it creates a tripping hazard).
Whether you’re going through the door completely or only part way through, you will need to address the door stops and trim, and potentially the jambs that make up the sides of the door frame. The goal is to make the wood fall underneath all of these components so the trim looks like it rests on top of the floor. This may require very precise cuts of the hardwood, and will likely require you to trim up the molding, stops, and jambs to fit the wood in.
How to Cut Door Trim for Hardwoods
Tools & materials required:
- Spare piece of hardwood
- Pencil
- Hand saw, jamb saw, or multi-tool such as the Rockwell Sonicrafter
- Elastomeric sealer (optional)
Step 1: Determine the height to cut the stop, molding, and jambs. This can be accomplished by setting a piece of hardwood on the subfloor next to each component and marking across the component with a pencil.
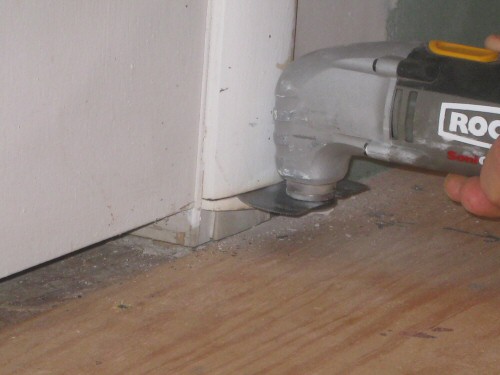
Step 2: Use a saw or multitool to cut the jambs, trim, and molding at the pencil marks. For this job we think the Sonicrafter is one of the best suited tools. It provides a very limited-vibration, accurate cut of the trim at the precise location required.

Extra Tip: Be careful not to cut the trim too high. Trim that floats above the floor just slightly will be imperceptible to you and visitors. Trim that is more than 1/16″ off the floor will have an obvious gap. While visitors may not notice it, you might! The goal is to have no gap between the wood and the trim.
Step 3: Measure and cut the hardwoods so that they fall underneath the stop and molding, and either butt up next to the jamb or go underneath it. We prefer to cut the jambs completely so that the wood can fall underneath them. Again, it is important to ensure you don’t cut too high to avoid a non-professional finish. This will likely require both rip and mitre cuts to get correct, and depending on board length may be more easily addressed with a jig saw than the combination of a mitre and table saw. We’ll cover using a jig saw, mitre saw, and table saw in a separate article.
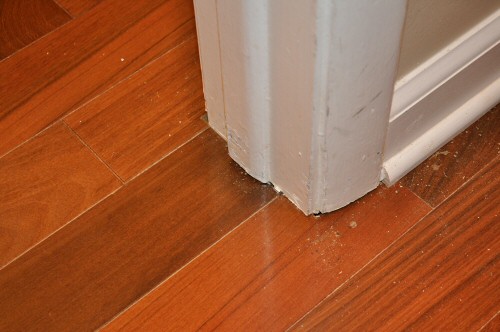
The door jambs and trim in this house are very old, beat up, and haven’t been painted for years… So this picture doesn’t look great. That said, you can see how the wood goes under the trim (and you can also see a slightly imperfect cut towards the back of the door that is visible and will need to be filled with a matching wood putty or caulk — a less desirable solution). We intend to replace all of the doors on this floor in the next 12 months.

Step 4: Carefully caulk or fill gaps, if desired. If you’ve cut the door jambs or stop slightly too high, you may be able to run a bead of elastomeric sealer between the wood and the jamb/stop/molding and obtain a very clean finish that hides the gaps without revealing the less-than-optimal carpentry. We’ll cover using caulk to hide other flaws in a future article.
Cutting Doors to Fit over Hardwoods
If you’ve raised the flooring level with you new hardwoods, you will likely need to cut the actual door. For wooden solid and hollow-core doors, this can be accomplished by either of the following methods:
- Use a table saw to rip-cut the bottom of the board. This will require two people and careful teamwork to slide the door through the table saw
- Use a circular saw to cut the door, clamping a piece of wood as a guide near the bottom of the door to keep the circular saw from swaying as you cut. (Clamping a guide board is better than simply marking and cutting, since circular saws are difficult to keep straight for finish work.
No matter which method you use, you’ll want a high-tooth-count furniture blade to make the cut. We used a new 10″ DeWALT 80-tooth blade on our table saw to make the cut, which produced a very clean, tight finish.
Also, instead of trying to measure the entire door, make sure to measure from the bottom hinge to the floor. You can then use the same reference point on the door. This is more accurate, as it removes any deviation that might be present between the top of the door and the top of the doorframe.
What do you think? What tips would you add for working around and through doorways?
P.S. Stop back this afternoon for the first “sneak peak” at a partially finished floor!


Fred,
Quick tip:
When cutting the door trim you can take a piece of scrap flooring, hold it in from of the trim, and let the saw blade sit on top of it while you cut. This helps keep the cut at the perfect height. Works great with a tool like you used, a handsaw, and even a door casing flush cut saw.
So I got this ingenious idea of installing my first floor at a 45 degree angle. After lots of cutting the floor is turning out pretty well. Do you have any ideas on a good way of transitioning the floor on a 45 to the patio french doors?
Todd, I mention marking the door using the scrap piece in the article. I have done as you suggested, and I find that unless you are using a flush-cut saw, you’ll likely tilt the saw unevenly sitting on top of the scrap. But, to each their own-I now prefer marking with the Sonicrafter, since the cap on the blade will force you to angle down instead of cutting horizontally (the alternative being that you’ll end up cutting higher than you should).
Hi,
I am installing engineered wood in my house and I am bit confused on how to install around the doors. All videos I am watching say cut under the door jambs/stops/moldings. I am scared to do so as I am thinking if I cut under the door jams – Isn’t it that the door jamb/frame will fall. what supports them. or are they supported by hooking to the wall/stud?
May be a silly question but really am looking for an answer.
I am going to start the flooring in 3 days. Have a hand saw to cut under the door frame/jamb – not sure if this even works. Have never used an electric jamb saw so am not comfortable. I have 7 doors that will need the cuts.
Thanks in advance.
Hi Ved,
I get the concern, but the jambs are indeed attached to studs that sit behind them and are not holding the door up by sitting on the floor. They are finish nailed to the studs that sit behind them. When you cut the jambs, you are not destabilizing the door at all.
You essentially want to mark and cut the door by laying a piece of engineered wood next to the door and cutting flush with the surface. Note that this is usually pretty tedious and after 7 doors you’ll be tired of it. Just be careful and take your time / work to get a tight cut. You can fill a very minor gap with caulk or drywall compound, sand and paint and it will be completely unnoticeable.
Hope this helps!
Hi Fred,
Thanks a lot for the quick response. Now, I can go and cut the door jambs without any fear. I somehow knew that it won’t be a easy job although the online videos were showing it a piece of cake. Fortunately I have enough time to work on this project.
Thanks again for the tips.
-Ved.
Can you tell me how you reversed tongue and groove direction through doorway transitions? I am not to sure where I should do this. Do I need to reverse direction in the whole other room, or just at the doorway? Thanks
You can reverse a groove by adding a spline (essentially an oval-shaped piece of wood that is a double-tongue.) There is no easy way to reverse a tongue, and you should not have to.
HOW DO I TRANSITION FROM HARDWOOD (3/4) TO LAMINATE ON TWO LAYERS OF UNDERLAY (LUAN) ?
Hello Fred,
I’m installing hardwood floors in two adjoining rooms, also I’m putting in new pre-hung doors do I put the floor down first and then put the doors on top of new floor?also do I run the floors in the same directions? Thank-you.
Thanks so much for your insightful instructions, tool suggestions and pictures! It has really been helpful for us. My question is, we will be installing Unfinished Red Oak flooring upstairs in place of the carpet. My husband and I have previously installed flooring, refinished wood flooring and installed tongue and groove ceilings. We are not experts, but feel we can tackle this project in our new home. That being said, while “scoping out” the upcoming project we are somewhat “mystified” as to how to lay the new 3/4 inch oak flooring next to long expanses of open staircase railings. In other words there is a open hallway section above 1 of 2 staircases with the “catwalk” area. The carpet butts up with a gold metal “shoe molding” for the carpet next to the 6 inch wide oak base upon which the spindles are. The plywood flooring is only about a 1/8 inch below this oak railing base; therefore the new flooring will obviously be much higher. Above the 2nd staircase in the back (weve removed the carpeted stairs) above the landing it is open to a 9ft expanse of the same oak base with the spindles; and of course the visible gold metal molding for the carpet. I thought maybe you might have experienced some installation like this. If so, what did you do; did you use a trim piece such as reducer next to the railing? I can send pictures if that would help. I have searched all over the internet and can not find any example or explanation of how to install flooring next to already installed railings. Thank you for your help!
I have a product you might be interested in that addresses this area. I ran into a situation when I removed my carpet and installed 3/8″ laminate floors. I had significant gaps under the door casings. I reset two doorways then realized I had 14 more and searched for some kind of fix but found none. Then I came up with the idea for Casing Kickers, which turned out to work pretty good. Check it out and see what you think.
We are continuing wood flooring into a room that previously had carpet. We laid the wood floor five years ago in our hallway and now want to continue with the wood floor in the same direction and into the other room. Do we install a horizontal strip of wood and continue the floor from there or do we just continue the floor matching the seams?
We are laying solid hardwood floors in an L-shaped hallway and would like to reverse the direction of the wood at the corner so the wood is running the long way in both sections of the hall. The wood flooring is tongue in groove. We would appreciate any suggestions for a corner treatment? Pictures would be wonderful!
Hi Fred 🙂
This is my first time installing hardwood floor. I purchased a new saw for the job and went a little crazy with it and now I’ve undercut my door jam much too high. Any suggestions on how to close the gap?
We are at this time, having wood floors installed AND I am totally disgusted! The installer has cut the door jam’s and casings way to high and in discussing this with him today, he tells me it has to be this way. None of this can be caulked as it will look horrible so now we have an extra expense of having someone come in and install new casings! Very hard these days to find anyone who does a good job