
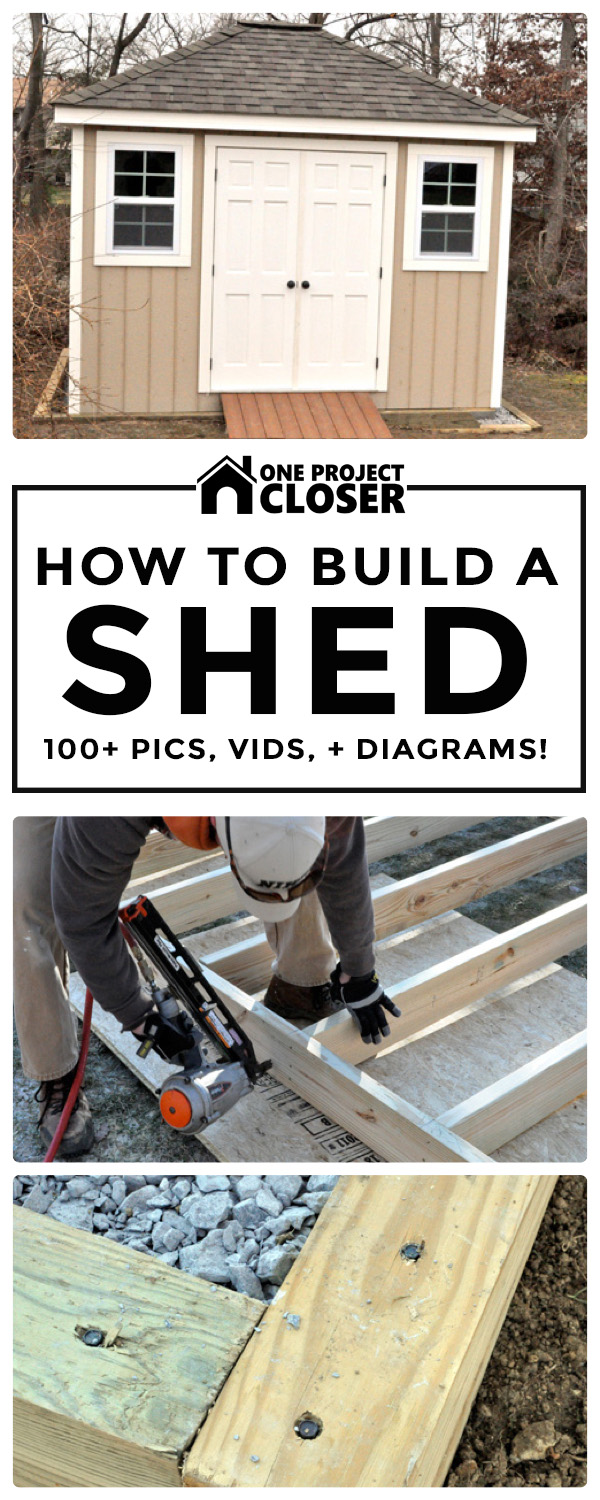
How to Build a Shed (with a Record 100+ Pics, Vids, and Diagrams!)
May 22, 2014 | by Ethan (email) |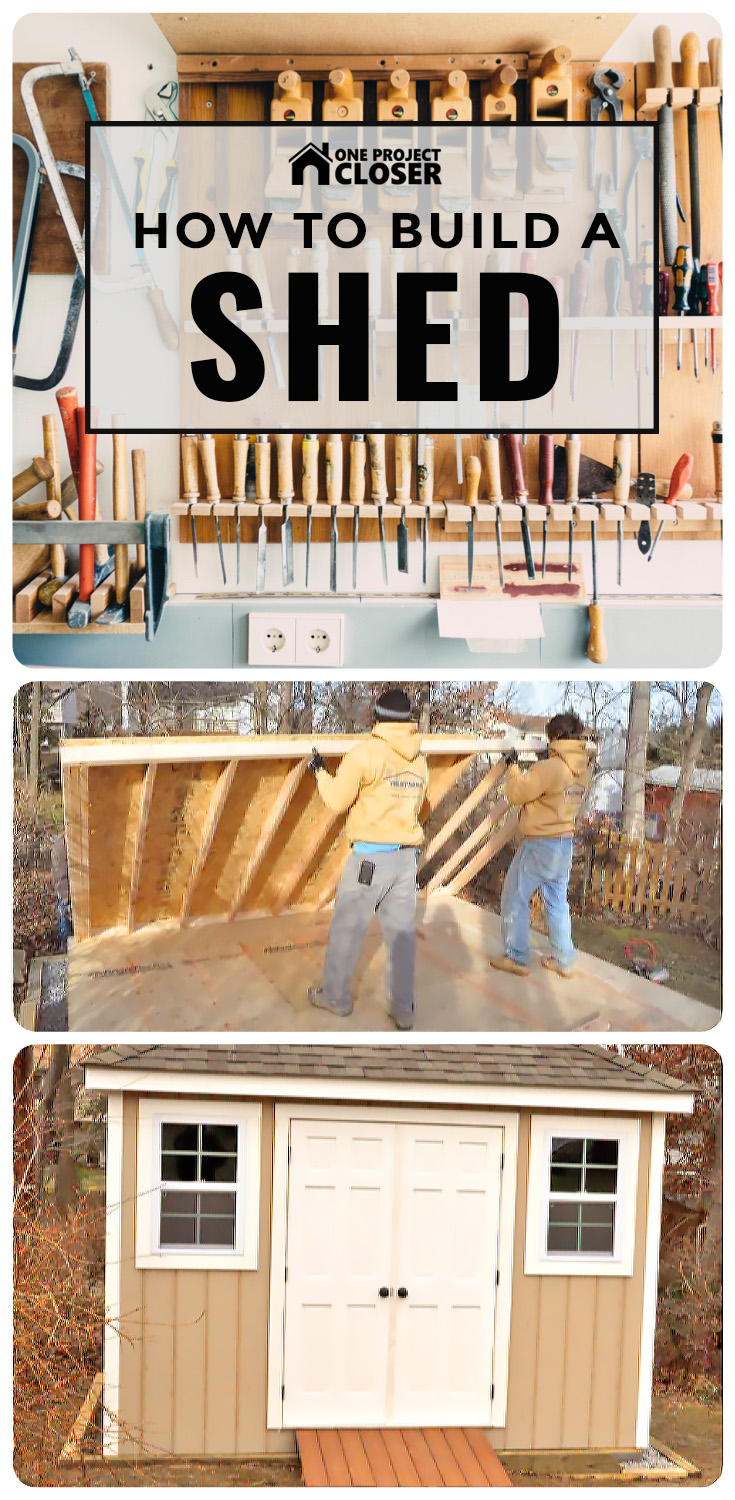
This article on How to Build a Shed is part of our library of DIY and expert Project Guides that share step-by-step explanations for a wide range of home improvement projects. As part of building this library, I follow expert contractors to the job site, documenting their steps, tips, techniques, and tools. We’re striving to be the best on the web! If you like what you read, please subscribe to our feed to keep up with all of the latest projects!
Most of last week, I followed expert general contractor and carpenter Steve Wartman and his crew as they built this great looking backyard shed. This article covers all of the details for building the shed’s foundation and subfloor, framing its walls, constructing a hip roof, installing a double door and windows, adding siding, laying shingle, and much more. Below the step-by-step instructions you’ll find a cost comparison for building vs. buying a shed, as well as additional resources for your own shed project.
If you’re looking for a contractor in the greater Baltimore area, I suggest you give Steve a call. He brings over 25 years of knowledge and experience, and this article is a great example of the quality of work he and his crew perform. To see more of Steve’s work, check out our article for building a deck and installing drywall.


Introduction
Most homeowners that want a backyard shed will have one built off-site and delivered to their home. (Here’s a video of a typical pre-built shed delivery we filmed in Fred and Kim’s backyard.) Unfortunately, shed delivery is not an option for all homeowners, and a common barrier is inadequate access. That’s why Steve and his crew were hired to build this shed. I’ll let him introduce the project.
Video Summary: The plan is to build a 10’x12′ shed. The homeowners are preparing to add an in-law suite to the back of their home, and this shed will provide storage for outdoor furniture and lawn equipment. The shed is deliberately planned for 120 sq. ft. because this is the maximum sized shed you can build in this area without pulling structural building permits. This shed will feature a foundation of solid, concrete block pillars, 2×4 framing, a hip roof that match’s the house’s roof design, and architectural shingles.
Step 1: Prepare the Site and Build the Foundation
After determining a location for a shed, it’s important to give it a solid, level foundation that will properly handle rain and moisture. Steve’s team accomplished this by digging out a 10’x12′ area with an additional 8″ of clearance on all sides. They lined the perimeter with pressure-treated 4x6s, sometimes going as many as three rows deep to handle a slight slope in the landscape. The crew used 20″ rebar to secure it to the ground, and 10″ Timberlok heavy-duty, wood screws to pull all the boards tight.


Pro-Tip: Timberlok 10″ wood screws should be installed through the face of one board into the end grain of the next (for all boards), and then down the top board through two or three boards.


The crew was able to reuse some of the excavated dirt to fill in low areas, being careful to tamp everything down to eliminate voids. They made ten foundation columns by stacking concrete blocks on undisturbed ground. Each column is composed of three solid 4″ blocks, glued to each other with construction adhesive. Using a line level, they ensured that all of the foundations were the same height, level, and equally spaced around the perimeter.
Pro-Tip: Foundation columns must be built on undisturbed ground. This is vital because undisturbed ground will not shift (potentially creating structural instability). Tamped dirt is not a reliable substrate for setting these columns, so care must be used when digging out the area.
Pro-Tip: Pouring a concrete slab foundation is a viable alternative to this method; however, it introduces additional concerns, such as frost heaving in colder areas. The shed design would also need to change to incorporate a 4×4 pressure-treated skid under the floor joists to allow rain and moisture to escape. The foundation design we present addresses these concerns, and is more cost effective than pouring a pad.
(See also: How to Pour a Solid Concrete Shed Base)
The crew filled in the perimeter with 2-4 inches of crushed rock. This provides a path for water to escape so that moisture doesn’t accumulate underneath the shed. It also looks nice in the finished product.

Step 2: Build the Outer Band Board
This shed features double band board construction, which means the perimeter of the bottom frame comprises a double ring of pressure treated 2×6 boards. The additional ring is helpful, because it adds to the structural integrity of the shed and provides a wider nailing surface for securing the walls to the floor.
For a 10′ x 12′ shed, the outer band board length and width should be 10′ x 12′, which is the full size of the shed. The inner band board (described in Step 3) fits inside this frame, and must be 3″ shorter in both dimensions (9’9″ x 11’9″) to fit snugly.
Step 3: Build The Inner Band Board and Floor Joists
The inner band board is constructed with joists spanning the shed’s width (front to back). The crew secures these joists with Simpson joist hanger ties and nails through the face of the band board. The joists are 2x6s placed 16″ on center (oc). Use of hanger ties and face nailing provides the necessary strength to hold the full weight of the shed and its contents.
Pro-Tip: It’s important to check the band boards for square by measuring both diagonals (corner to opposite corner). If they measure the same, the structure is square. If not, you must rack the frame to get to square before fastening the inner and outer band boards together.
Pro-Tip: We recommend a pneumatic framing nailer to install nails through the band board into the grain of the joist. This can be accomplished by hand (i.e., with a hammer), but would be far more time consuming.


This inner structure fits snuggly inside the outer band board frame.

The crew nailed the double band boards together, but not before confirming that everything was still square.

Step 4: Install the Subfloor
Steve is a big fan of Advantech flooring for its superior weather resistance. Using Advantech results in less warping, twisting and delaminating than would be present if traditional plywood or OSB were employed. If you check Advantech’s Website, you’ll see that they claim the lowest water absorption rates in the industry.
Pro-Tip: Fir plywood is a suitable alternative to Advantech if Advantech is not available. It is priced similarly.

Steve’s crew oriented the subfloor to keep the groove side exposed for the next row. This is important because it allowed the crew to setup a “beater block” to drive each sheet snug without damaging the tongue.

Next, the crew screwed the subfloor in place, taking care not to drive screws too close to the groove and create an obstruction for the next sheet.
Pro-Tip: Typical 2″, #8 screws are appropriate for this job. Screws should be driven every 12″ along the joists and the perimeter.
Pro-Tip: We recommend keeping screws six inches back from the groove until the next sheet is installed. If you install the screws too close to the edge before installing the next sheet, the next sheet will be VERY hard to get into place.
(See also: Installing a Plywood Subfloor in a Habitat Home)

The crew staggered the joints for each row and marked the location of the joists to enable easy fastening.
Pro-Tip: Plywood joints should be staggered lengthwise. This reduces potential floor bowing in the final installation.


Step 5: Frame the Walls
Pro-Tip: Dimensional lumber is often curved or bowed. Before you begin framing, it’s important to check each piece for warping, and if necessary, orient them all identically. In this video, Steve shares some pro tips for checking and marking boards.
This shed features 2×4 framing with studs placed 16″ on center. The crew framed the front wall first. This wall was the most complicated, because the front wall includes the door and two windows.
To frame the front wall, Steve’s crew began by measuring stud locations on the top and bottom plates. For this step, it’s useful to understand a bit of stud vernacular:
- King Studs or Common Studs: Span from the top plate to the bottom plate (the full height of the wall).
- Jack Studs: Support headers, which span above doors and windows.
- Cripple Studs: Used above or below windows and doors.
Pro-Tip: Many lesser quality sheds are constructed with 2×3″ boards at 24″ on center to meet a lower price point. Beware of this type of construction, as it is much more likely to result in bowed walls.
In this picture, the king stud locations are marked with X’s, and the jack stud location is marked with a J. Placing three king studs on the end isn’t necessary (you could get away with only two); however, the third stud provides a nailing surface on the inside corner of the finished shed, which is especially helpful for building shelves at a later date.

Headers are required above doors and windows, since these elements of a structure cannot support load. Typically, headers are made by sandwiching 1/2″ plywood between 2x material, resulting in a flush surface inside and out. In this case, Steve’s crew omitted the 1/2″ plywood because the inside will not be a finished space and does not need to be flush.
Pro-Talk: What’s 2x Material? 2x (spoken “two by”) refers to any dimension lumber that is nominally 2″ wide, such as 2x4s and 2x6s.
Understanding Header Math: Finished 2x material is actually 1.5 inches wide. Accordingly, placing two pieces of 2x side-by-side will give you 3″ of width. By sandwiching 1/2″ plywood between the boards, you achieve a 3.5″ width, which is the width of a 2×4. Depending on the distance being spanned and the load being supported, 2×6, 2×8, 2×10, or even 2×12 material may be appropriate. For the spanning distances in this shed, 2×6 header material is appropriate. For heavy loads (such as supporting a second floor), LVL or steel I-Beams are used for headers.


Just like installing the joists, keeping everything square was a big focus. After each wall was built, the crew measured the diagonals and made adjustments as necessary. The picture below shows the front wall after they finished framing. You can see the headers above the windows and door.

The other three walls were framed with studs placed 16″ o.c. without any other components.
Pro-Tip: A utility bar (like the Stanely FatMax Xtreme) is a useful tool for bending and torquing boards into place.

Step 6: Install SmartSide Panels
After each wall was framed, Steve’s crew installed SmartSide engineered panels. These panels are already primed, and they will be painted to match the house at a later date. These panels are a durable and relatively inexpensive alternative to other siding materials, such as vinyl siding.

The crew stapled the panels (rather than nailing them), because stapling provides a better hold.

Each piece overlaps the adjacent piece, and the top and the bottom of the panel extends beyond the wall to cover the top plate (above) and the band board (below).
In this picture, you can see the crew checking the spacing with a spare piece of 2×4.

Step 7: Frame the Hip Roof
This shed features a hip roof, which matches the roof on the existing home. Hip roofs are much more interesting than the more typical gable roof, and they are also much more complicated to build. Here’s a quick video describing the challenges of building a hip roof.
Fun Fact: Hip roofs experience lower wind resistance than gable roofs because each side is sloped.
Hip Roof Nomenclature
Hip roof terminology can be a little confusing, so I’ve put together this rough diagram showing the different components of a hip roof from above.

- Ridge rafter
- Common rafters
- Hip rafters
- Creeper rafters (also called Jack rafters)
- Top plate
The difficulty in building a hip roof lies in making all the required compound cuts. Steve explains a bit more about that in this video.
Build the Hip Roof
Rather than framing the walls and building the hip roof on top of the structure, Steve elected to frame the roof on the ground. It’s a trade-off, because while it’s easier to frame the roof on the ground, it can be challenging to get the roof in place afterward. This method is only possible when the crew is careful to keep the subfloor, walls, and roof perfectly square. Otherwise, the structure will be skewed and the roof will be misaligned.
As Steve mentioned in the video, he began cutting the rafters while the other crew members worked on the walls. This roof features a 7:12 pitch, and Steve used a roofing square (speed square) to mark accurate angles.


The toughest rafters to cut are hip rafters, because they butt against two adjacent common rafters.

In this picture, the hip rafters are the ones with lines marked across their width. The other three rafters are common rafters. All hip and common rafters meet at the ridge rafter.

All the rafters have a notch called a birdsmouth seat that allows the rafter to sit flat against the top plate.

Steve’s crew began building the top plate around the perimeter of the shed, and they marked the locations of the rafters. In order to make this top plate the proper size, they laid it out over the foundation floor.


The crew setup a temporary support for the ridge rafter, and started by securing the six common rafters.


They space the rafters 24″ o.c, which provides sufficient support for the roof.


This is a closeup of the birdsmouth. The small spacer accounts for the gap required to accommodate the siding. You can also see the 6″ overhang, and that they cut the tail end of the rafter for the soffits.

Next, the crew moved on to the hip rafters. You can see how the birdsmouth sits at the corner of the roof.


Lastly, they installed eight creeper rafters.

The final step for the hip roof was to attach the fascia board to the ends of the rafters. The crew ripped the edge to match the slope of the roof.

Here’s what the framed hip roof looked like before the crew slid it on top of the walls. You can also see they added a couple of collar ties that span between the common rafters to prevent the roof from shifting while it’s being moved.


Step 8: Raise the Walls
Now that the roof is ready to go, the crew needs to raise the walls. Since they had already framed the walls and attached the plywood siding, it is an easy task to set the walls in place, check for level, and nail them to the floor.
After getting this first wall setup, the crew nails a temporary support to the floor and wall, keeping it level while they continued with the other walls.


Here’s a great picture showing how the plywood siding overlaps the band board. It will also overlap the top-plate when the roof is moved into place.

You can see how including the (optional) third king stud provides a nailing surface in the corner. This is usually done for the benefit of drywall; however, Steve includes the extra stud to make it easier for the homeowner to build shelves.

The double band-board construction from Step 1 allowed Steve’s crew to stagger their nails and better secure the walls to the subfloor.

Step 9: Move the Roof in Place
To slide the roof on top of the frame, the crew setup a slanted support and some temporary blocks to protect the plywood siding. With a person at each corner, they walked the roof over and set the first edge on top of the walls. Two guys moved onto ladders, and they continued to slide the roof along the wall framing. The final step was to remove the temporary blocks. It’s a testament to Steve Wartman and his crew’s precision, because everything fit perfectly.


Step 10: Roof Sheathing and Tar Paper
The crew drove nails through the top plate, and drove 8″ Timberloks through the rafters into the wall framing to secure the roof. Next, they began laying 5/8″ OSB. If you remember, Steve mentioned that some contractors will use 1/2″ OSB, but he has found that over time it’ll start to sag. Accordingly, he prefers 5/8″ OSB for better rigidity. The two sides of the OSB sheathing are not the same, and if you look closely, you’ll see “This Side Down” printed on one side. The difference between the sides is that the top side is textured and easier to walk on.


The roof framing is 24″ oc, and Steve likes to use sheathing clips between the rows of OSB for increased support.


In this picture, Steve trims excess OSB along one of the hip rafters.

The ridge vent will sit at the peak, so the crew cuts a small gap in the OSB.

After the OSB is in place, they cover it with tar paper, starting at the bottom, and overlapping each row approximately 6″ all the way up the roof.

The crew used staples to secure the tar paper in place.

Step 11: Install the Soffit, Drip Edge and Fascia
In this design, a ridge vent and vented soffits allow air to move through the shed. This prevents moisture from becoming trapped. A properly installed fascia and drip edge prevent rain and water from moving inside. Here’s Steve with more details about these components.
Video Summary: Steve screwed the F-channel to the wall of the shed and then nailed the soffit to the underside of the fascia board.


Next, the crew mounted the drip edge (pictured below) and slid the fascia in place, securing both with small aluminum nails.

Step 12: Hang the Windows and Door
The front of this shed will have a double door with windows on each side. The openings for these components were framed out with the walls and then concealed by the plywood siding.
Using a Milwaukee Sawzall and Flush Cut Blade, the crew removed the excess siding and bottom plate.


They leveled out the window and nailed the windows around the frame.


Next, they framed out the windows and door frame with PVC board, including an angled threshold to direct water outside. They also added PVC to the corners of the shed to seal them. All of the PVC is secured with finish nails and caulked.


The crew installed a solid wood double door, which required trimming the bottom to fit the opening, cutting a chamfered edge where the doors meet, routing a space for the hinges, and shimming the doors level.


The crew installed a Kwikset door knob on the right door and a matching knob and two latches on the left door.


Step 13: Shingle the Roof
The last step before finishing the shed is to shingle the roof. Steve’s crew will install architectural shingles because they have a longer lifespan and better durability. Eventually, the house will be re-shingled to match the shed. This guide doesn’t fully cover how to shingle a roof. Until we cover that in greater detail, here’s another online resource that provides solid instructions for shingling.

The cut row of shingles is actually three-tab, and all the caps are cut from three tab as well.


The crew snaps chalk lines to ensure each row is straight.

They also apply Protecto Wrap under the shingles at each corner to ensure the corners are completely waterproof.


This picture shows Steve using a utility knife with a hook blade to cut shingles. These knives make working with shingles much easier and are safer than traditional razor blades.

Taking care to keep each row even and straight, the crew progresses up to the ridge vent, adding caps along the hip rafters.


The crew cuts the vent to size and nails it in place, covering exposed nail holes with roof sealant.


With the ridge vent installed, the shed is complete!
The Finished Shed
The homeowner is really pleased with the results. We think the shed looks great!


The Cost to Build This Shed
Many of you have asked how much it costs to “stick-build” a shed versus the cost of purchasing a pre-fab kit, or having a complete shed delivered on site. Steve was very kind and put together a detailed price list that he used as part of bidding this job. All numbers are factual, utilizing a reputable shed company found here in the mid-Atlantic area for comparison.

When you’re reviewing these numbers, there are several factors to keep in mind. First, the shed that Steve and his crew built included a lot of features that are considered upgrades, for which a shed company will charge extra. These upgrades are things like the ridge vent, double-hung windows, 6-panel doors, SmartSide siding, and a hip roof, and more. The second thing to remember is that the Stick Built Shed price is for materials only. A quality contractor like Steve will charge an additional $2500+ for labor. You can see that hiring out a shed build isn’t the cheapest option; however, a contractor can still be very competitive.
Pin for later
Found this article help but want to save it to reference later? Great! Please, pin this image and share it with your friends too.

Looks like an excellent shed. I might use many of the same design elements when I get around to building my backyard sauna.
I’m doing the same for my sauna. Wait…. I’m not planning a sauna. 🙂
Do you know approximately how much it would cost to purchase all of the materials required for this project? I’m in the market for a new shed and trying to weigh the cost of building one ourselves (with some experienced family/friends) with the cost of purchasing one to be delivered and installed for us.
That’s my question too. With all these pictures though we can get a really close estimate in case Ethan doesn’t have the numbers. For example, there are 68 2×4’s used in the wall framing (varying lengths 12′, 8′, and studs).
I’m working on getting some numbers, and I’ll get back to you. I think the contractor was more expensive than having one delivered, however his price was still competitive and he really went the extra mile (double band board, 5/8″ OSB, hip roof, etc).
Thanks for commenting, and I hope to see you around OPC!
Steve gave me some actual numbers that should be a huge help for people trying to understand the costs associated with building a shed vs. buying one. I’ve updated the post. Check it out, and let me know what you think.
Regarding the below, where can I find the update, or the material list. Thank you, great shed, I’m 71 but going to give it a try.
Steve gave me some actual numbers that should be a huge help for people trying to understand the costs associated with building a shed vs. buying one. I’ve updated the post. Check it out, and let me know what you think.
I am about to start on this shed, now ion the process of excavating as it is on a hill. I would certainly appreciate a list of materials, if that is available. At 71 I need all the help I can get. Dave
Excellent write up Ethan. OPC is well on its way to be being the best on the web. Keep it up!
Thanks Jeff! I always appreciate the encouragement, and you’re great questions.
How does Ethan find contractors to follow? I imagine that this is a great way to learn a lot of details and tricks that a normal DIY book or article might not cover. Things that the contractors have picked up or been handed down from years of experience.
I can see a contractor being worried about liability and someone getting in the way and slowing things down if a random person wanted to tag along to learn like this. I don’t think he’d be worried about a homeowner picking up enough knowledge from one follow to be able to go out and become competition. It’s been 14 years since I worked for a framing contractor, and I’ve forgotten nearly everything. I used to know everything from how to read a blueprint and pop all the chalk lines on a slab or floor to how to frame an entire 3-story apartment building. If I ever build anything like this shed, or a future home, I’d love to be able to refresh my memory and update my knowledge by doing my own “follow.”
So far, the contractors have been people I know or a friend-of-a-friend sort of thing. I’ve been turned down several times too. I do pickup some tricks, and I try to share them in the write-up when applicable.
You’re right about liability and so we’ve drawn up simple contracts that protect both parties. I also work to stay out of the way, and the contractors are usually able to talk and work at the same time, explaining what they are doing while they do it.
Keep doing what you do OPC this is just the foundation of your start of great how-tos.
Thanks! I’m already working on the next two contractor follows so I’m really excited.
Wow! If we needed a shed we definitely now have the knowledge, the skills however are still a work in progress. Wish we were in the area so we could give this awesome crew more business.
I echo everyone else’s sentiment that this has been a great and very informative series. Any hints on what is coming in future contractor follows?
Hey Haus,
We’ve got a deck build and recessed lighting install on tap for next week. Stay tuned!
Fred
As a non- builder ( as in challenged to piece together even a pre-cut birdhouse!), I found this fascinating. The guys that put these things together REALLY have some skill. As I went through the instructions, I couldn’t help but think that this finished project is probably more substantial than the housing of most of the world’s inhabitants.
Wow, that’s a nice shed. Rekindles my desire to build one of these someday – http://www.tumbleweedhouses.com/. Great job, I love the detailed tutorial.
That’s a pretty good price comparison for a homeowner to start with. I’d imagine that the hip roof is one of the more expensive roof options, both in materials, time, and labor. Got an idea how much less it’d be for Steve’s company to build a gable or gambrel roof on that same shed?
It’s about the same in materials but about $400 more because if the extra labor.
Good to know. I think that same shed with a gable roof would be within a lot more DIYers’ skill set and comfort zone. I’m confident I could build that shed with a gable roof myself and save the labor cost. My materials cost would go up, because I screw things up more than a pro would, but a couple of wrong cuts versus another $2500 for labor? These pro follows may be just the inspiration some people need to tackle a job like that. Or at least understand where the value is when they have a quality contractor do the work.
excellent post. I wonder if the costs will vary significantly from region to region? In other words, would this shed cost a lot more in Minnesota than in Georgia?
You didn’t tell us how to build the ramp. I’m terrible at figuring out angles for guts. Can you help?
I know that Ethan is back on a deck project at this house later this week. Maybe he can snag some shots of the ramp. Unfortunately, we didn’t follow on the ramp-build day b/c there wasn’t enough going on to justify the trip. We’ll see if we can put something together though!
I like to work inside the shed when I am doing a lot of my projects. So my suggestion to you is to add a window in the rear for cross a breeze, just a thought for those who work inside sheds a lot.
Bobby, this is a great idea! Not without expense though – probably just north of $100 extra for the materials. The ridge venting in this shed makes it a good bit better than other models for venting, but I definitely like the idea of adding a window. First time I’ve seen you comment here. I hope we’ll make you a long term reader!
Great Project! To keep with the look of my house I would go with a gable roof – would love to see a tutorial or supplement to this on a more standard gabled roof – maybe with a partial loft storage? Great tutorial!
txgi121 – Ethan’s been in touch with a new home builder as a potential for future pro follows. That could very well result in a gable roof tutorial. Gables are the simplest form to build – maybe if we can’t follow on our own we can build one and write the tutorial in-house! I hope we’ll make you a regular reader at OPC!
txgi – Also wanted to add that we just linked to a popular mechanics article up in the “related content” section that has a gable roof along with a great break-out schematic of the shed they build.
The angle cuts for a hip roof is a little more difficult than most backyard DIY-ers can handle.
I’m not a big fan of Gable Roofs and favor the Gambrel (Barn) type of roofs. Even in small 8’x10′ or 10’x12′ sheds this gives the owner the option of a small loft for extra storage for light weight items such as lawn furniture cushions etc, etc.
I liked his use of a third stud in the corners for a nailing surface.
Another poster suggested a window at the back of the shed for ventilation. While this may help it also would make for a out of sight enterance for any burglars. Trust me from experience there are low-lifes lurking around your neighborhood. A small window Air Conditioner or small ceiling fan would work well. This brings up another suggestion for you. How about a follow up with a “HOW TOO” electrical wiring a shed. Lights or a charging station for cordless hand and yard tools will eventually be needed. I keep my Snow blower with it’s “Electric Start” in my shed and for a long time I had to run a long extension cord for this start up.
I truly enjoyed this article and will be checking out a few more. I enjoyed the video’s that were in the text and feel this will help those who don’t totally understand carpentry construction that well. It refreshed my old brain and I’ve been building for the last 60+ yrs.
Thanks and keep them coming.
Barry A. Rye
Barry, this is an awesome comment. Thanks for leaving it! If we get a chance to follow a pro through an eletrical wire-up, we’ll definitely do that. Thanks also for adding your tips. I hope we’ll make you a regular reader here at OPC. You can subscribe over on the right hand side. Come back and comment often. We love experienced craftsman. It makes all of our articles that much better!
what would it cost for a 10×10 shed
Labor is going to be pretty similar. You’ll probably save about 10% in materials (or so) if you stick with this design. See the price breakout at the bottom of the article for a detailed view, and then take 10% of that off for a 10×10.
Yes I knew it would cost about a hundred more bucks for a window ,and is a major risk for thieves.
I however do not need to worry about this issue my closest neighbor is 1 1/2 miles away, also helps to have 2 king dobberman pinchers on my land ( ha take that tool thieves haha) .
Electric I have already done I was a electrician some years back. I ran one 110 line with 15 amp breaker and one 220 line with 15 amp breaker for my air compressor, the 110 line just runs a bench grinder and a florescent light and a little clock radio. I ran 1 1/2 inch conduit under ground about 18 inches deep.
Found a semi-used breaker panel on craigslist.com for $30.00 . my total cost for running electric was $75.00 as a DIY .
Is there a specific type of door that works best for a shed?
Hi Rachel,
One door style isn’t much better than another as long as it’s a solid door. Hollow doors won’t withstand wind and rain very well. It’s also a good idea to prime and paint the door to better protect against water infiltration.
Thanks for stopping by, and I hope to see you around OPC again!
I was looking for hip roof shed plans and came across your great tutorial. Although it did not include plans, your step by step instructions are so complete that I was able to draw my own from these and to put together my list of materials. I didn’t know about the Smartside panels; I found them really great to work with and they helped me achieve the look I wanted.
I made a few changes and used double “barn” doors on the right with only one window, on the left, to achieve a look similar to the shed on this picture: http://miss-cupola.com/wp-content/uploads/2011/10/Cabana.jpg .
I built the roof on the ground but, knowing I would not have a crew to get it in place, I used screws instead of nails. Once all the rafters were reinstalled on top of the walls, I found that the 7:12 pitch, which may be right for a two-storey house, was too steep for this low building, so I took everything down and cut all the rafters to a 5:12 pitch. Good thing these rafters were screwed, not nailed…
To build the roof, I must thank the author of this hip roof calculator: http://www.blocklayer.com/roof/roofeng.aspx . Without it, I think I would have had to settle for a gable or flat roof! 😉
Again, thanks for your tutorial.
Jerome
P.S. Building my own doors, recycling a window, and not including the landscaping work, my cost for the materials and hardware project was $1,600
WOW that shed looks great.. Im planning on building one like yours Do u have plans to shed? How tall are walls?
Considering one was to build the shed the same way, which type of roof do you think would be least expensive out of a gable, or hip? I’m sure a shed roof would be the least expensive, but it would also be the least decorative.
I think both of them require about the same amount of materials. The hip roof is more complicated, and therefore it takes more time to build. If you hiring a contractor, he’ll probably charge more for a hip roof to cover his time.
We purchased our home 8 years ago. There’s a marvelous shed on site, but unfortunately a fire in the wiring before we purchased it caused some damage. It’s structurally sound, but definitely needing a bit of an overhaul. Excited to find this tutorial as I know I’ll pick up some tips that will make a project on next spring’s to do list easier to accomplish. Thank you.
Hey mamabear,
I’m glad you’re finding the site and this article useful! I hope to see you around OPC more.
my shed is in the planning stages.. i really like your ideas. may I ask where you obtained the double swingout doors, have been able to locate in this area.
thanks
I am so glad I came across this blog. I was about to start building a new shed but was finding the planning a little difficult. With your detailed pictures and information I feel confident to go ahead with the project now and have learnt a lot of handy tips to implement when we begin the work. Thanks for the great post.
Hubby built a wonderful cottage style shed for us last summer. Great post. Hugs P.S. I invite you to share this at my Thursday hop ( you can link up through Sat)
Good work guys. But thanks for giving me something else to add to my to-do file!
I’m looking to build a hip roof 12 x 16 shed on a cement slab to match my house. You mentioned a program to take the guess work out of the ridge, common, hip and jack rafters. Care to share this program or a viable place to find plans that include all measurements and cut templates? Awesome tutorial, thanks so much for posting it.
Great, detailed post. Love the pictures….. Think I’ll put one up on my lunch break now. Ha!
This is quite literally exquisite. Everything presented so neatly. Great Work, thanks for sharing.
Nice shed. Very well built.
Question: What are the lengths of the studs? They appear to be shorter than the standard 92 5/8″.
Thanks,
Frank
[…] *source de l’image: oneprojectcloser.com […]
FREE 8X12 GABLE ROOF SHED PLAN
http://goo.gl/j2kuH7
Nice. However you can make it yourself. Just google WoodPrix and learn how to do it easily.