
Thank you so much for joining us at One Project Closer for this tutorial on how to change the blades on a riding mower from friend and guest writer, Jason. This post is sponsored by the Home Depot Prospective Campaign. Post may also contain affiliate links. Opinions (and typos) are 100% our own, and we appreciate you supporting our site in order to continue to provide free content to our readers.
Spring has arrived and here in the Mid-Atlantic that means the sounds of mowers are filling the air! If you are like me replacing your blades with a sharpened set when you prepped your mower for winter at the end of last season was not on your todo list. Maintaining sharp blades on your mower is important for both the health of your lawn and to reduce stress on your mower’s engine. Dull blades pull at the grass stressing roots and tearing the grass blades, leaving your yard more susceptible to disease. Using the right tools makes swapping dull blades with sharp ones a surprising simple maintenance task. Plan to do this at least twice each mowing season.
Changing the blades on your riding mower
Project Time: 30 minutes
Cost: $0 – $25 (if replacing with new blades)
Difficulty Level: Easy
Materials Needed:
- Flat head screwdriver
- Needle nose pliers
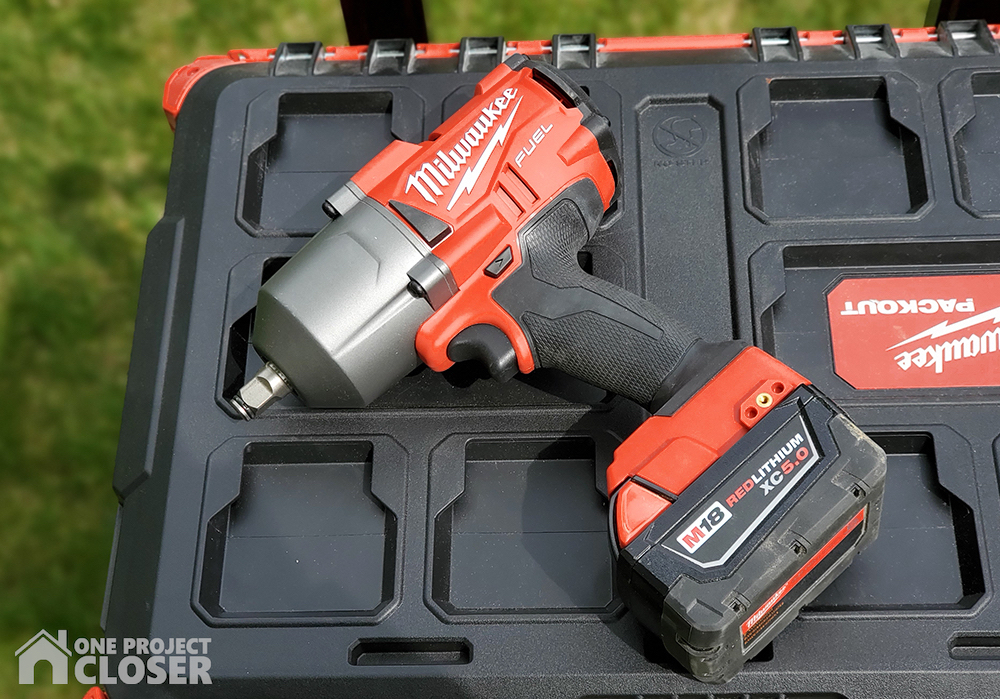
- Milwaukee Impact Wrench
- Impact socket
- Breaker bar
- Torque wrench
- Socket
- Replacement or already sharpened set of mower blades
- Scrap 4×4 wood
- Work Gloves
Other Featured Products to help organize and carry your tools:
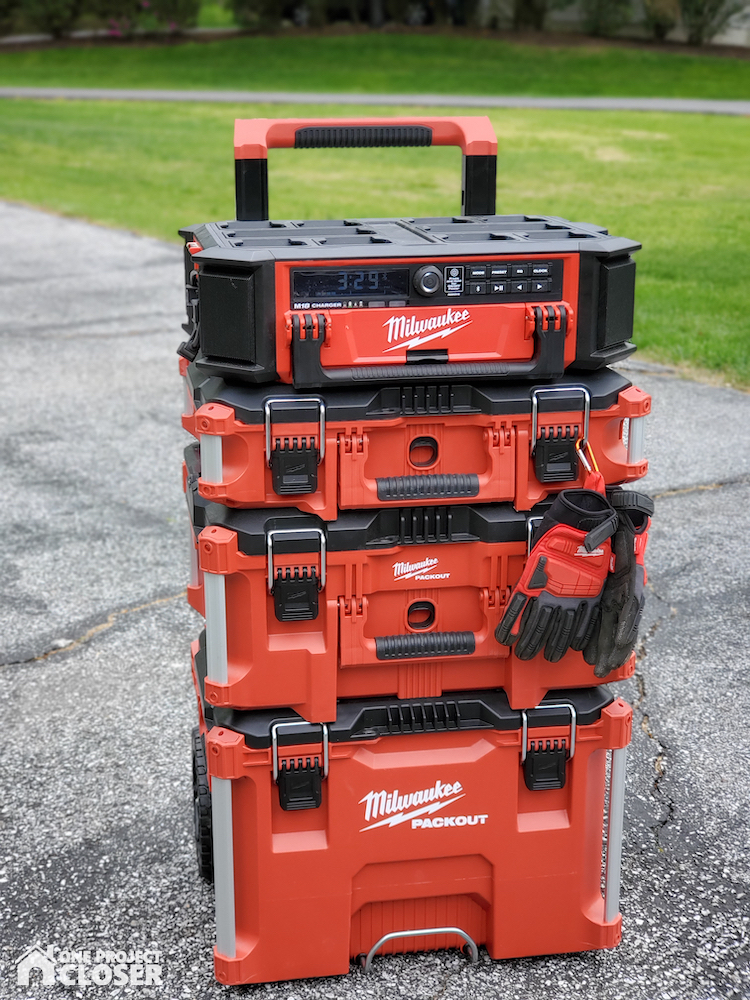
- Milwaukee 22 in. PACKOUT Modular Tool Box Storage System
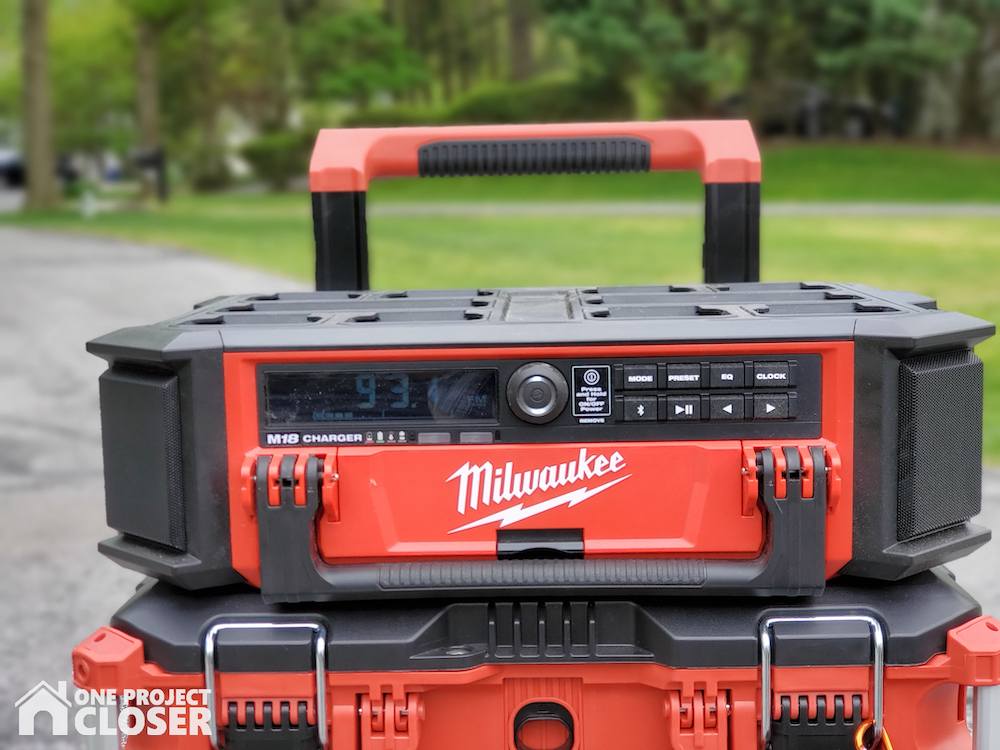
- Milwaukee M18 Lithium-Ion Cordless PACKOUT Radio/Speaker with Built-In Charger
Be sure to check out our amazing Home Depot Coupons before you buy to save yourself some money!
STEP ONE
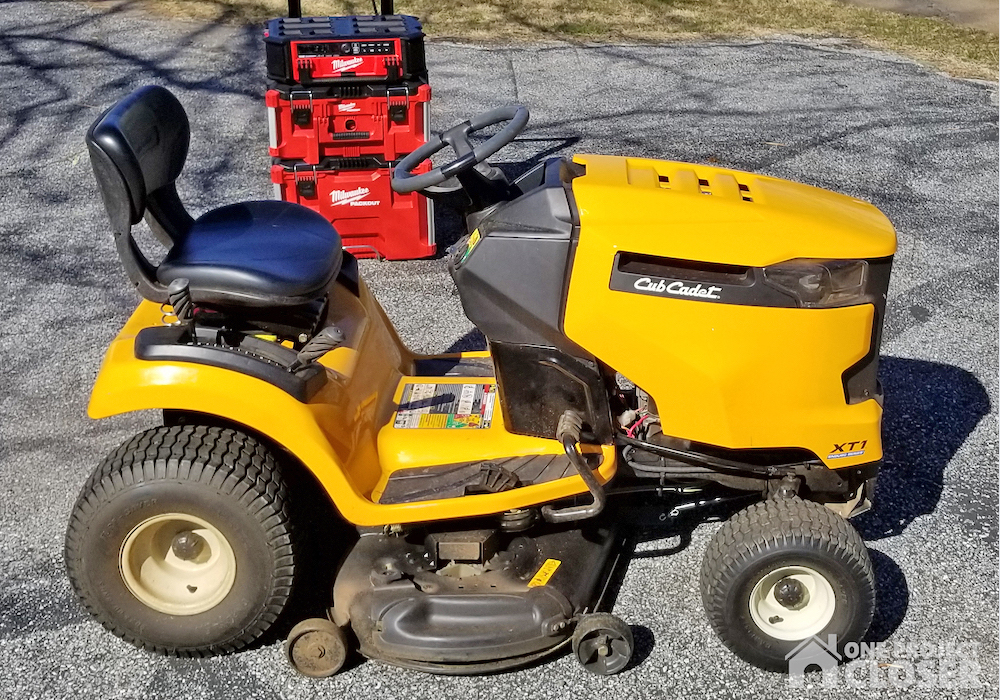
Gather your tools and materials. In this post, I am using my Cub Cadet XT1 riding mower which has a 42” deck.
*Note: I use Milwaukee PACKOUT Storage System to organize my frequently used jobsite and cordless power tools. Being on wheels makes it easy to transport to the project site and keeps my most needed tools close by. Also, I just acquired the Milwaukee PACKOUT Radio/Speaker System. This was the first outdoor project in which I got to try it. Ten speakers provided a full 360° sound, and kept me jammin’ to my favorite radio station. This speaker system is also perfect for a construction site or an outdoor party, but even when just putzing around the garage.
Position your riding mower on a level surface, disengage PTO, shut off the engine and engage the parking brake!
STEP TWO
Note: Deck removal varies by make and model, so augment this step with instructions from your owner’s manual.
Start by lowering the deck to provide easy access to the deck’s connections.
Remove the bow tie pin from each side located at the rear top of the deck and slide the deck’s lift arm apart from the deck post mount. (Tip: Sometimes these bow tie style cotter pins are a bit stubborn, especially when new. Use needle nose pliers to grasp the pin and a flat head screwdriver to help expand the pin to aid with its removal.) Now move the deck lift lever to raise the deck lift arms, so that they are tucked up and out of the way.
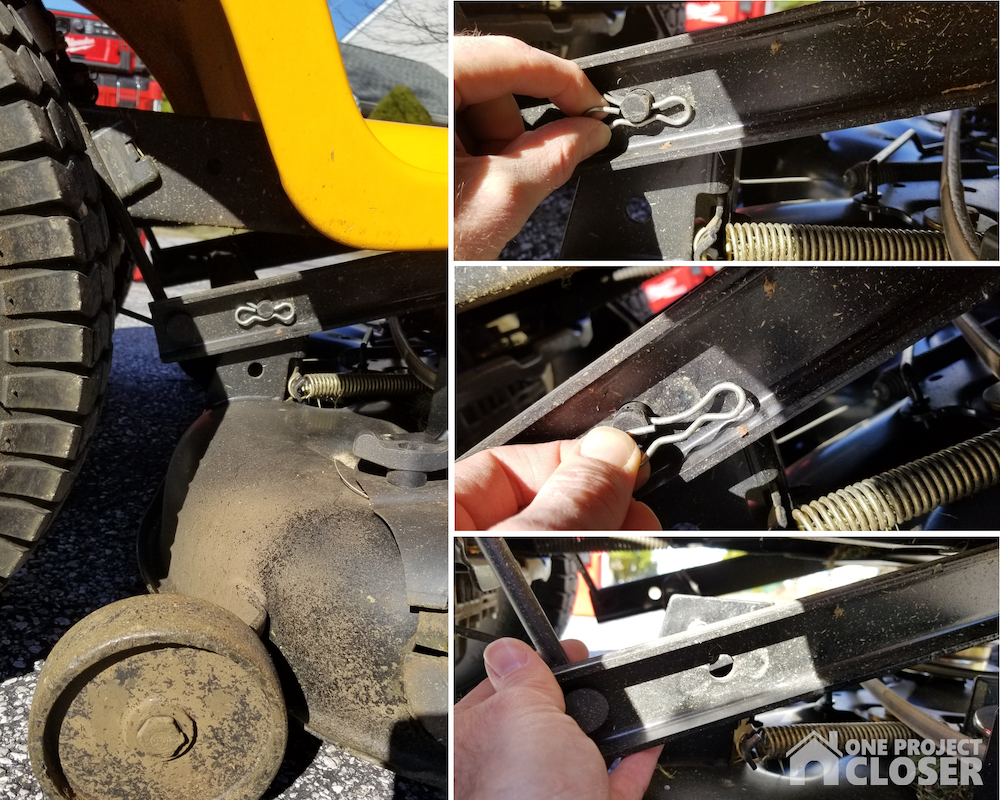
Remove the bow pin from the front deck lift rod and slide out the rod.
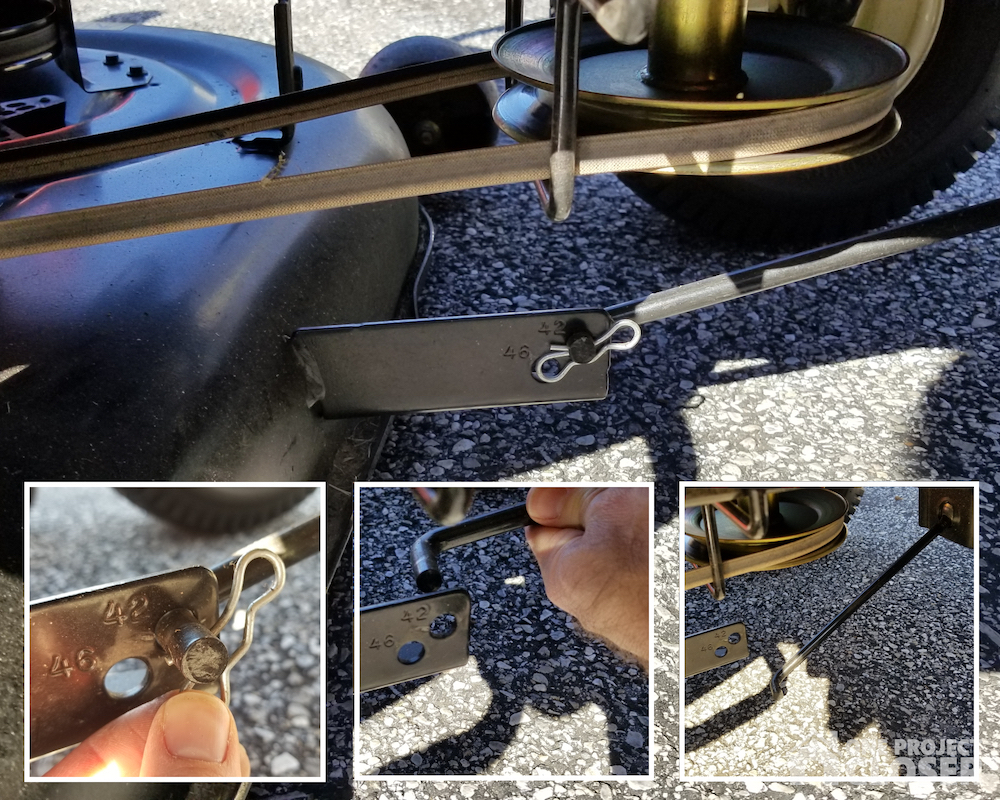
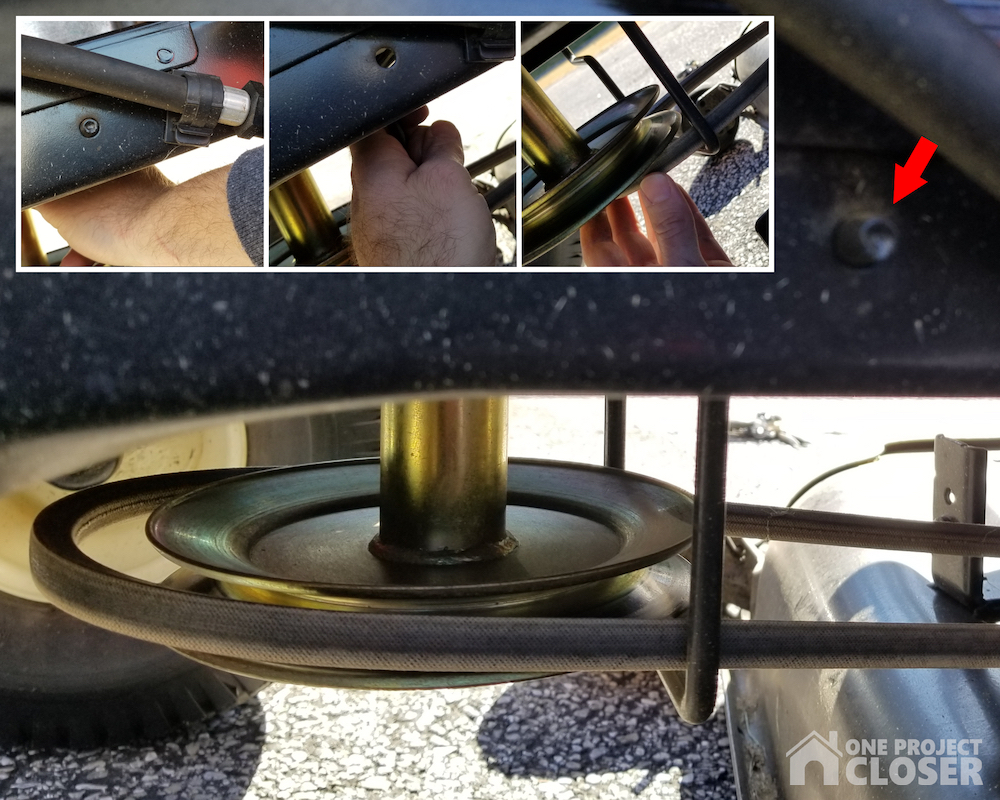
With the deck now detached from the lift arms, slide the deck forward a couple inches to make it easier to remove the belt from the engine pulley (located at the front). On this mower an engine pulley keeper prevents the belt from being fully removed from the pulley. While the keeper can be removed, I simply apply pressure to the keeper on its left (facing forward) until it pops through the hole securing it to the mower’s frame (see red arrow) and slide it downward, creating a gap between the keeper and the pulley that the belt will clear.
The final step required to remove the deck is to detach the Power Take Off (PTO) cable spring from the deck. Carefully slide deck a few inches to the right side of the tractor to provide better access to the PTO cable spring. Then push the idle pulley (arrow in top right picture below) toward the back of the deck to create slack in the PTO cable (middle right picture below) and contract the PTO spring. Then unhook the spring. Be careful to avoid pinching injuries!
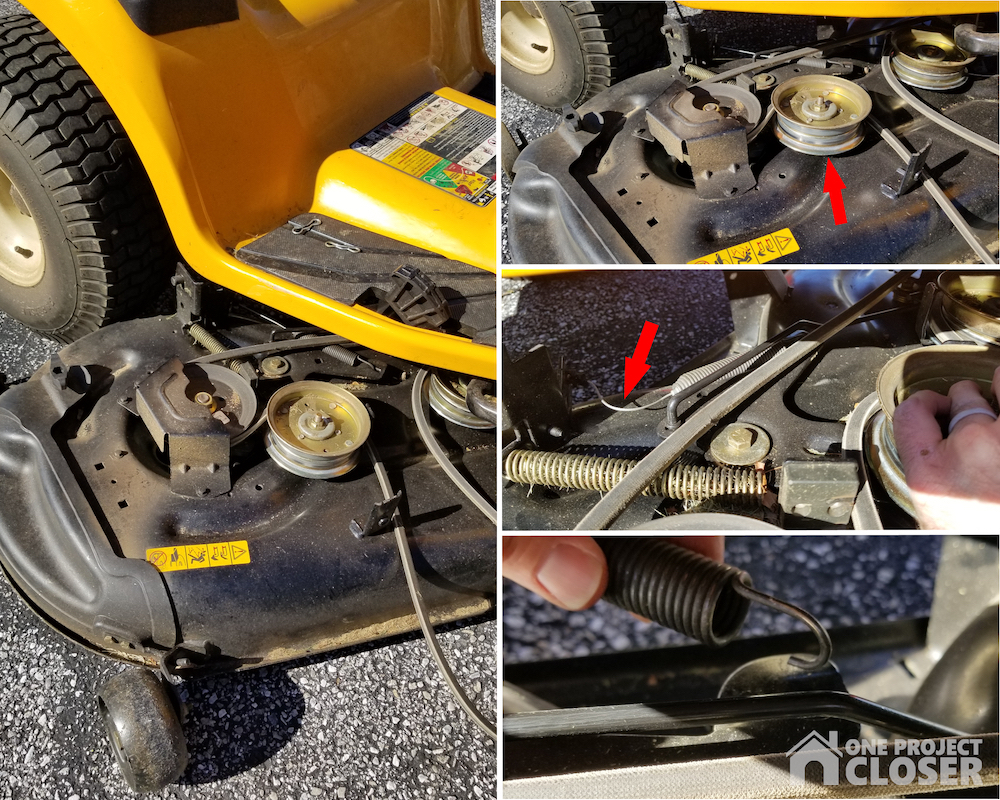
Now just one final bow tie cotter pin to remove which secures the PTO cable to the deck.
STEP THREE
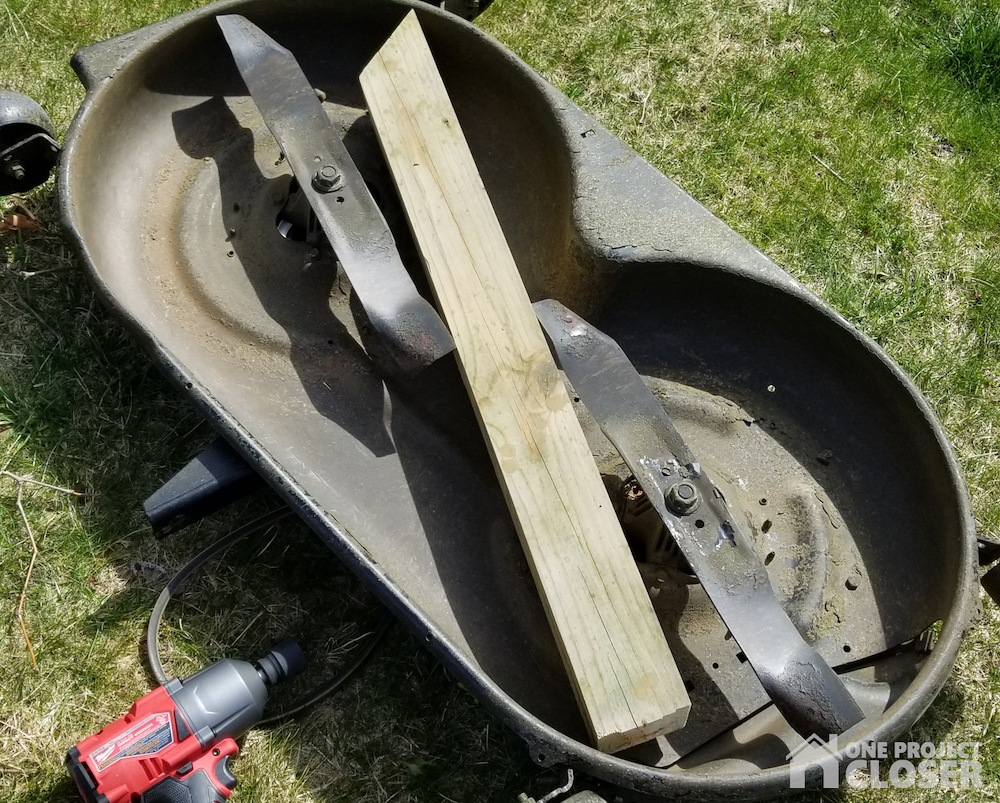
Now that the mower deck is completely detached, carefully slide it out from under the mower. Roll it to a grassy surface and flip the deck over so that it is resting upside down.

STEP FOUR
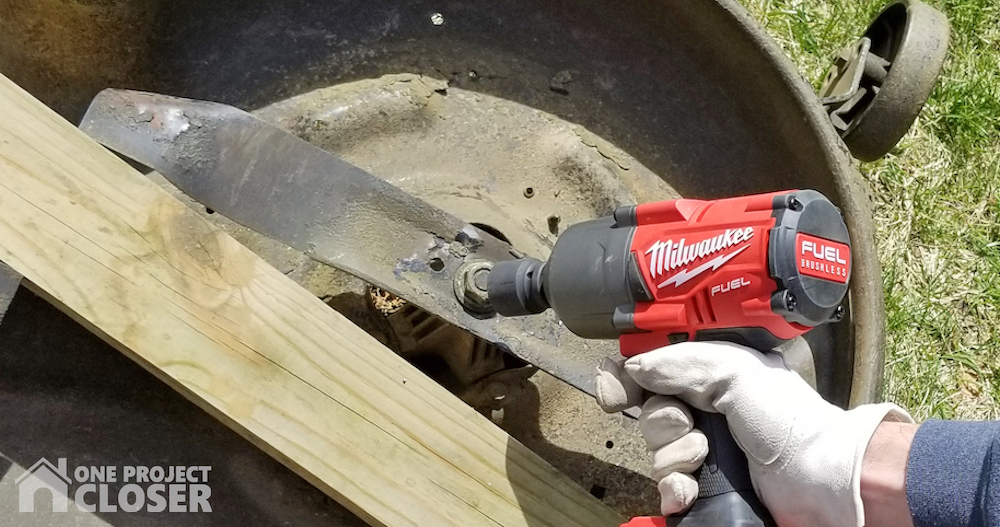
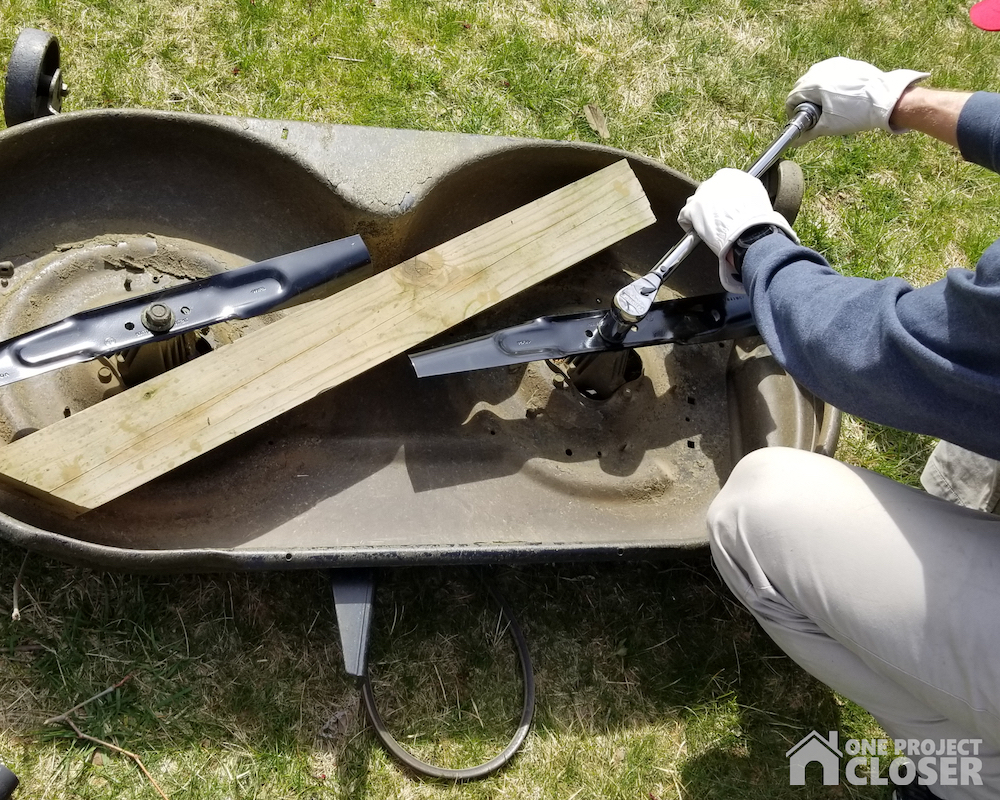
Some mowers are equipped with a lock that prevent the blades from spinning while removing (or tightening) the flange nuts. Chances are that unless you have a commercial mower, you will need to use a block of wood to prevent the blades from turning when removing the flange nuts. I keep a scrap piece of 4×4 for this purpose, but even a piece of firewood will do the trick.
STEP FIVE
Remove the nuts securing each blade to the spindle assembly. Note: High torque requirements and weeks or a season of cutting grass can make these nuts stubborn to remove. An impact wrench makes this painless. I use my Milkwaukee M18 FUEL 18-Volt Lithium-Ion Brushless Cordless 1/2 in. Impact Wrench, but alternatively you can use a breaker bar to loosen these nuts.
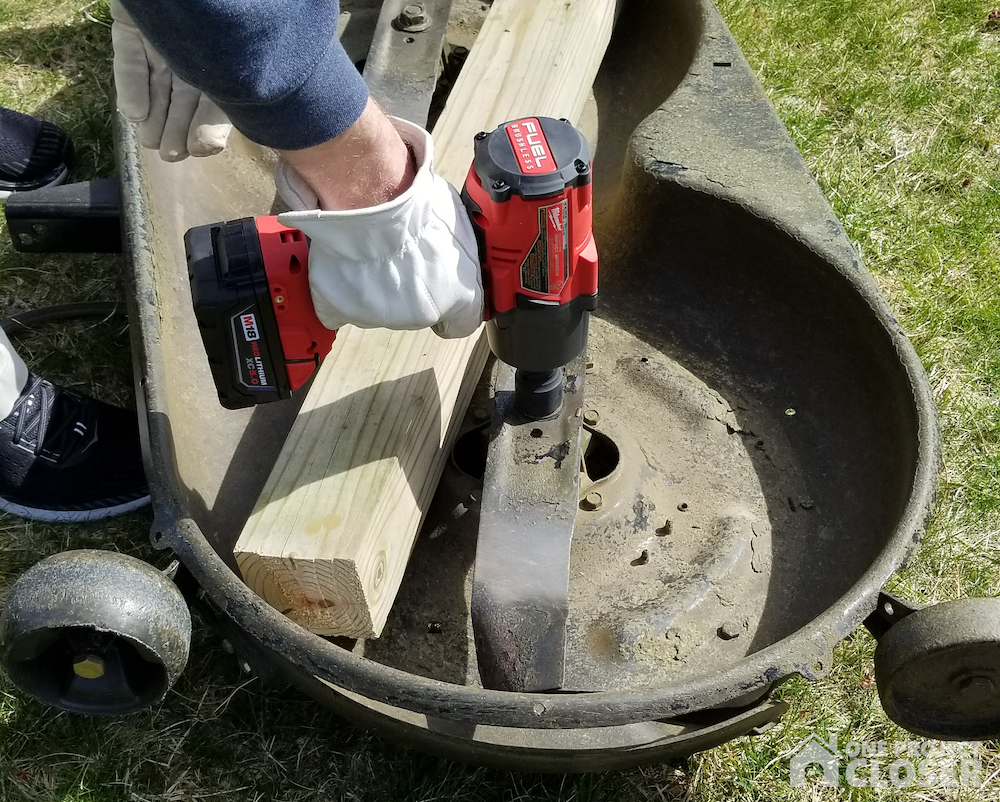
Now replace with a sharpened (or new) set of blades. Hand tighten the nuts and then complete tightening using a torque wrench according to your owner’s manual. This Cub Cadet specifies tighten the flange nut between 70 lbs-ft and 90 lbs-ft. (Tip: Keep a spare set of blades on hand. This way you can sharpen your old blades on a rainy day or have them professionally sharpened at your local small engine service shop, so they will be ready for a midseason swap.)
STEP SIX
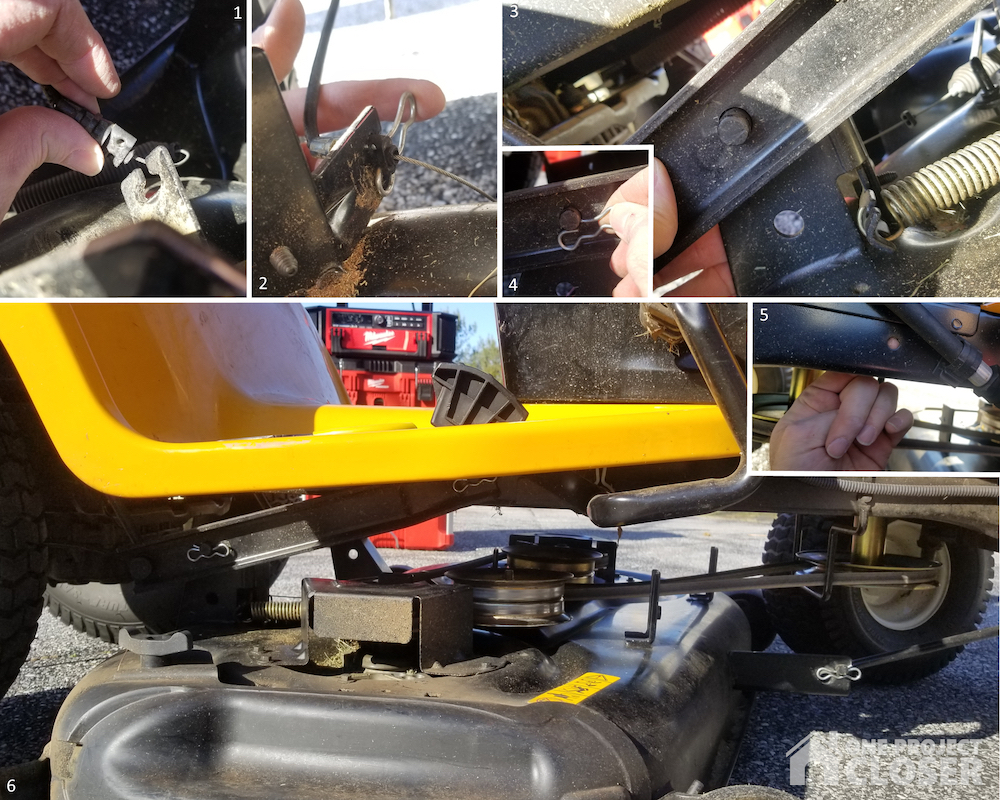
Now reattach the mower deck by completing the removal steps in reverse order.
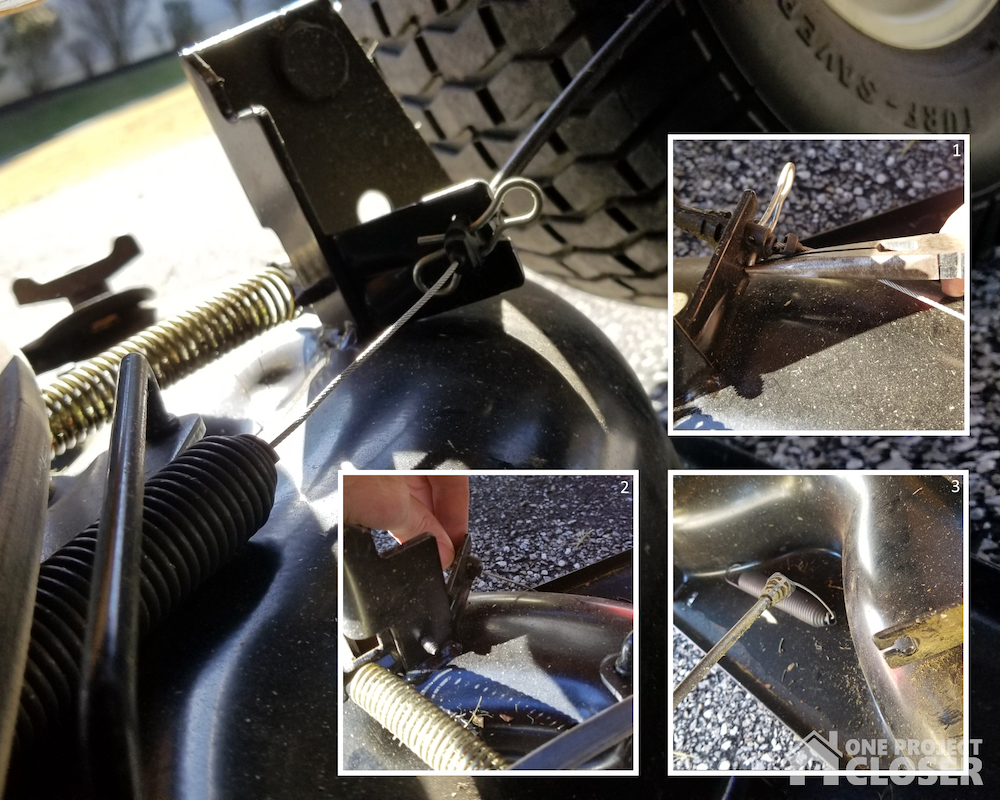
- When reattaching the PTO cable to deck mount eyelet, position cable collar through eyelet and secure the bow tie pin so that the pin’s belly is seated in the collar’s notch (inset image 1 and 2 below).
- Lower the deck lift lever, so that the lift arm’s can be positioned on the deck mounting rods (inset 3 and 4).
- Do NOT forget to reposition the pulley keeper post through the mower’s frame (inset 5) after looping the belt back in place around the drive pulley.
- Finally, inspect all connections and ensure the deck will raise and lower (inset 6).
STEP SEVEN
Congrats you are done. Now go ahead and lay down some big league outfield-styled lawn stripes in that yard!

Hi I’m Jason. I know a little about a lot — which occasionally gets me in a sticky situation. Fortunately, the DIYer community is always there to help get my projects back on track! I enjoy time outdoors, researching and collecting tools, gadgets & gear, as well as craft beer and mixing cocktails.

Very good instructions, but you can change the blades without removing the deck. I used to use a 2X6 and a cinder block as a ramp and ran one side of the mower up it to give me clearance to get to the blades. Of course I chocked the wheels before going under it.
Now that I’m older and a little smarter, I use a mower lift.
James, Thank you, glad you enjoyed. Yes, my father does the same thing and uses a ramp to change his blades too (with impact wrench and blade lock)! He has a larger lawn tractor so the deck is more cumbersome then my 42″ deck on the Cub Cadet.