
Soldering pipes (called sweating) is the standard way to join two or more pieces of regular copper pipe together. A solder joint forms a strong, watertight seal that will last for decades or longer when done properly. In fact, a proper solder joint is less likely to leak than the rest of the copper pipe, which can develop pinhole leaks do to chemical erosion.
For many homeowners the thought of plumbing anything is quite daunting. We all envision our basements or living areas filling up with water due to some error or oversight in our work. The truth is that basic plumbing, including sweating pipes as discussed in this article, is a relatively simple job that any motivated homeowner can tackle safely with only a few specialized tools.
 This article covers the basics of joining two pipes together. If you’re looking for more information, we highly recommend Stanley’s Complete Plumbing, which will walk you through this and many other topics in more detail than we can.
A note on permits & experience: Some jurisdictions require you to be a licensed plumber to perform plumbing work. We are DIYers and not licensed plumbers. This article is for general information. You may wish to consult with a licensed plumber before undertaking plumbing work in your home or business. In any event, use this information at your own risk.
Editors Note: This article was originally published in January of 2009. We are constantly working to improve our knowledge-base, and this post has been updated to incorporate readers’ comments, new pictures, and better instruction. We hope you find it helpful.
Understanding Pipe and Fittings Basics
Most water pipes in a house are between 3/8″ and 3/4″ in diameter. Main water lines are as large as 1-inch, while small lines (e.g., to a refrigerator icemaker) could be as small as 3/8-inch. The nominal diameter of a pipe is always 1/8 inch less than the outside diameter. Copper Pipe wall sizes vary with the size of the pipe such that the inside diameter is always approximately the nominal width. Copper water pipe is sold in three different wall thicknesses (K, L, M), and can be rigid or soft pipe. Sizes.com has a great article on copper pipe basics for more information.
In order to join two pieces of copper pipe together, you must use a sleeve or other fitting which has an inside diameter that matches the outside diameter of the pipe. You can pick up elbows, caps, tees, valves, couplers, and other fittings at your local DIY center.
Tools and Materials needed to Solder Pipes
The tools and materials list for standard sweat soldering isn’t long or complicated. Everything is available in your local big box store or plumbing supply shop.
- Plumbing Solder (non-lead based). Solder is sold by the ounce on a spool. Solder melts at a much lower temperature than copper, which makes it suitable for joining two copper pipes under heat.
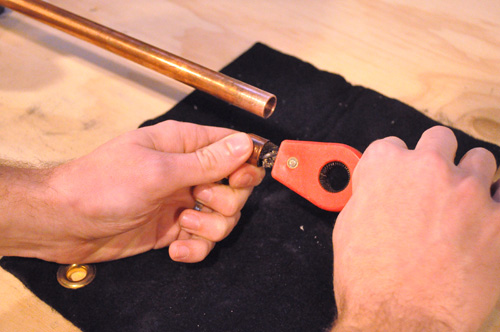
- Copper Pipe Brush. The brush is used to clean the inside of the fittings and the outside of pipes to prepare them for soldering. Plumber’s sandcloth can be used as an alternative but this tool makes the job easy.
- Small Propane Tank & Welding Striker. Used to heat the pipe and fitting to be joined.
- Plumber’s Flux. Used to coat the pipes and fittings to prepare them for soldering.
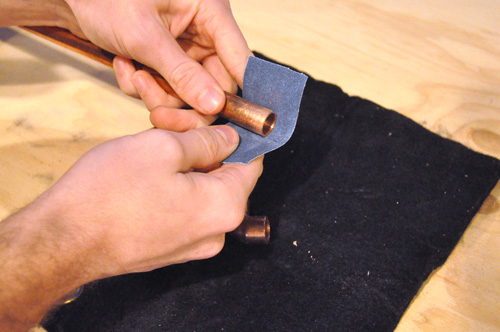
- Plumber’s Sandcloth. Used to de-bur pipes.
- Heat Resistant Pad.
- Copper Pipe and Fittings.

Tip: Brazing is an alternative method for joining copper pipe, and it results in an even higher joint strength. Brazed joints are achieved by using different filler metals (like BCuP or BAg) than soldered joints, however these alloys require significantly higher heat to reach their melting point. You’ll find brazed joints on things like refrigerant lines, however brazing is unnecessary for most residential plumbing applications.
Step 1: Preparing the Plumbing Environment
This tutorial doesn’t cover sweating a joint that is already a part of home’s plumbing. However, if you were going to work in that environment, these steps are important. No matter the environment, you should always take precautions to protect the area where you will be heating the pipe with the propane torch.
Turn off the main water to the house by opening the lowest possible valve in the house. (e.g., the utility sink in the basement) to drain all water from the pipes. Water in the line will prevent the pipe from heating and will cause the installation to fail. You may also need to open a pipe on the top floor of the house to relieve vacuum pressure.
Disconnect any PVC plumbing from the nearby copper. (Newer homes may have a combination of PVC and copper piping). You will be working with a propane torch that burns at over 1000 degrees so protect objects around the joint area from heat. Be sure there are no combustible materials nearby, and that you put up a heat guard between the torch and any flammable materials, such as wood studs. An assistant may be appropriate.
Ensure adequate ventilation in your work area, and open doors and windows and consider running a fan. Do as much work as possible at a bench. If you are making several joins, work as many of them out of the plumbing line as possible.
Step 2: Preparing Copper Pipes for Soldering
Using the copper pipe brush, clean the outside of the pipe and the inside of the fitting. After cleaning, the pipes should be free of debris and appear shiny.
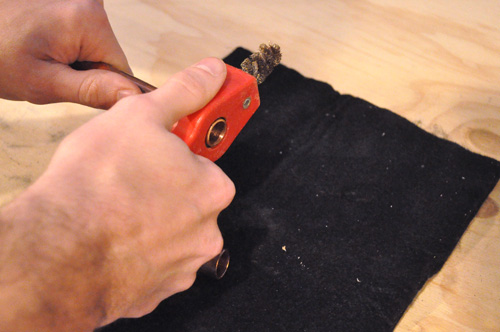
Inspect the pipe and the fitting for burrs (small pieces of metal on the fitting or pipe that prevent an easy join). Try dry fitting the connection to ensure they easily connect, and if they don’t fit easily and snugly, clean the pipes further using the copper pipe brush or sandcloth (shown below).
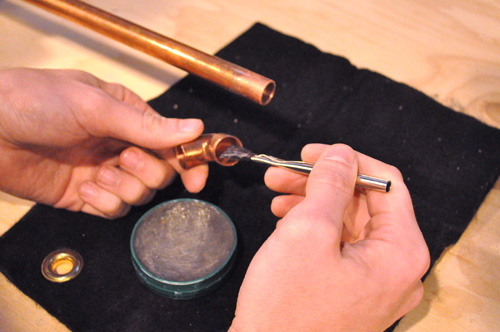
Once dry fitting is successful, separate the pipe and fitting and apply plumber’s flux to the outside of the pipe and inside of the fitting. During soldering, plumbing flux will evaporate and draw the solder into the joint, forming a tight seal all the way around the joint.
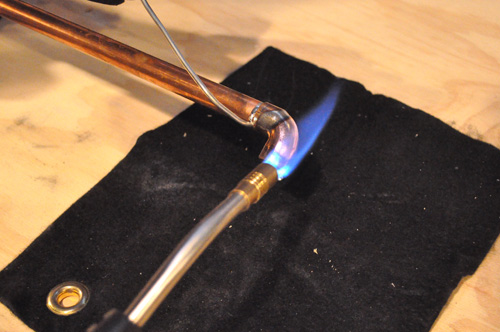
Step 3: Soldering the Pipes
Light the propane torch and turn the flame to medium. Keep in mind that most torches will produce more flame when tilted downward. Be careful to hold the torch in a consistent way. Point the flame directly at the joint. The joint will heat up after about 20-60 seconds. Note that if you’re soldering a valve, it’s better to open the valve to reduce the risk of damage to the valve.
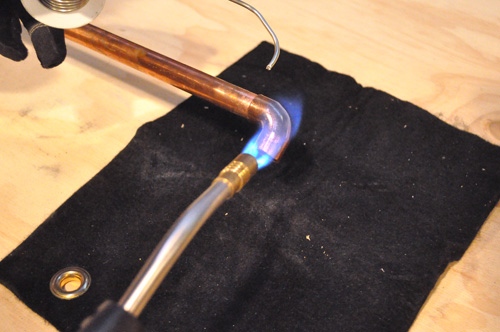
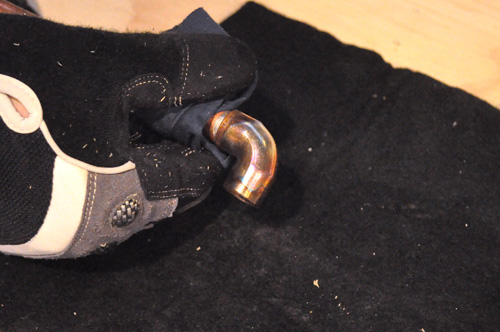
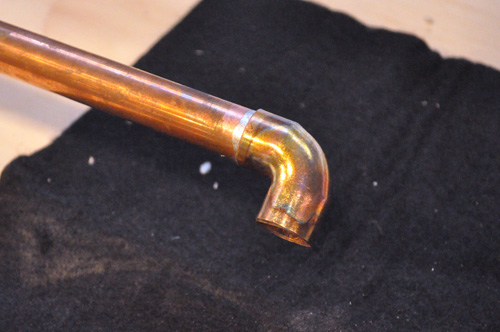
Touch the solder to the crease between the fitting and the pipe. When the joint is hot enough, the solder will melt and capillary action will pull the solder into the joint. As the solder starts to melt, move it all the way around the joint. When solder pools outside the joint, the joint is stable. Turn off the heat and allow the pipe to cool. Clean away excess flux with a damp rag as it can corrode the pipe and later cause pinhole leaks to form.
Step 4: Testing the Solder Joint
If you followed these instructions, the joint is likely very tight. The only good way to test is to put pressure on the joint (turn on the water to the house). Be sure to wait until the solder has cooled (2-3 minutes) before pressurizing the line to avoid the solder cracking due to a quick change in temperature.
More Plumbing Help
Like we said at the outset of this article, for more information on this and other plumbing topics, we highly recommend Stanley’s Complete Plumbing, which covers this topic in more detail and many other home plumbing scenarios. Good luck with your plumbing!
What do you think? Tackled any plumbing projects in your own home? Would you change anything here?

Good post on the basics. Stanley’s Complete Plumbing is indeed a good guide. The two changes I make from the above are (1) using MAPP gas instead of propane, as the fittings heat more quickly and it makes sweating bronze or brass fittings (like dielectric unions) easier (2) using a self-igniting trigger instead of a striker. Being able to squeeze the trigger and have the flame come on is mighty convenient, especially when you’re working up under the house.
Gene – good tips and thanks for introducing me to MAPP… Just read about it on wikipedia @ http://en.wikipedia.org/wiki/MAPP Burns about 2000 degs. hotter than propane making it an excellent choice for this job. You learn something new every day on here.
You might want to add letting the joint cool down before turning the water on. Cold water through hot pipes can make the solder joint crack until it has cooled down for a minute or two. Also, when soldering valves, it’s a good idea to open the valve before applying heat to make sure the least amount of heat gets transfered to the plastic or rubber seat of the valve.
bmulligan – thanks for the tip, and a good one. I’ll update the post.
What about sweating a vertical pipe, where I have to solder the joint upside down? Will the solder still pull into the joint from capillary action, even though the joint line is upside down?
Thanks!
@Paul: Yep. In general, you heat the fitting (versus the pipe), and the solder will flow towards the heat
Good to know, Gene — thanks! I was a little worried the solder would just run down the pipe, and I’d really be stuck!
Paul
What type of solder to use
Richard,
The post contains the answer to the question you asked: Plumbing Solder (non-lead based solder designed for plumbing applications; often a silver-based solder).
From the post, you can see the product here on Amazon:
https://www.oneprojectcloser.com/products/amazon.php?asin=B000G36C76
Two comments:
1. After the pipe cools down a little, clean off the excess flux with a damp rag. If left on, the flux and actually corrode the copper pipe and cause pin hole leaks later on
2. I would advise soldering with the ball valve open, not closed as depicted in the picture. Just aim the heat away from the plastic covered handle. The reason being, if any tiny bit of water got into the valve, it will turn to steam when soldering. Steam under pressure. I once saw a guy burn himself very badly opening a ball valve after soldering it and steam shot out and scorched the fabric on his pants to his leg.
How do you keep the teflon, plastic, or what ever it is inside the ball valve from melting?
Paul,
It won’t melt. Just focus the flame towards where the actual soldering will occur. And note that the valve should be open during soldering (unlike what is pictured above).
Great tutorial! Have a questions on whether the flame is applied at the same time the the solder is touched to the fitting and pipe?
Also, any precautions to take when soldering a shower valve manifold to copper piping?
Rick
What is the material in the valve? It looks like Teflon. How is it that it does not melt? Does it have a high heat tolerance?
I need 3″ copper water pipe 6″ length.
Outside diameter is approximately 3.125
Any help will be greatly appreciated.
Mitch,
Check a plumbing supply shop, probably have better luck than the local big box for that size pipe. Good luck!
I am adding a small bar sink in my basement and tapped into kitchens supply line is there any tricks on stopping water from entering the joint area i am sweating for some reason I keep getting water even though the valve is off ? Almost impossible to get a nice joint.
thanks Rob
Robert,
First, be sure the valve is really working… if it isn’t, you can turn water off further back in the line (even at the street in some cases). If the valve doesn’t completely shut off the water, you can replace it too. See these two articles:
https://www.oneprojectcloser.com/main-cutoff-water-valve-street/
https://www.oneprojectcloser.com/install-or-replace-a-copper-pipe-main-water-valve/
Open the lowest faucet in the house and allow all the water to drain.
One tip I’ve heard of but haven’t used is stuffing bread into the line. Bread will eventually dissolve so it doesn’t clog the line permanently but it can dry up water temporarily.
Let us know how it goes.
Great guide! I was wondering if there is a rule-of-thumb number for the pressure range a sweat connection can handle properly?
Wei, I don’t think there is a standard answer, as this depends on the thickness of the copper employed more than the solder joint. I’m sure there is a code rule for what pressure must be handled by indoor plumbing.
I know that you can install a pressure relief valve on the line to ensure you don’t go over-pressure for the system (these are often installed inline with a main valve in a home in case there’s a pressure spike in the municipal water supply).
Any ideas for a joint that won’t melt? I need to replace a shower/tub valve; I’ve busted through the wall and spent the last two hours trying to get the old valve loose!
I have a standard ‘weed burner’ with a pretty hot flame – there is no sign of this thing letting go with a hefty flame (frustrating!).
Any ideas?
Thanks,
-Tim
…about that last post…
Forgot to mention, the pipe is, in fact, empty (no water). It’s the pipe from the valve to the shower head. I’ve even tried the hot/cold pipes and they won’t budge.
Thanks,
-Tim
Can’t get one of my joints to stay water tight even after several attempts at soldering. Any suggestions?
I finally abandoned all my pipe-sweating attempts and went and bought SharkBite. If you’ve never used it, this stuff is simply amazing. It’s super simple and super easy; you can pick it up at Home Depot.
Seriously, it’s like snapping together tinker toys and then you’re done. Never leaks either. I’ll never sweat another pipe.
-Tim
I just have a repair in a cooper water pipe in the attic and the plumber reapir a 1 foot long cooper pipe and coonectet togheter with a Brass Couplins my question is this repair is permanent and is under the CODE of TX STATE BOARD OF PLUMBING because I am not convence about it, I just whant the wright repair, Thanks
I am refurbishing my bathroom amd would like to bury my water pipes for my toilet and sink in the wall.I would secure them so they wouldn’t move. Should i insulate them?
I should also add they are going to be in an inside wall covered by sheetrock.
Need some advise on seperaing a soldered connection. I was successful with one of the connections (hot water) but I can’t seem to get the other seperated using the sweat method. I think I have over cooked the joint, is that possible?
FOLKS HAVE BURNED DOWN THIER HOUSES BY WORKING NEAR WOOD FRAME AREAS OF THIER HOMES>I WAS TOLD TO USE A WATER SOAKED RAG TO SHIELD JOISTS OR FLOORING FROM THE FLAME>
Mark – that’s a whole lot of capital letters ya got there… We show a flame retardant rag in the post that is typical to use for plumbing. A water soaked rag is a BAD idea. Water transmits heat from hot pipes WAY faster than a dry rag. Trust me; “been there and done that” as they say.
i have a pin hole leak in the hot water pipe going to my shower – it is basically on a level line that is the lowest point in the line – how do I get the water out of it to heat it?
G.E. What I generally do is stick a paper tower (curled up) down into the pipe and repeat it with new paper towels until I get all the water out. If the shower is above grade you can also open the water faucets at a lower level and the water should drain out (with the exception of a little remaining water, sometimes, if you are soldering near the trap).
I just wanted to comment on getting water out of the lines. I had a master plumber come do some work to help me add a full bath to my basement. When he tapped into my water lines he was having problems with water in the lines and asked for some white bread. I oblidged and he used that to dry the lines. First bit of water was pretty nasty when he turned it back on and also it clogged a few of the aerators on my household faucet. I had to remove them and clean them to allow water back through them. Overall the bread trick did work
The bread trick does work. He should have flushed the lines once he was done though. i.e. run the faucet without the aerator for a little bit.
One thing to note about turning off the main water… Turn the water off on the most downstream valve you can. That way if that valve starts to leak over time you can just turn off the next upstream valve while you repair the leaking one. In my house I have three shutoff valves. The one in the yard, the one before the meter, and the one after the meter. So far I’ve had to tighten the packing nut on the one after the meter but can see the day I have to swap it out.
Our meter has a built-in valve, so we’ve only got one on the street. I’ve had to go to that once to swap out the inside main. Worth noting that in every jurisdiction I’ve heard of, it’s perfectly legal to operate the county’s stop, so long as you’re current on your water bills.
Have often wondered what was involved in sweating copper pipe. This article, and the comments, have been very informative. We recently did some plumbing using PEX. Glad we didn’t have to use a torch!
Great article, I’m learning a lot from the site. I’ve got to replace every outside faucet at the house we bought. They all have slow leaks. I’ve got caps or some other valve over them. Between that and some bathroom remodeling, this kind of stuff will come in handy.
If the valve bodies are good and it’s just a leak you could get by with replacing the washer. If you’re in an area that gets cold in the winter replace it with a frost-proof sillcock.
Thanks for the reply, Jeff. Most of them are in pretty bad shape. I figure if I cut the water off to replace one of them, I might as well get them all. Thanks for the info on the frost-proof sillcock.
I recently sweated some copper fittings together ,but only put flux on the outside on the outside of pipe not the inside.Water has been on for two days and no leaks. Is it going to last. thanks
Hard to say without looking at the joint. I’d flux the whole joint for fear of pinhole leaks, but it might be fine. Hard to know.
I’m trying to solder a 1/2″ male adapter onto my cold water supply under my kitchen sink. I’ve followed all of the steps, & my connection is smoking. Seems like it’s very hot, but the solder isn’t melting. Any suggestions? Thanks
Two most common problems — (1) water is not all the way out of the line or is too close (needs to be at least 6 inches away — (2) you aren’t letting the pipe get hot enough. The solder will melt if the pipe gets to solder’s melting point (around 400 deg. F)
Thanks for this very informative site!
I have a pinhole leak one foot outside my home. It’s the main line from the street (copper), that runs into black plastic pipe at the footing of the house (1.5 feet down). When installed (years ago), it looks like the copper pipe was “bent” to meet the black plastic pipe, and this is where the leak developed. Because of the bend in the copper line, I cannot use a line-clamp as you’ve described on this site. I was however, able to stop the leak by wrapping the line with electrical tape and placing two pipe clamps tightly over the tape. This stopped the leak completely, but is of course, only temporary.
My question is, how can I reattach copper line to the black plastic line, once I remove the leaky copper portion? The leak is very close to the black pipe, so I don’t think there is enough pipe extending out to add a sleeve. It looks as though the copper line (male end) is simply inserted into the black pipe. What method is used in this case? Thanks for your response.
Hey would you mind stating which blog platform you’re using?
I’m going to start my own blog soon but I’m having a
hard time choosing between BlogEngine/Wordpress/B2evolution and Drupal.
The reason I ask is because your design seems different then most blogs and
I’m looking for something completely unique.
P.S Sorry for getting off-topic but I had to ask!
I have a couple suggestions for anyone doing plumbing repairs. Install valves! If you need to do work on a tub, cut the water to the house and then install a valve on the line you need to work on – actually I do both lines whether I’m working on one or both. Once in place you can isolate the tub from the rest of the house and turn the main back on. I assure you, there are few things that make a wife tough to live with like no hot water! I’ve done this for every plumbing job I’ve had to do and it does add a bit to the price but, if I ever have to go back (or the next owner needs to) I can do the work without shutting down the entire house’s water system. I’ve done the same for two pipes that froze on me last winter so I can shut them down in advance of extreme cold weather. If I have to repair or replace it, a valve goes in. It takes very little extra time once you have the pipes exposed so its really cheap insurance.
Second is to never bury plumbing joints if you can in any way avoid it. I ran into a leak in the upstairs bath and had to rip out an entire wall to get to it. Had the builder installed an access panel things would have been so much easier both coming and going. I ended up putting in a tongue and groove lower wall (as from the hanger bar down) in the closet backing the tub with two sections that pull out for access. I’ll never have to rip out a wall to reach either of top floor baths for repairs or upgrades.
Tim…
I think you do pretty well teaching or informing with this topic. But, how do you repair a joint that does leak?
Start over, just reapply more solder? What do you do?
Thanks in advance.
MAPP may be good for larger brass fitting…. The standard “blue” bottle propane is best when using modern water-based flux… Keep the flame low and pull out as soon as the flux changes color… MAPP can easily over-heat and burn the water-based flux ..then no solder will stick…you have to take everything apart, re-clean and re-assemble… With the “old-school” flux, too much heat was not not a problem..