
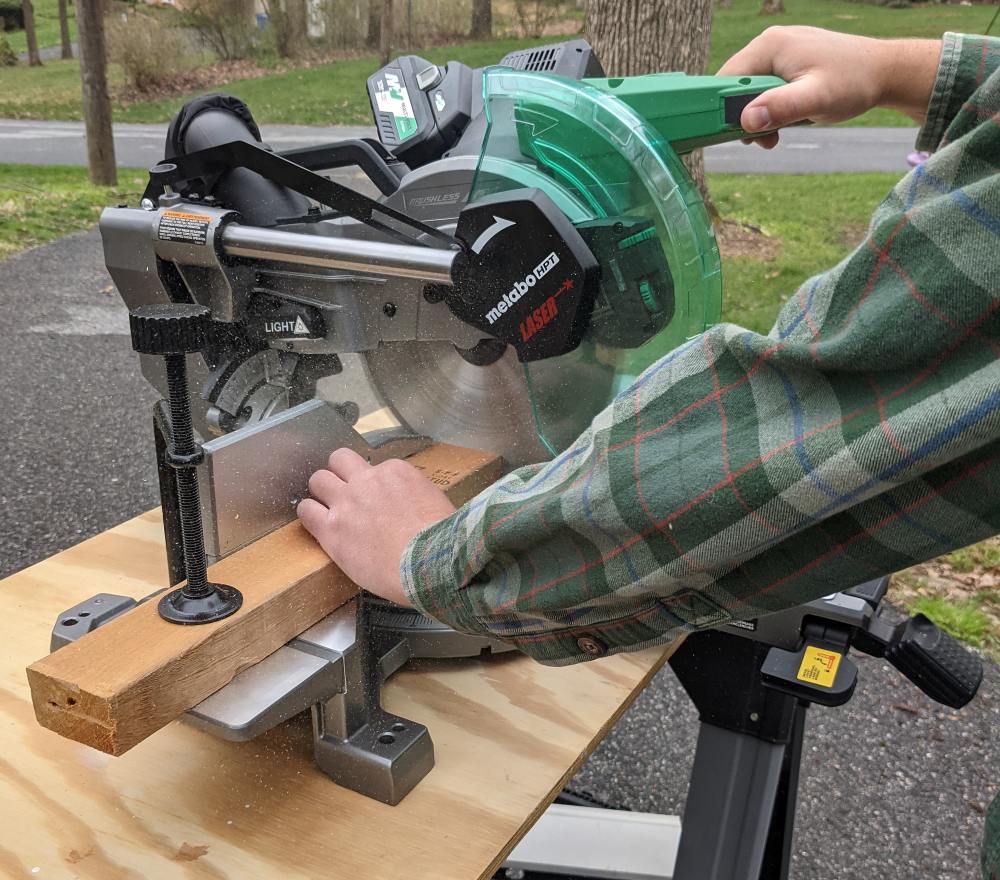
Matabo HPT MultiVolt 10-in 36-Volt Sliding Compound Hybrid Miter Saw Review
April 14, 2021 | by Aaron (email) |I’m dusting off the proverbial sawdust from my testing bench and taking a look at an offering from Lowes. Lowe’s shipped us their new Matabo PHT Hybrid Multivolt 10″ 36V Sliding Compound Miter Saw (C3610DRAQAM) for test and review. This is my first time using a cordless miter saw so I’m excited to see how it stacks up against the many corded models I have experience with. Being a hybrid tool, there is also an optional AC Adapter that allows the tool to be used as a traditional corded miter saw. While Lowe’s provided this tool for free, they are not compensating us for this review and these thoughts are entirely my own.
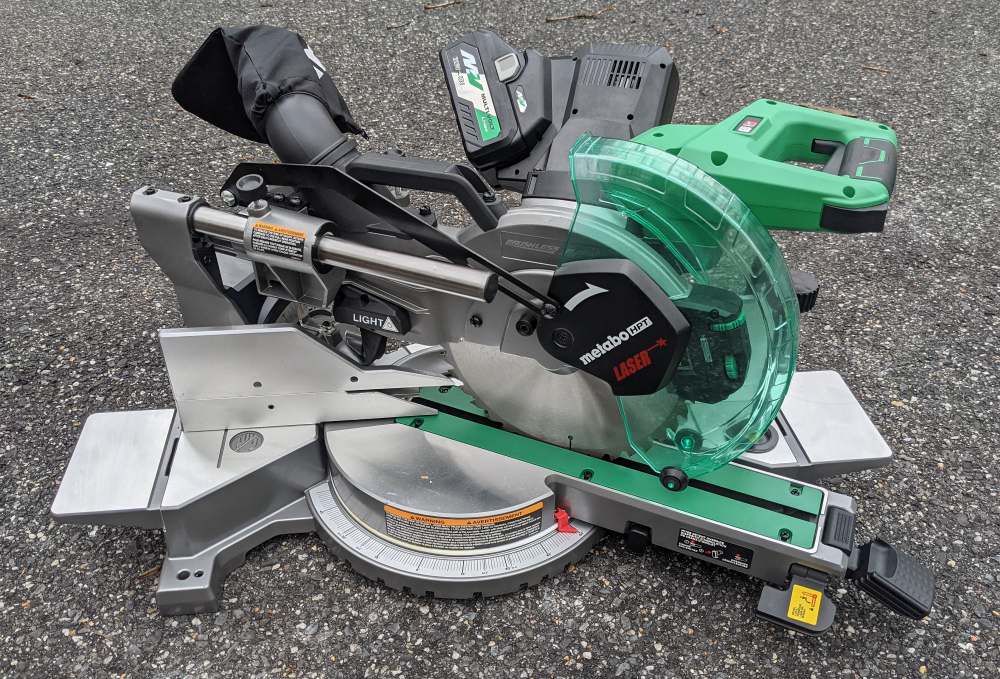
Key Features and Capabilities
- Hybrid power: 36 Volt 4AH Battery or AC Adapter
- Portability: Cordless power allows for easy access to any job site
- 0-60 degree miter angle to the right and 0-55 degree miter angle to the left
- 0-48 degree bevel angle range to either side
- Work light and adjustable cut-line laser
- Bevel and Miter locks easily accessible on the front of the saw
- Excellent depth of cut for a compact saw at 12.5″ for 90 degree cuts and 11″ for miter cuts
- Adjustable vertical cut depth
Performance and Testing Features
The two biggest factors I look for in a Miter saw are cut quality and accuracy. I was pleasantly surprised to find that the 36Volt 4AH battery provides plenty of power, resulting in clean, repeatable cuts. Though the cut line laser is a bit finicky to adjust, once dialed in, coupled with the LED work light it makes lining up cuts a breeze.
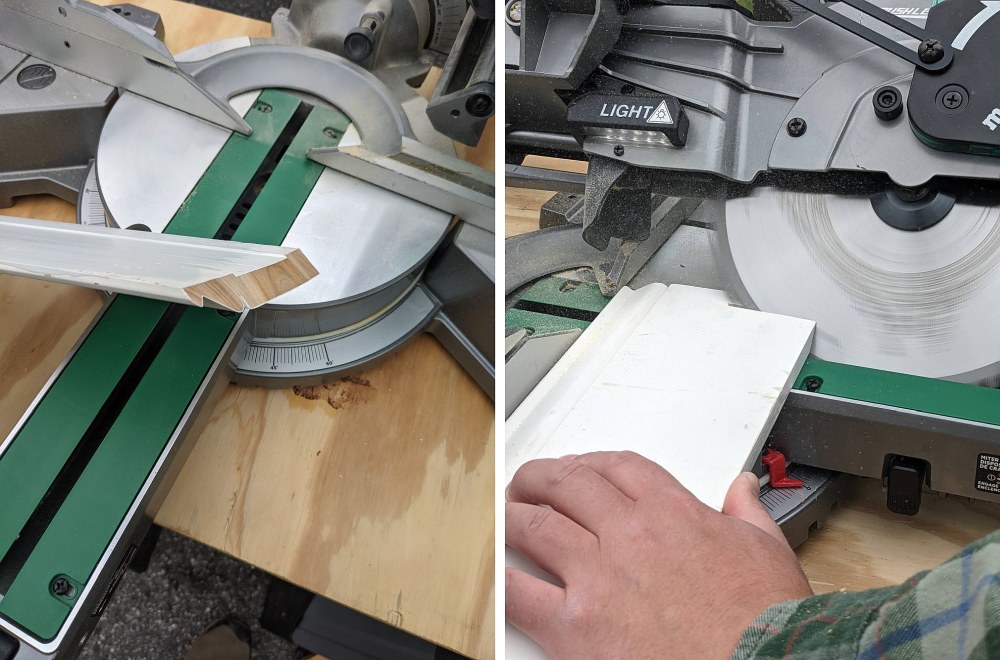
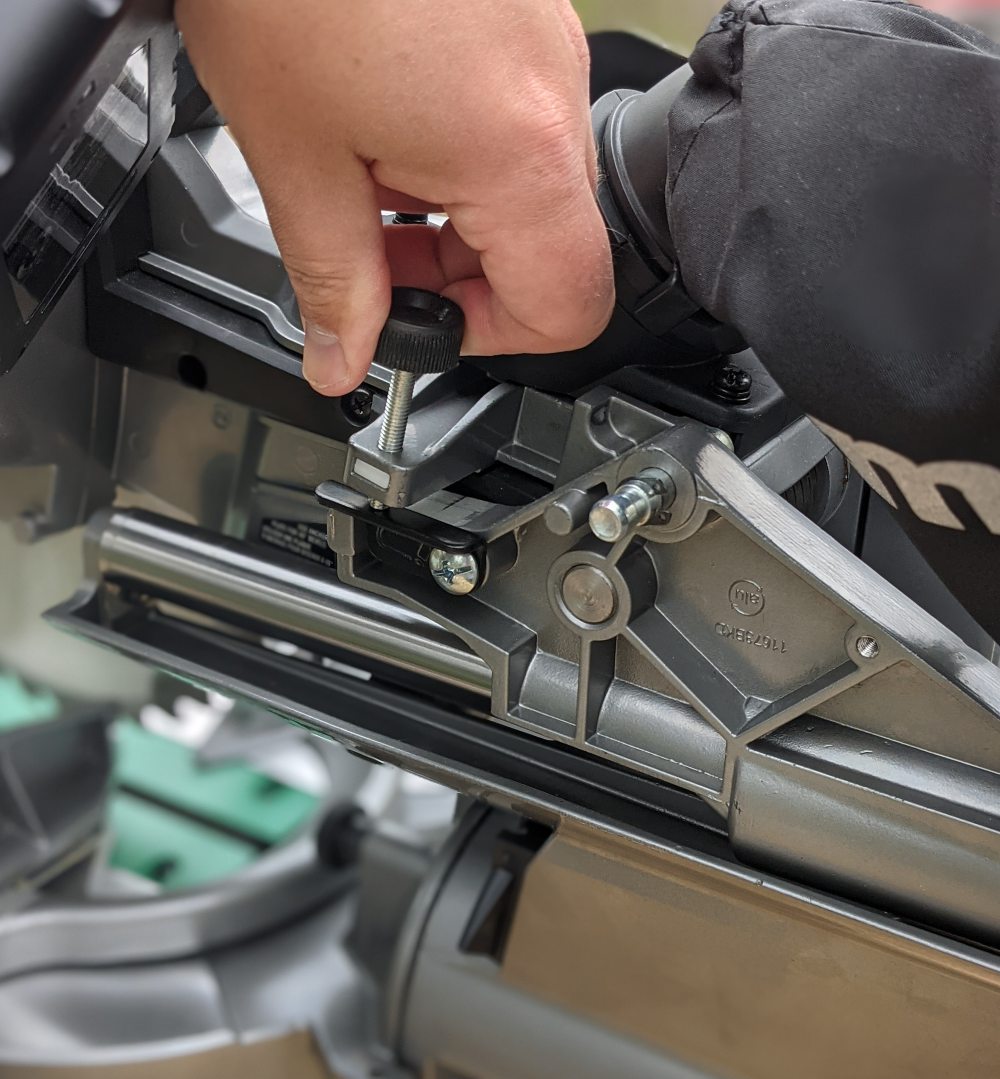
In addition to clean cuts, adjustability is also important. Having the miter and bevel locks at the front of the saw is a welcome feature and they function well. Not only does the Metabo HPT C3610DRAQAM have the usual adjustable miters and bevels, it also has a vertical depth of cut feature that could prove quite useful. By flipping down the black bar in the picture below and adjusting the knob, one can adjust the saw to only cut to a certain vertical depth into the material.
Overall Impressions
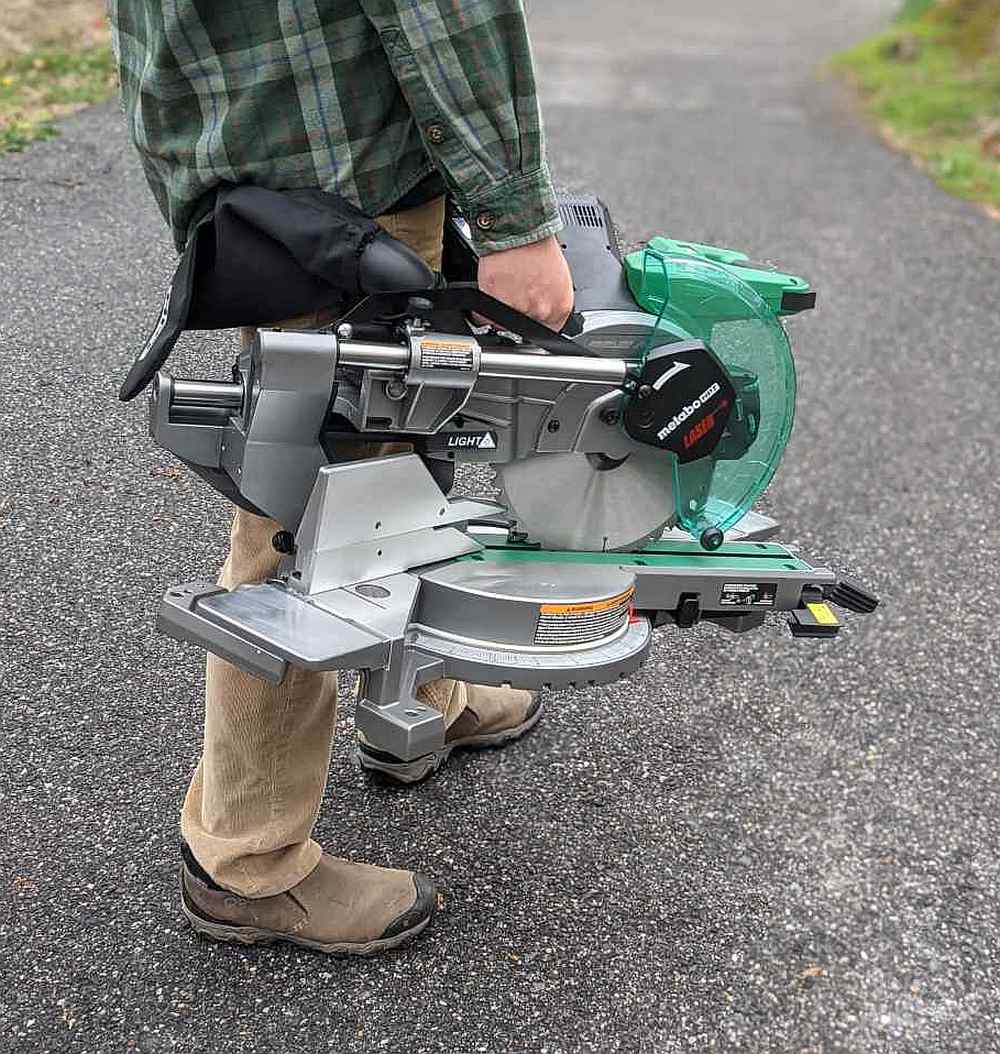
Easily the most impressive thing about the Matabo HPT C3610DRAQAM is the power that the included 36 Volt 4AH battery provides. I put it through several cuts, including some older Douglas Fir 2x4s I had laying around, and it never once bogged down. The ample power combined with the extensive list of features makes this miter saw a strong contender for anyone looking for a reliable workhorse. Also, having the capability to adapt it to AC power makes this quite versatile. It can be used in a shop-type setting or easily packed up for a day on the job.
Where To Buy
Both the Matabo HPT C3610DRAQAM with battery and charger and the Matabo MultiVolt 36-Volt 4 Amp-Hour Lithium Power Tool Battery Adapter Kit are available at Lowes. It can also be purchased as a kit (C3610DRA) with the AC adapter, but then does not include the battery and charger.
Matabo HPT C3610DRAQAM (battery and charger) – $669
Matabo HPT C3610DRA (AC adapter) – $669
Matabo MultiVolt 36-Volt 4 Amp-Hour Lithium Power Tool Battery Adapter Kit – $169
Thank you so much for joining us at One Project Closer for this tutorial on DY Car Maintenance: Oil Change tips and tricks. This post is sponsored by the Home Depot Prospective Campaign. Post may also contain affiliate links. Opinions (and typos) are 100% our own, and we appreciate you supporting our site in order to continue to provide free content to our readers. Professional auto mechanics may have a different way of completing this project – this advice does not replace common sense or the need to consult a professional. DIY at your own risk.
If you haven’t ever changed the oil on your car before, this is a great project for the beginner Car DIY. Be sure to check out my previous article first if you’re unfamiliar with the basic process of changing the oil in a vehicle. Now for a few oil change tips and tricks!
Tip #1 – Save Those Containers
I briefly touched on saving your oil containers to store your spent oil for delivery to a recycling or disposal facility. However, other plastic containers can work just as well, and if you buy in bulk like our family does, chances are you have plenty of them to choose from.

Tip #2 – Wear Gloves
That may seem like a silly tip, but I honestly hadn’t thought of it until someone else suggested it to me years ago and it makes cleanup so much easier because no matter how meticulously careful you are you will get some oil on your hands.
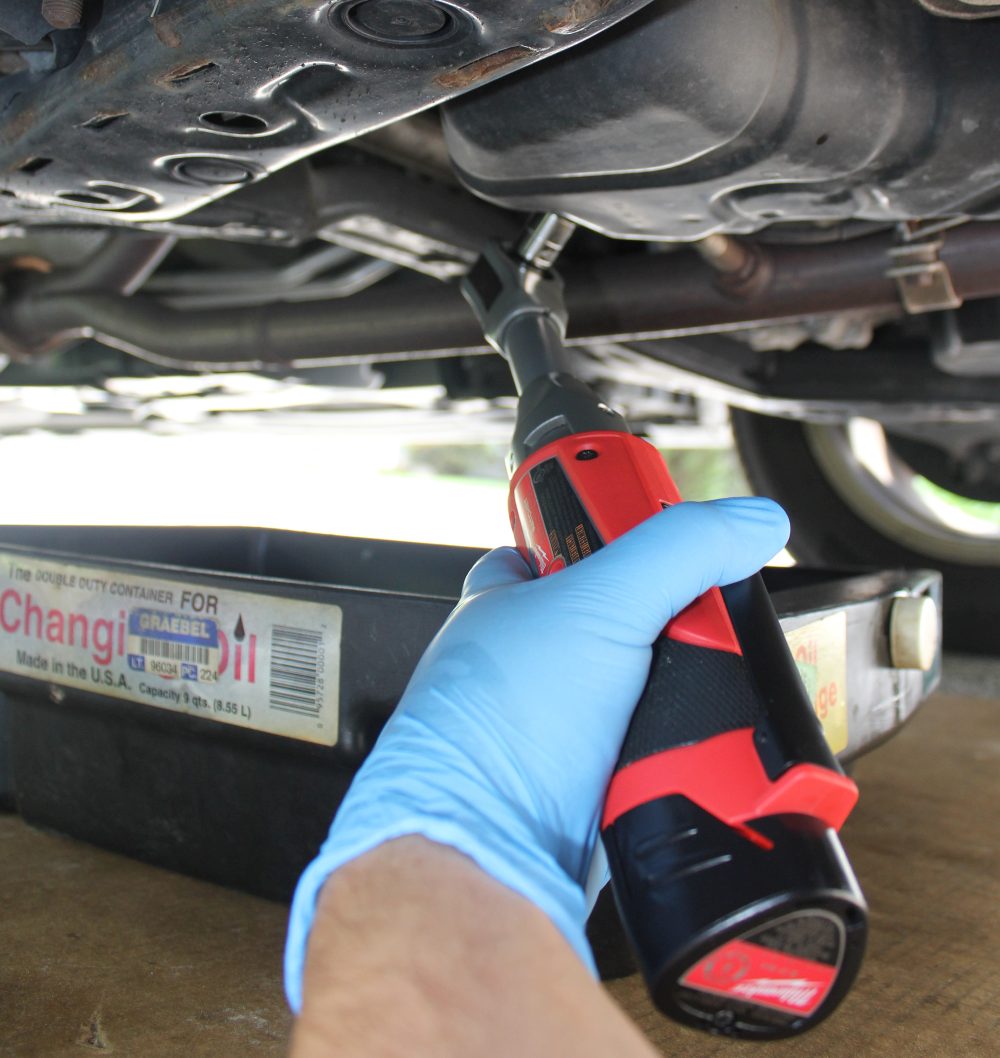
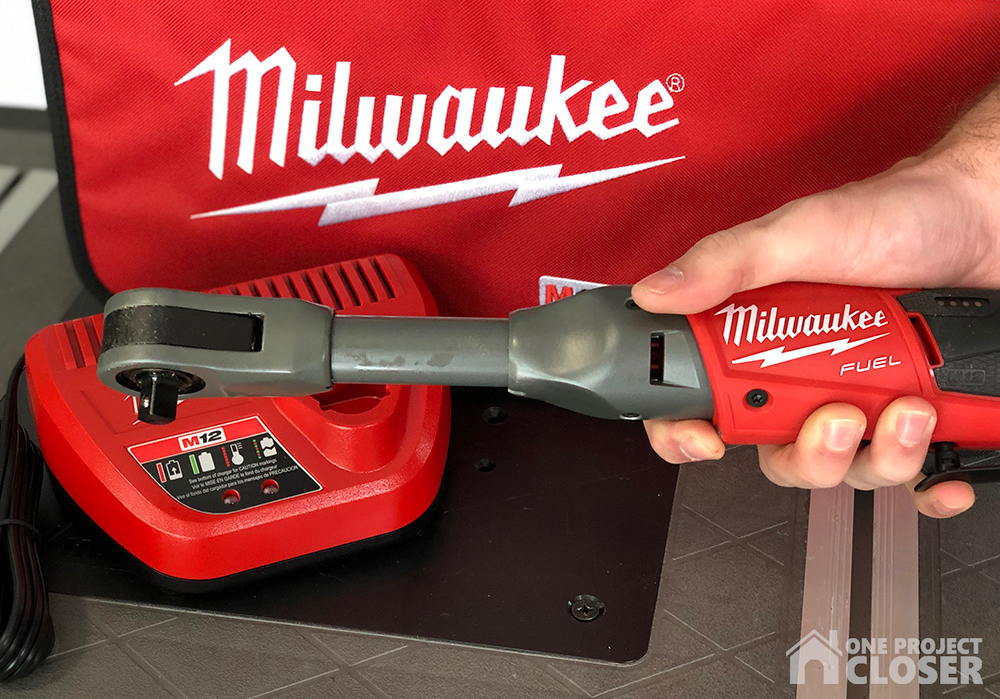
How Does The Wrench Perform?
Here you can see I’m using the Milwaukee M12 FUEL long-reach 3/8″ ratchet to loosen the oil plug nut on the oil pan. Measuring a total 11.5″, this tool really shines for jobs like this, where using a traditional wrench is a stretch and quite awkward to get enough torque on a bolt. With a max 55 ft-lbs of torque, the Milwaukee wrench is on par with it’s more cumbersome pneumatic competitors. If I have one complaint, it’s that the tool feels heavy in the hand, though not ergonomically uncomfortable. Having said that, the reason it is so heavy is because it’s built to last with metal internals that are sure to give you several years of reliable service. The power trigger also has good feedback and is progressive, meaning the more you pull it down, the faster and more forceful it moves. Forward and reverse are adjusted via a traditional switch on the head of the wrench. Overall, I was impressed with the quality of the wrench and could definitely see using it for many projects in the future.
Tip #3 – Quality Matters
I know at least part of the reason you’ve chosen to change your own oil is to save money, but please don’t cheap out on oil and filters. Choose a brand name synthetic oil and your engine will thank you with increased performance, economy, and longevity. For oil filters, I prefer to get the OEM filters from the dealer. Call around or search the internet though because like everything else at car dealerships, prices vary widely. I tend to stock up so I don’t have to visit the dealer every time I need to change the oil.

Tip #4 – Use the Doohickies
Yes, that’s the official technical term. No, please don’t fact check that. In all seriousness though, if your vehicle has a cartridge style oil filter and you follow my above advice regarding OEM filters, chances are it will come with a little plastic drain (doohickey). There will be a smaller cap on the end of the filter housing that is typically removed using a 3/8″ ratchet wrench or a hex wrench. Remove this and then clip the drain into the exposed hole. Doing so releases an internal spring valve that allows the oil to drain out of the housing before removing it completely, which equates to less mess. When you pull the drain out it will pull the rubber o-ring seal out with it. Not to worry, this is intentional and your new filter comes with a new one you should use anyhow.
Tip #5 – Oil Your Seals
The new gaskets / o-rings on your oil filter will seal better with a little lubricant. Dip a clean finger into a container of new motor oil and rub the oil on the new seals before installing them.
That about sums it up for my oil change tips and tricks. I’d love to hear some of yours!
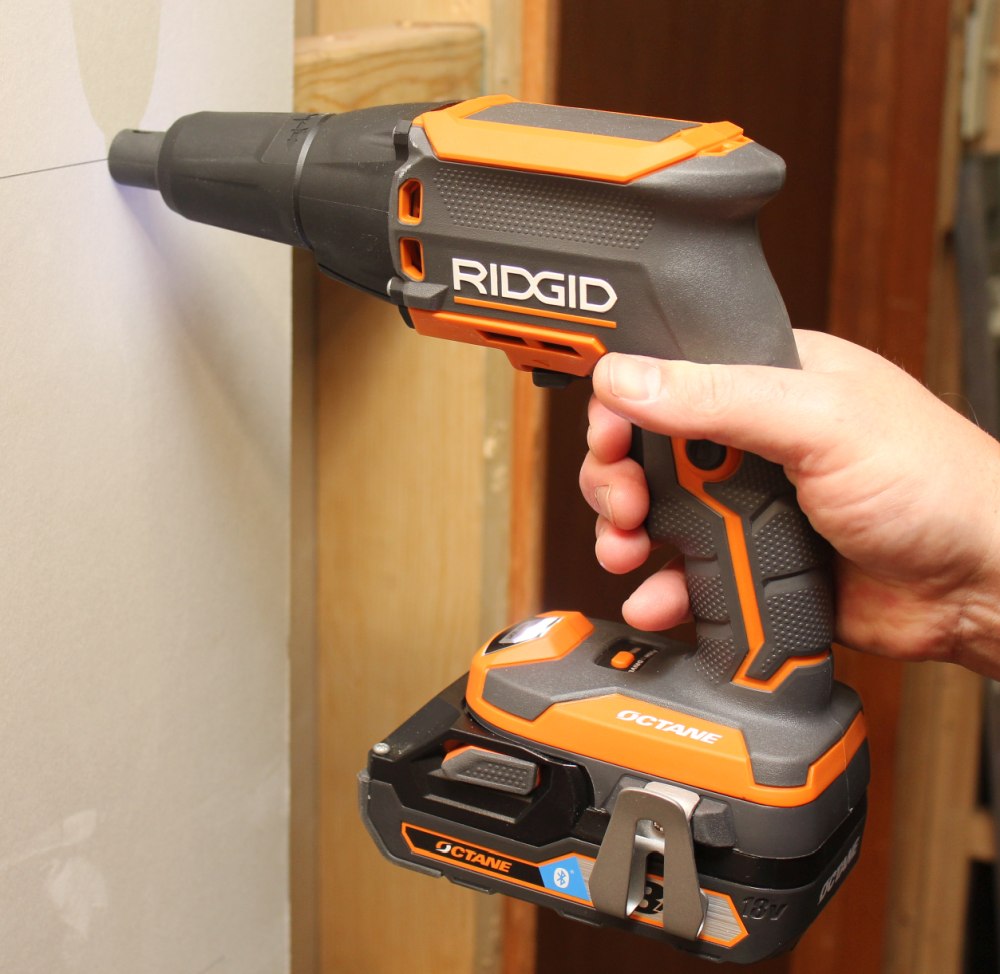
Tool Review: Ridgid 18-Volt Cordless Brushless Drywall Screwdriver
January 19, 2020 | by Aaron (email) |Thank you so much for joining us at One Project Closer for this tool review: Ridgid’s Brushless Drywall Screwgun. This post is sponsored by the Home Depot Prospective Campaign. Post may also contain affiliate links. Opinions (and typos) are 100% our own, and we appreciate you supporting our site in order to continue to provide free content to our readers.
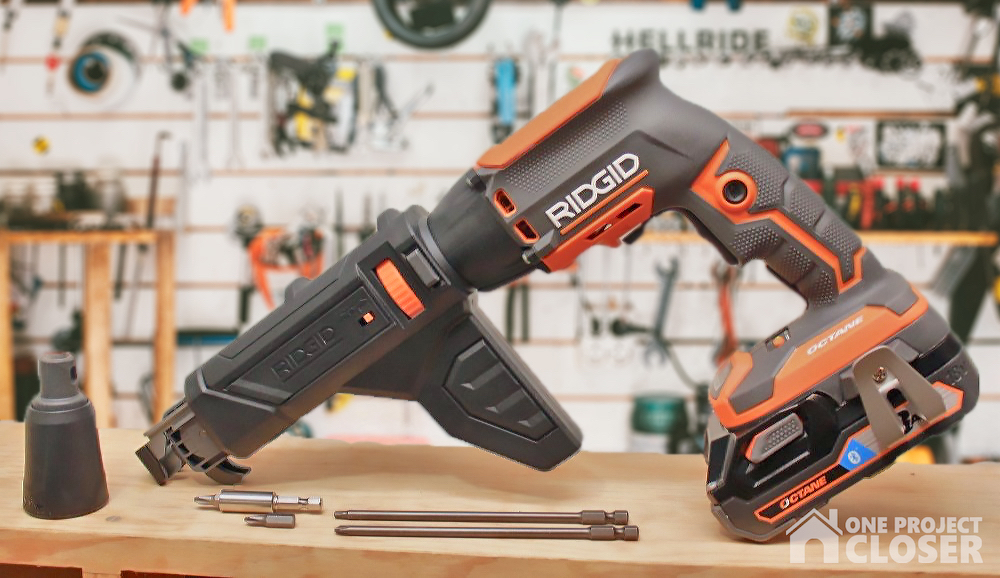
Ridgid was kind enough to supply us with their Cordless Drywall Screwgun, which is part of their new Octane line of brushless tools. I already owned a several-years old corded version by Ridgid, which I honestly wasn’t too impressed with. Up until now, whenever I’ve had a drywall project to complete I find myself reaching for my cordless drill driver or impact driver to get the job done, while the corded gun sits in the box. Read on to find out why I’ll be reaching for this tool instead from now on.
What You Get
Along with the screwgun, Ridgid packs in some nice accessories…
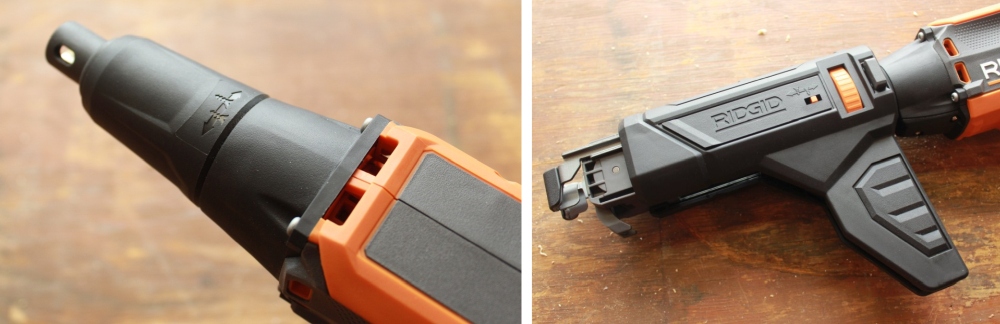
- Drywall Nose Cone – With tool-less attachment and screw-depth adjustment.
- Collated Attachment – Also with tool-less adjustment (some manufacturers sell this as a separate accessory)
- Two Long Bits – one square head and one phillips head
- Two Phillips Head Bits
- One Bit Hex Drive Bit
Notable Features
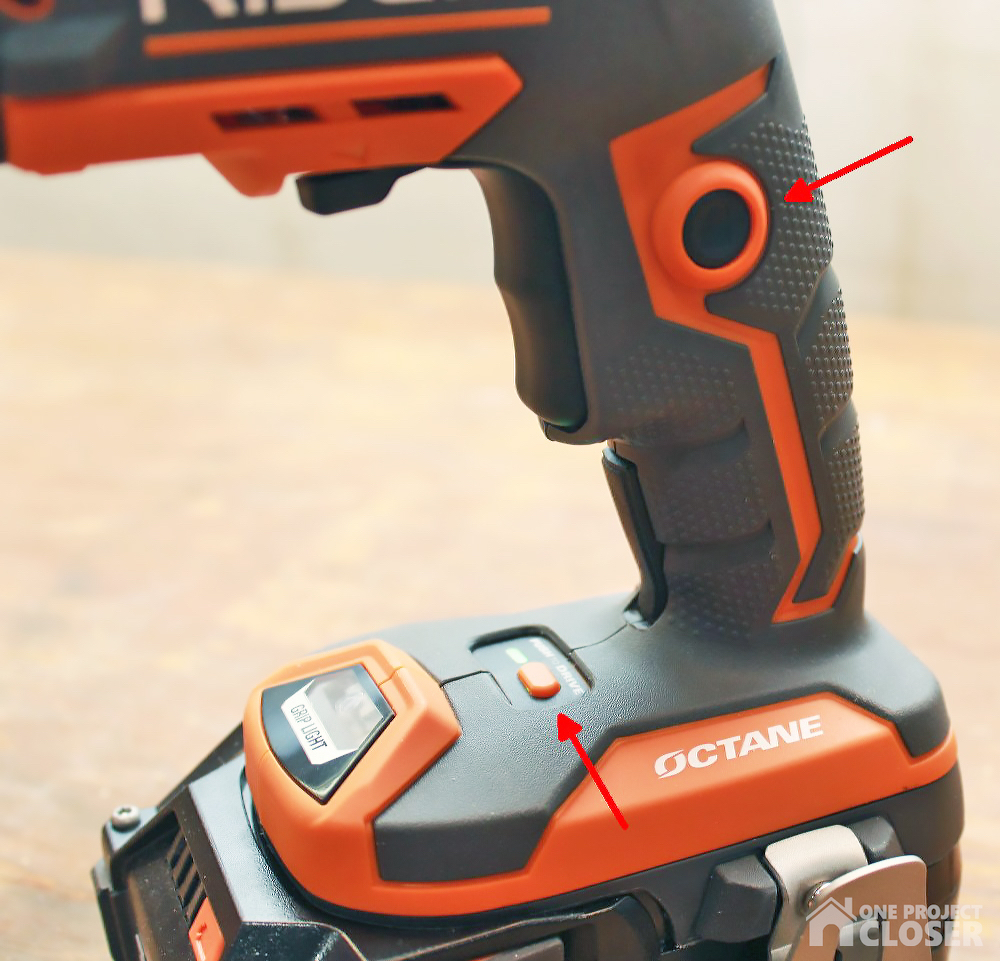
By far the coolest feature Ridgid has incorporated in this screw gun is Power Drive mode. Once activated, the motor only turns on to drive screws when pressure is applied to the surface you are screwing into. To make things even more efficient you can also lock the trigger with a button on the handle. Power Drive mode makes for a more efficient workflow while maintaining battery life and keeping the job site quieter.
The nose cone and collated attachments both clip on and off without tools, making them a breeze to switch between. Screw depth adjustments on both are toolless in nature as well.
Performance
Whether in the automatic Power Drive mode or manual mode, the Ridgid drywall gun performed well. Once I achieved the proper screw-drive depth this tool was unstoppable and allowed me to drive more screws, more accurately, in a shorter amount of time. What more can you ask for?
Value
It’s been my experience that Ridgid tools offer a great balance of performance and value and this tool is no exception. It’s available exclusively through Home Depot at $149 for the bare tool if you’re already heavily invested in Octane batteries or as a complete set with two 2 Ah Octane batteries, charger, and carrying case for $299.
Thank you so much for joining us at One Project Closer for this Bosch Daredevil Standard Spade Bit Set Review. This post is sponsored by the Home Depot Prospective Campaign. Post may also contain affiliate links. Opinions (and typos) are 100% our own, and we appreciate you supporting our site in order to continue to provide free content to our readers.
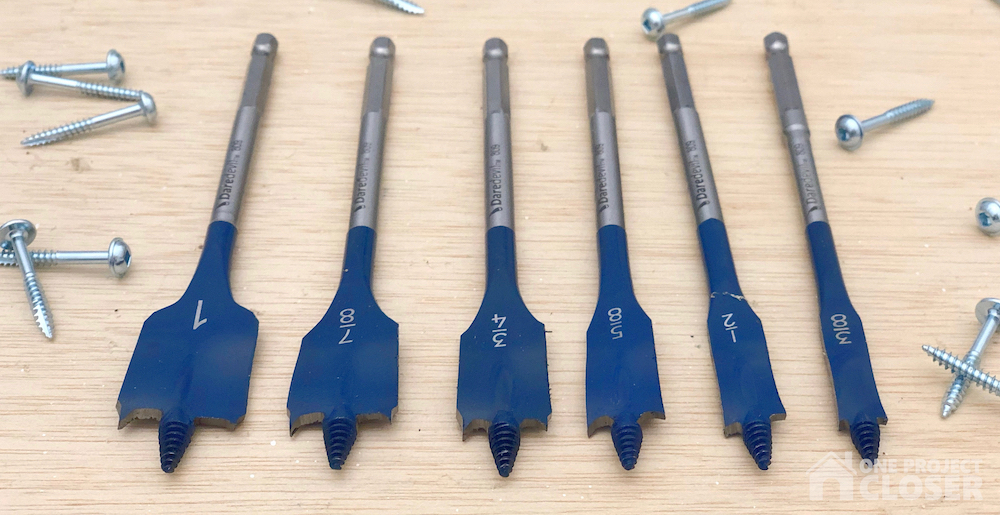
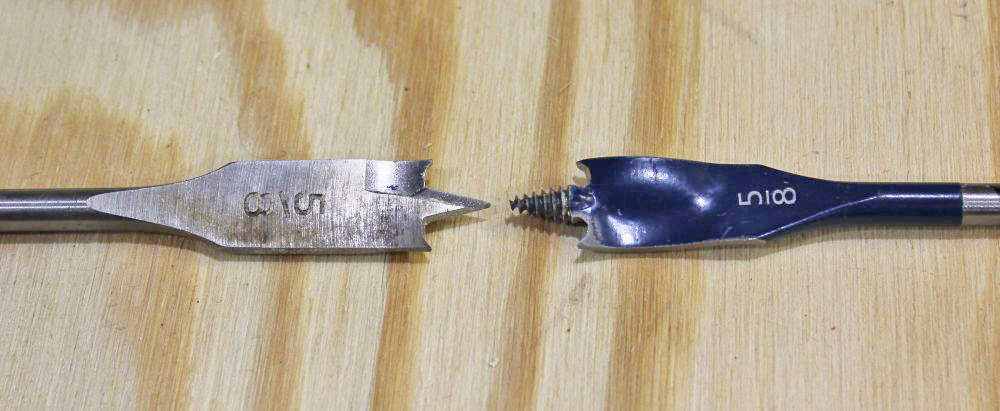
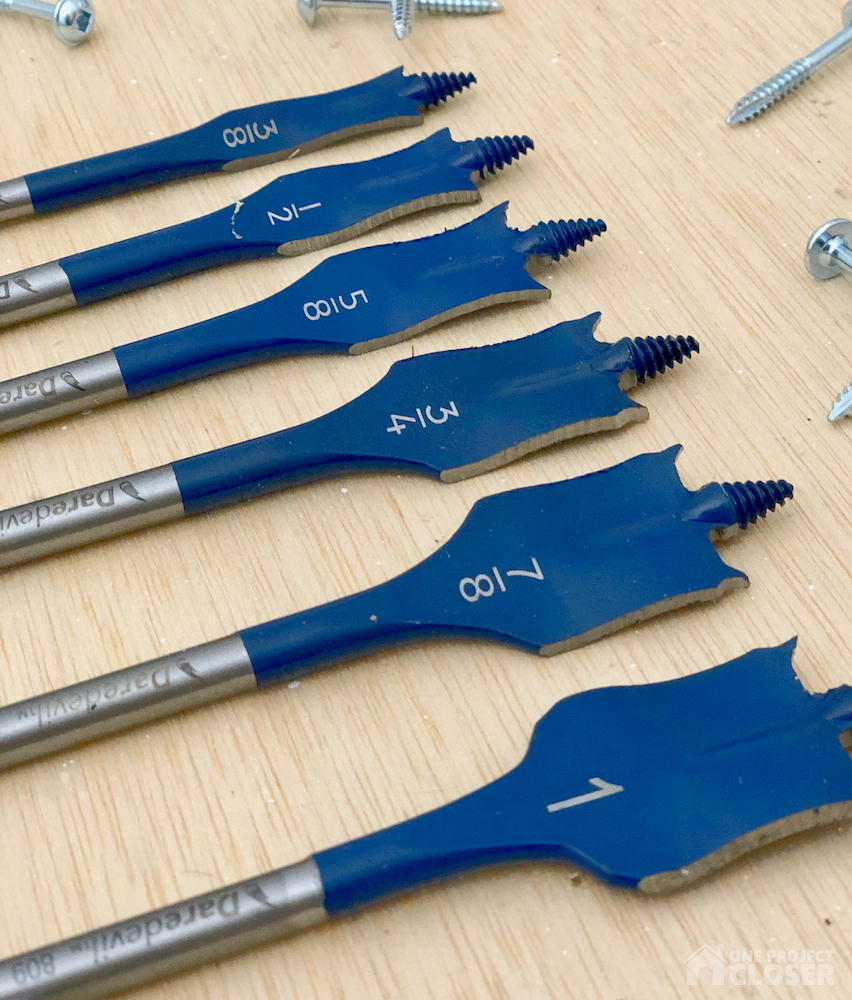
We’ve long been fans of the Bosch Daredevel Spade Bits! They cut faster, last longer and are well worth the investment! Back in October of 2018, Bosch sent us their new Daredevil 12-piece spade bit set to try out. The short of it is that their performance was surprisingly impressive. The screw-tip point and contoured paddle cutters really do work to pull the bits through a workpiece with ease. You can check out my original review here on our sister site Toolbox One. Bosch recently sent us the 6-piece set so I’m revisiting my review from two years ago and fit them just as impressive as I did two years ago.
Testing Claims
In the original article, I timed the speed it took to go through a standard 2 x 4 using 5/8″ bits, and while Bosch claims speeds up to 10x as fast, my findings were closer to 3-4x as fast, which is still quite notable. Add up the time and physical exertion saved, and the small uptick in price for these premium bits starts to make quite a lot of sense.
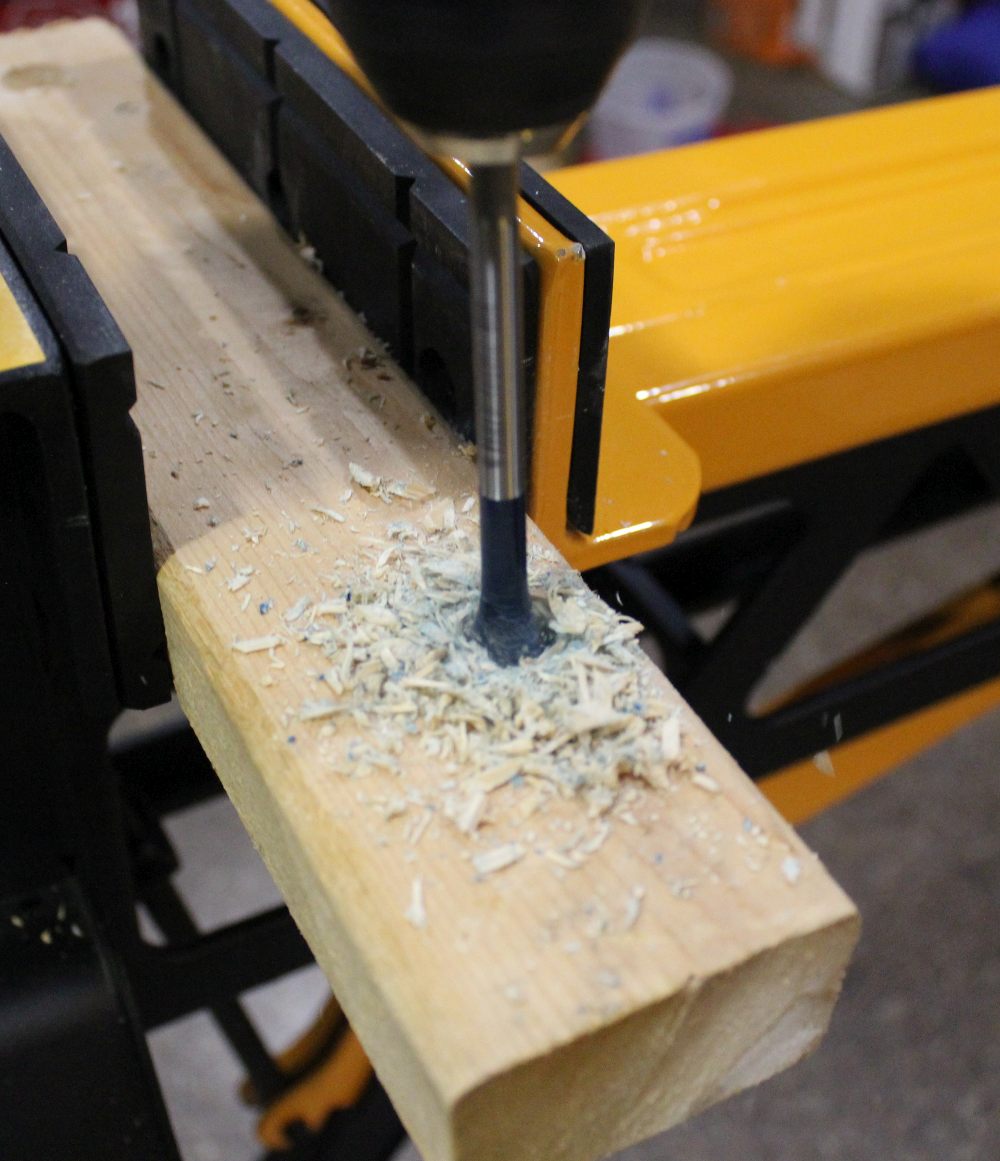
Let’s Test It Out!
If pictures are worth a thousand words, then videos must be worth even more. Check out this quick side-by-side comparison video of me drilling through two 2 x 4s using a competitor’s standard style 3/4″ spade bit vs. the Bosch Daredevil 3/4″ spade bit. After you watch the video be sure to pick up a set at your local Home Depot for under $11.00!
Thank you so much for joining us at One Project Closer for this tutorial on How To Change Oil In a Car. This post is sponsored by the Home Depot Prospective Campaign. Post may also contain affiliate links. Opinions (and typos) are 100% our own, and we appreciate you supporting our site in order to continue to provide free content to our readers. Professional auto mechanics may have a different way of completing this project – this advice does not replace common sense or the need to consult a professional. DIY at your own risk.

Home Depot sent one of their Husky 100-Position Double Ratcheting Wrench Sets to try out. Being that I’ve been on a bit of a car maintenance tear with my latest blog posts, I thought I’d write about changing oil since we’ve already covered brakes, rotors, and tire rotation. Also be sure to check out a few of my oil change tips and tricks!
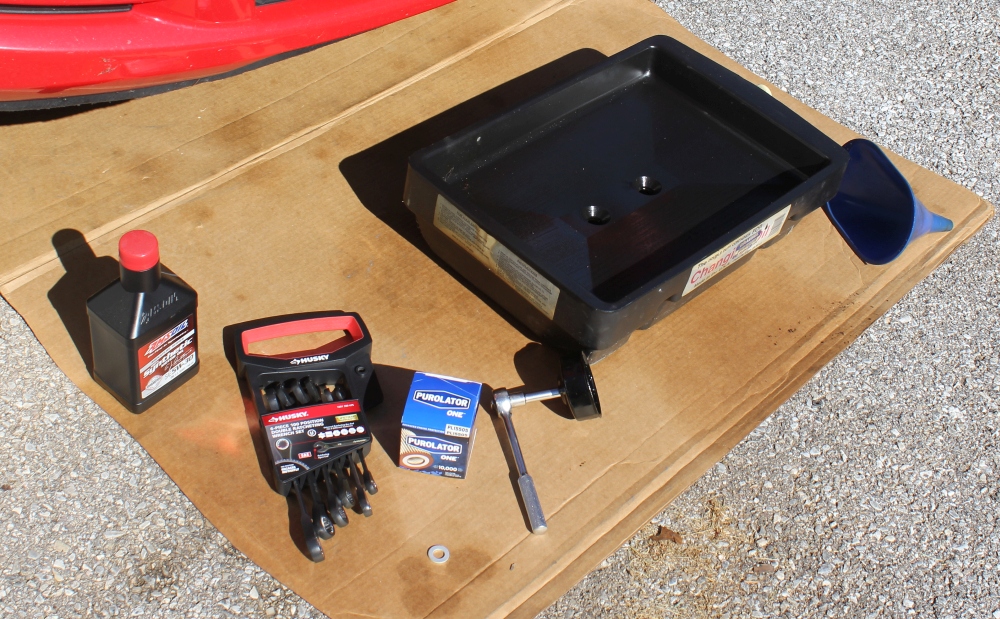
What You’ll Need:
- Oil – your car manual will tell you which weight and how many quarts you’ll need for your particular vehicle. I recommend spending some of that money you are saving doing it yourself, and upgrade to synthetic oil. You can go longer between changes and your engine components will last longer.
- Funnel
- Husky 100 Position Double Ratcheting Wrench Set (make sure to get SAE or metric based on your vehicle)
- Oil Filter
- Oil Plug Washer
- Oil Collection Pan
- Old Cardboard or some other spill protection
- Old Rags or Shop Paper Towels
- Oil Filter Wrench and 3/8″ Drive Ratchet Wrench – oil filter wrenches are specific to different types of car makes.
- Jack
- Jack Stand
Don’t forget to get the best Home Depot Coupons and deals before buying your tools for this project!
Let’s Get Started:
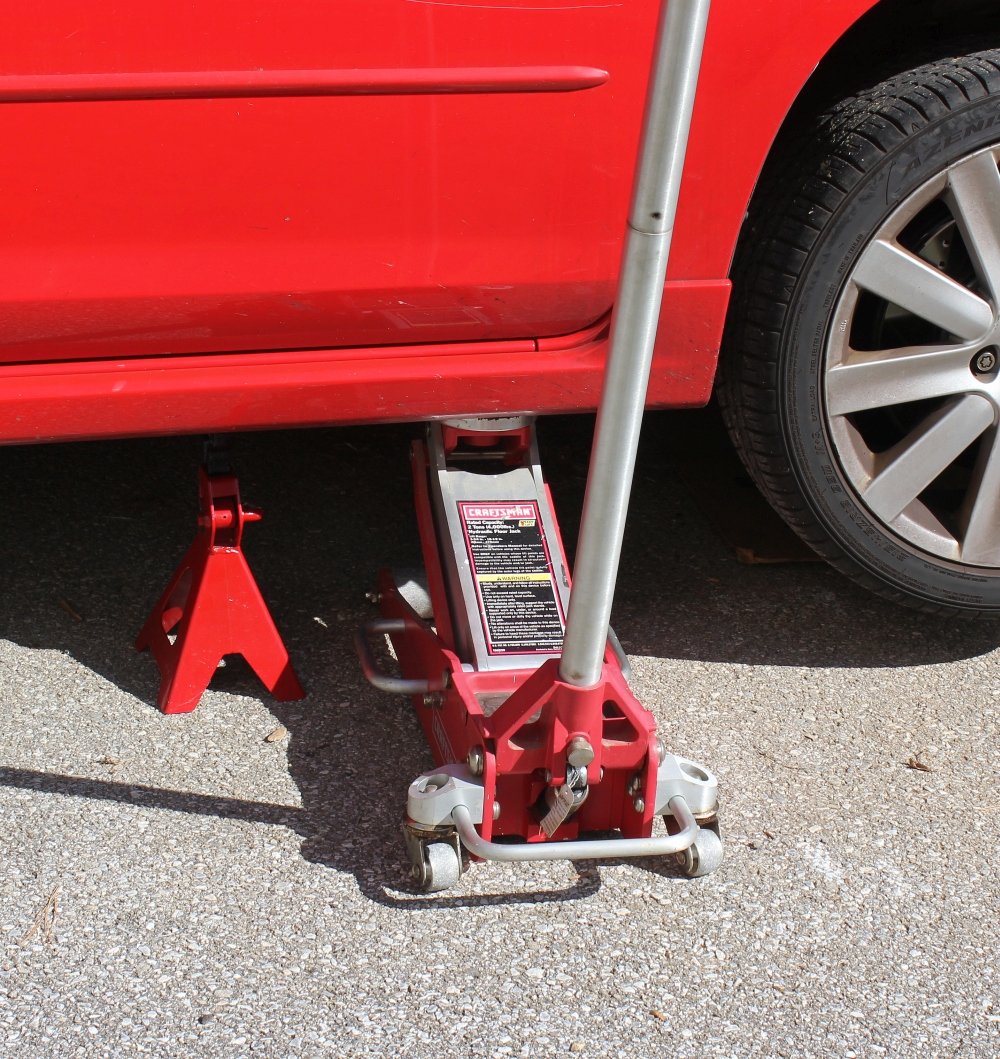
If you don’t already know which side your oil pan is on lie down and take a peek under the car. That is the side of the car you’ll want to jack up enough so you can slip in underneath with a wrench. Don’t forget that jack stand for added safety!
Step One
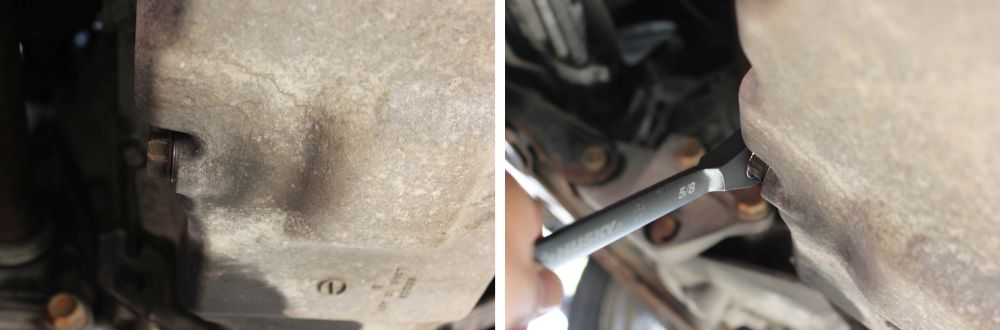
Locate the oil pan plug and position the oil catch pan underneath. The oil will shoot out with some force so be sure to factor that in when placing it. Using the appropriately sized wrench for your oil plug loosen it a 1/2 to 1 turn. Set the wrench aside use your fingers to untighten the bolt until it feels loose.
Quickly pull it away from the oil pan, allowing the oil to drain freely into the catch pan. Now remove the jack stand and carefully lower the vehicle back down while the oil is draining to get the best drainage. After 15 minutes or so the drainage should have slowed to a drip. Jack the car back up and replace the oil plug using a new washer and torque it down firmly with your ratcheting wrench. These Husky wrenches are super solid and the fine control ratcheting action makes them super useful for tighter spaces. And even IF, you were to break one, and that’s a big if, simply return it to Home Depot for a replacement no receipt necessary.

Step Two
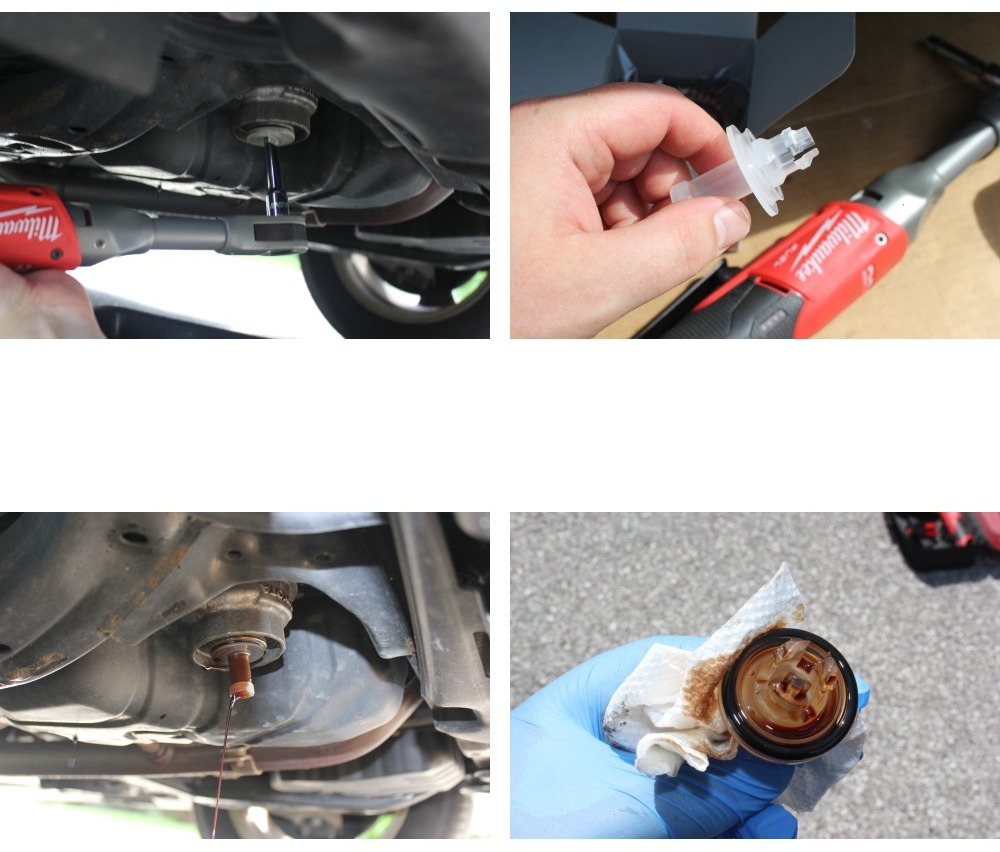
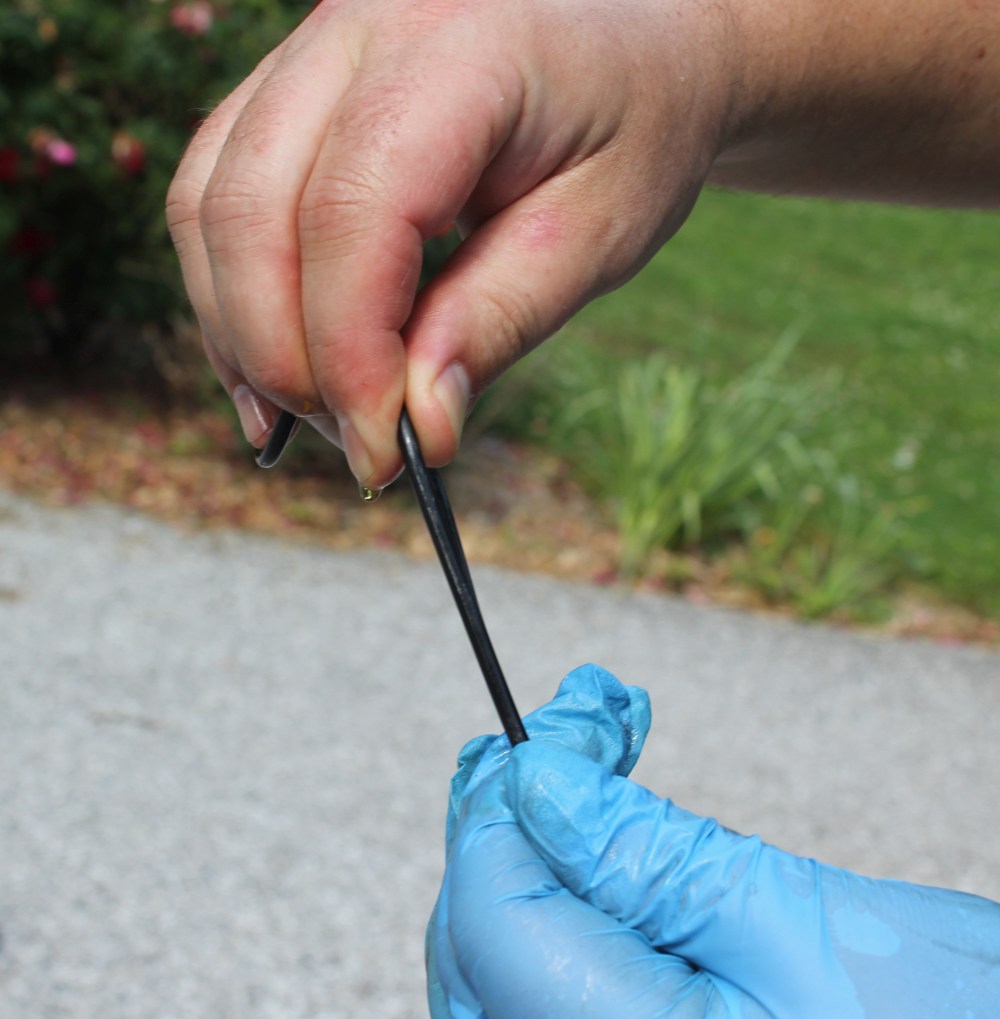
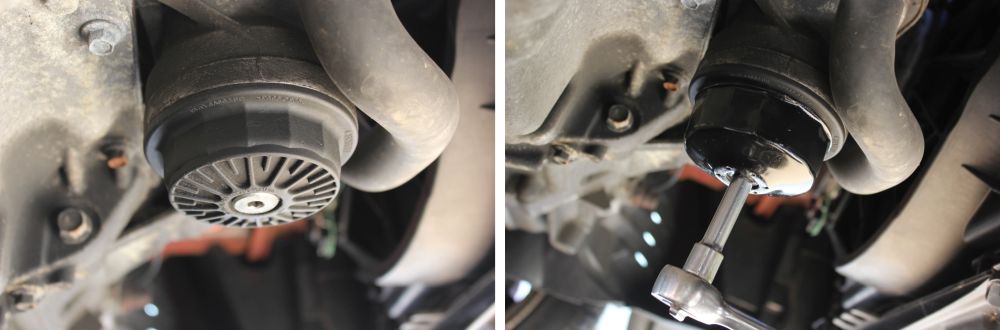
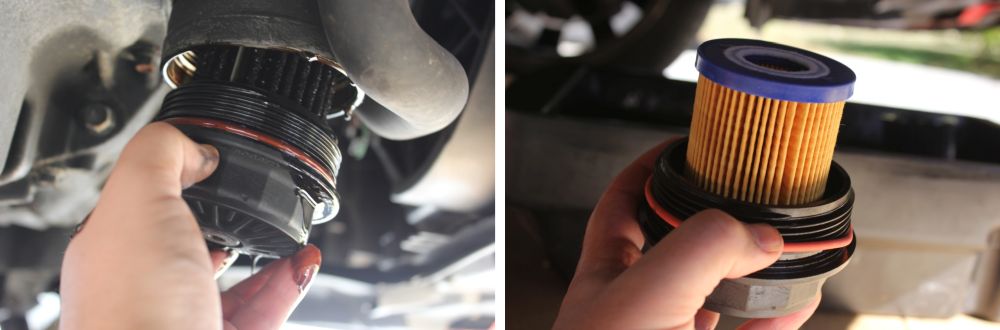
Next, locate the oil filter on your vehicle. Most are located underneath, but some vehicles are more easily accessed from above. Your local auto parts dealer can help you get the right size and type of filter for your car. In my case, this particular car using a pleated cartridge style of filter. Place the oil catch pan underneath of the oil filter and use the oil filter wrench to loosen the filter a turn or two. Again, use your fingers to untighten the rest of the way.
Once you’ve wiped up any mess and disposed of the old filter, replace the o-ring and cartridge, using a little bit of new oil to lube the o-ring. The same is true if replacing an all-in-one style filter. Now simply reverse the process and finger tighten the filter and finish tightening with the ratchet wrench and oil filter wrench.
Step Three
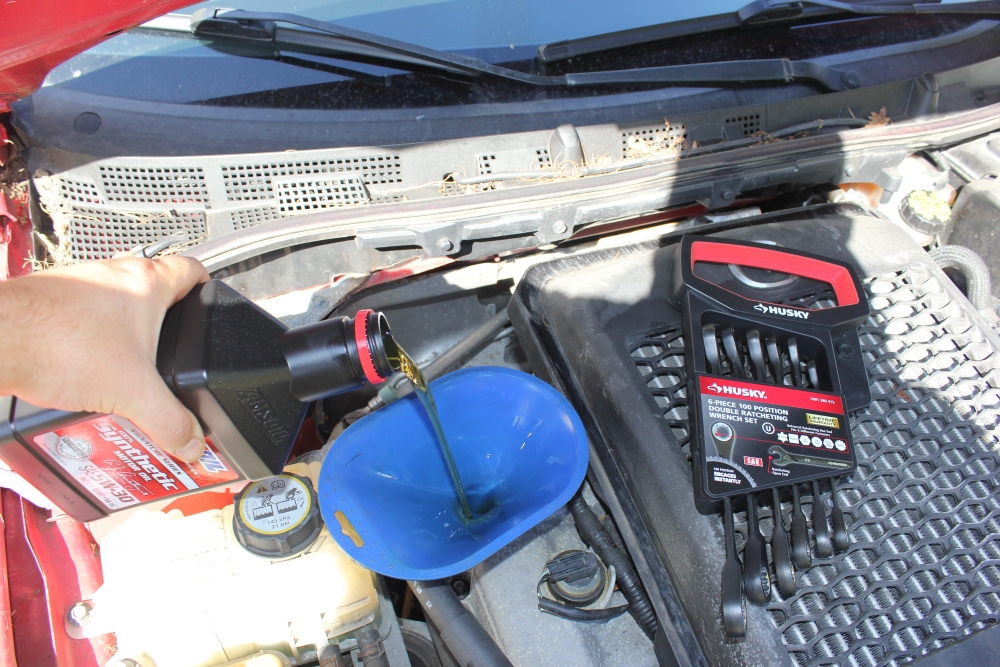
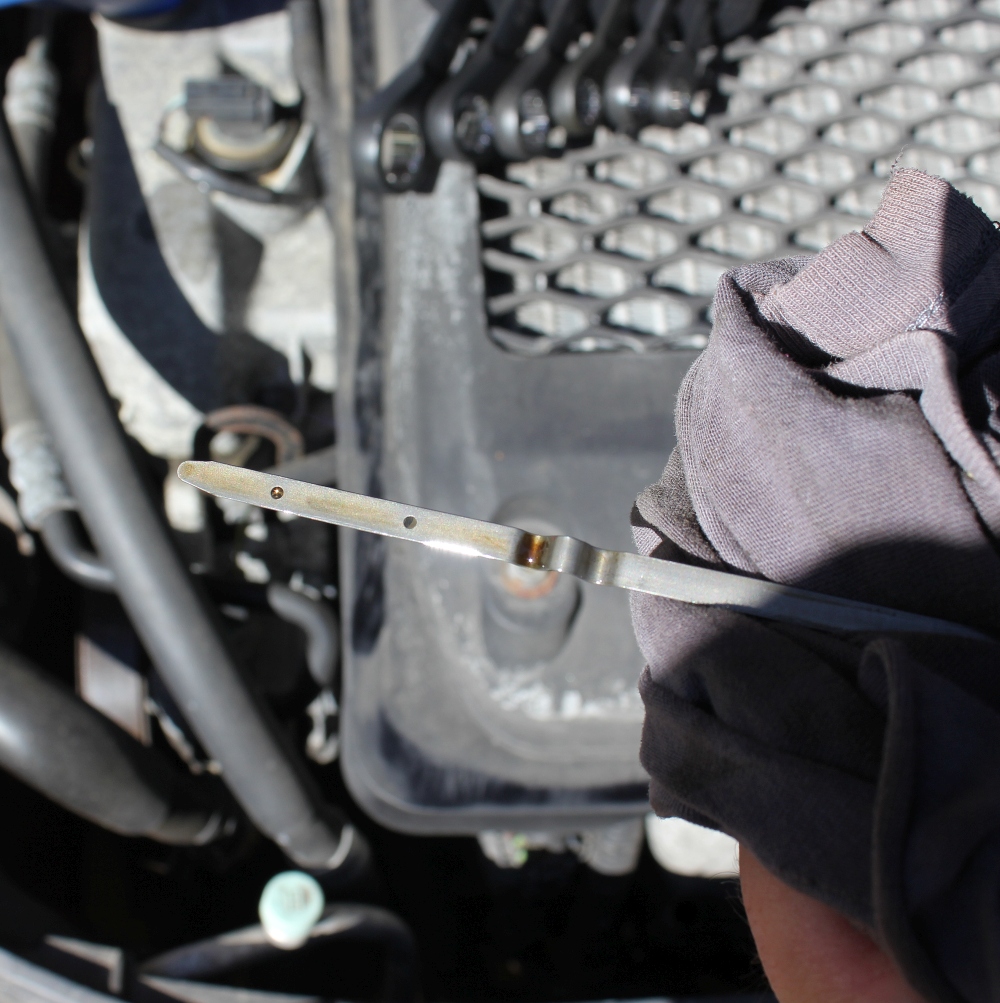
Now it’s time to lower the car off of the jack and fill ‘er back up with oil. Unscrew the oil cap on top of the engine, and using a funnel, add a little bit less oil than the manual calls for. Next check the dip stick to see if the desired oil level has been reached. Slowly add more oil if necessary, and repeat this process until the dipstick reads as it should. Finger tighten the oil cap and you’re good to go.
*Pro Tip #1 – Be sure to save your old oil containers to dispose of your used motor oil properly. Most local landfills will have a place to do this, or you might find a local mechanic willing to help you out.
*Pro Tip #2 – Lay your oily rags and paper towels somewhere safe to dry before disposing of them. Spontaneous combustion is a very real occurrence.

Thank you for following this tutorial on how to change oil in a car. What are your best tips or advice on how YOU change oil in a car?
Thank you so much for joining us at One Project Closer for this tutorial on How To Replace Brake Pads On a Car. This post is sponsored by the Home Depot Prospective Campaign. Post may also contain affiliate links. Opinions (and typos) are 100% our own, and we appreciate you supporting our site in order to continue to provide free content to our readers. Professional auto mechanics may have a different way of completing this project – this advice does not replace common sense or the need to consult a professional. DIY at your own risk.
Let’s face it. Most of us DIY because it keeps the bank account in check. Sure, there is also the satisfaction of a tangible job well done, but at the end of the day, saving money feels good. Changing brake pads in a car is one of those tasks that seems more daunting than it actually is. However, with the right tools and a couple of hours you can save yourself a good chunk of change (estimates for front brake pad replacements are around $200) by doing it yourself. For those of you wanting to go the extra mile and also replace the rotors be sure to read our recent article on replacing brake rotors as well. It’s chock full of great information that will familiarize you with this project, even if you only plan on replacing the brake pads.
DIY Brake Pad Replacement
Project Time: 1 hour
Cost: $50 (premium brake pads from my local auto supplier)
Difficulty Level: Moderate
Materials List:
- Premium Brake Pads (yes, they are worth the money. They definitely last longer and also will come with new clips)
- Brake caliper grease
- Brake cleaner
Tools Needed:
- Husky Mechanics 125 Piece 3/8″ and 1/4″ Drive Set
- 3/8″ drive torque wrench (optional)
- Flathead screwdriver
- C-clamp
- Car jack and jack stands
Be sure to check out our amazing Home Depot Coupons before you buy to save yourself some money!
STEP ONE
Turn the wheel you’ll be working on to face outward to allow easier access to the brake caliper bolts and then safely jack up the car and remove the wheel. The process for jacking up the car is covered in more detail in our article on rotating tires. Also, take the time to remove or loosen the brake fluid reservoir cap under the hood of the car. This is usually tucked up against the firewall inside the engine bay.
STEP TWO
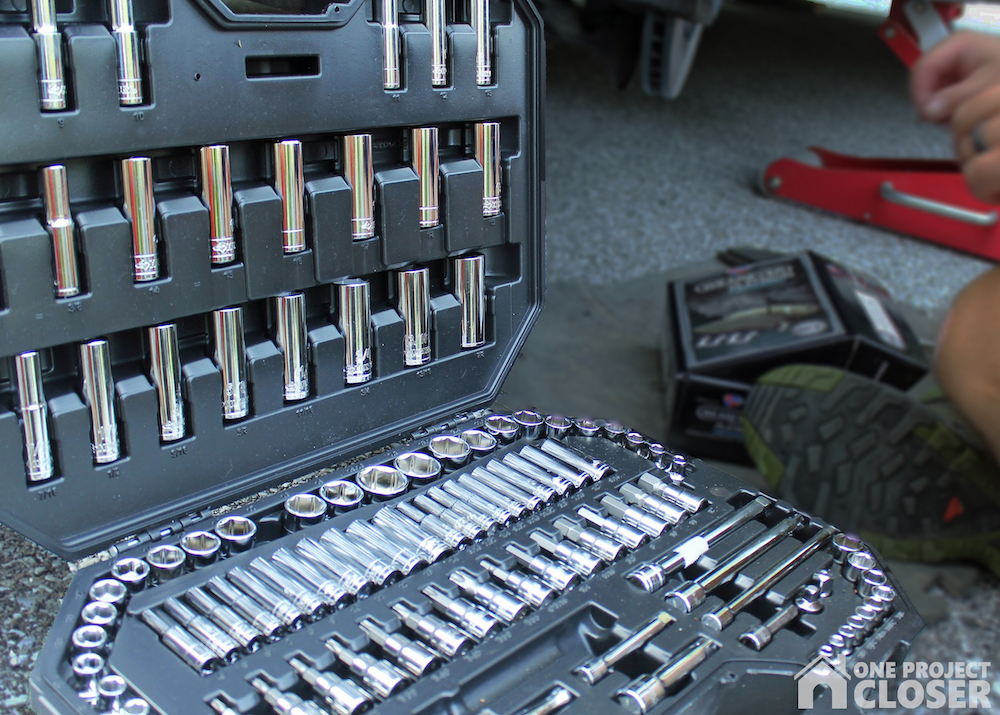
For this project, I used the Husky Mechanics 125 Piece 3/8″ and 1/4″ Drive Set. This set has just about everything you could need to complete most mechanical tasks in the garage and around the house. It comes with SAE and metric regular and deep sockets. It also has 24 bit sockets, which include SAE hex, metric hex, and torx. The torx bits could be especially handy if you do attempt a brake pad replacement on your vehicle as many vehicles have torx head bolts on the calipers.
There are tons of full sets on the market out there, but two features really make this one stand out. Husky mechanics tools are backed by a no-questions-asked lifetime warranty. If you break one for any reason, simply return it to Home Depot (even without a receipt) and they will replace it free of charge! In addition to the awesome warranty, the ratcheting action on the wrenches is ultra-fine, like 2.5°. If you’ve ever tried wrenching in a tight space you’ll know what a welcome feature this is.
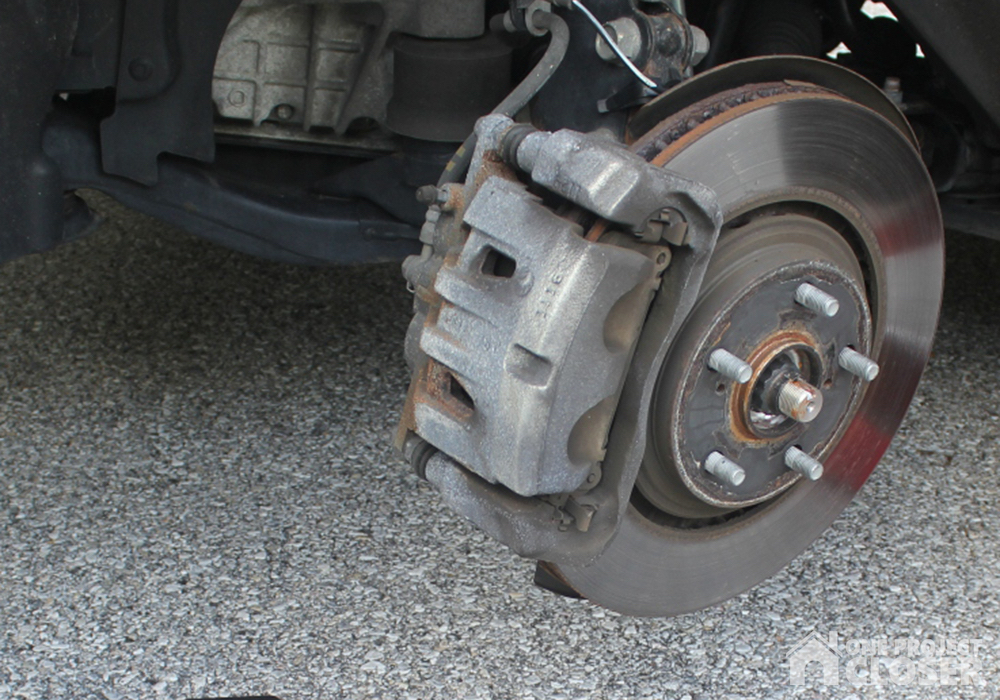
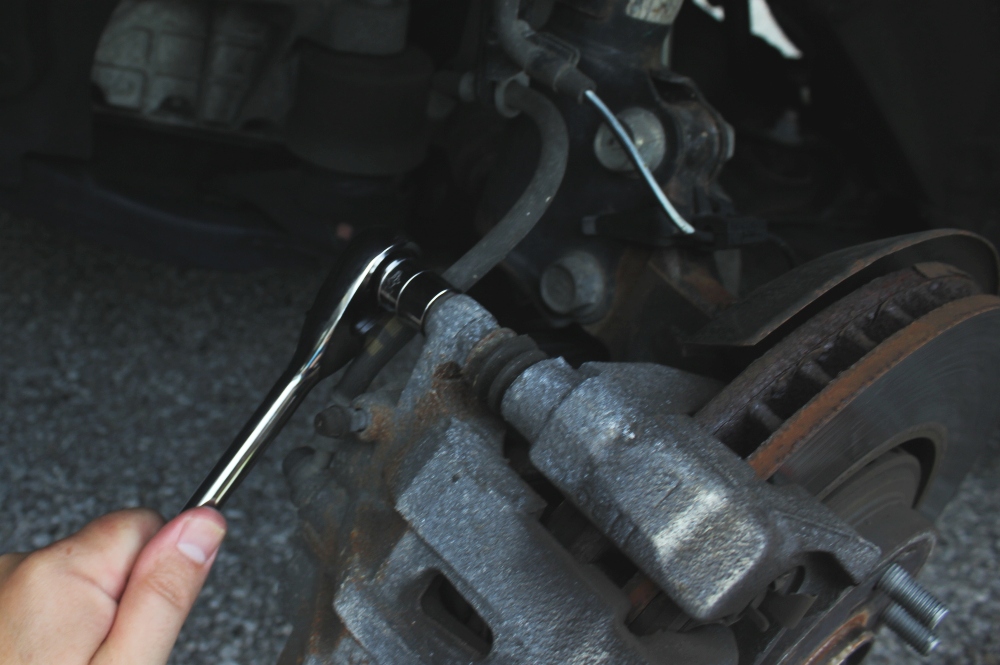
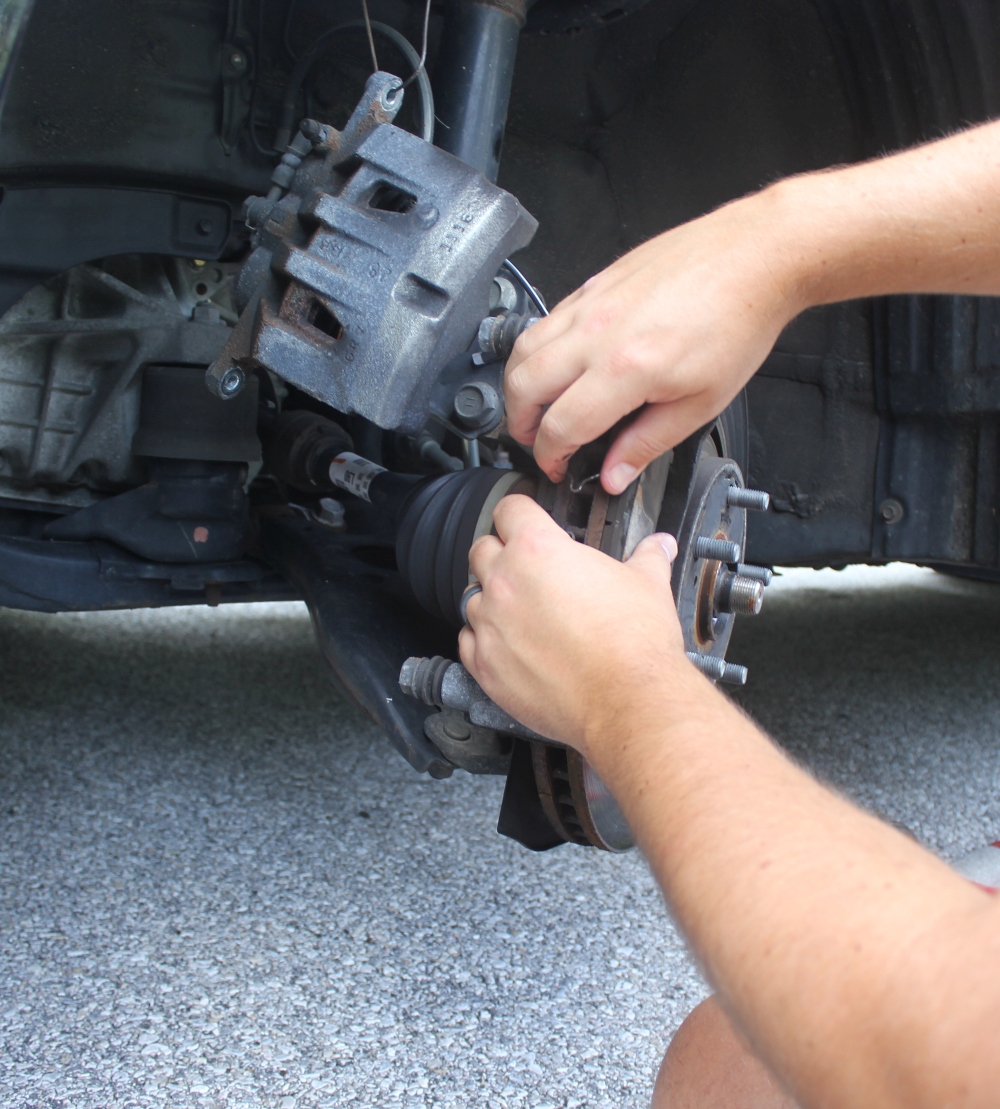
Locate the two caliper bolts that secure the caliper to the caliper frame. Loosen these using the appropriately sized socket or torx drive (varies by car). Pay close attention when removing these as sometimes they are different sizes and will need to be replaced in the proper position.
STEP THREE
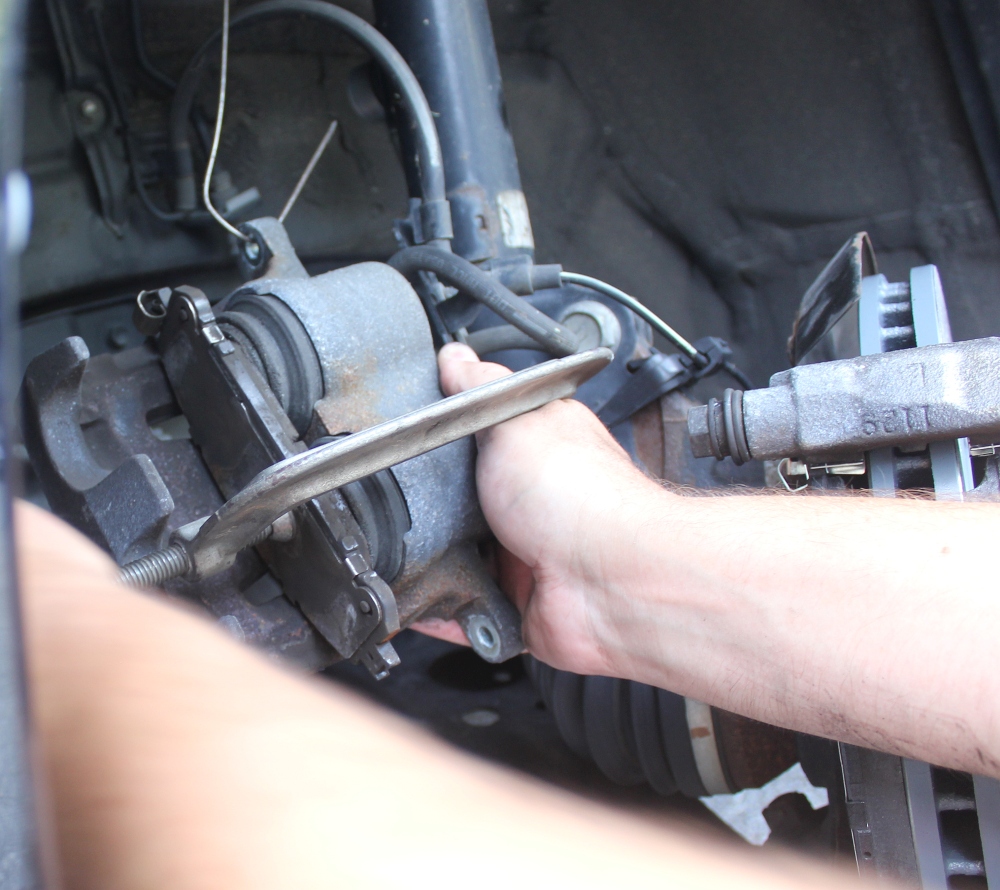
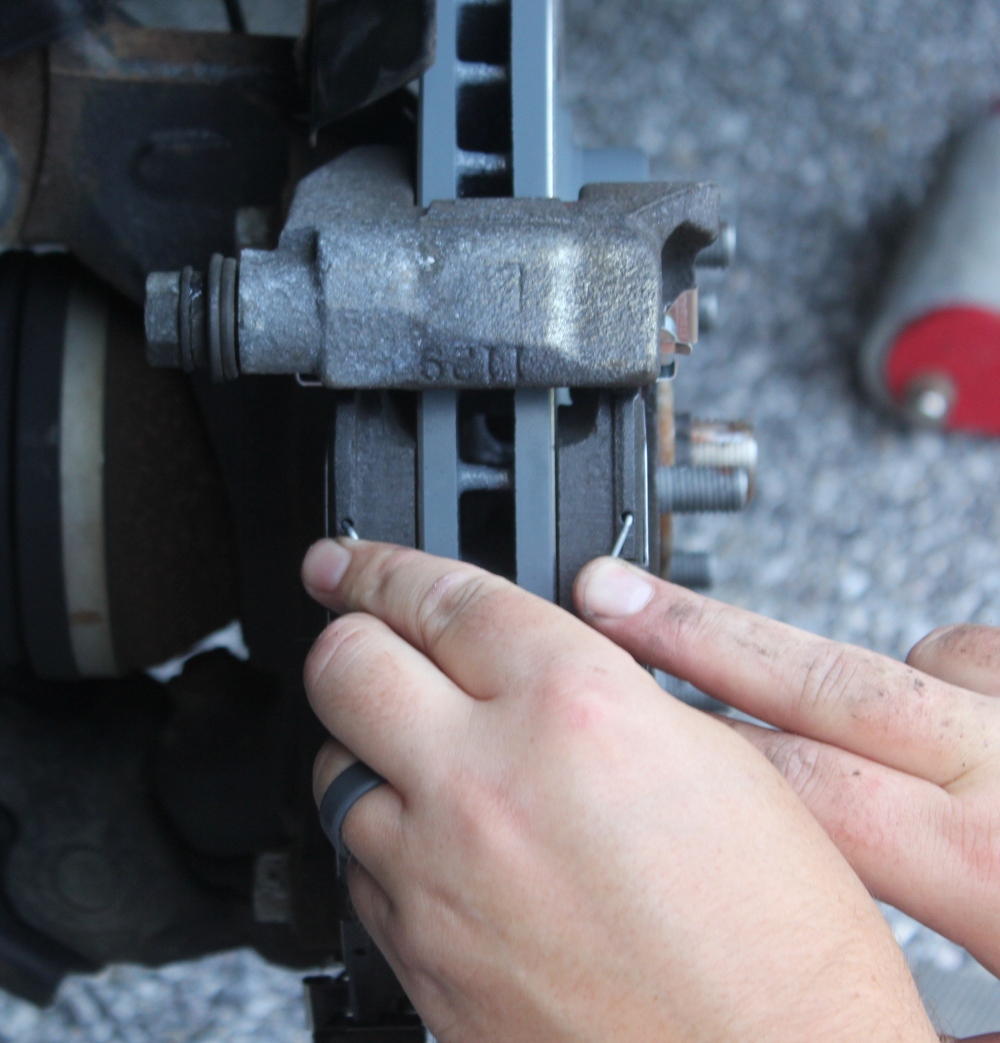
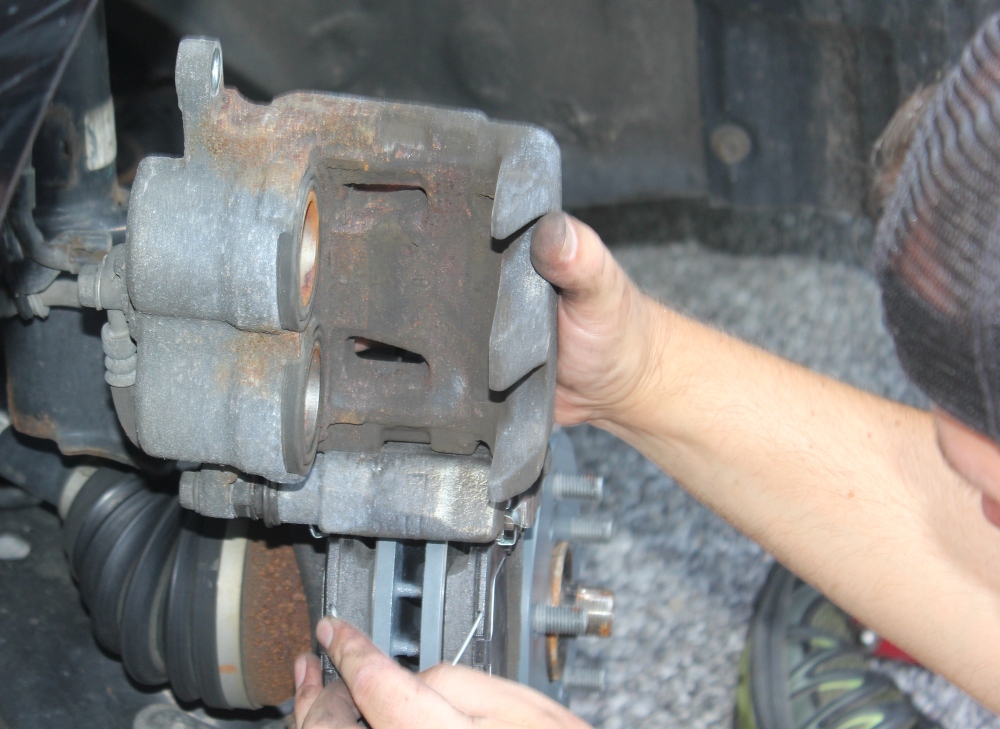
Carefully shimmy the caliper off of the brake pads. Here I fashioned a temporary hanger out of an old coat hanger to hang the caliper from the suspension spring to keep it up out-of-the-way and prevent unwanted tension on the brake line. Also, notice that I’ve used an old brake pad as a block to allow a c-clamp to recompress the brake caliper piston to fit over the new, thicker brake pads.
STEP FOUR
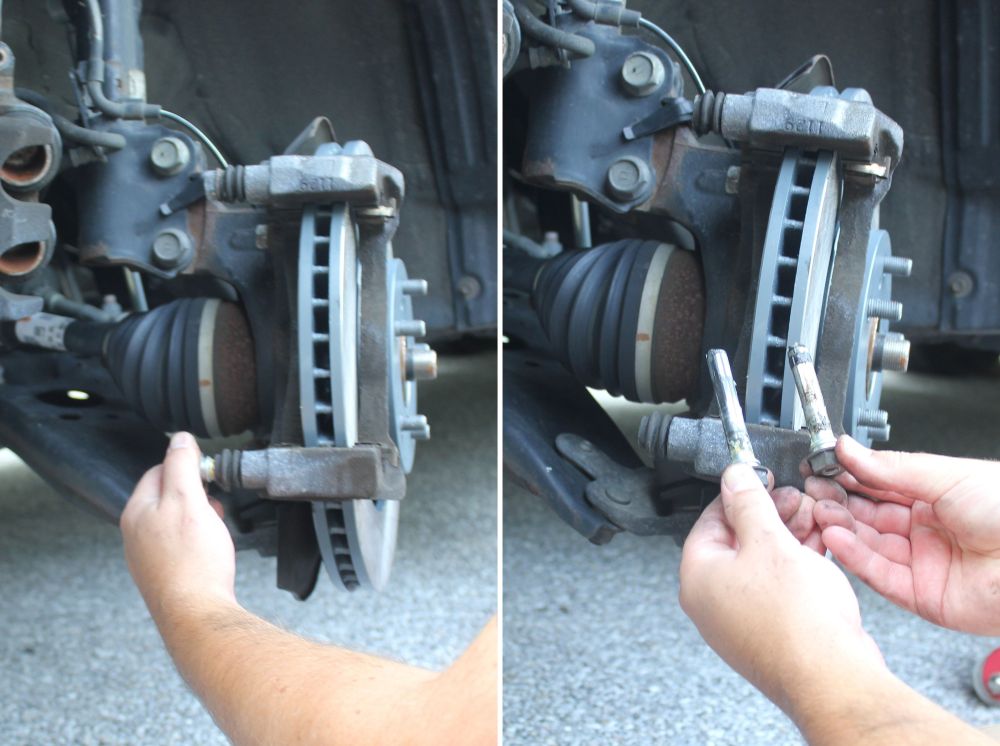
Most cars will have some sort of clips holding the pads in place. Go ahead and remove these and then use a flat head screwdriver to gently pry the brake pads out of the caliper frame.
*Pay close attention to how the pads are installed in your particular vehicle. Go ahead and snap a picture or two for posterity while you’re at it.
STEP FIVE
There are studs that the caliper rides on as it is compressed and depressed during braking. In the case of my van, these simply pop out, taking care not to tear the rubber boot seal around the bolt head. It’s a good idea to clean these up and regrease them using some caliper grease to ensure smooth braking action. Again, like the bolts that hold the caliper on, these can be a different size from one another so pay careful attention here. Once regreased, they simply pop back into place with some gentle pressure.
STEP SIX
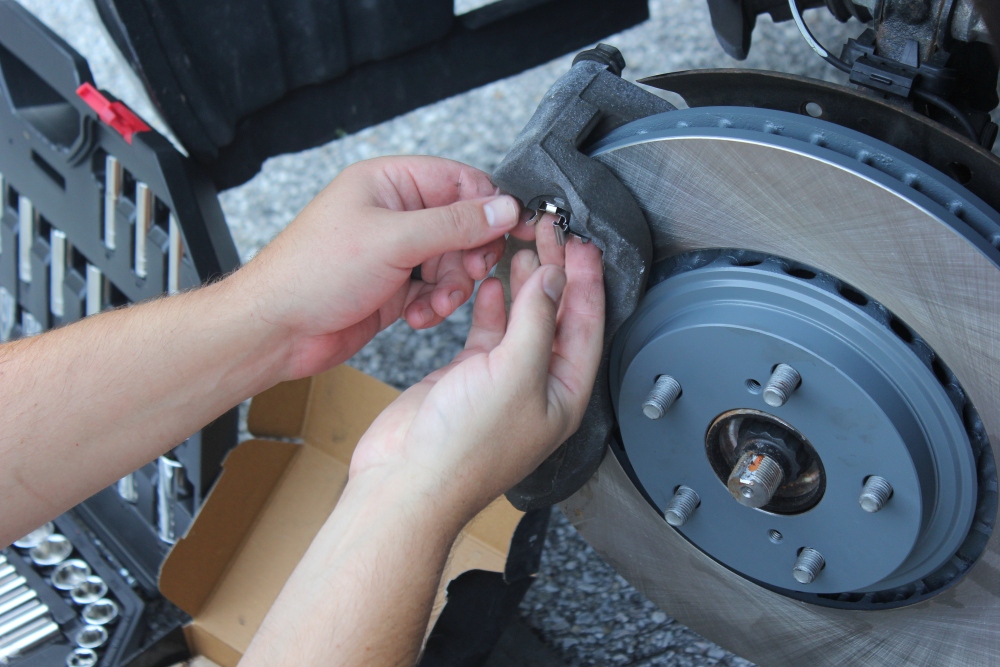
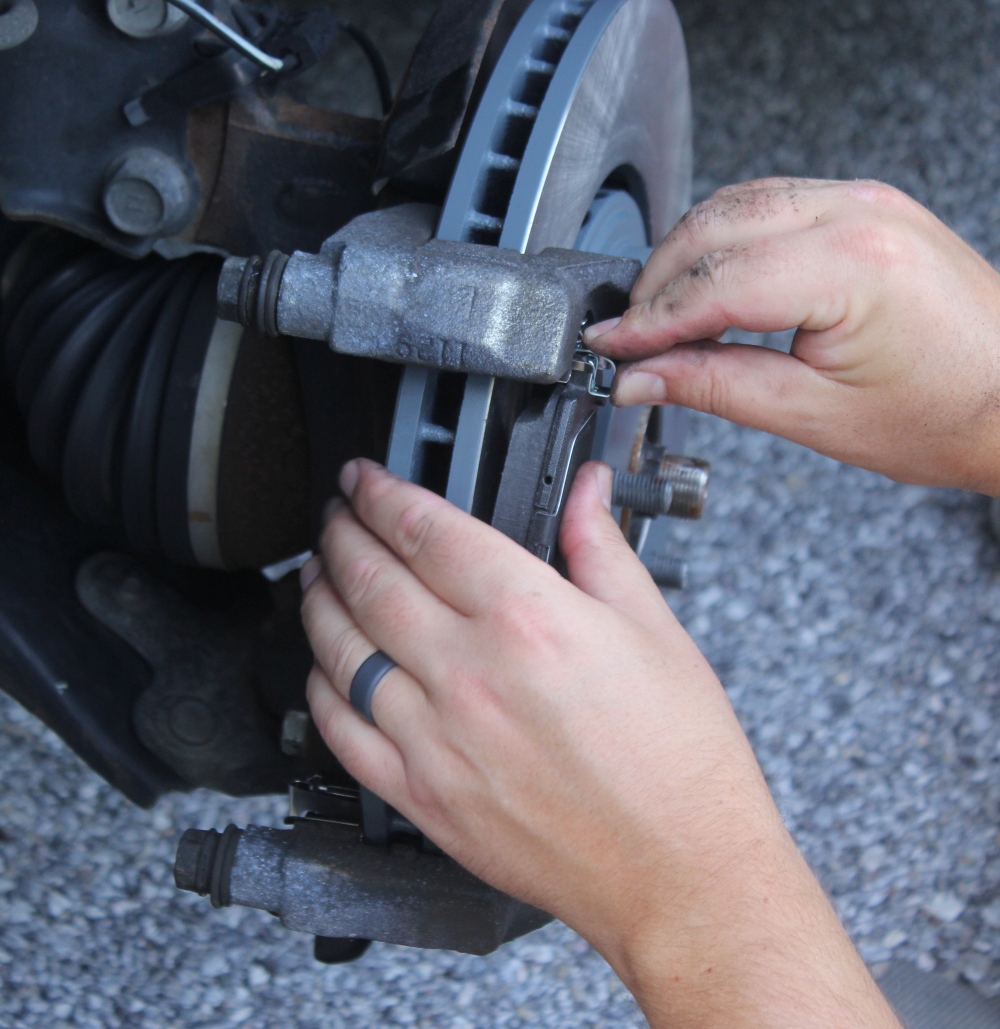
Because you listened and bought the premium brake pads, you also have new clips. Now’s the time to install any new clips that came with your brake pad set. On my van, I had clips that go in the caliper frame as shown below, the clips that attach to the pads themselves, and the V clips that hold the pads apart when the vehicle is not under breaking.
STEP SEVEN
Once the clips are installed, go ahead and snap the new brake pads in place. You paid close attention to the way the old ones were oriented right? RIGHT?
STEP EIGHT
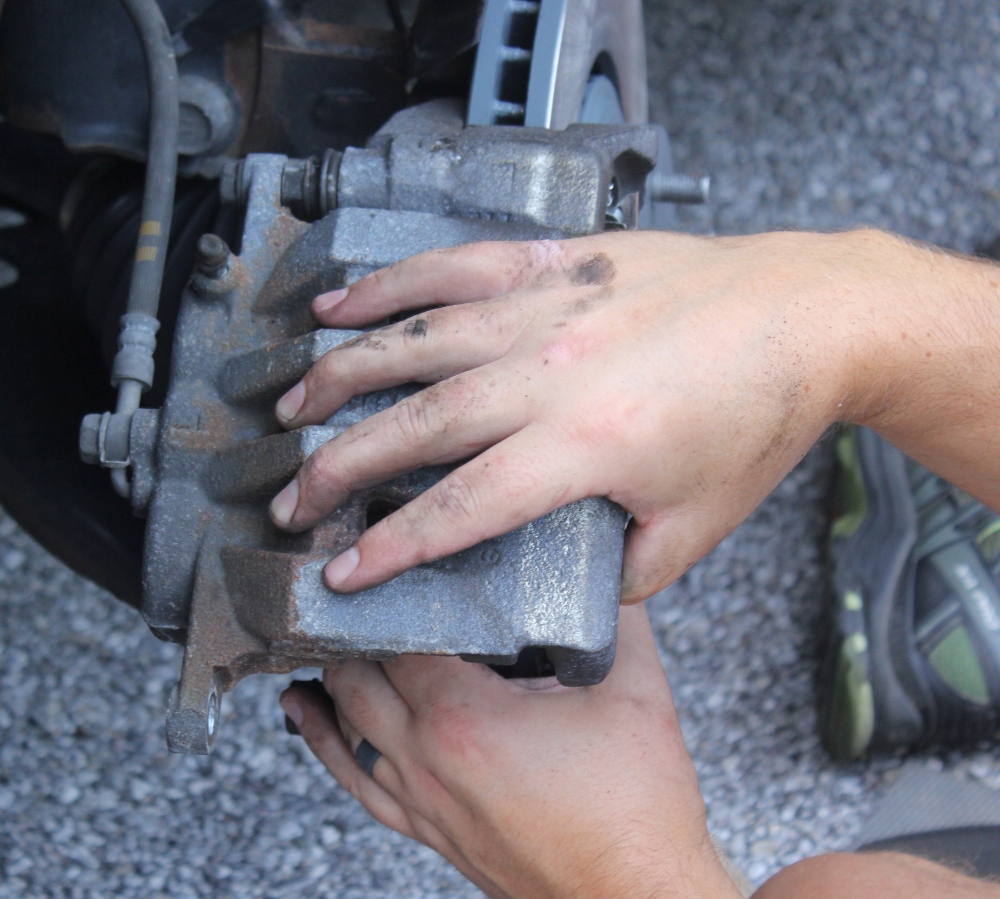
I like to get the top bolt of the caliper started loosely by hand and then scissor the caliper down over the brake pads and caliper frame while holding the pads together with my other hand (remember those V clips are pushing the pads outward).
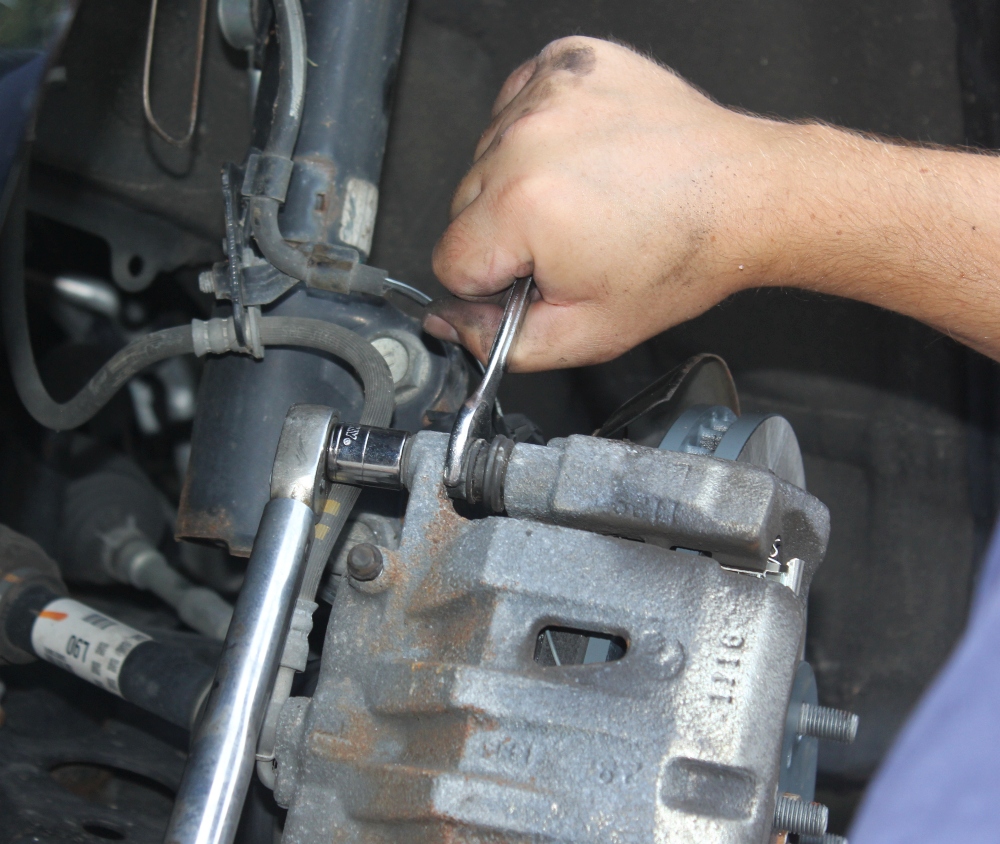
STEP NINE
Reinstall the bottom caliper bolt and tighten both of them to roughly 25-30 psi. Your vehicle may vary, but this is a pretty safe range to go by. If you don’t have a torque wrench just tighten them until they feel quite snug. 25-30 psi is not wrenching as hard as you can.
STEP TEN
Reinstall the wheel and repeat on the other side. After both sides are complete be sure to check the brake fluid reservoir and top it off with the appropriate fluid if necessary.
STEP ELEVEN
Enjoy a cool refreshing beverage of your choice and humblebrag to your friends about your newfound skills.
DIY Tire Rotation Made Easy: Featuring Ridgid’s Octane Brushless 1/2″ Impact Wrench
July 31, 2019 | by Aaron (email) |Thank you so much for joining us at One Project Closer for this tutorial on DIY Tire Rotation Made Easy. This post is sponsored by the Home Depot Prospective Campaign. Post may also contain affiliate links. Opinions (and typos) are 100% our own, and we appreciate you supporting our site in order to continue to provide free content to our readers.

Tire rotation is among the many regularly scheduled maintenance tasks that accompany vehicle ownership and is made easier with the use of an impact wrench. While not particularly expensive to have done by an auto shop, knowing how to rotate your own tires is a valuable skill that also translates into knowing how to change a flat tire should you ever be stranded. Tires should be rotated every 6 months or roughly every 5,000 to 8,000 miles, whichever comes first. Refer to your owner’s manual for a more specific number tailored to your car.
The idea of not having to drag out the air compressor and air hose to power a pneumatic impact wrench is highly appealing to anyone who regularly works on cars. When the Home Depot sent me to my local store to check out their BOGO promotion on their new Ridgid Octane batteries I snagged their new Ridgid Octane Brushless 1/2″ Impact Wrench as my free tool option.

Tools Needed
- Ridgid Octane Brushless 1/2″ Impact Wrench
- Heavy Duty Floor Jack
- Jack Stands
- Torque Wrench
- 21mm 1/2″ drive socket (your vehicle will vary)
- Wheel Lock Key (included with your vehicle and usually stored near the onboard emergency jack)
Step 1: Rotation Pattern
The first step in changing or rotating tires is to check the recommended tire rotation pattern in your owner’s manual. Most cars will rotate front to back.
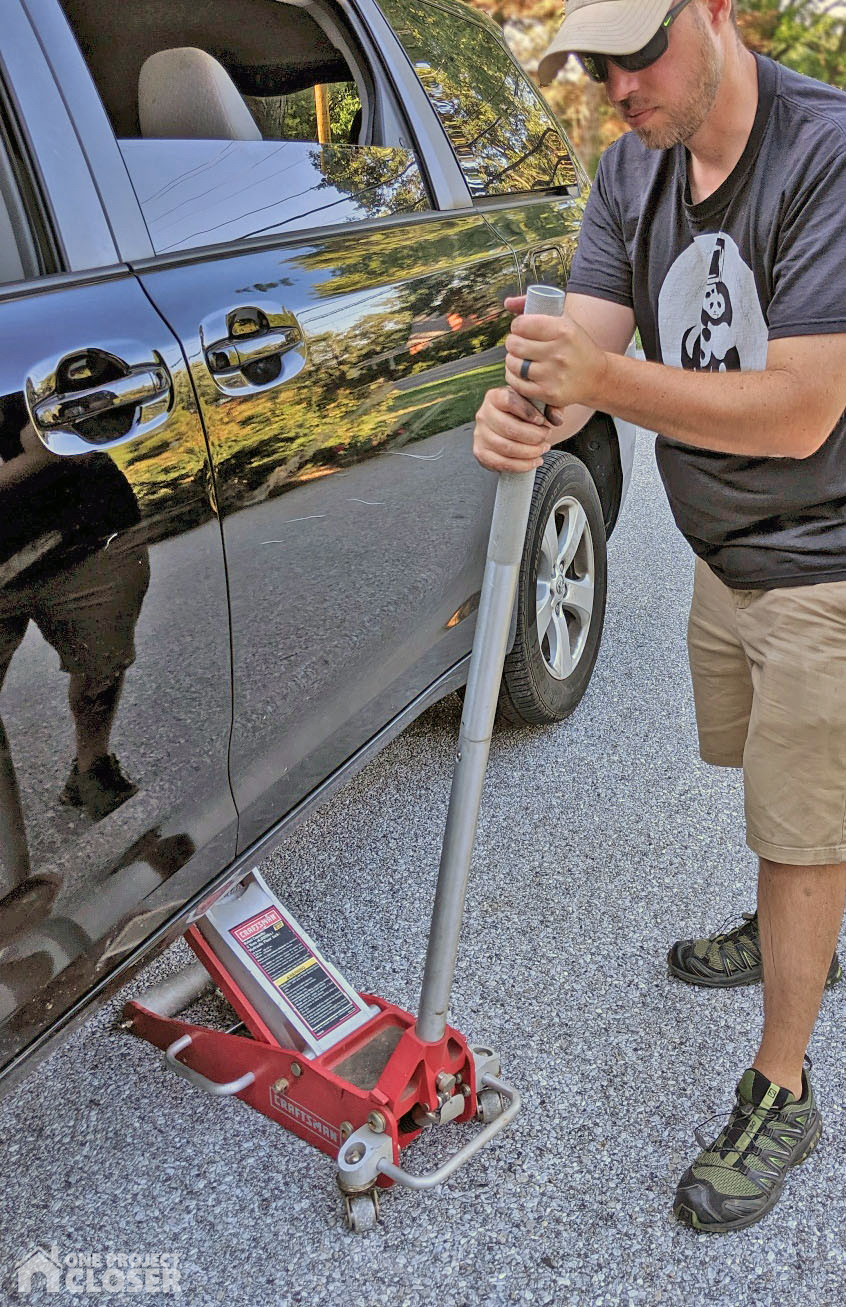
Step 2: Jack Up the Vehicle
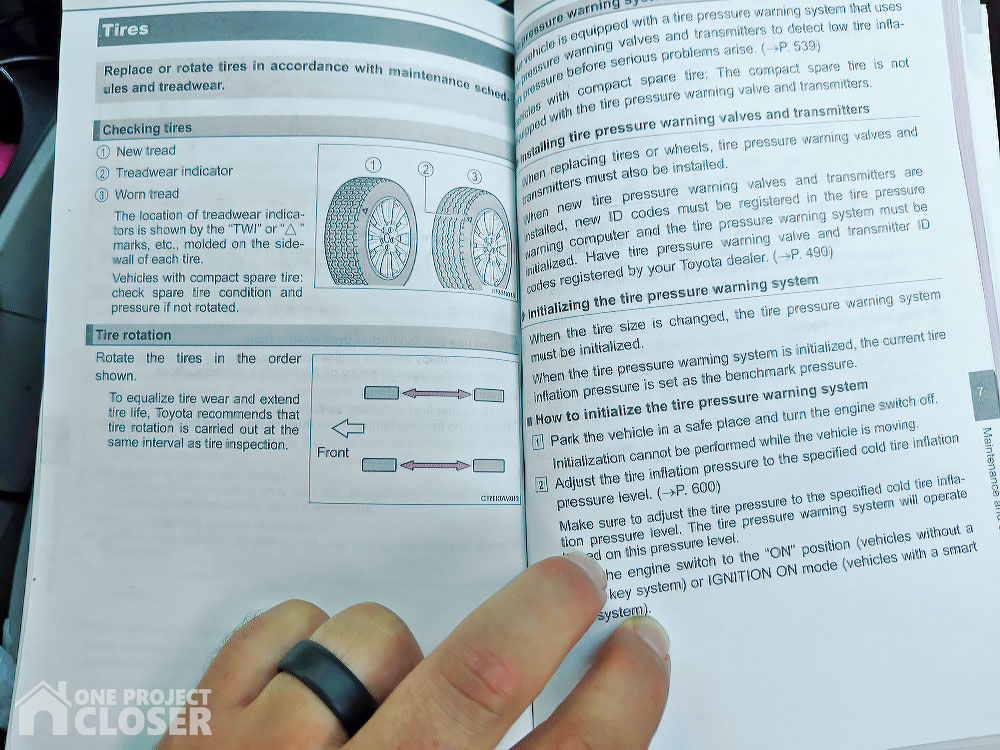
Safely jack up the car enough so the wheels are slightly off of the ground. If you peek under the side of your vehicle you will find designated spots where the chassis is reinforced to accept the pad of a jack. If you have trouble locating them refer to your owner’s manual under changing a spare tire. They will look something like the picture below. Make sure to put your vehicle’s emergency brake on and chock the wheels (I use an old brick) on the opposite side of the car. In this case, my tires rotate front to back so I will be jacking up one side of the van at a time. Once you’ve achieved a good jacked height, make sure to put a pair of jack stands under at least one other jack point as a safety precaution should the jack fail.

Step 3: Remove the Lug Nuts
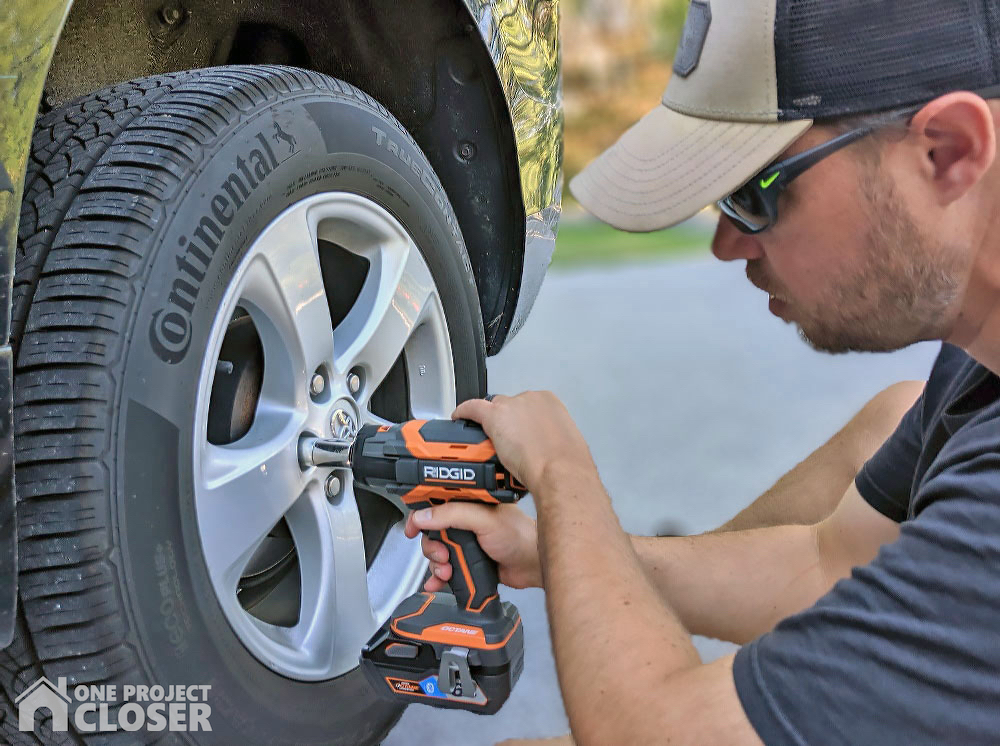
This is where my new Ridgid Octane Impact Wrench is a real game-changer. It certainly makes this a DIY Tire Rotation Made Easy!Previously, I had to either first loosen the lug nuts slightly before jacking up the van, then remove them by hand with a wrench, or drag out a huge air compressor and air hose to use a pneumatic impact wrench. The new Ridgid Octane cordless tools and batteries from Home Depot are smart and “talk” to each other so the battery delivers the correct power to whatever tool it’s plugged into. This powerful combination results in a maximum of 620 ft./lbs. of reverse torque and 485 ft./lbs. of forward torque. The Octane tools will still work with the old-style batteries, but will not be quite as powerful or long-lasting.
*This is where the wheel lock key is needed. One of the lug nuts will have a special head that the key fits into that you can then use the socket on to remove it.
Here you can see the difference in the wear on the tires. I actually waited a little longer than I should have to do this so the difference is starker than it might be otherwise. Rotating the tires regularly will distribute this wear evenly and extend the life of your tires.
*Check the tire pressure too. Running incorrect tire pressure can lead to increased tread wear and loss of fuel economy. The correct tire pressure is easily located on the pillar inside the driver’s side door.

Step 4: Reinstall the Wheels
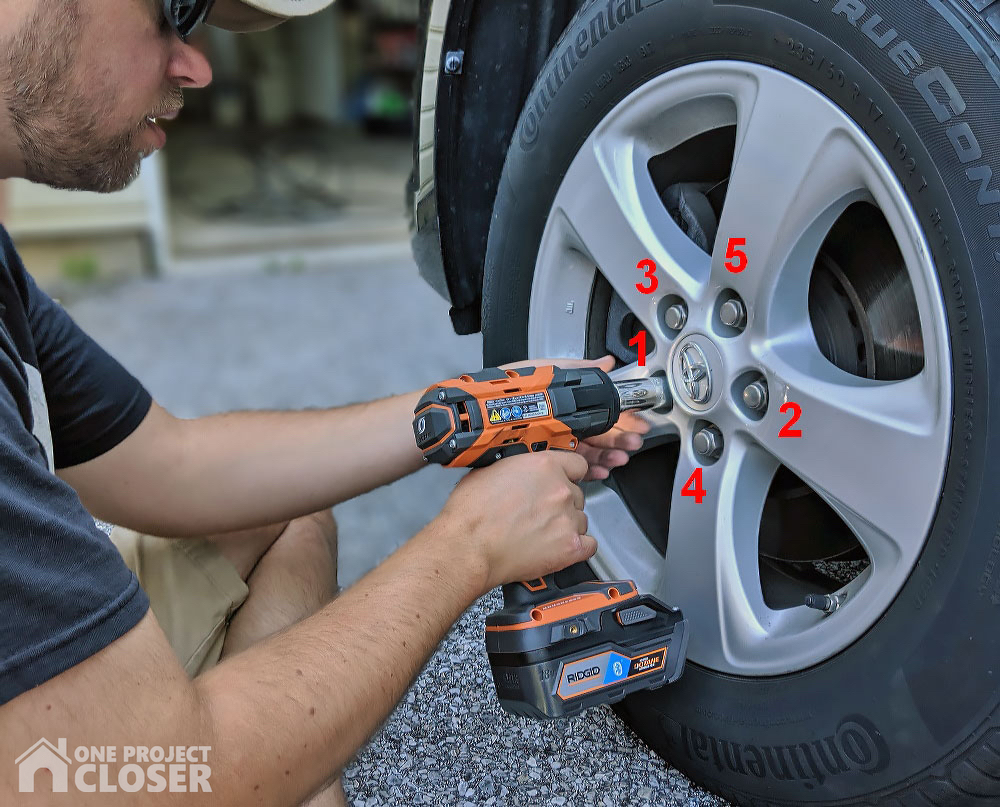
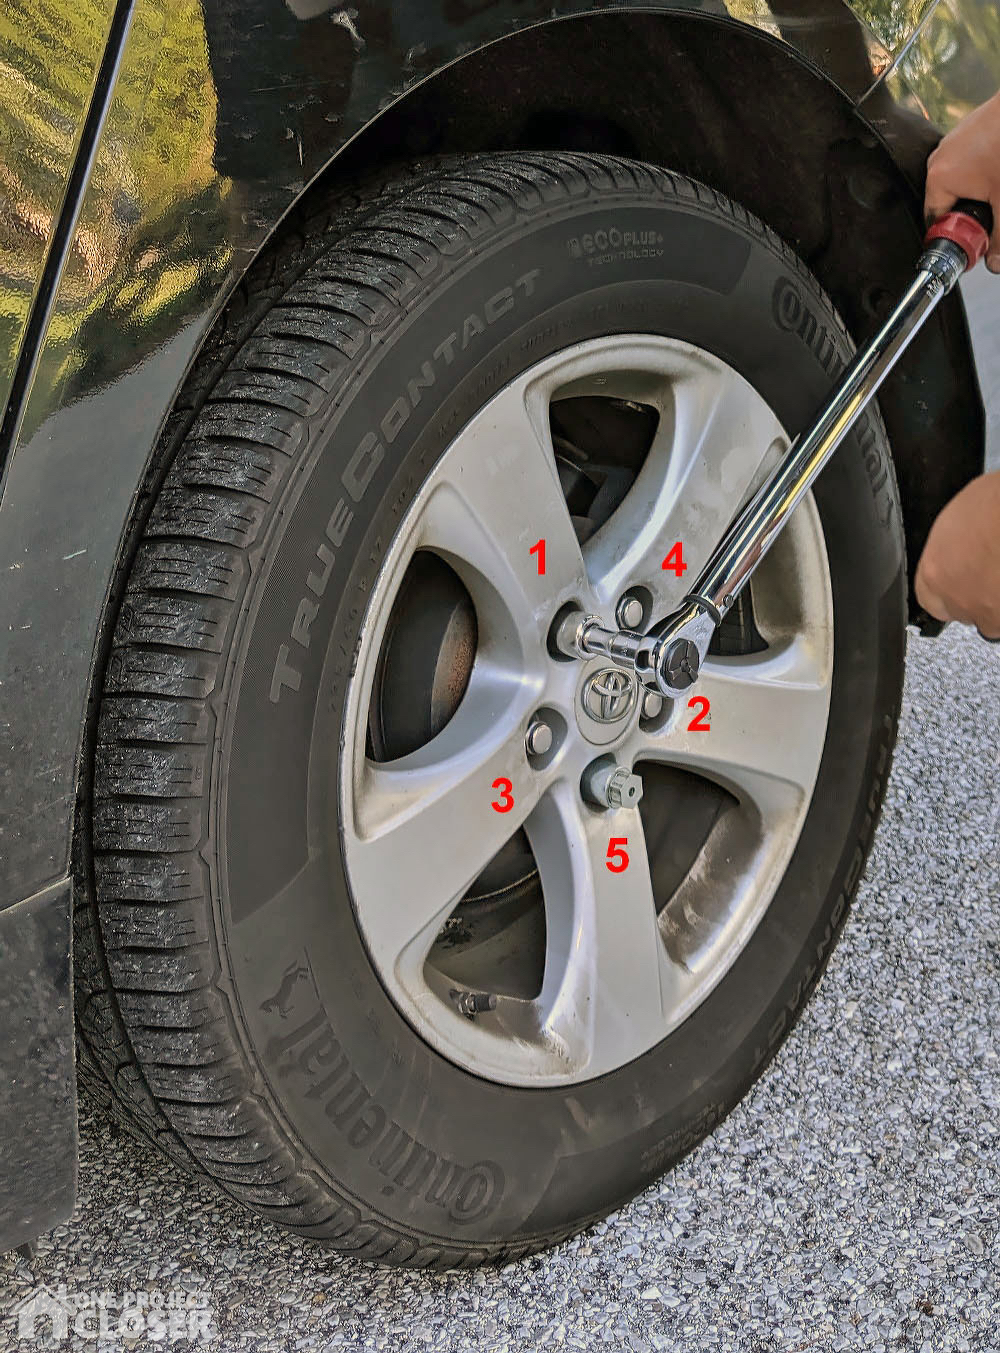
Before reinstalling the wheels it’s a good idea to peek at the brake wear as well. I’m glad I did this go around as after almost 50k miles our van is in need of some front brakes soon. Begin by aligning the holes and placing the wheel on the lug nuts. Then one by one, hand tighten all of the lug nuts as far as you can get them on. Make sure to revisit them all once as the first few will usually go on a little further once they are all on. Next, switch to the impact wrench at the lowest speed. Gently feather the trigger until the lug nuts are just snug and no further. This is to avoid over-torquing (tightening) the lug nuts. It’s also VERY important to tighten the lug nuts in a star pattern to assure even distribution of force so the wheel sits perfectly on the hub. You can see the numbered order in the picture below. It doesn’t matter where you start and stop, so long as you follow a star pattern.
Step 5: Lower the Vehicle and Torque the Lug Nuts
Once both wheels are reinstalled with the lug nuts gently snugged, the jack stands can be removed the vehicle slowly lowered from the jack. Now you will need to set a 1/2″ impact wrench to roughly 80-90 ft./lbs. of torque. Again, your owner’s manual will give you an exact number if you prefer. It’s important to apply Following the same star pattern as before tighten the lug nuts on both wheels until the dialed torque is achieved. Make sure to double-check all of the lug nuts a second time. Repeat steps 1-5 on the other side and you’re all done!
Where To Buy?
The Ridgid Octane Brushless 1/2″ Drive Torque Wrench is available exclusively at the Home Depot for $149 as a bare tool. I snagged mine as a part of their current BOGO promotion where if you purchase an Octane Battery Starter Kit (charger, 3 Ah, and 6Ah batteries) for $179 and you can pick from a variety of free Octane bare tools. Be sure to check out our amazing Home Depot Coupons before you buy to save yourself some money!
Pin For Later
Appreciate this tutorial on DIY Tire Rotation Made Easy and want to save it for later or share with your friends? Pin it!
DIY Track Saw Straight Edge: Featuring Ridgid’s Octane Circular Saw
July 4, 2019 | by Aaron (email) |Thank you so much for joining us at One Project Closer for this tutorial on How to Make a DIY Track Saw Straight Edge. This post is sponsored by the Home Depot Prospective Campaign. Post may also contain affiliate links. Opinions (and typos) are 100% our own, and we appreciate you supporting our site in order to continue to provide free content to our readers.
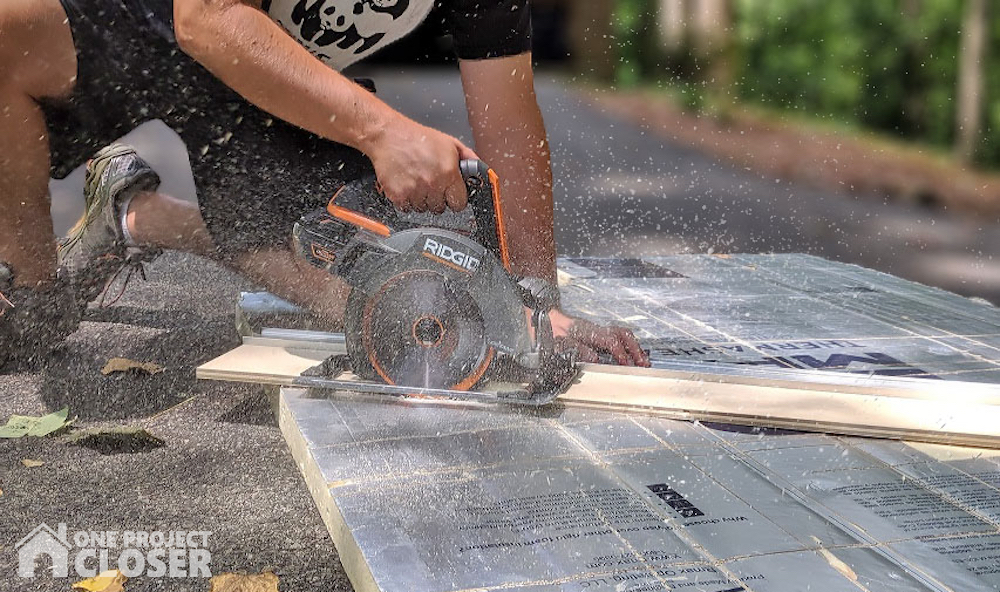
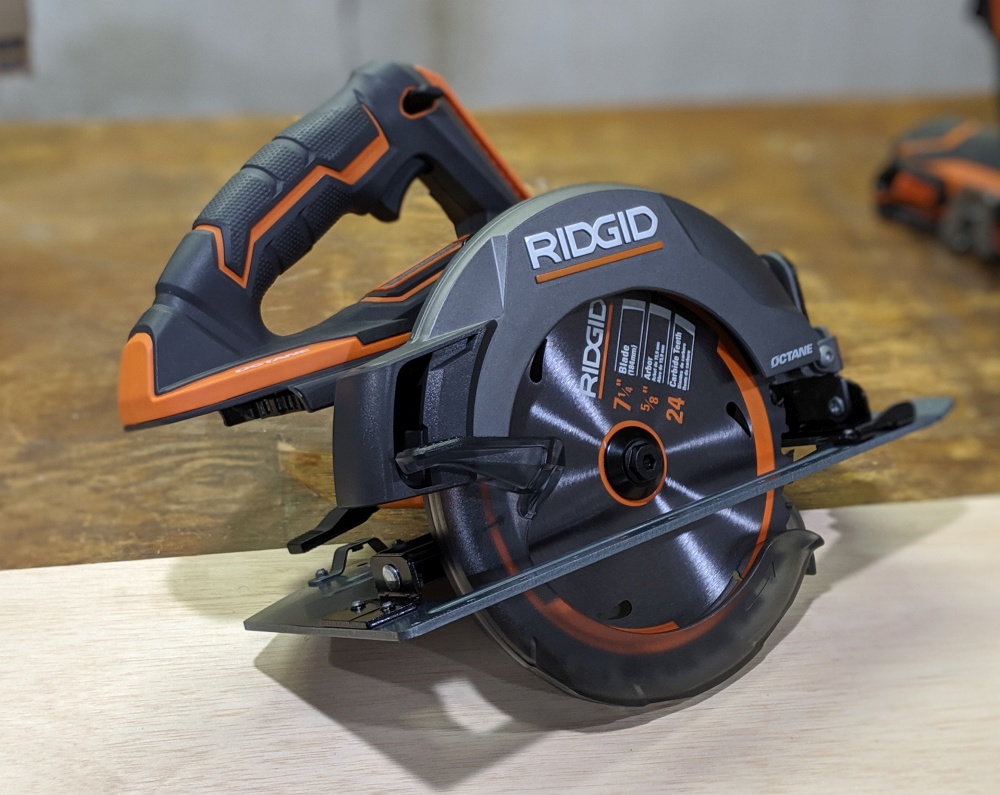
One of the tools on my top 10 wishlist that still eludes me is a nice track saw. If you are the type of DIYer who loves using sheet goods to build things, it should be on your list too. Why don’t I have one yet? The simple answer is cost. The price point for nice track saws ranges anywhere from $500-$1000. However, in less than an hour and with minimal materials, you can make a DIY Track Saw Straight Edge that utilizes the circular saw you likely already have in your collection. Ridgid recently sent us their new Octane Brushless Circular Saw, so this is the perfect chance to test it out.
Tools and Materials:
- Ridgid Octane Brushless Cordless Circular Saw
- Ridgid Octane Brushless Cordless Hammer Drill / Impact Driver Set
- 1/2″ Sanded Plywood 49″ x 12″
- Screws or other fasteners
- Tape Measure
- Pencil or Pen
Step 1: Sizing Materials
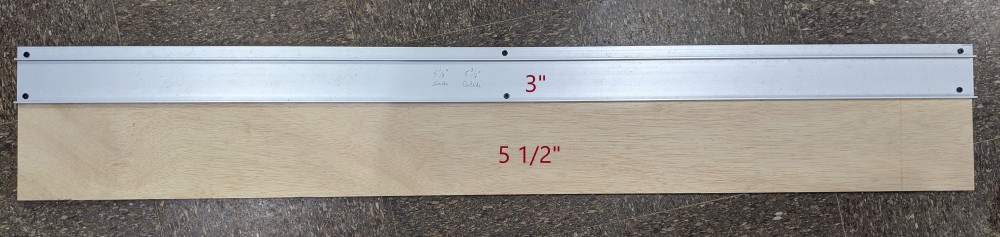
You’ll need to cut two pieces of plywood to create the parts which make up the “track saw.” Begin by measuring the distance from the blade of your circular saw to the edge of the baseplate. Add together this measurement, the width you want your straightedge to be, and another 1/2″ or so. This is the width of your base. For example, I already have 3″ wide aluminum straight edges that I’ve been using with my old corded circular saw and the distance from the blade of the Ridgid Octane saw to the edge of the baseplate is roughly 5″. This means I need a base a little more than 8″ wide. I chose to make my base 49″ long so that it can be used to cut sheet goods up to 48″ wide.

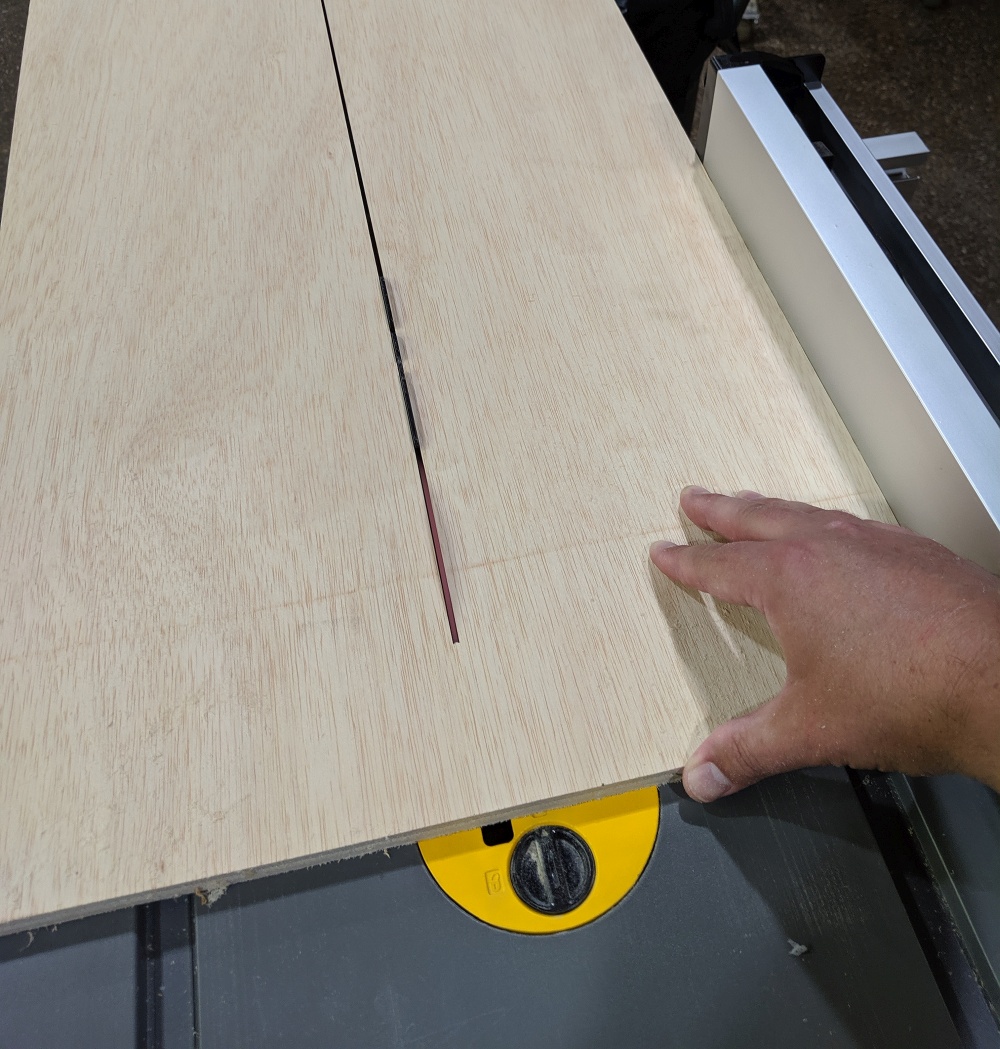
*Note: If you use plywood for your straight edge, make sure to use a factory edge as it will be nice and straight if you don’t have a table saw. I used a table saw to rip the plywood because I have one, but it is not necessary and can be ripped with your circular saw.
Step 2: Assembly
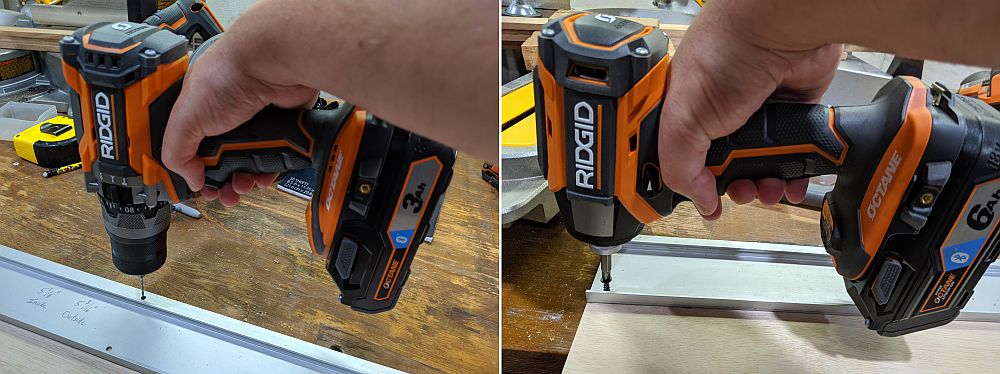
Line up your straight edge piece flush with the back of the base and fasten it securely in place using screws or even some wood glue and clamps. If you are using plywood, remember to have the factory straight edge facing where the saw will glide against it.
Step 3: Dial It In
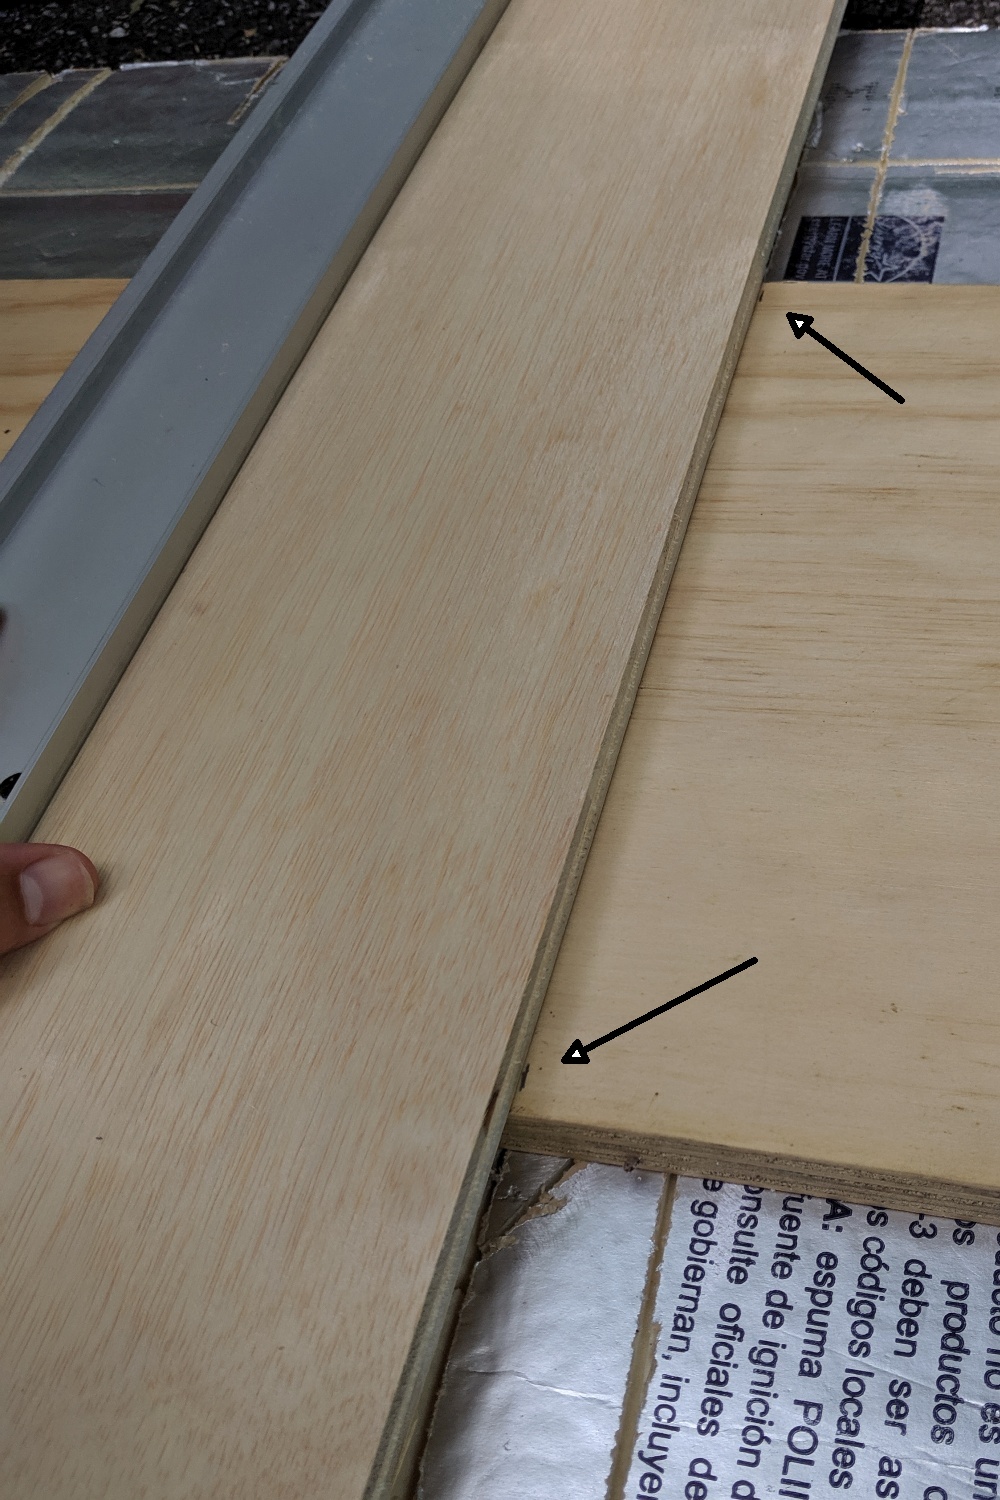
Now you’re almost ready to use your new “track saw” guide. The third and final step is to run the saw along the straightedge with the blade lowered such that the teeth just clear the bottom. I like to use an old piece of foam board so I can cut comfortably on the ground. The foam board offers ample support and the teeth of the saw are not hindered by it. Eventually, it will get too many saw marks in it and need replacing, but I’ve had this one for two years now and it has lots of life left in it.

Why Did I Make This Again?
Now, here’s the cool part. Whenever you want to break down some plywood you can simply make two marks on either side of where your cut line would be. Then place your “track saw” such that the edge lines up on both of those marks. Set your saw to the proper depth, and make your cut.
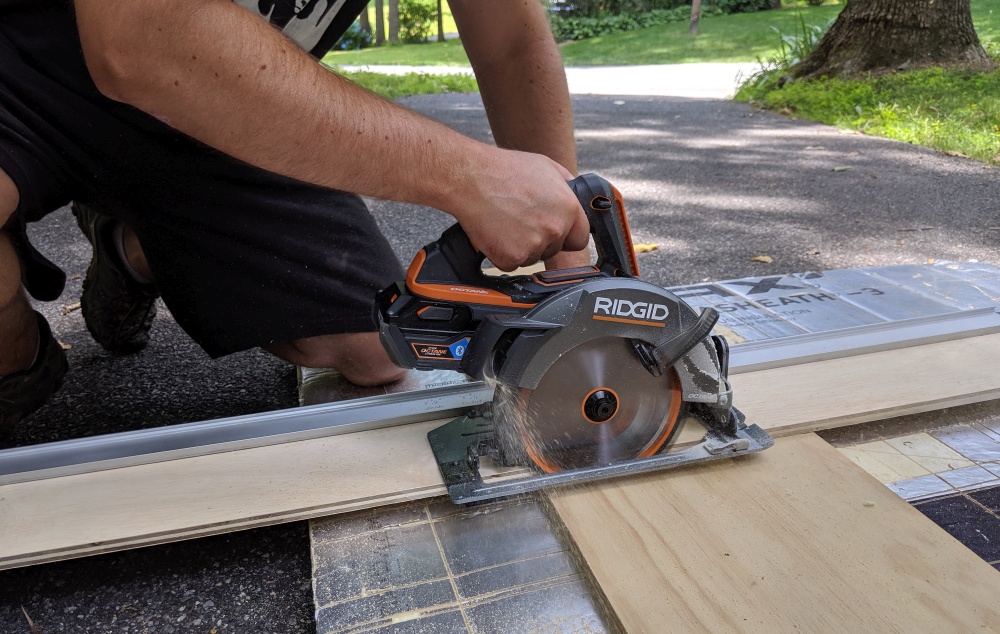
Tell Us More About the Saw
I’m glad you asked. I am pleasantly surprised at how powerful this saw is. If you’re a cordless skeptic like I was, these Octane tools will make you a believer. The bevel and blade height adjustments are a breeze utilizing quick-locking levers. The blade height adjustment even has detents so the saw doesn’t slip down before you have a chance to tighten the lever. This saw is smart too. I tried to start making a cut once with the teeth sunk into the foam board just a little bit and that tiny bit of resistance was enough that it wouldn’t start. The older and hopefully wiser I get, the more I appreciate well-designed safety features that protect against dangerous kick-back.
As with all Ridgid tools, it’s available exclusively at the Home Depot and comes as a bare tool for $149 or can be purchased via a number of combo deals that include Octane batteries and chargers. Be sure to check out our amazing Home Depot Coupons before you buy to save yourself some money!
Watch Ethan and Fred review this new Ridgid Circular Saw:
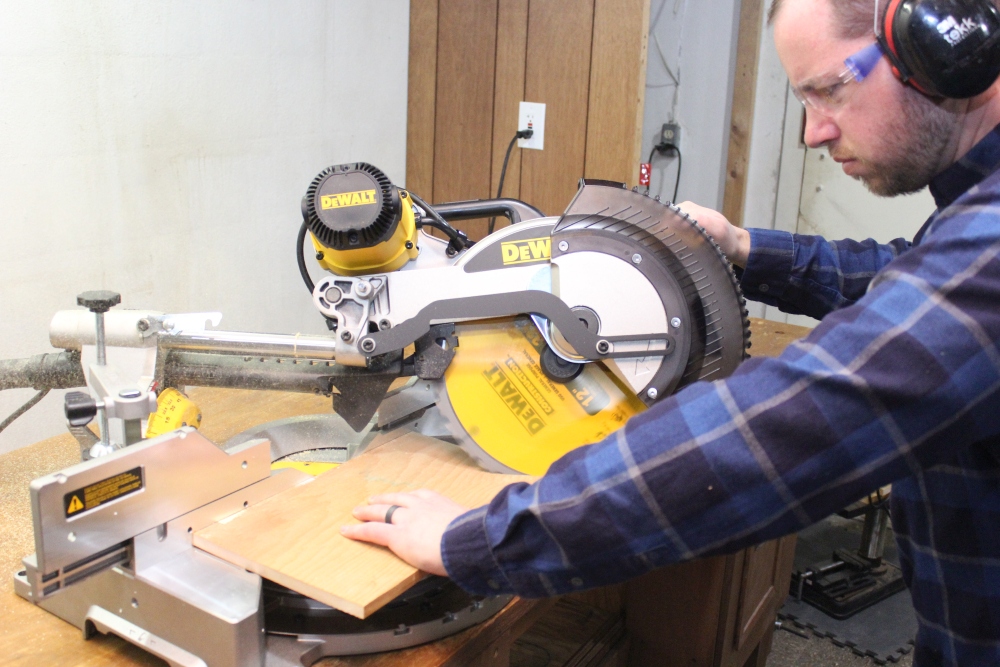
DeWalt 15-Amp Corded 12 in. Double-Bevel Sliding Compound Miter Saw (DWS779)
April 19, 2019 | by Aaron (email) |Note: This post from DIY tool reviewer Aaron Talbot first ran on our tool site, Toolbox One.
Along with the recently reviewed DeWalt Compact Jobsite Table Saw, we also received the DeWalt Corded 12 in. Double-Bevel Sliding Compound Miter Saw. Up until now, my personal saw has been a DeWalt 10″ compound miter saw that I purchased about 10 years ago. That saw has been a workhorse and is still going strong, so I was excited at the prospect of adding this 12″ sliding model to my collection.

Stuff Lawyers Made Us Say: We’re are continuing our partnership with The Home Depot to provide candid reviews of tools from a wide variety of manufacturers. The Home Depot is both providing the tools for free and compensating us; however, the opinions we express here are our own. Remember, we’ll always be up-front with you when we’re receiving a free product, compensation, or both. And of course, we always strive for objectivity in our reviews.
Key Features and Capabilities
- 15 Amp 3800 rpm motor provides ample power
- Cuts up to 2″ x 14″ dimensional lumber at 90° and 2″ x 10″ dimensional lumber at 45°
- Adjustable sliding fence supports and clamp can support up to 7 1/2″ crown molding and 6 3/4″ base molding vertically
- Capable of 60° miter cuts to the right and 50° miter cuts to the left
- 10 positive detent miter stops with an overrideable cam lock for quick, accurate miter adjustments
- Positive bevel stops at 22.5°, 45°, and 33.86° (for cutting standard 38° crown molding)
Performance and Overall Impressions
The DeWalt DWS779 comes ready to go right out of the box. It weighs in at about 56 lbs, so while no super light, it is transportable if you were to use this as a contractor moving from site to site; especially if paired with the optional mobile base. Mine will mostly be staying in my basement shop so I set it up on my workbench, attached my dust extractor, and went to town on some old 12″ wide shelving scraps I had lying around.
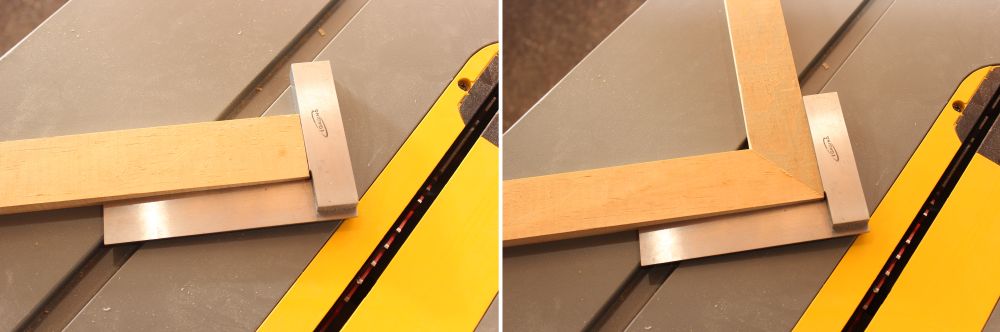
Perhaps the most important thing to mention is that all of the cuts I made were accurate right out of the box with no discernable gaps when measured against my precision square. While DeWalt does afford some adjustability to dial in accuracy, it’s so refreshing and a huge time saver to have a tool be accurate off the shelf. In addition, the sliding action on the saw is quite smooth and never caused any hesitation while cutting. The miter and bevel adjustments were equally intuitive, smooth, and easy to make as well, even after several uses and a healthy coating of sawdust.
If I had to pick at anything, the dust collection could be improved. You can see in the pictures that quite a bit of dust eludes the undersized dust shroud, making cleanup a bit burdensome.

What’s the Difference Between the DWS779 and DWS780?
In my efforts to make sure I touched on all of the key specifications of the DWS779 I went over to dewalt.com, only to find the DWS779 is not listed on their website, but rather the very similar DWS780. If you’re currently in the market for a sliding compound miter saw you may have run into the same question. In the research that I’ve done, it seems the only difference between the two saws is that the DWS780 comes with a Cutline™ blade positioning system. The roughly $250 price tag gap (at the time of this writing) is significant, so you’ll have to decide if that’s important to you.
Price and Where to Buy?
The DeWalt 12″ Corded Sliding Compound Dual-Bevel Miter Saw (model DWS779) is available at the Home Depot below.
DeWalt 15-Amp Corded 10 in. Compact Job Site Table Saw with Stand DW745S
March 27, 2019 | by Aaron (email) |Note: This post from DIY tool reviewer Aaron Talbot first ran on our tool site, Toolbox One.
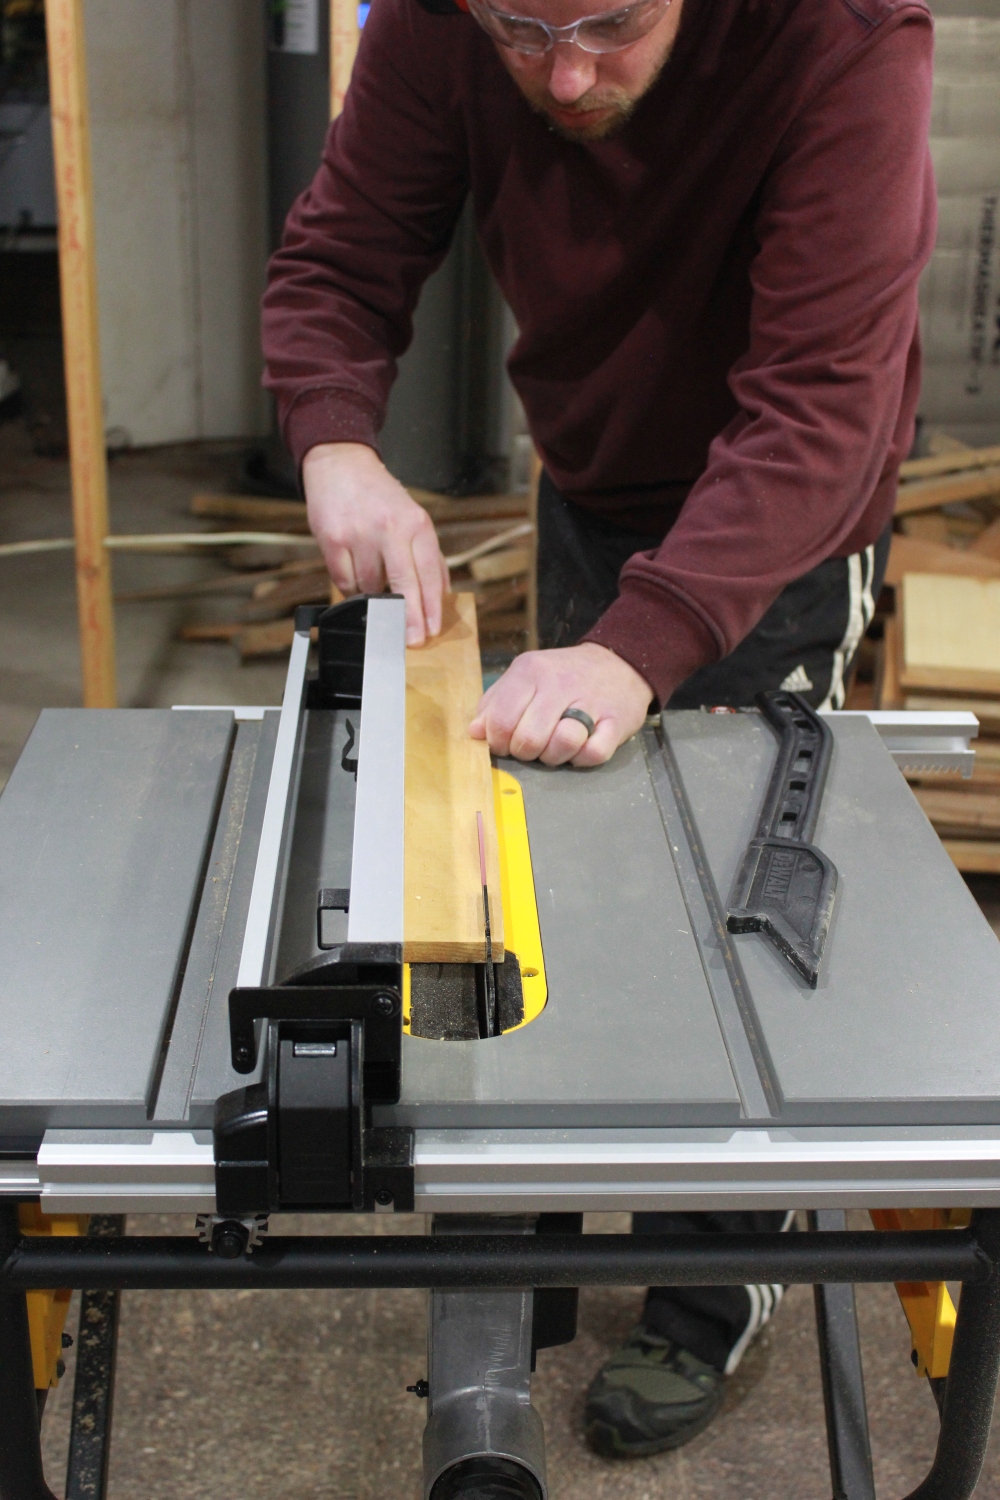
My decades old 7 1/4″ compact table saw recently bit the dust, pardon the pun. As such, it was sweet serendipity when Home Depot shipped us DeWalt’s new 10″ Compact Job Site Saw w/ Stand as part of our ongoing #THDProspective partnership with them. I quickly called “dibs!” and packed it up to bring home to my basement shop. I’ve been putting it through the paces and it’s been pretty impressive thus far.
Stuff Lawyers Made Us Say: We’re are continuing our partnership with The Home Depot to provide candid reviews of tools from a wide variety of manufacturers. The Home Depot is both providing the tools for free and compensating us; however, the opinions we express here are our own. Remember, we’ll always be up-front with you when we’re receiving a free product, compensation, or both. And of course, we always strive for objectivity in our reviews.
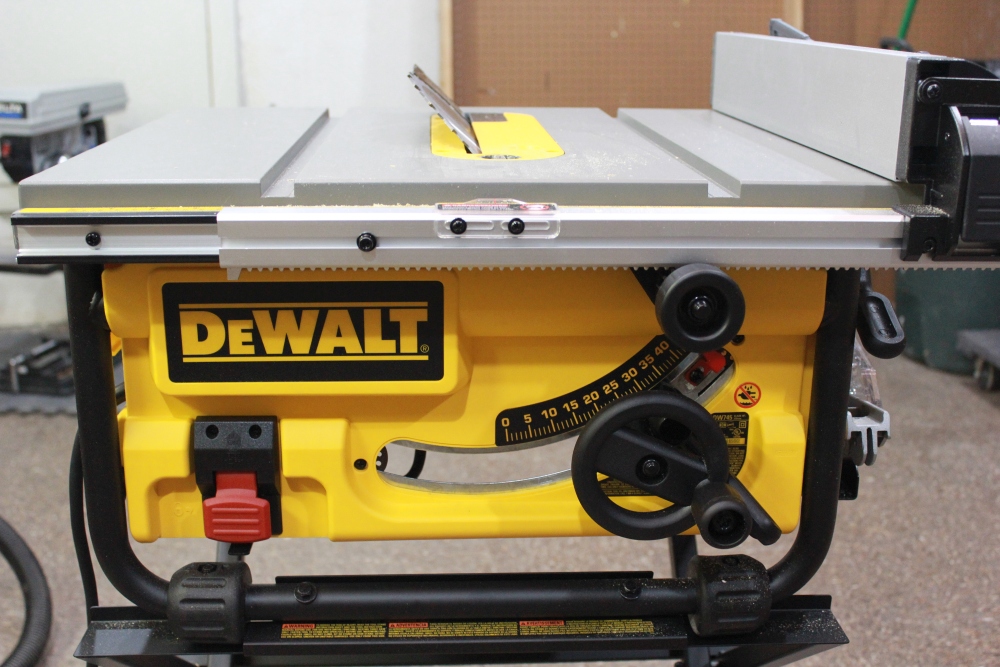
Notable Features
The DeWalt Compact Jobsite saw is packed with thoughtful features that make it durable, accurate, and easy to use. Among the most notable is DeWalt’s well-known rack and pinion style fence rail. By having the front and rear rails move simultaneously, it allows for quick and accurate fence adjustments that remain parallel with the blade arbor. Because the fence adjusts by telescoping the rails in and out, the saw can be stored without them protruding beyond the table, making storage more compact and safer. The fence itself has a flip down support bar to support workpieces when the rails are extended beyond the table top.
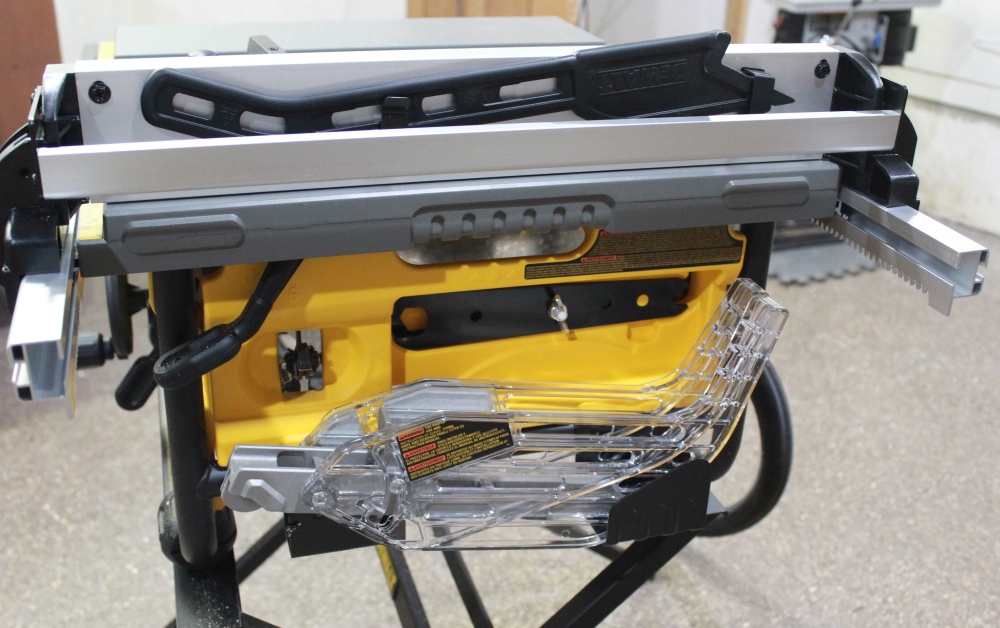
All of the adjustments on the saw are tool-free, including removing the throat plate for blade changes, adjusting or removing the riving knife, and installing the Site-Pro blade guard. Changing the blade is the only operation that requires a couple of wrenches, which are included and securely fastened on the side of the saw with a wingnut. There’s also onboard storage for the Site-Pro blade guard and included push stick when not in use.
Impressive Performance
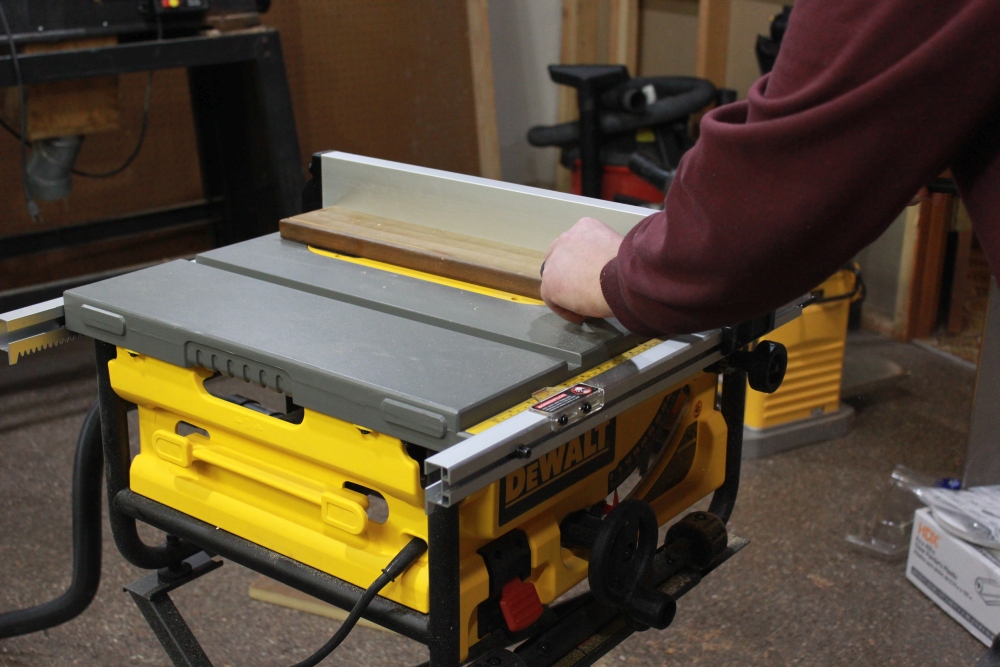
The two biggest factors, apart from safety, when it comes to table saws are cut quality and accuracy. To date, I’ve ripped several linear feet of 3/4 inch solid pine and 7/8″ solid cherry, and this little saw had no problem with either of them. The 15 amp motor delivers ample power and didn’t hesitate, even when ripping the much denser cherry wood. The included 24T carbide ripping blade provides a nice cut quality for almost any construction project. I have plans to do a few smaller woodworking projects so I upgraded to a 50T combination blade for an even finer edge finish.
The aforementioned rack and pinion fence does its job well and stays parallel to the blade. I found the fence scale to be accurately set from the factory, but keep in mind that if you plan to use the scale and change blades, you may need to readjust it if the blade kerfs are different. After jointing and planing the faces of the boards, I used a small square to confirm that the ripped edges of the boards were indeed a perfect 90° to their faces.
What Could Be Improved?
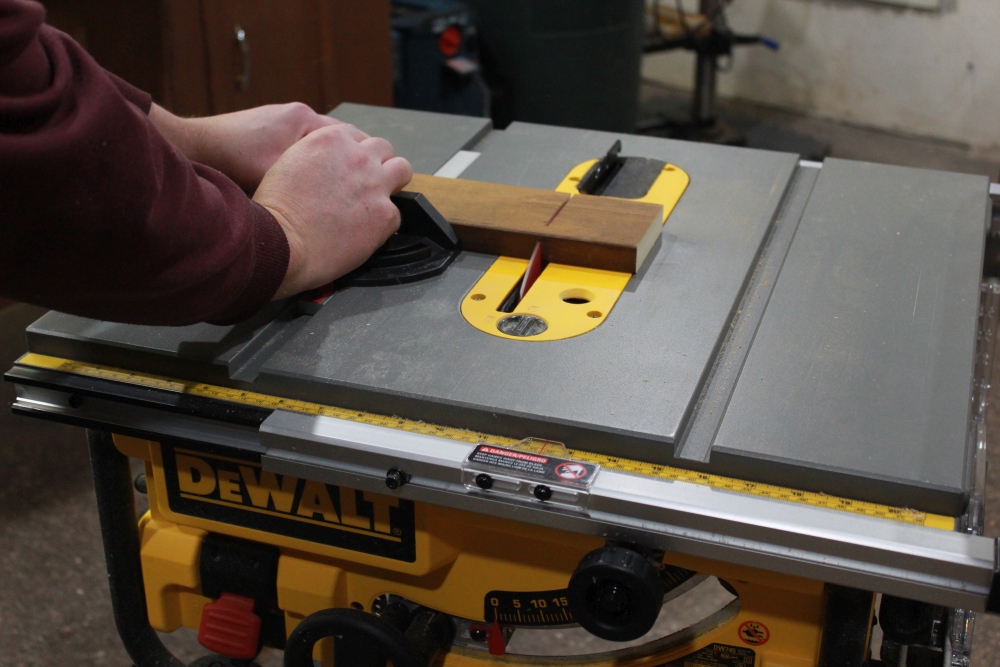
Overall, I’ve been really pleased and impressed with the performance of this little saw. However, there were a couple of niggly things I’d like to see DeWalt improve on in the future, the most glaring of which is the included miter gauge. Everything about the DeWalt Compact Jobsite Saw seems so well engineered and then I went to slide the miter gauge in the miter slot and it has quite a lot of play (I’d say at least 1/32″) and there’s no way to adjust it. After reading some other reviews it seems this is not an anomaly.
The included stand could also be beefier. While it has been plenty stable on the floor of my shop, I could see how it might be trickier to stabilize on a job site where it might be used on gravel, soil, or other less inherently stable surfaces.
Final Thoughts
The DeWalt 10″ Compact Jobsite Table Saw with Stand is an impressive little package with plenty of power to conquer almost any remodeling job. Its compact size makes it appealing to the serious DIYer with limited space or contractors with limited space in their vehicles. It’s a steal of a buy at the Home Depot for only $299.
