
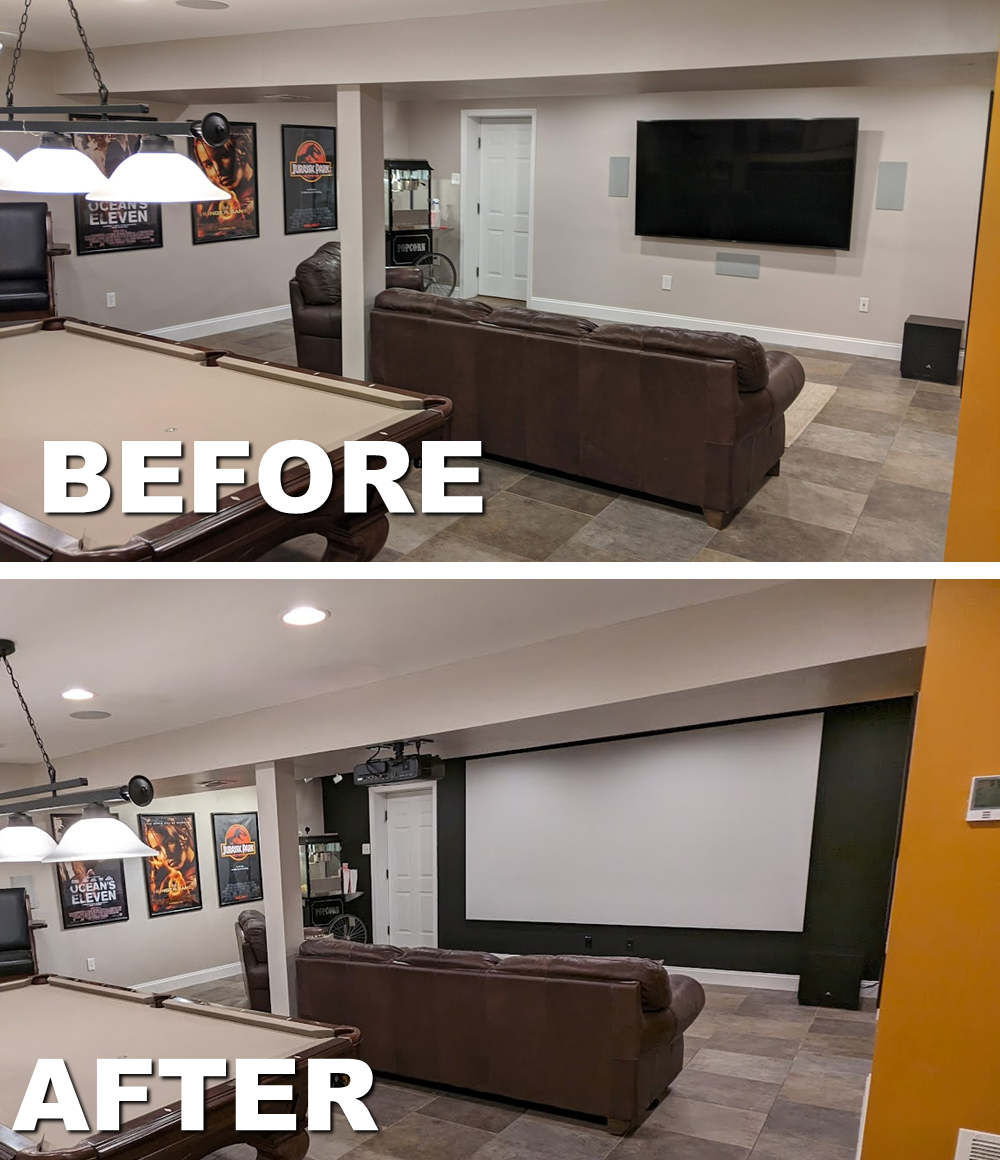
We recently upgraded the TV area of our basement family game room from an 85″ Sony 4K TV with a 5.1 surround sound system to a projector and 142″ screen with a 6.1.4 Dolby Atmos system. This project has been a journey because of the unique challenges our basement presents, including the lack of a dedicated home theater room, a large soffit/bulkhead that runs down the center of the space (limiting projector placement), and lighter-colored walls that make the space otherwise inviting but create reflections that tend to wash out projected images.
In this post, I cover the soup-to-nuts planning, design, and implementation process, how we selected the projector, screen, and speakers for our setup, and some initial performance reviews now that the system is running. My hope is that if you’re planning a home theater for your house — especially if it is in a shared space like ours — this post can help you along in the journey. I’m working on a few follow-up posts on specific aspects of the project and reviews of the equipment I used.
Basement Game Room Setup
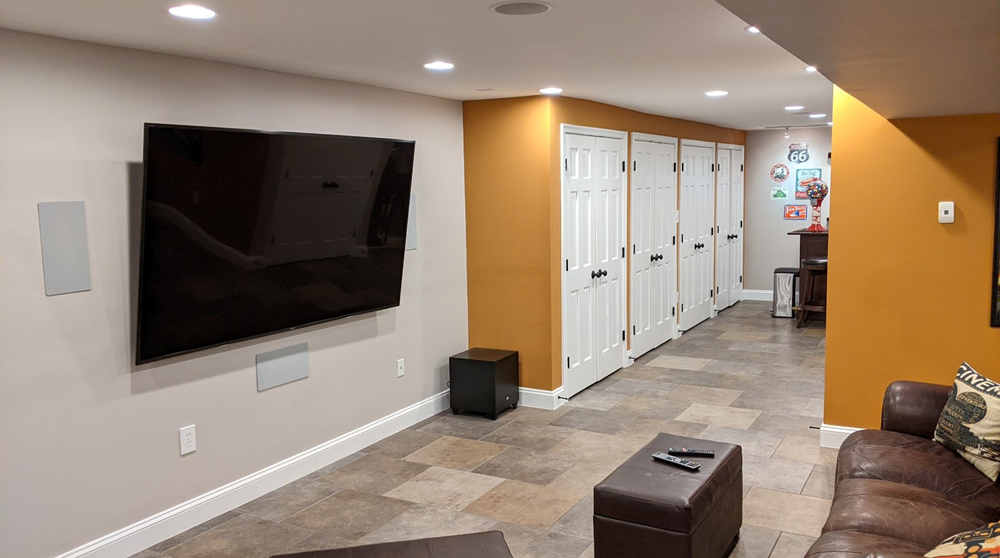
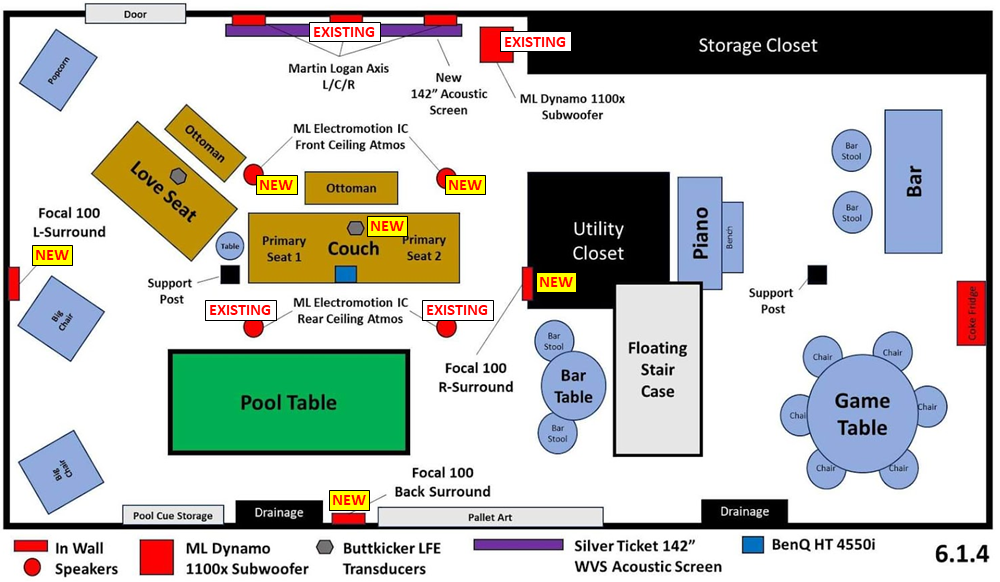
Our house is a traditional center hall colonial with a basement that we’ve roughly divided into four quadrants. Each quadrant has a separately-controlled radiant heated floor with a thermostat on the wall of the central utility closet. As you can see, we have a TV/Theater area, a pool table area, a game table area, and a piano/bar area, along with a long storage closet that runs along the back side of the house. The left-most side of that storage closet is where our A/V equipment (e.g., Receiver, 4K Blu-Ray Player, PS5) are stored out of site. Here’s the plan we created in PowerPoint for re-designing our space.

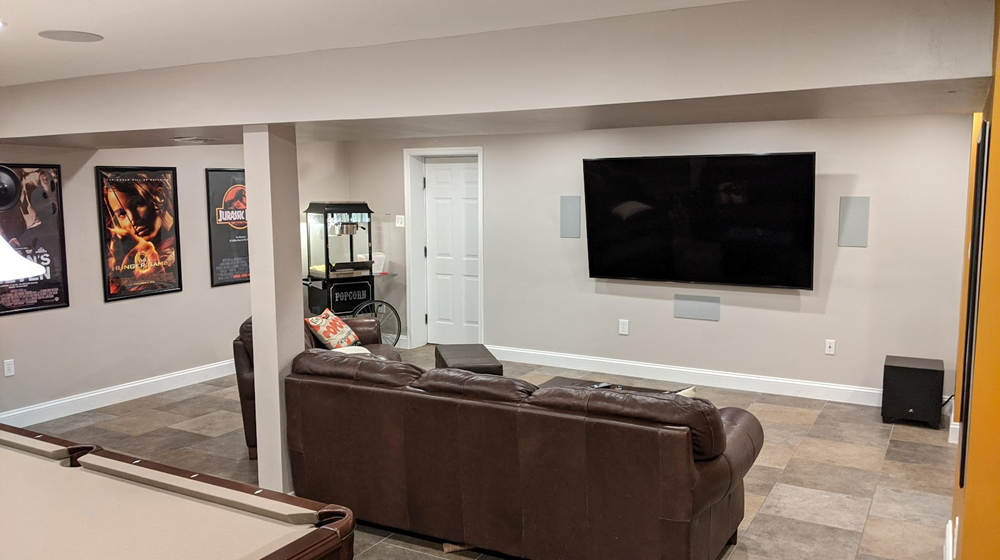
Our existing room setup (shown in the “before” picture above) included:
- A Sony 85″ TV
- A Marantz SR6014 Receiver Powering a 5.1 setup that included the following speakers:
- 3 Martin Logan Axis In-wall Speakers (Front Wall – Left, Center, and Right)
- 2 Martin Logan Electromotion IC In-Ceiling Speakers (Behind Couch)
- 1 Martin Logan Dynamo 1100x Subwoofer
Here’s a few pictures of the space with the 85″ TV before we got started on the upgrade:

Goals for the Project
Goal #1: Larger Screen. Of course, the primary goal of the project was to achieve a much larger and more immersive TV- and movie-watching experience. At the outset, we weren’t quite sure how large of a screen made sense for the space. Our couch sits about 11-1/2′ (138″) from the wall. Would a 120″ screen make sense or would that feel too big? What about 135″ or even 150″? I’ll cover more on that below, but ultimately, we landed at 142″ although from a strictly viewing-distance point of view, we could have gone even larger — even to 150″+ without an issue.
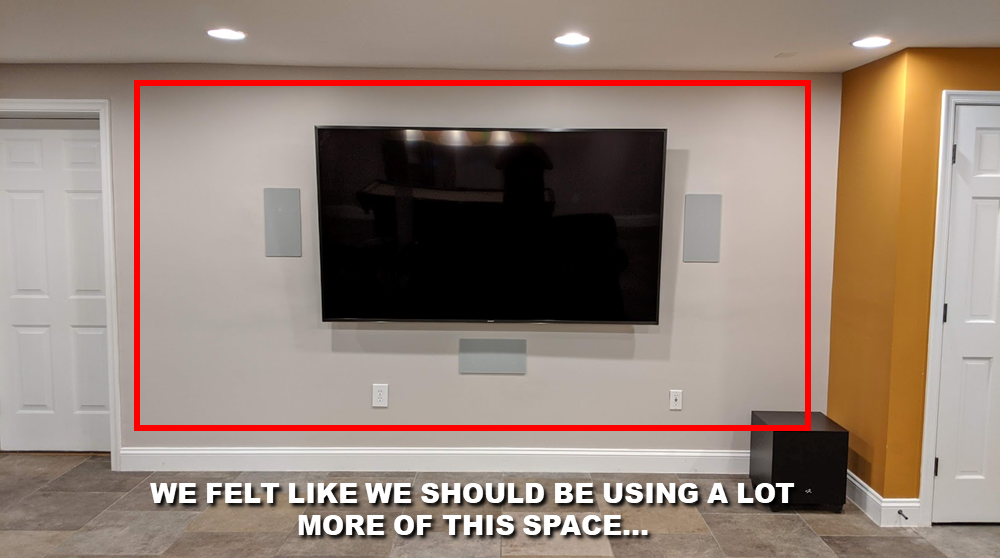
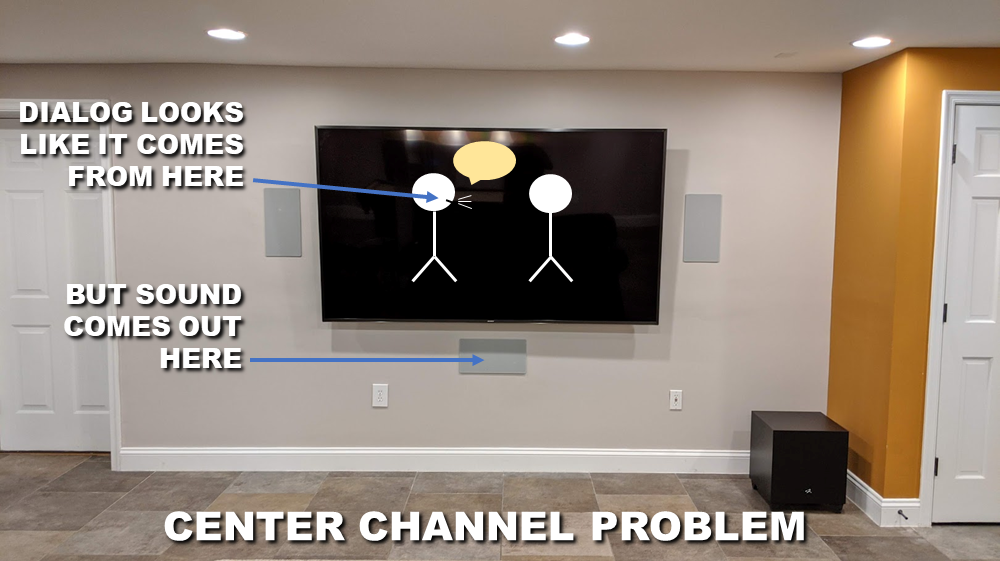
Goal #2, Improve Dialog: A secondary goal for the project was to solve a problem that has long irritated me about our current setup: center channel placement. When you have a large TV with any kind of surround sound system, the front center channel speaker (where most of voice track is played) must sit above or below the screen. An 85″ TV is a little over 40″ tall. If the mouth of a speaker falls around 30″ up on the screen, and your center channel is mounted 6-9″ below the screen (as in most set ups, including ours), it means that the sound of the speaker’s voice and the visual of their mouth are going to be disconnected by a whopping 3+ feet. I would always notice this when we watched TV or movies and it a little bit drove me nuts. Some people won’t be bothered by the visual-audio disconnect, and sometimes I could get lost in a film sufficiently that I forgot about it, but most of the time, it was a persistent irritant. So the secondary goal of this setup was to mount an acoustically transparent screen that allowed the center channel to be placed directly behind the screen, and therefore much closer to any on-screen speaker’s mouth.
Goal #3, Add Dolby Atmos: A third goal that emerged during planning was an upgrade of the sound system from 5.1 (meaning 5 speakers and 1 subwoofer) to at least 5.1.4 (meaning 5 ear-level speakers, 1 subwoofer, and 4 in-ceiling Dolby Atmos speakers). We ultimately ended up with 6.1.4, a somewhat unusual set up that isn’t widely recommended anymore but worked well for our space). This image shows what speakers we already had, and which ones we added. Note: Our Marantz SR6014 is capable of decoding 11 channels (+ 2 Subwoofers) and powering 9. Since we ended up with 10 decoded channels, (the “6” and “4” in 6.2.4) we had to route two channels through an external amplifier.
Goal #4, Don’t Make Anything Worse: And the final goal: ensure we’re actually upgrading from the 85″ TV and 5.1 setup. This may sound obvious, but one concern when moving from a TV to a projector is picture quality due to projector, screen, and room integration. One of the reasons I didn’t install a projector in the first place is because it’s a lot more work to select the projector and screen and make sure they’ll work for the space. In addition, non-dedicated rooms present challenges, like light reflection, that must be dealt with for the picture to look good. Ultimately, we didn’t want a washed-out looking picture.
Screen Size: How Big is Too Big?
If you Google screen size and viewing distance, you’ll quickly be presented with a number of viewing distance calculators (like this one, or this one) that will almost certainly undersize the screen for your space. The primary driver seems to be that for standard TV, calculators recommend a 30°-35° field of view; for mixed use: 35-40°; and for cinema: 40°-45°. Our setup delivers a whopping 48.3° field of view. With potentially one exception, it is not too big. I’ll get to that exception, and why I still think you should target a 48° to 50° field of view, after we discuss aspect ratios.
Aspect Ratios: 16:9, 2.40:1, or Something Else?
As you’re probably aware, video content can be delivered in a wide variety of aspect ratios. If you’re 40 or older like me, the format you grew up with was 4:3. Around the late 90s, concurrent with TV’s transition from analog to digital, the industry migrated to the now commonplace 16:9. Movies are often filmed in 2.35:1, 2.39:1, or 2.40:1 (sometimes called CinemaScope). On a regular TV, Cinemascope will leave you with those familiar black bars on the top and bottom of your screen. And still more formats are in use today, including a new 1.90:1 IMAX format that is in-between 16:9 and Cinemascope and will leave you with smaller black bars at the top of bottom of the screen. Top Gun Maverick streamed via Prime and a number of Disney+ movies offer this format.
So which to choose? Well, it’s going to depend on a few factors: what content you watch the most; what your selected projector will support; your wall size, and your viewing distance. There are even solutions that involve projectors with lens memory and motorized masking screens that will allow you to have the best of all worlds. For us, those options were out of budget.
So, we selected 16:9 (in my view the “easy button” for a few reasons: 1) We tend to use the projector for TV (40%), Gaming (40%) and Movies (20%). And, because of our room layout, our projector options were very limited. The one we landed on happened to support 16:9.
But What About That “Too Big” Comment?
So when is a 16:9 aspect, 142″ screen too big for an 11.5″ seating distance? The answer is with a few TV shows that use a lot of camera movement. An example would be certain HGTV programs, which use a lot of changing angles, zooming, panning etc. to keep you engaged in the show. With such a large screen, a lot of rapid panning and camera movement, especially with very bright content, can be a bit overwhelming.
But let’s talk about what absolutely DOES look amazing on the 142″ screen: everything else. Sitcoms, news programs, football, the olympics, most everything available on streaming services, and all types of movies are absolutely stunning at a near 50° field of view. And if you were to downsize your screen to make it suitable for the occasionally rapid-panning HGTV program, every other content format would suffer. So it’s a trade. In this case, I think the old adage is true: the bigger the better.
A Strategy for Testing Various Screen Sizes
We started the project by using blue painter’s tape to mark out potential screen sizes around our existing setup and going slightly larger than the internet calculators recommended. I marked out 120″. At first, this larger space seemed really big. But as we sat with it for a few days, it seemed like we maybe could go larger.

Around this time, a friend invited me to the Home Theater Enthusiasts forum on Facebook. I shared my space, plans, and a picture of our space and I got almost universal feedback: go bigger. So we taped off 135″ and after sitting with that for a few days, it seemed much better.
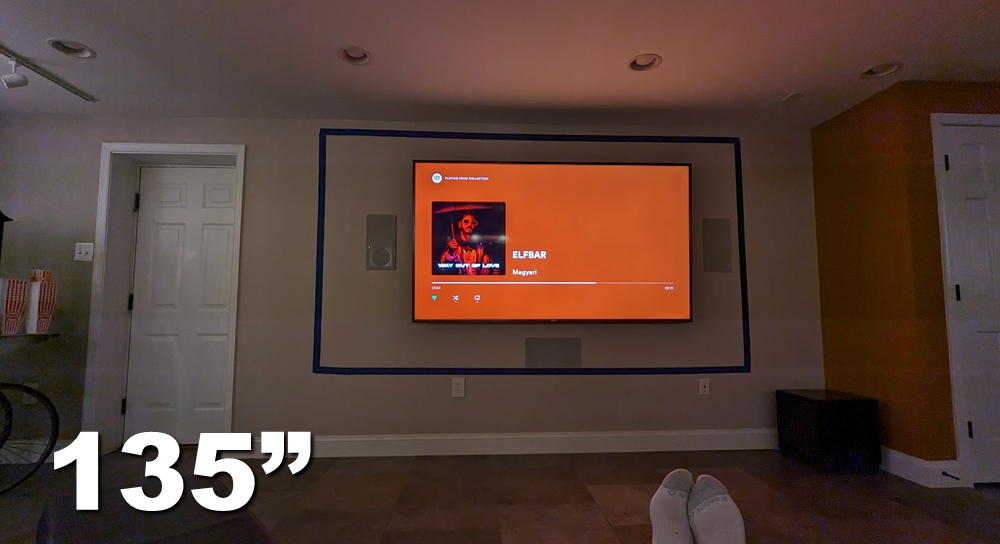
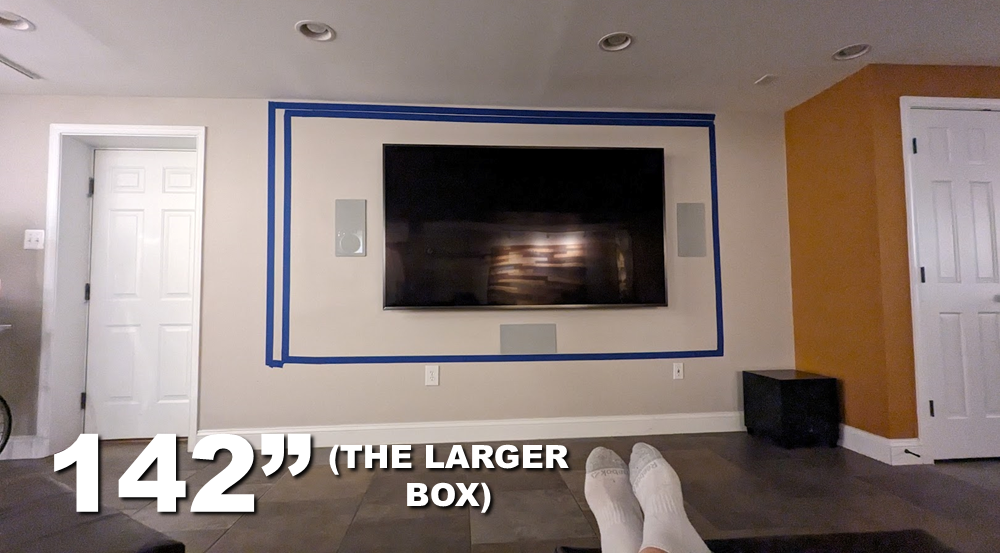
But then my son asked, could we go any bigger? I started looking around at screen options. Many screen manufacturers make a 120″, 135″ and 150″ screen. Unfortunately, the projector that seemed to work for our space could not be properly located in our room to throw a 150″ screen. But I did find that a popular screen manufacturer, Silver Ticket, made a thin bezel 142″ acoustic screen that was a possibility for our space. So we taped out 142″ and sure enough, it still looked great.
My recommendation if you’re thinking about screen size and worried about going too big, tape out various screen sizes on the wall and sit with them for a few days. Remember: if you install a 16:9 projector and you watch Cinemascope (2:35:1) content, you’re going to have a lot of screen real estate lost to black bars at the top and bottom.
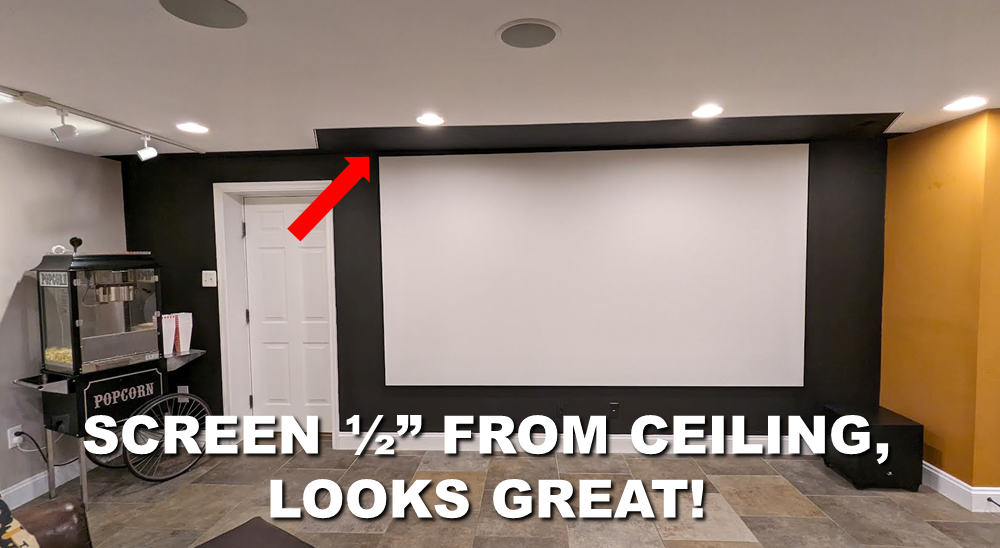
Can the Screen Touch the Ceiling in a Home Theater?
This question really concerned me when designing our space. We have 8′ ceilings and I didn’t know if it would look weird for the screen to be adjacent to the ceiling. The answer: it’s totally fine. You may have to deal with some light reflection issues off the ceiling that could impact contrast, but there is absolutely no drawback to watching a screen that is touching the ceiling and the light issues can be mitigated.
How to Select a Projector & The Throw Ratio Challenge
Selecting a projector is challenging. There are literally thousands of projectors for sale ranging in price from a few hundred dollars to $100,000 or more. They have wide variation in specs and it’s hard to figure out which one makes the most sense for a particular space. So how do you get started? Well, first things first, you need to understand the most important specification that makes projectors different from TVs: throw ratios.
The throw ratio of a projector is defined as: distance (from lens-to-screen) / screen size. So for example, if a projector has a throw ratio of 1.50x, it means that for the projector to throw a 142″ screen, the lens must be located 213″ (1.50x) back from the screen. For a throw ratio of 1.00x, a projector would need to be 142″ away to throw a 142″ screen. A projector whose widest throw ratio is 1.00 cannot throw a 142″ screen from 120″ no matter how you configure it.
So available throw ratios in your space create a major filter in the projector selection process. In our room, the back of the projector can sit no further than about 14’6″ from the screen. If it were to sit further back than that, it would be in the walkway that surrounds our pool table and tall people would hit their heads on it when playing pool. Since we knew we wanted at least a 135″ screen (and preferably a little larger) and the projector lens could sit no closer than 13’6″ from the screen, we were limited to projectors that with a throw ratio of 1.16x or less.
This shorter throw ratio, it turns out, dramatically limited our projector options. Many of the most recommended 4K home theater projectors have a minimum throw ratio of 1.35x or higher. This includes projectors like the JVC DLA-NP5, the Epson LS12000 and UB5050, and others. Here were the other important criteria we considered:
- Throw ratio of 1.16x or shorter
- Native 16:9 aspect ratio
- 4K (3840 × 2160) resolution
- Low input lag (<20ms) to support gaming
- An LED or laser light source (these last 5-6x longer than bulbs and do not dim nearly as fast if at all)
- High brightness (3000 ANSI lumens or higher)
- Lens shift capability that allowed for mounting in the right location to project the screen where it is located in our room
- Good reviews
The best resource on the internet for determining which projectors can work in your space is Projector Central’s Throw Ratio Calculator. Once you know the throw ratios that will work for your space, you can load them up into the calculator and have it spit out every projector that might work for you.
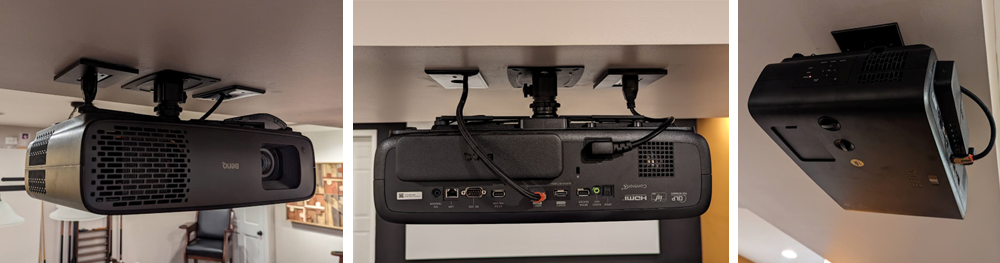
Our Projector: BenQ HT4550i 4K LED DLP Projector
After factoring in our other criteria, we backed into only one projector that met every one of our needs: the BenQ HT4550i. A detailed review of the BenQ HT4550i is forthcoming. I’ll link to it here when it’s posted! In brief, the BenQ HT4550i offered everything we needed for our particular space. Of course, it may not work for your space/needs, but if it does, we can wholeheartedly recommend this projector. It’s been great (with a few provisions we’ll share in the detailed review.)
How to Select a Screen for Your Space
Once you know your target screen size, and the projector that you want most for your space, I recommend buying the projector and having it delivered and setup before finalizing a screen choice. The reason for this is simple: with the projector in hand, you can order screen samples and actually project onto your wall (with the samples hung up) and decide which one looks the best for your space. As with projectors, there’s a lot of options out there for screens. Here’s the main options available when it comes to selecting a screen and some links to read more:
Fixed vs. Motorized: We knew we wanted a fixed screen for our setup. I would recommend motorized only if there is another purpose to the wall you’re using besides the home theater. Some folks may also choose motorized if the screen is in a formal (i.e., upstairs) living space and they want it to remain hidden much of the time.
Acoustic vs. Non-Acoustic: An acoustic screen acts as a window to sound, whereas non-acoustic screens do not. If you want to mount your speakers behind your screen, you’ll need an acoustic material. A secondary issue is how the acoustic capability is achieved: either by perforating the material or by using a woven fabric that is naturally acoustically transparent. Perforated screens can give rise to the Moire effect, but are available in a wider range of options.
White vs. Grey: Since the early 2000s most screen manufacturers are offering both white and grey screens. In general, white screens offer superior color reproduction and are appropriate for 100% light-controlled spaces. Grey screens will lower the black floor of a projected image and can be useful to obtain darker blacks in non-light controlled environments.
High Gain vs. Low Gain: High gain screens reflect more light back to the viewer, while lower gain screens reflect less. High-gain grey screens can offer lower black levels while still reflecting enough of the picture to show vibrant colors.
Ambient Light Rejecting (ALR) vs. Non-ALR: Some screens have physical properties that allow them to reflect light coming from a specific direction while rejecting most other light. ALR screens tend to have a narrower watching angle but can allow a projector to be used in a brighter environment. Note: Some ALR screens are specially-designed for Ultra-Short-Throw (UST) projectors, while others cannot be used with USTs.
Regular Bezel vs. Thin Bezel vs. No Bezel: This is exactly what it sounds like. Most screens have a 2-3″ black velvet bezel around them. Thin-Bezel screens have a much smaller bezel (often <.5″) and No Bezel screens have… no bezel at all.
There are a few more factors, but these are the most important. I can’t stress enough that trying screen material in your space with your projector is really important. So plan to buy the projector first, and then purchase screen samples.
Where to Order Screen Samples
Our Screen: The Silver Ticket 142″ Thin Bezel WVS Acoustic Screen
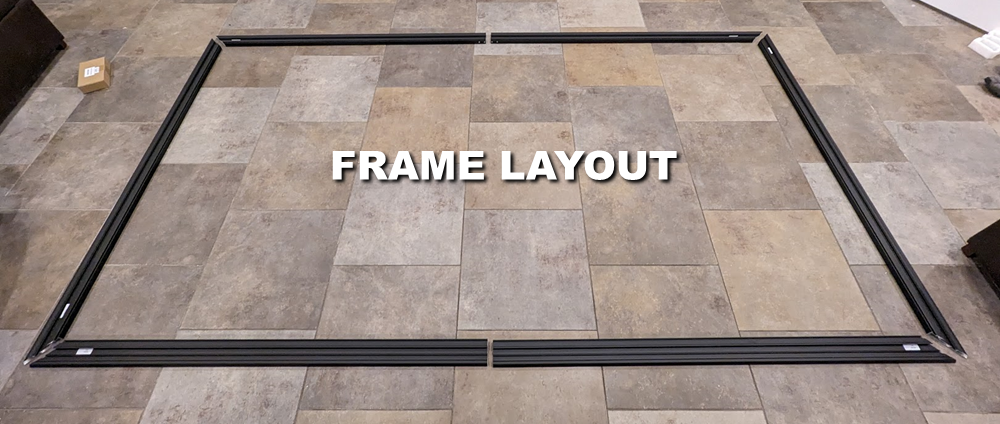
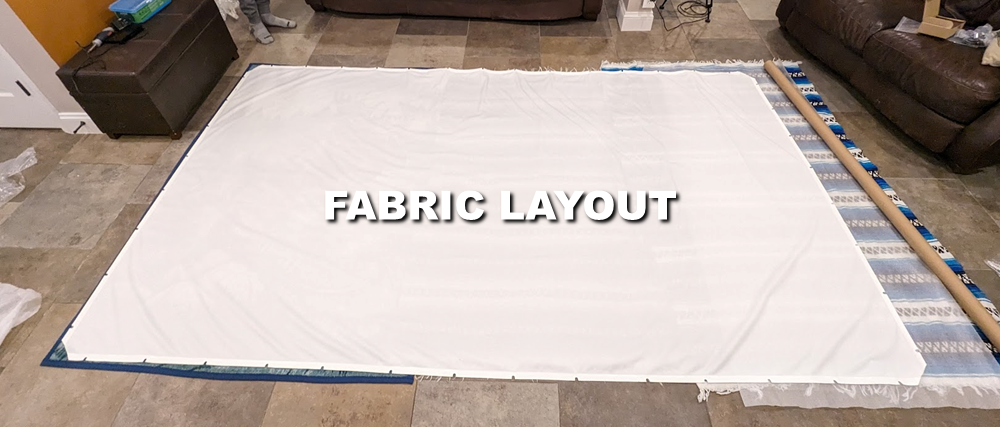
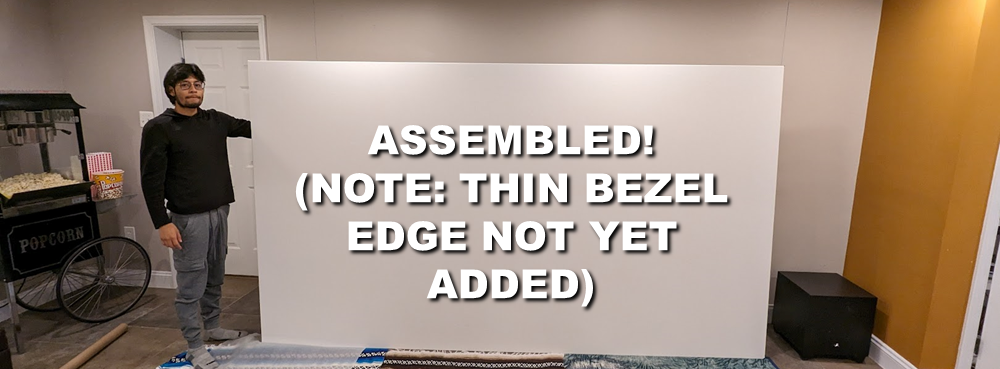
Ultimately, we ended up choosing the Silver Ticket 142″ Thin Bezel Frame with ST’s WVS (Woven Acoustic) Material. It’s a white, 1.1 gain, non-ALR screen material that offers great color reproduction at a fraction of the cost of many other screens on the market. Our screen came in under $1,100 with shipping. It is a self-assembly item. It took us about 90 minutes to put together. The instructions were easy to follow, and I didn’t snap pictures through the whole assembly. Silver Ticket has a nice YouTube Video of the assembly process.

Audio Considerations & Dolby Atmos
I last upgraded our audio system in 2019 to a 5.1 setup with a fairly powerful receiver: a Marantz SR6014, which could decode 11 channels and power up to 9, even though we were only using it for 5.1 at the time. If you’ve followed audio at all, you know Dolby 5.1 surround sound has been around since the 1990s. Basically, the 5.1 means 5 speakers (Front Left, Front Center, Front Right, Surround Left, and Surround Right) and 1 subwoofer. After 5.1 came 6.1 (adding a single surround back speaker directly behind the primary listening position (PLP)), and then 7.1 (splitting that surround back into 2 separate channels), then 5.2/7.2 (adding an additional subwoofer), and so-on.
In the 2012 timeframe, Dolby released an entirely new specification called Dolby Atmos. The new specification decoupled the actual speakers in the room from underlying logical “objects” in a dome-shape around the listener, leaving it to the receiver to map the objects to the speakers in the set up. Atmos also gave rise to the addition of new height/ceiling channels that could augment the bed-layer channels. There are a wide range of possible speaker setups with Dolby Atmos, but the most recommended we’ve seen is 7.2.4 (7 ear-level channels, 2 subwoofers, and 4 ceiling channels – two in front of the PLP and two behind it.) I’ve heard of set-ups as crazy as 9.6.9.
Based on recommendations from my newly acquired forum buddies, I decided to pursue a Dolby Atmos setup for our space with a goal of expanding our 5.1 to 7.1.4 or 7.2.4 depending on whether I wanted to install the additional subwoofer. Ultimately, I decided that two surround back channels really didn’t work in our space, and landed on 6.2.4 with the following configuration:
- 6 bed-layer speaker: Front Left, Front Center, Front Right, Surround Left, Surround Right, Surround Back
- 1 Subwoofer and 1 Low Frequency Effects Transducer (runs on the second subwoofer channel).
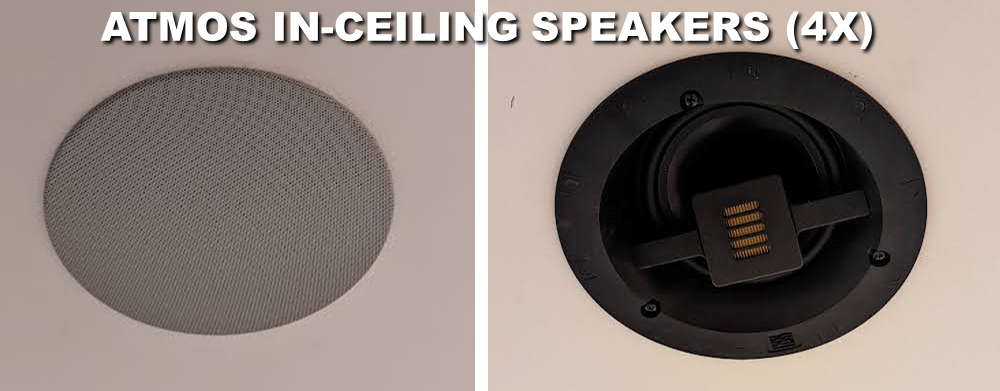
- 4 In-ceiling speakers (called Atmos speakers by most folks).
Repurposing My Existing Speakers
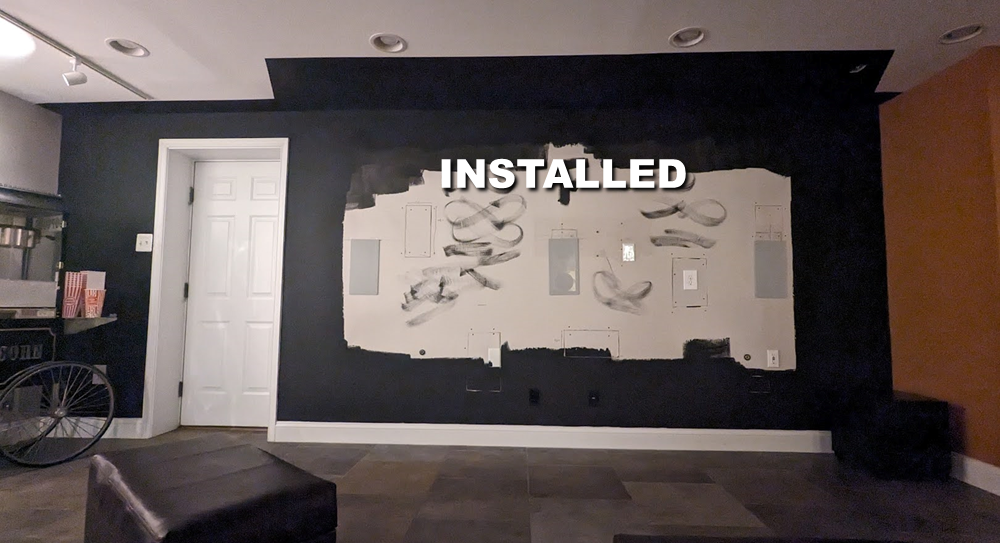
Front Sound Stage: With the new, wider acoustic screen, we set about to re-arrange our front sound stage to put the L/C/R in-line across the front of the room. This required some relatively easy (but tedious) drywall work. Fortunately, with the screen hanging in front of the speakers, there was no need to do a lot of finish work.
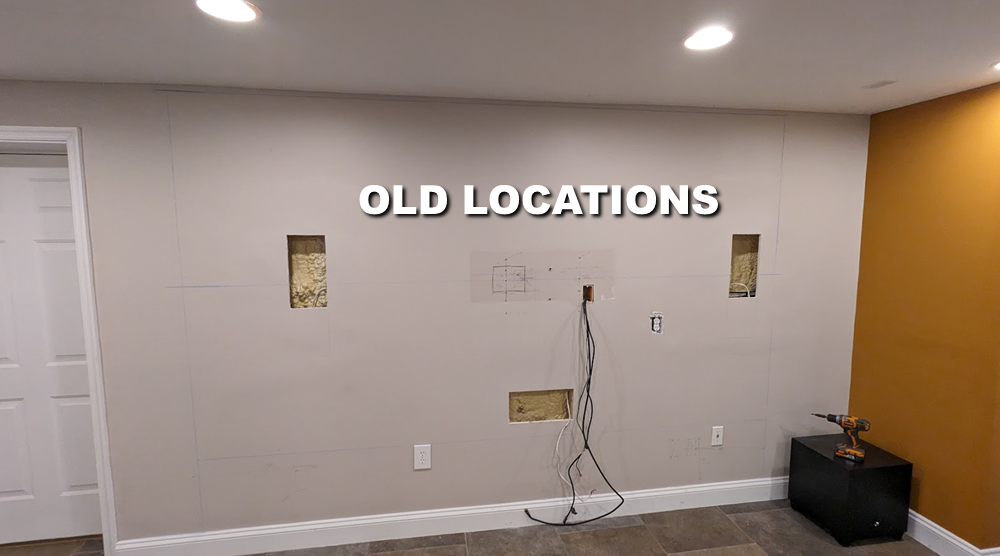
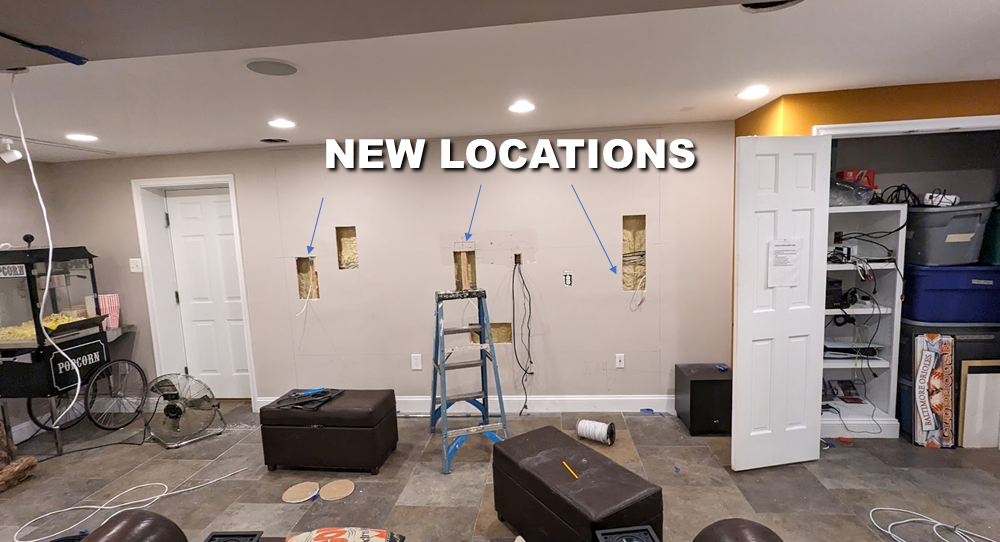
Surrounds: In the old 5.1 system we had been using two Martin Logan in-ceiling speakers as the surround-left and surround-right channels. Technically, in-ceiling isn’t the best setup for 5.1, as all five speakers should ideally be located at ear level; however, many people use ceiling speakers for the rears when placement otherwise is not ideal. We repurposed those for Dolby Atmos speakers (see below). That left us needing new surround speakers at ear-level. We selected Focal 100 In-wall Speakers for our surround-left, surround-back, and surround-right. We chose to use a single surround back channel (instead of surround back-left and surround back-right) because with our existing artwork we couldn’t mount two speakers, but had a nice space where one would fit. Here’s our surrounds:
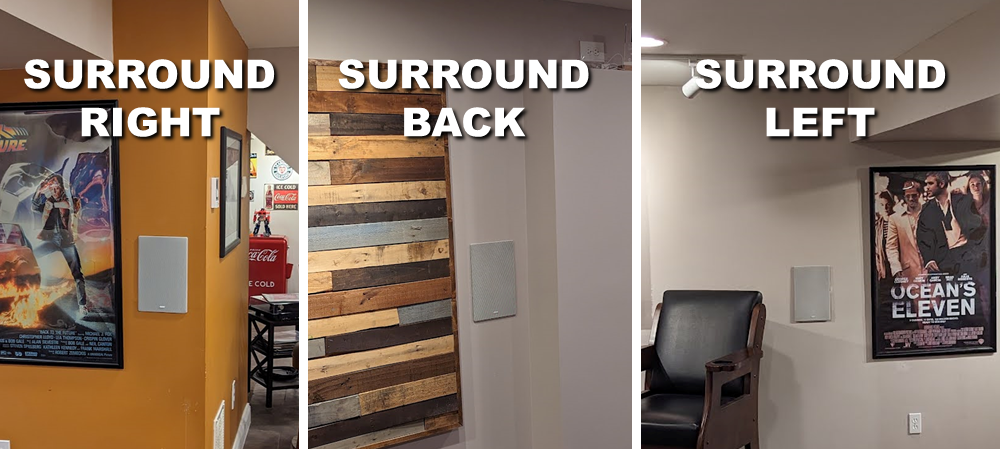
Dolby Atmos Speakers:
As mentioned, we re-purposed two in-ceiling Martin Logan Electromotion IC speakers that had been used as the L/R Surrounds for Atmos Ceiling Rear speakers. I was able to find two additional ceiling speakers to add in the Atmos Ceiling Front Speakers. Each of these ML Electromotion speakers has a built-in tweeter and woofer that can be aimed at the primarily listening position.
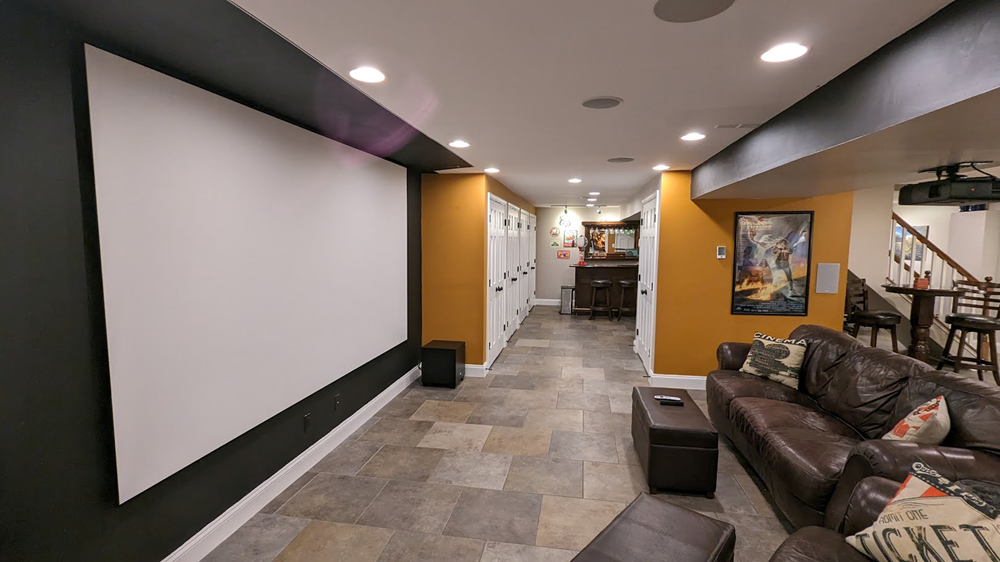
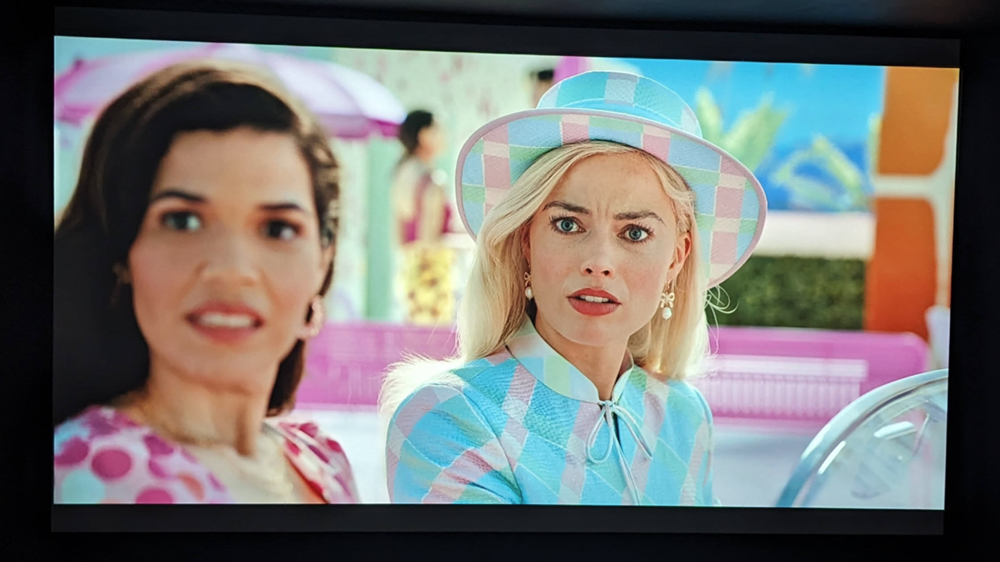
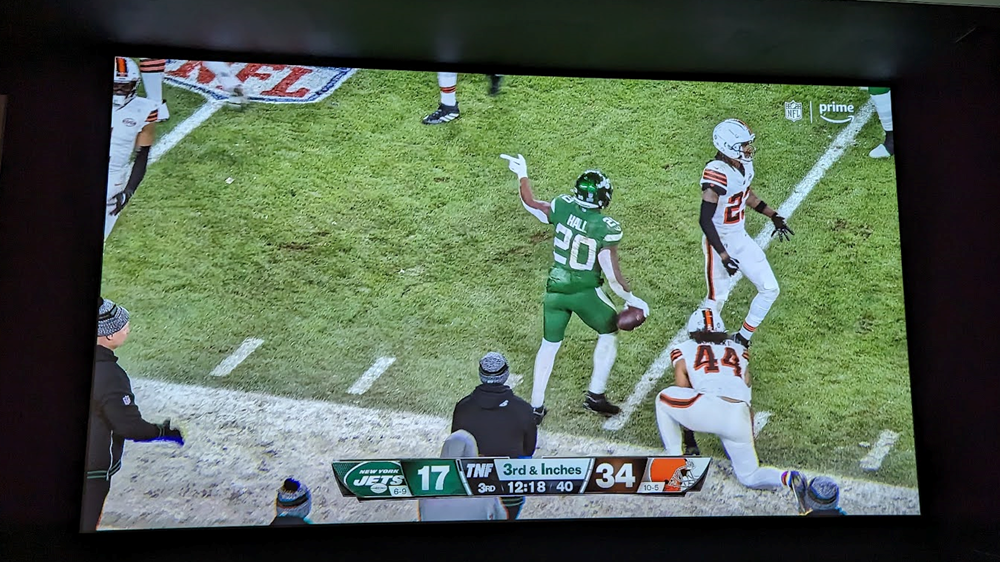
Pictures of the Finished Room
Here’s a few pictures of the Home Theater in Action! You’ll have to just trust us that it sounds amazing!
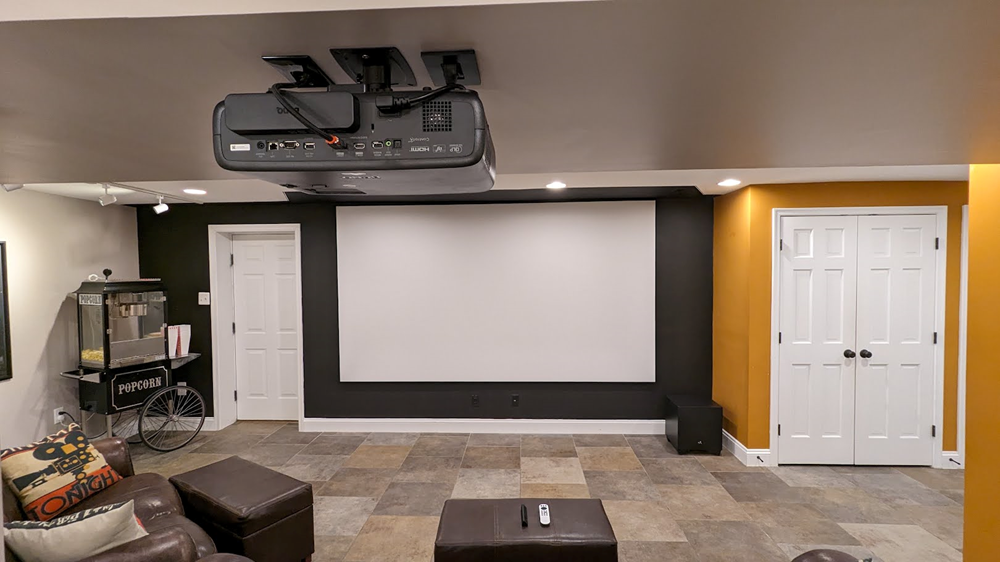
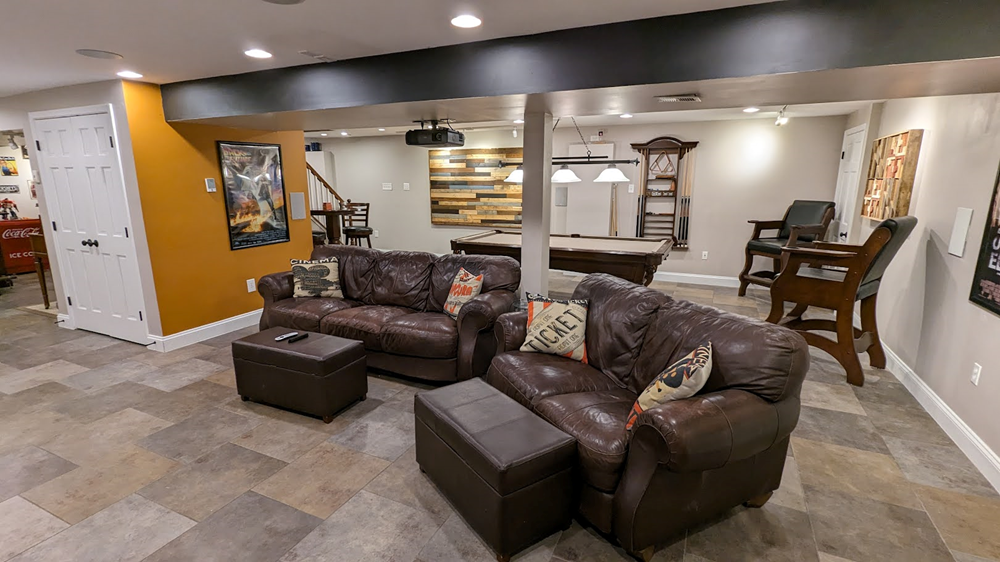
Pictures of the Home Theater In Action
Here’s a few pictures of the BenQ HT4550i in action!

Final Thoughts
This setup is absolutely awesome. The BenQ HT4550i produces a wonderful, bright picture that is just stunning and the Silver Ticket 142″ screen seems to be the perfect price-to-performance ratio for our environment. The upgraded Atmos speakers offer an amazing listening experience. It truly is next level TV and movie watching.
Update as of November, 2025: The projector and screen are still going strong. We have over 1,000 hours of use on this setup now and it is just so wonderful to have a big beautiful screen to watch every night. We love it and simply could never go back to a TV. Even a 100″ television feels way too small when you’ve become accustomed to 142″ projection.
Questions & Comments
I certainly hope this helps you out! Stay tuned for a few follow-up articles on the screen and the projector itself.

Amazing improvement and great guide, I know the family must be happy with this one!
Absolutely love the step by step, laying out your thought process.
How does the screen do in general ambient light? With that setup, a drink on the table playing pool, and the game on the big screen. Cant go wrong.
Omer – great question. This setup will handle only a very moderate amount of ambient light and looks better when all lights are off. It is somewhat program dependent. Football and other sports tend to be very brightly lit. These can look good with more ambient light. Darker programs (think Star Wars space scenes) need the room to be full black to look good. In general, ambient light is the enemy of projection — it’s why movie theaters are so dark inside.
Super great. Just starting my journey and like home theater, but needed a jumping off point. I’ve new construction in a smaller basement room, but still just didn’t know where/how to begin and what might make sense. Cheers!
Great set up. I have the exact arrangement before your upgrade. You gave me an awesome idea for my basement setup. One question I had was about your LCR speakers on the projection wall. Doesn’t the projection screen in front of the speakers take away from the sound integrity?
Hi, not at all. The screen is acoustically transparent – no noticeable degredation of audio quality.
I’m designing a similar room right now, what’s the overall demensions of the entire room? Thanks
Whole room is about 42′ x 26′.