Another friend stopped by today to introduce herself and share with you 5 easy steps to improve curb appeal! Make sure you also visit her blog and show her some love! Also, tonight kicks off our big Before and After Contest supporting Habitat for Humanity, open to everyone, not just bloggers. Hope to see you tonight at 10pm EST.

Hi, friends! I’m Amy, aka One Artsy Mama, and I am thrilled to be here today to share some of the things we did to improve the curb appeal of our home this spring! I live in a townhouse with my hubby and our adorable almost-five-year-old “Little Crafter,” and while there’s plenty of living space for our family inside, we don’t have too much yard to speak of. We have a short sidewalk with just a bit of grass on each side that adjoins to our neighbors’ yards and leads up to a small front stoop. But, we like to do the best we can with what we have, especially since we frequently host gatherings of our family and friends. We want our home to be as cheerful and inviting from the outside as it is when you’re inside!

If you’ve ever visited my blog, you’ll know that my favorite kinds of projects are quick, cheap, and easy. Whether it’s a kids’ craft, a home decor project, a piece of jewelry, or our yard, most of us don’t have a ton of extra time and money to spare. So, here are a few simple and inexpensive ways we spruced up our front yard this season… and you can too!
Step 1: Attractive Edger
The first change we made was getting rid of the rotted wood we had lining our garden space. It looked nice when we put it down five years ago, but over time, it started to look pretty rough. I’m ridiculously picky about edging (I hate the bumpy kind that I think looks like tombstones, and our garden isn’t well suited to build a wall), but I totally love what we found this year at Lowe’s.

Step 2: Trim existing bushes and weed the garden!
Before adding anything else, we wanted to make what we already had look as neat and well-maintained as possible. Hubby and Little Crafter weeded while I trimmed our burning bushes and rosebush. Obviously weeding is hard work! Whew!

Step 3: Plant colorful annuals. (or perennials if you prefer!)
For Mother’s Day, my boys took me to a local Flower and Jazz festival where Little Crafter chose some pretty blooms as part of my gift. Melt my heart!

LC is at the perfect age for helping in the garden this year, and he wants to do literally everything himself! So, he was thrilled when I let him help plant what we’d bought!

Step 4: Put down mulch.
It always amazes me what a difference a little mulch makes in the overall appearance of a garden! Look!

Step 5: Add colorful potted flowers and plants.
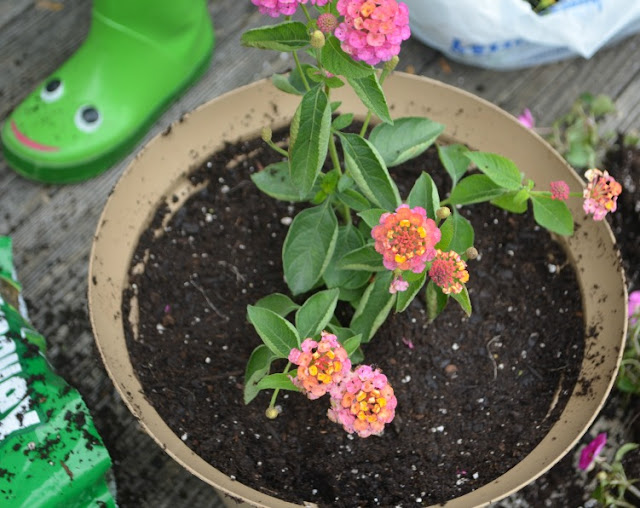
For the first time this year, I’m attempting to add even more color and beauty by having potted flowers in addition to the ones we planted in the ground! I got a self-watering pot from Walmart for less than $5, and we chose three types of flowers to go inside. I wanted a good mixture of heights and colors, so first we planted a tall Lantana in the center.

Then, we went around the edge alternating four Dwarf Celosias {orange spikeys} and four Portulaca, aka Mexican Roses.

I love the way it turned out, and I think it’ll be even prettier as it grows! And fortunately, LC isn’t going to let me forget to water any of the flowers… he and his Mickey Mouse watering can are on the job!

It’s amazing what a difference just a few hours’ work can do to transform your yard from blah to beautiful! Remember, if it isn’t easy and affordable, this artsy mama doesn’t do it! I think the little things we did really give our home a curbside appeal it didn’t have before.

What about you? What do you like to do to spruce up your home and make the outside just as inviting as the inside is?

Thanks to Jocie for having me here today and letting me share a little about our Springtime improvements! I’d love to hear your thoughts! Feel free to visit me anytime over on my blog, on Facebook, Twitter, Pinterest, or Instagram! I love making new friends. And, check out my recently published e-book, Crochet 101, to help beginners learn basic crochet stitches and techniques.
Hugs & Glitter,


