

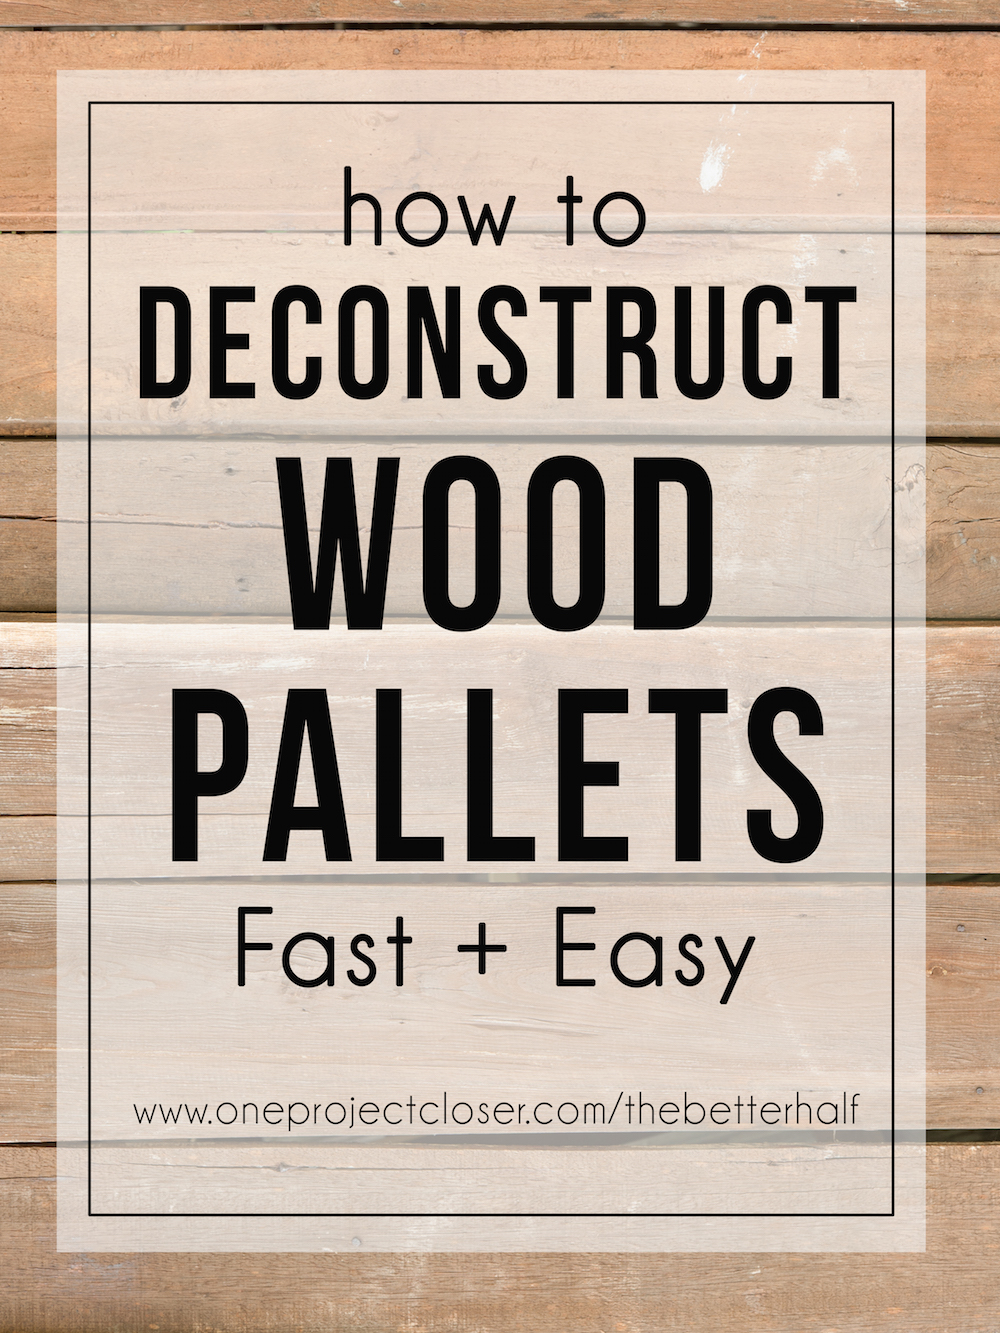
Just call me Professor Jocie because you are about to get schooled in deconstructing wood pallets and making pallet signs. LOL!
Okay, maybe not “schooled”… in response to some reader requests, I wanted to share with you my tips and tricks for pallet signs. The truth is, I spent MANY frustrating hours trying to deconstruct wood pallets and ended up damaging the wood despite all that effort! So, I turned to Ethan (my master of the tools) for some help.
He suggested using a few power tools that would make it much easier, quicker, and less destructive of the wood. Ethan and I deconstructed one wooden pallet, made one large and one small pallet sign, and shot video and still images of the process in under 2 hours. If we hadn’t been using it for blog fodder, I could have done it in half the time – that is QUICK! When I have used a crow bar and hammer in the past, it took one hour just to remove one plank of wood. I have heard from a reader that there is a crow bar specific to deconstructing pallets, but I don’t know how that compares to this process, since I have not tried it.
Pallet Video Tutorial
My hope is that this video will demonstrate and teach our technique for deconstructing pallets and building pallet signs. Its my big video debut (I’m super nervous!), but Ethan did a really wonderful job of shooting and editing it. A BIG thank you to Ethan!
For more details, tips and pix, you can also follow along below.
Making Pallet Signs from One Project Closer on Vimeo.
Deconstructing Wood Pallets
This goes very quickly, especially if I am cutting up several pallets at a time and storing wood, since a chunk of my time is spent setting things up and cleaning.
Materials Needed
- Reciprocating Saw
- Wood Pallet
Okay, so my materials list was very short, but let me tell you about it. I used an 18 volt, cordless reciprocating saw. It goes through the wood and nails like butter! I have used the 12 volt before and it was MUCH slower going and seemed to require more elbow grease and strength.
Where to Look for Pallets
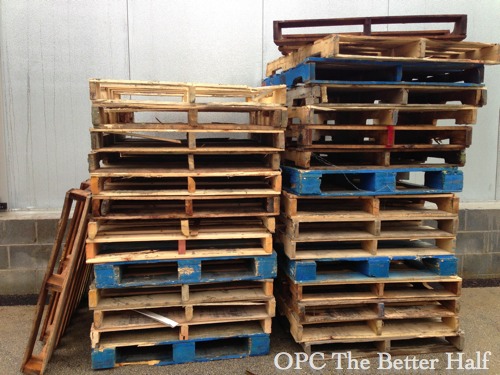
As for wood pallets, a reader recently asked me where I got mine. This past week, I saw a bunch sitting behind a grocery store about a mile from our house. I found one that looked like it was in good shape (clean, paint-free, dry), put it in the back of my RAV, and drove away quickly in hopes that I wouldn’t be sent to prison! lol!
The truth is, once I started looking for free pallets a few months ago it seemed like they were everywhere. In fact, many of my friends work at job that give them away. Here are a few suggestions but it’s always a good idea to call ahead to see if there are pallets available.
- Goodwill
- Grocery Stores
- Habitat ReStore
- Craigslist
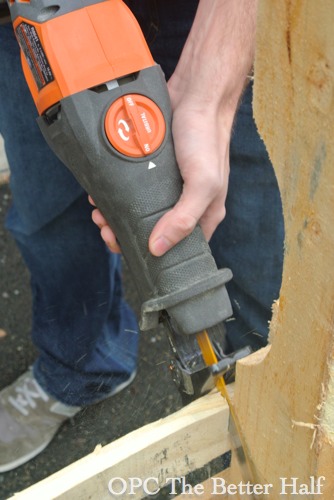
Step 1: Safety First
I always make sure to wear eye protection and gloves. Seriously, it is no fun to get hurt, plus, you know I look good! Also, when not using the reciprocating saw, I turn on the safety switch.
Step 2: Cut the Pallet
There are three major parts of a pallet –
- Top deck with long planks of wood
- Bottom deck also with long planks of wood but fewer in number
- Stringers, the three (or four) thicker pieces of wood that run in between and perpendicular to the upper and bottom decks
If I want to preserve the length of the wood, my goal is to make cuts at the back of the plank where it is nailed to the stringer. Ideally, I only cut the nails if the plank is pulled slightly away from the stringer, although sometimes, I cut little of the wood in my effort to get to the nails. No big deal!
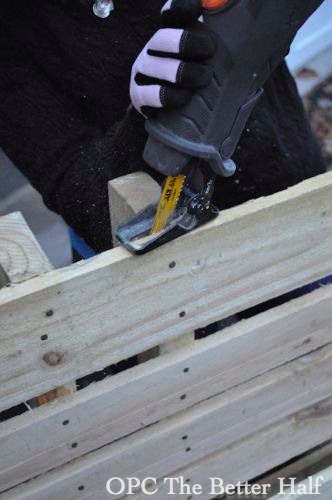
Each plank meets with each of the three stringers, therefore it takes three or four cuts to remove each plank, depending on the number of stringers on the pallet.

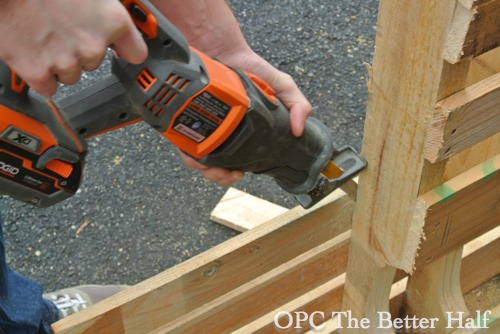
Tip: When using a reciprocating saw, make sure the shoe of the saw is pressed firmly against the wood to reduce vibration and increase control.
If making smaller pallet signs and don’t need to preserve the length of the wood, I will cut the planks on each side of the stringers. This goes much quicker but often results in a very rough cut.

Step 3: Remove Nails (Optional)
Depending on the look I want, I sometimes will remove the nail heads from the wood using a hammer. Not much too it, just an extra step.
Building a Pallet Sign
Materials Needed
- 2 Plywood strips the height of the pallet
- 3/4 inch Wood Screws
- Impact Driver or Drill/Driver
- Table Saw or Circular Saw
- Orbital Sander
Step 1: Organize the wood
Pallets are made from scrap wood and vary in wood, thickness, depth, and type of wood. As a result, I often play around with pieces of wood and their layout until I have the look and size pallet I want.
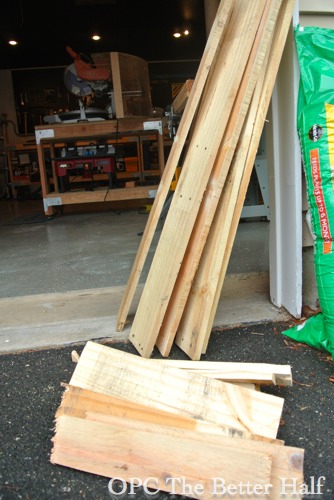
Also, if I have left the nails in the wood, I decide whether I want the heads of the nails showing.
Once I have the look I want, I place in facedown on the ground.
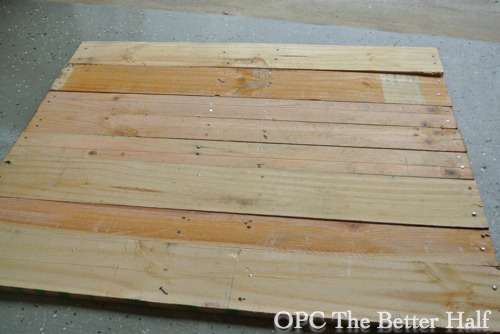
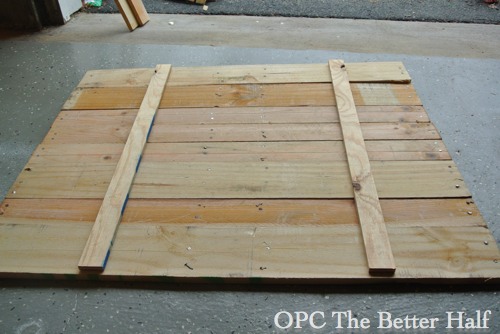
Step 2: Bracket the Wood Together
I use strips of plywood or scraps of pallet to bracket the pieces of pallet wood together. For smaller pallets, I sometimes only use one bracket, but two always works best. I have also seen metal brackets, but using scraps is by far the cheapest and easiest way to go.
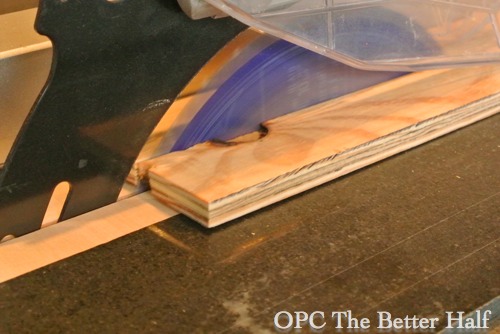
For the larger pallet I made, I cut two pieces of ply wood using the circular saw.
Then, I evenly spaced them perpendicular to the wood planks.
Then using 3/4″ wood screws and an Impact driver, I placed two screws in each plank of wood moving across the wood bracket.
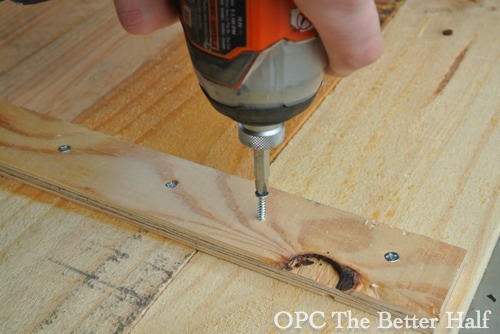
I like to push one end of the sign against a wall to hold all the pieces tight together as I screw them into place in order to reduce the gaps between the planks.
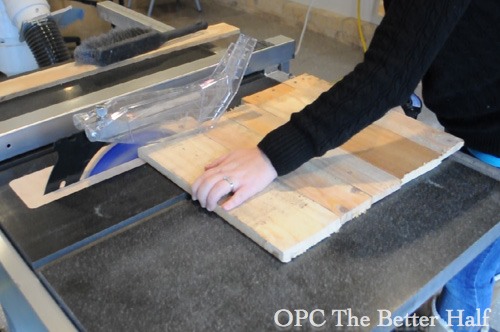
Step 3: Finish the Sign Edges (Optional)
For more rustic signs, I often leave the edges rough and uneven. But for a more finished look, I use the orbital saw or circular saw to make the edges even and smooth.
Step 4: Sand (Optional)
Just like the edges, this step is also optional. If I have used wood that is in good shape but I also want a more rustic look, I do not sand the top. However, sometimes the wood is dirty, rough, fuzzy, splintered or painted.
I have hand-sanded in the past, but it is super slow. The orbital sander worked really well and FAST!
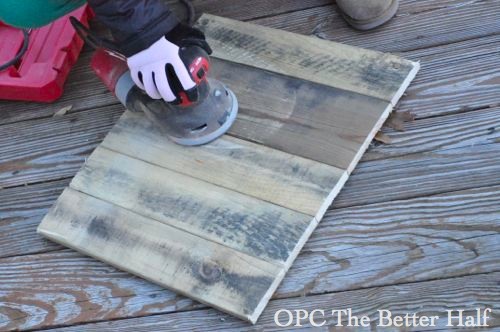
After sanding, I wiped the sign with a damp cloth to remove any debris or dust.
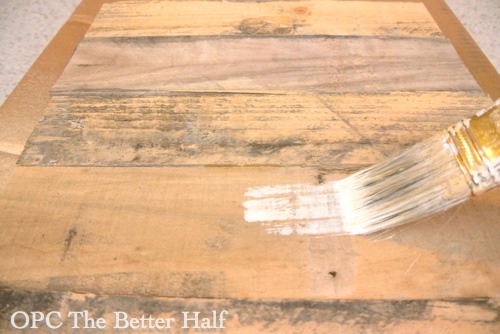
Step 5: Paint
With most of my signs, I have chosen to paint the planks of the wood, partially because I like the look and added color but also because it hides imperfections and color variations in the wood. I’m sure acrylic paint works great for this, but I always use left over wall paint from our old house projects. Those small sample containers at Home Depot and Lowe’s would also be great for pallets!
This was a pallet that I did not sand, but used a paint and primer in one for the base color.
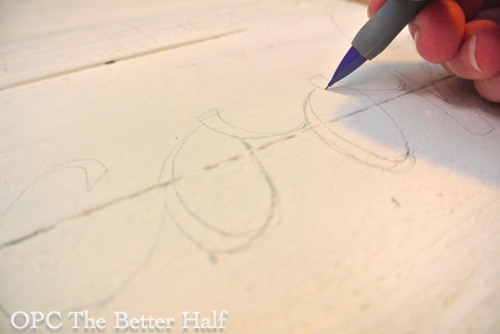
Once the base color is dry, I free-hand letters, design, or saying onto the pallet using pencil first, then acrylic paint. People who do not like to free hand sometimes use carbon paper and a printed design, stencils, or vinyl designs.
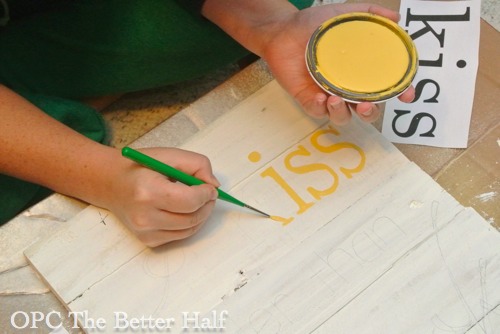
After the sign is completely dry, I use sand paper to sand the entire pallet. For a rougher, more rustic look, I use coarse sandpaper and make sure to sand some areas until the wood shows. For a vintage but not rustic look, I use medium sandpaper on the entire pallet. The best part about sanding is that it evens out the painting and any errors! Sometimes, if I have made a big mistake, I just sand it off and start again.
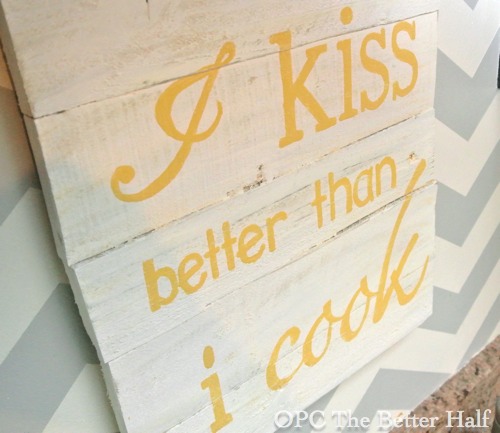
Step 6: Display with pride!
As I get more confident with pallets, it seems I have made one for every occasion. They are so easy and also FREE to make.


What do you think? What are your tips for deconstructing pallets and making pallet signs?
As always, thanks for reading!


Okay, I really want A BUNCH OF THESE for the new house…. SO fun!!!
These are awesome – I especially love the “I loss better than I cook” sign! I love for you to link this up to my weekly link party:
http://sewingbarefoot.blogspot.com/2013/01/the-weekly-creative-16.html
Shannon @ Sewing Barefoot
Oops! I meant “kiss” – sorry, didn’t catch the auto correct!
Great video, Jocie- you’re a natural! I love your pallet signs, and wish I could find a free source, though my hubby is horrified at the thought. He’s a chemist, and knows what gets spilled on their pallets! 😛
Great video! Very clear and concise.
Great job, Jocie!! Way to know all those technical tool terms 🙂 I was imagining Ethan behind the camera with cue cards lol
WOW! Thanks for sharing. I am going to hit our warehouse up for some old pallets:)
🙂 You did great!
I love trash to treasure projects! These look great!
Nice to see a video of this! I’m always curious to see what people can make out of scrap wood.
Nice video…it turned out great. It looks cold there though! Haha
Nice work! I am curious if you need to seal the wood. Don’t some pallets have pressure treated wood?
I am eager to give this a try because I love to reuse resources. Maybe I can teahc my wife how to do this?
I am confused, though. Are you, or are you not, cutting the nails? I saw this post at work, where I cannot view the video. Maybe I will just watch the video when I get home and my question will be answered?
Thanks for the project!
Fabulous! We used a hammer and small crowbar for my first sign to salvage as much of the pieces as possible and then hammered the nails out. It didn’t take too long but we had an easier pallet-not those hefty ones. I’m hoping to begin another sign once I come back from a little trip to Florida… 🙂 I just love your Valentine signs!
Great video! One question: If you do choose to remove the nails from the front side of the pallet sign, do you fill the resulting holes with wood filler, or leave them as nail holes?
For a more rustic pallet, I would leave the holes (especially if you aren’t going to paint the pallet), but you could easily fill the holes too. 🙂
Wow, you just made that look really easy. I guess as long as you have the right tools 🙂 All the more reason to start stocking up, right?
Love the end results!
Jocie, you are so talented. Not only can you make all this fun stuff, but you can make a video to show us how like a pro! I’d be stumbling all over my tongue if I tried this. Great job. 🙂
Great post, valuable advice! Pinned for when I’m ready to tackle my stack of pallets. It just looks so daunting! lol I’m including a link back in this week’s highlights. Thanks so much for sharing! 😉
This is wonderful, but I thought maybe you could show us which pallets are safe to use in the home. So many of these pallets are used to carry very hazardous materials and the product soaks into the wood. Simply ask a truck driver or captain of a ship and they will mention how spills happen all the time on these pallets. People are going crazy using these pallets but not thinking about how the product is still in the wood when they bring their creations in the home- especially making headboards. There has to be a way to figure out which ones were used for poisonous or hazardous materials. Please advise.
Here you go Kimberly. Donna from Funky Junk did a blog posting on it awhile back.
http://www.funkyjunkinteriors.net/2011/04/all-you-ever-wanted-to-know-about.html
CONGRATS!!! You have been featured at The DIY Dreamer… From Dream To Reality! Come on over and grab you featured button, you deserve it!
http://thediydreamer.com/from-dream-to-reality/from-dream-to-reality-linky-party-52/
A friend of mine is into pallet art / decorating and he had a special crowbar custom made and it works quite well, even on pallets made with ringshank nails. This is a great alternative to that for those who don’t want to buy a special tool just for deconstructing pallets.
My husband and I just did a “pallet wall” in our bedroom and it looks amazing! I also just finished staining up a headboard! I thought those pallets would be easy peasy to pry apart but boy was i wrong! I was surprised when my husband got out the reciprocating saw and you are totally right, cuts through super easy! There are so many projects i’m looing forward to creating! 🙂
Hi Jocie! Just giving you some blog lovin! Came to this tutorial from your kitchen post. I still haven’t tried to use pallet wood but with your instruction, I may give it a try. Posted your project link to my Facebook to share!
Debbie
Love all the great info, but did want to pass on some FYI. I have been advised that Pallets that are marked with Blue Paint are usually rented, therefore the stores you are taking them from are then penalized a higher fee for those taken.
Great tutorial!! I just can’t figure out how to hang these things! How do you hang them…kind of heavy, so I know to use an anchor if I must, but wondering if you attach hanging hardware or just nail it to the wall??
Thank you!
Hi Jocie. I love your red and cream Christmas sign. How did you get the writing so perfect? Did you use a stencil and if so did you make this yourself (and would you be kind enough to share!) or did you freehand the writing? I’d love to make one and have got the pallet ready and waiting but I can’t seem to work out how to get it so perfectly lovely. Many thanks Maria x
Hello Jocie, I really like your signs, thanks for sharing. I would like to do it too and happily have some pallets but I’m having issues understanding which kind of paint I should use. Should I use a primer everytime? Should I use interior or exterior paints? Should I use a protective coat at the end to avoid scratches or weather damage (if placed outdoors)? Can you please explain everything about the paint, which kind to use and how ? I’ve been looking all over the Internet and you are the first person I found that explained every step in an easy way. Thanks
I have a pallet and I have cut a few boards off. My problem is when I use my orbital sander, the wood gets fuzzy, almost like paper fuzzies but the don’t wipe off. I don’t know if I should keep sanding or do something else. It seems the more I sand the more fuzzy it gets. Have you seen this before? Thanks for any advice, Shannon