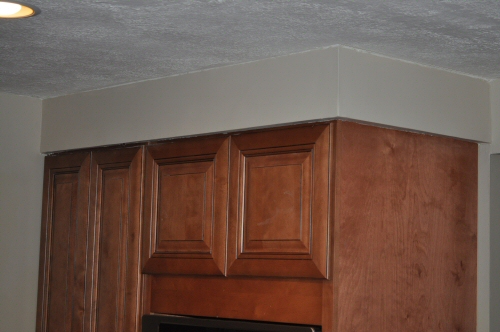
If you’ve been following along with our kitchen remodel, you’ll remember that a few months back we needed to modify the existing soffits to accommodate the new cabinet layout. We hired one of our friends who doubles as a handyman to modify three drywall soffit sections.
One of the larger modifications to accommodate new floor-to-ceiling cabinets required extending a soffit 12 inches out from the original depth (which was already about 13 inches for the existing wall cabinets) and adding about 3 inches to the right side to accommodate the extra width. Everything went smooth and the soffit looked great, but it didn’t quite work with the cabinets.
The problem was that the original soffit wasn’t 100% square, and the floor beneath the soffit wasn’t either.
This normally isn’t a huge problem when installing regular hanging cabinets, as a slight error is hard to see, and the cabinets can easily follow the contour of the soffit. But with floor-to-ceiling cabinets, the error was very obvious. The gap on the left side of the cabinets was about 3/4 inches. On the right, it was about 1/4 inch, leaving a very visible 1/2-inch slope all around the upper edge of the cabinet.
Unfortunately, with this type of cabinet, no molding would fit at the top, and besides, molding might look downright ugly. We could have shimmed the bottom of the cabinets, but with a 1/2″ error to overcome, it seemed like this option would create a potentially non-square look between the two cabinets.
The only option that made sense was to re-form the soffit. Our original idea was to remove the whole soffit and put in a new one, but our handyman came up with a better solution: shim a 1/4″ piece of drywall under the existing soffit, set it at the slant of the cabinet, and re-mud the 1/4 inch piece in place. Here’s what it looked like, in pictures:
Drywall Soffit Fix for Floor to Ceiling Cabinets
Here’s a shot that shows the 1/4-inch drywall piece fit into place. You can see on the right that a bit of the existing mud had to be removed to get the 1/4-inch sheet in place. But the rest of the way, a few shims were required. This 1/4-inch piece of drywall is fastened all the way around the perimeter and in the field to the soffit above.
Here’s a close-up of the screws holding the drywall in place at the perimeter.
And here’s the right side of the cabinet before the shims were cut.
Here’s a shot after the corner bead was installed, and the first coat of mud is applied. Note that if you mud with the cabinets installed, you could be permanently affixing the cabinets to the wall.
And here’s what the soffit looks like today… Despite the fact that the wall oven is sitting in place, it actually isn’t installed yet.

Overall, this solution worked better than a large molding, because the lines are crisper between the cabinet and the soffit. The best part is, we avoided removing and replacing the existing soffit, which would have been far more work.


Fred,
Great solution! Wish I had thought of that one! I’ll file that away in the memory bank for sure! Bravo.
Our home is definitely a fixer-upper…..and we could really use this. Thank you!
tkcharlesworth@aol.com
This looks great with your new cab’s.
Just curious though, is there a reason you didn’t take out the soffits altogether?
Carol, wish we could have! But several of them have plumbing (copper and PVC drain), so we couldn’t…
Got it! We didn’t take ours out either when we did our kitchen. But I would have loved to.
Great technique to properly installing cabinets. Thank you for the post!