


In the process of finishing our basement we had to add a few breakers to our main breaker panel, which was poorly labeled to begin with. I took the opportunity to go around the house and establish exactly which breakers controlled which receptacles and made a new label key with all the details.
This is a really easy (and oddly fun) project to tackle when you’ve got the time.
I used a standard-issue electrical outlet tester (picture on the right), created the breaker label key as a Word table, then laminated the printed version and taped it to the inside of the panel door.
Locating all the connections proved to take some time. Some rooms in our house have receptacles and/or lighting connected to three separate breakers! The key is to flip only one breaker at a time and find everything that won’t turn on when it’s off.
Finishing the list itself took very little time, and now that I have it saved on my computer, I can easily make changes as we need to and reprint it.

Label Receptacle and Switch Plates
For new work, we recommend writing the breaker number on the receptacle/switch box when you first run the wire. Then when you finish up, grab a Sharpie and write the breaker number on the inside of the switchplate… We’re about to write it on the one below.
If you ever need to work on that receptacle in the future, you’ll know just which breaker to flip and can save the trial-and-error-followed-by-clock-resetting-all-over-the-house method most of us have experienced in the past.

(Photo credit: Receptacle tester and breaker finder – Amazon.com)

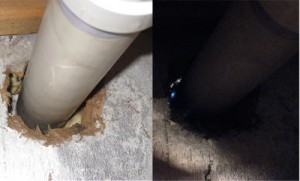 I recently began checking my home for air leaks and boy did I find them. I started with a couple exhaust vents and was surprised to find little bits of sunlight coming through (see picture). This is a common place for air leaks but fortunately there is an easy solution. Click here for help finding air leaks in your home.
DAPtex Plus
DAP (official site) is the maker of DAPtex Plus foam sealant. It’s designed to seal up cracks, gaps, and voids like the one I described around my exhaust pipes. It features CoVinyl-X9000 “for superior weather resistance plus added toughness and durability”. What that means to me is that cold air, rain and even pests won’t have easy access to my home anymore.
DAP was kind enough to send me a few samples including DAPtex Plus. I used it over the weekend with great results. Read on for a step-by-step guide to sealing air leaks in your home.
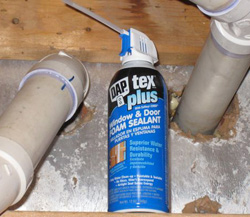
DAPtex Plus Uses & Information
The label on DAPtex Plus is a little misleading. The full name is DAPtex Plus Window & Door Foam Sealant but it can be used in many areas, both inside and outside. Here are some suggested uses:
- Windows
- Doors
- Ducts
- Vents
- Pipes
The foam comes in a small pressurized can- it looks similar to a can of spray paint. DAP includes a straw to fit into the nozzle enabling you to better direct the foam. The foam comes out white and takes about 24 hours to fully cure. Before it cures, the foam is workable (toolable) and cleans up with soap and water. After it cures, the foam is sponge-like and can be painted with latex paint.
Where to Find DAPtex Plus
DAP products are available from several retailers. Some of the most common distributors include Home Depot, Lowes, Sears, Target, and Walmart. Click here to locate a retailer near you. You shouldn’t have any problem finding this product. Expect to pay around $6-7 for a 12oz. can.
How to Seal Air Leaks
Sealing up air leaks is a simple project and it will improve the energy efficiency of your home.
Note: these guidelines are not meant to replace manufacturers directions
Access: I needed a little more access, so I cut a rough opening in the insulation board with a utility knife. For pipes, make sure you can reach the entire circumference before proceeding.
Prep: Clean up the application area by removing any dust, debris, grease and dirt. I used my shop vac. Shake the can really well for about 1 minute. You’ll actually be able to hear the foam moving around. Push the straw into the nozzle and remove the safety tab above the trigger.
Install: Hold the can in an upright position and pull the trigger. A small putty knife is really useful to work the foam into place. Have a wet rag nearby to wipe up any excess.
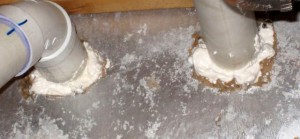
Additional Information
- For outside applications, you have to paint the foam with a latex paint after it’s fully cured.
- Clean up the straw and nozzle with warm water for future uses.
- You can scrap off cured sealant but for best results, work it in place while it’s still wet.
- If you’re concerned about a large space, consider how spray foam insulation may help.
What do you think? What air leaks are you going to seal?