

Well, its been almost 2 months since we had Lucy’s First Birthday Happy Hour Celebration and I figured I was overdue to share it with you. We had an amazing time and all the decorations and coordinating outfits came together beautifully.

When we picked the date we didn’t realize that the Raven’s would be in the play-offs and be playing at the same time as the party. Fortunately, the color scheme was already purple so it looked perfectly planned when everyone showed up in Ravens purple. Sadly, the Raven’s lost and didn’t go to the Superbowl, but we had a wonderful time anyway! Check out Kim’s little Ravens!

I made the girls coordinating purple and zebra print birthday outfits. Check out my complete tutorial on making your own. The girls got lots of compliments and looked really cute! These outfits really set the design and color scheme of the party.


Of course it wouldn’t be a Happy Hour party without beer and wine, so I took it a step further and made beer and wine cupcakes! They were super easy and tasty, just adding beer and wine (to different batches of cupcakes, of course) to box cake mix. Check out my earlier post to make your own. I color-coded the cupcakes so little ones would not accidentally eat the spiked ones. Purple were child-friendly, Chocolate were Merlot cupcakes, and white were Blue Moon beer cupcakes.


Our cheery helpers, Kim and Fred, spend a LOOOONG time blowing up balloons to create a cascade of balloons in front of our large front window and on both sides of our fireplace. Fortunately, Fred in particular has lots of hot air to spare, lol! They ended up looking very beautiful and whimsical but were very time-consuming.

For party favors, I found a cute idea of butterfly bags for school lunches made with Ziploc baggies, clothespins, and fruit. So instead of the fruit, I added colorful jelly candies (or gold-fish for the smaller kids) and purple glitter glue to fancy them up. I also attached purple pipe cleaners and eyes. They were really cute and easy to make.


Cake pops are really popular right now, but more time-consuming than I wanted so I made marshmallow pops instead. I melted milk chocolate, dipped in a marshmallow on a stick, and then dipped in rainbow jimmies. I placed them in a short glass container filled with candy for an adorable and colorful addition to the snacks at the party.

Finally, I placed a number “1” in a large glass jar with candy and affixed lots of balloons as a pretty table decoration. So simple! Thanks Jacolyn Murphy for the idea.

Overall, it was a wonderful party, minus the Ravens losing the game! Thanks to all our friends for coming and making it a special day for us and thanks to Nicole and Ruth for taking some of these wonderful pix!

We’ve written a fair amount about installing baseboard and quarter round for hardwood floors, and the right finish nailer for doing this job. One recurring question from fellow DIYers tackling this project is whether you should lay quarter round that matches the wood floor or just paint the quarter round white to match the baseboard.
Editors note: This article was first published in November of 2008, and it has garnered a lot of attention. We’ve learned there are several different opinions about this topic and have instituted a poll to determine the majority vote. Please read through the post and cast your vote at the end. Check out the comments, and you’ll see why people feel so strongly.
Should Shoe Molding Match the Baseboard or the Floor?
While there’s no hard and fast rule on this, here’s our thoughts on it:
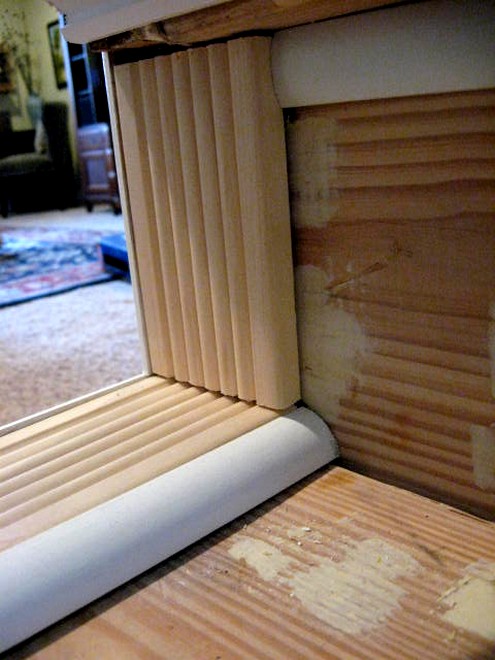
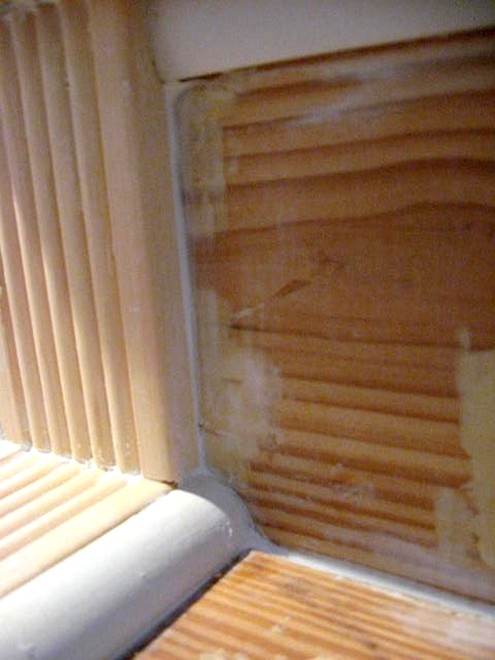
If you are laying quarter round or shoe molding on hardwood floors, you should lay a quarter round or shoe molding that matches the floor wood grain & stain. Most folks know that hardwood flooring companies generate a lot of profit from trim pieces. If you want to avoid paying the high price for matching trim, but still want a clean, finished look, consider buying unfinished trim pieces at your local big box and staining the to match your prefinished floor. This will save you 50-75% off buying matching trim, and you likely won’t be able to tell the difference (especially if your hardwoods are oak or pine, which are readily available in unfinished trim at home improvement stores).

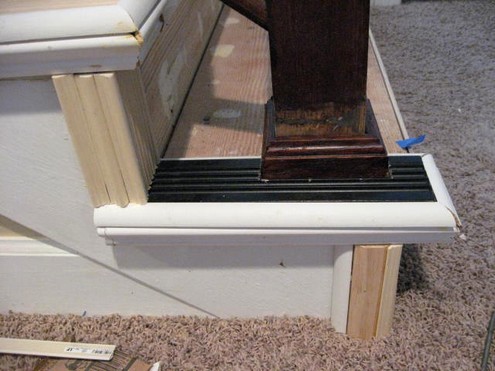
If you are laying quarter round on a ceramic, vinyl, or stone tile floor, you should paint the quarter round to match the baseboard molding. The most common trim color is white, and so this most often will lead to a white quarter round trim. One exception to this rule is when a ceramic or vinyl floor sits next to a room with hardwood and the quarter round continues from a hardwood area to a tiled area. Another exception would be when the baseboard is an authentic stained wood itself, in which case the quarter round should be stained to match the baseboard molding. The reason for painting the trim white is that a stained quarter round tends to draw the eye to the corner of the floor, instead of framing the floor itself. Stained quarter round on tile floors serve more as a distraction than an accent.


As I said, there’s no hard and fast rule for this. Some people prefer painted quarter round even on hardwoods. Lay some sample pieces in your own room before making a decision.
Vote!
Don’t forget to cast your vote. You can select as many choices as you’d like, and if you want to suggest other options, send me an email.
![]() Loading ...
Loading ...
What do you think? Which option did you choose in your room?

It hard to believe how quickly summer has come and gone and unfortunately, that means we are down to our last Before & After! All of our weekly winners are entered in the end-of-year contest for a $150 gift card to the home improvement store of their choice so stay tuned.
Our last Before and After winner for 2010 is Donna from Funky Junk Interiors! We’ve already featured one stair redo but this Before and After takes things in a totally different direction. Now her stairs practically ooze spunky personality, all on a very small budget.
For being our last winner, Donna gets a $50 gift card to Home Depot, Lowes, or Amazon. And, we’ll make a donation to Habitat for Humanity for $100 in her honor. Plus, there’s that bit about being entered into the grand prize contest. Read on for the full details about Donna’s stair makeover and this weeks Habitat Quick Fact.
Funky Stairs by Donna
I’ve always loved the look of stamped numbers and logos on wooden crates.
So back in April, 2010, when I walked by my carpetless stairs (that had been like that for 2 years!!), I came up with an even BETTER plan! Sometimes it pays to not have the funds for all the things you THINK you need. 🙂

Grabbing some crate and label inspiration I had close by, I started drawing up my plan.
Sign equipment used
The drawing programs I use are CorelDraw and Signlab, alongside a vinyl cutting machine built for commercial use. I use this equipment in my vehicle lettering business, which aren’t priced for novice type users. However, stencils anyone can make is all this takes.

And then I got right to work. 🙂 Yep, right ON the stairs.

And here’s the result. Come on in and I’ll show you around my old crate staircase! 🙂


The stairs were designed to appear to have been made out of old signboards and wooden stamped crates.

Some steps share one logo, looking as if a large sign was cut in half in order to create the steps.

Different ideas for treads were utilized for a fun eclectic look!


The end result is something so fun and outrageous, you can’t help but smile. 🙂 And a funny story? My two cats think there’s something on the stairs so they wind themselves around each logo as they use them. 🙂

The very fuzzy before.

And the very funky eclectic FUN!! after.
A wooden crate staircase is one wild way to enter this house and suits my own personal style to perfection. The more banged up and paint splattered the stairs previously were, the more authentic they appeared! My favorite splatters are from the dog after she ran through a knocked over paint spill. 🙂
The stairs fool most anyone that walks in. They aren’t authentic, but they sure look like it.
Method used:
- Sand and vaccum the stairway as is
- Latex paint with stencils – the white is leftover ceiling, the rest acrylic craft
- Distress the painted stencils.
- Stain – oil based I had on hand, went overtop the stencils
- Varnish – satin in a spray can for wood
There was simply nothing to lose in trying out this crazy idea. The stairway can always be covered with carpet right on top of the wildness at any time.
Give your own old carpeted stairway some thought on what design may suit your own home!
Thanks from One Project Closer!
Donna, I love the stairs! I could picture these going into some sort of game room (or man cave). Thanks for sharing this inexpensive stair redo.
Habitat Quick Fact
From World Habitat Day:
On Oct. 4, 2010, in recognition of World Habitat Day, Habitat for Humanity will raise awareness of the need for improved shelter and highlight Habitat’s priorities: the worldwide connection between human health and housing, and, in the United States, neighborhood revitalization. These themes echo the United Nations’ chosen theme for 2010 for events in the host city of Shanghai, China and the rest of the world: “Better City, Better Life.”
The most important thing you can do is take action! Below are three common ways that people take action in their community.
Advocate
In addition to building homes in partnership with people in need, Habitat advocates to address the causes of poverty housing. Advocacy activities always include a specific request, such as asking supporters to sign a petition, send a message to an elected official or take part in a rally.Fundraise
World Habitat Day is a great way to raise funds for Habitat in your area. A fundraiser can help educate the public and generate publicity for nonprofit organizations like Habitat for Humanity.Educate
Organize a public awareness event for World Habitat Day 2010 that not only highlights the need for affordable housing in your own community, but also discusses the need for improved shelter for billions of people around the world.For some ideas on how you can take action in your community, click here.
Grand Prize Contest
You’ll have to save the rest of your Before & After submissions till next summer when we kick off another annual series. But the winning isn’t over! Stay tuned as we open up the voting to see which B&A project you liked most!
Before & After: Stair Project by Rhoda @ Southern Hospitality
September 4, 2010 | by Ethan (email) |This week’s Before and After winner comes from a well know style and design resource on the web: Rhoda @ Southern Hospitality. Rhoda’s been an annual supporter of our Before and After series and always has an amazing DIY project to share.
We chose Rhoda’s submission because it’s such a dramatic difference and she really walks you through doing it yourself.
For winning this week’s contest, Rhoda gets a $50 gift card to Home Depot, Lowes, or Amazon. And, we’ll make a $100 donation to Habitat for Humanity in her honor. The end-of-year contest is coming up soon and Rhoda is now entered for a $150 gift card to the home improvement store of her choice. Read on for Rhoda’s story and for this week’s Habitat quick fact.
Stair Project Renovation by Rhoda
Here’s how it all started. Ripping that carpet off, one step at a time. Unearthing all the ugliness that was hiding beneath. Our builder certainly never meant for these stairs to be shown, that’s for sure. And like I mentioned, if I had any delusions of something nice lurking beneath this mess of carpet, that was quickly put to rest after the first couple of stairs.

In fact, it just got worse, as I went down the stairs ripping that carpet and padding off.
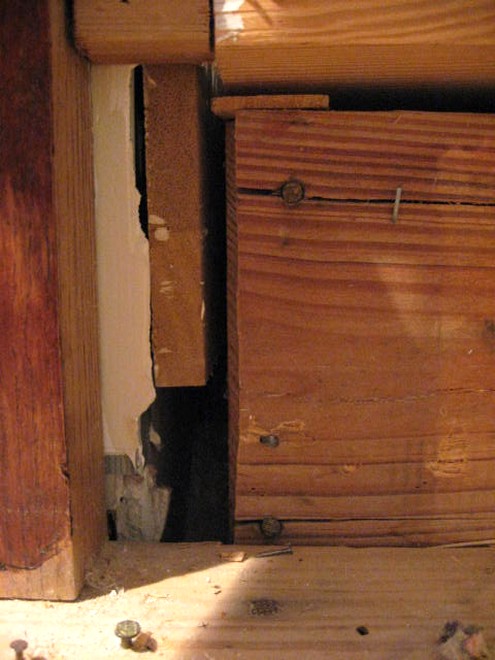
Like this gaping hole! I know, it’s really bad. So bad that I started to question my sanity. But, one thing I’ve learned in the DIY world is this fact. Most anything can be improved upon by hiding it with molding or caulking with caulk and that was my motto here. Hide it, cover it up, or make it look better.
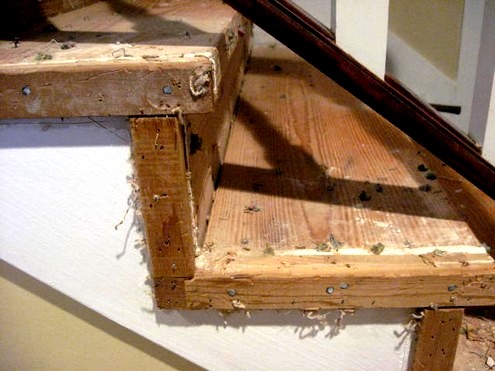
Look at the ends of the stairs. Pretty darn bad, with all the carpet fuzz and the milllllllions of staples that were in here. That itself took awhile, just to get the staples pulled out. This wood was not meant to be seen either, so I had to cover it all up with molding. Evil, evil carpet tack strips. I pulled and tugged and finally got them all out of there.
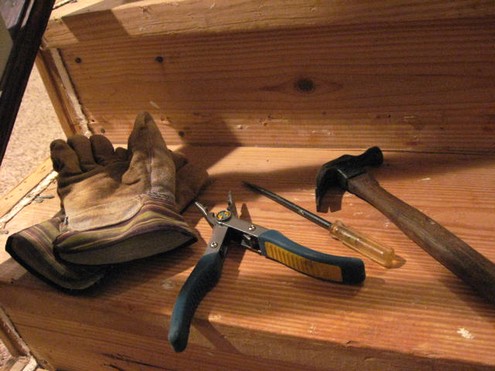
Using these tools. Don’t even try this without safety glasses and leather gloves. I didn’t have a crowbar or I would have used it.
How about these lovely edges with drywall trapped inside. Is there any hope to beautify THIS?? Well, yes there is. You see, I had a vision. Or maybe it was a nightmare after I saw what I was working with.
First, I bought a nice hand sander and began sanding as much roughness as I could off all the stair treads and risers. I went through several pieces of heavy duty sandpaper and sanded them as good as I could. And no, they were not even smooth at this point either, but then came the wood filler putty. That works pretty good too for smoothing out holes and gaps in wood. There’s only so much you can do with rough raw wood like this, but paint works wonders too. I went back and resanded after I added the wood putty to all the holes and uneven gaps.

So then began the process of covering all the ugly gaping holes with molding. I went to the store and bought about 3 or 4 kinds of molding, going back a couple of times when I fine-tuned things a little more and figured out what all I needed. I started at the top, cutting those pieces to fit and used wood glue to hold them in place. Cause they are nothing but foam and could be cut with scissors. You gotta love molding you can cut with scissors.
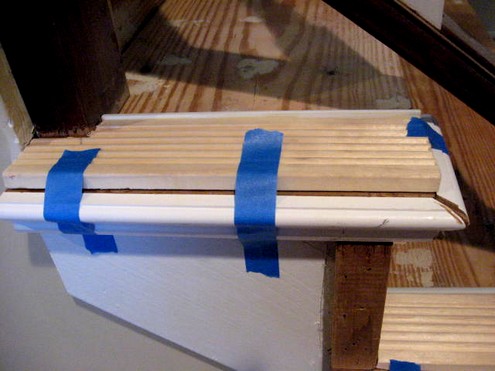
See, here it is. It will splinter a little, but I made it work just fine. It was all I needed to cover underneath the stairs and on the sides to cover up the ugly holes and it was cheap. Cheap, I like for something like this. Held in place with blue tape til dry.
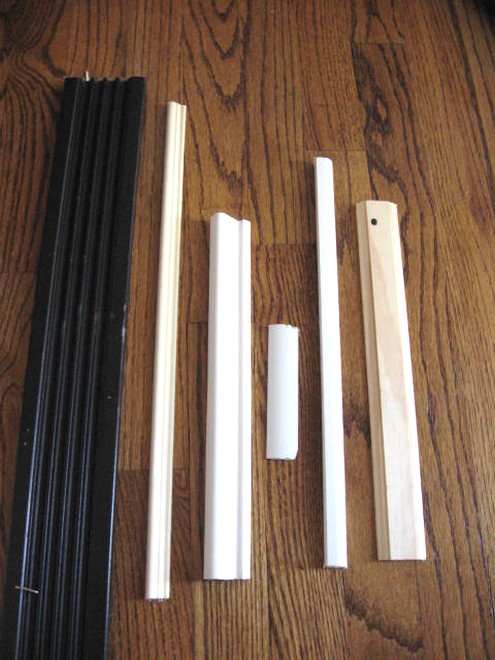
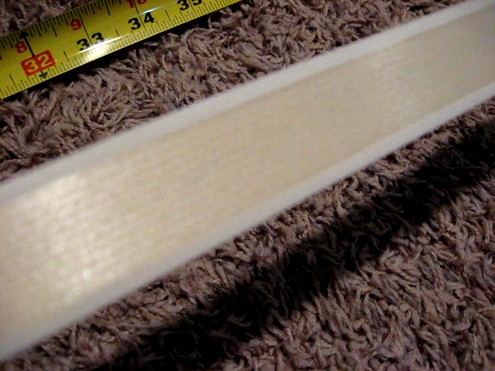
Here’s all the different size moldings I used, so you can be on the lookout for it as I explain it all. Some of this was leftover from other projects and some I bought.
Left to Right:
- 3″ Reeded molding
- 1/2″ fluted trim (bottom of stairs)
- 1 1/4″ small chairrail type
- 1″ MDF (this is the one I cut with scissors)
- 1/2″ shoe molding
- 1 1/2″ to trim out the stair nose
All of this was real wood molding, except that one piece. Someone asked if I have an an electric miter saw. NO! I wish I did and one of these days, I may have to break down and get one. I used a less than $10 yellow miter box that you can buy at the home stores. It works fine, of course takes much longer than an electric one would.
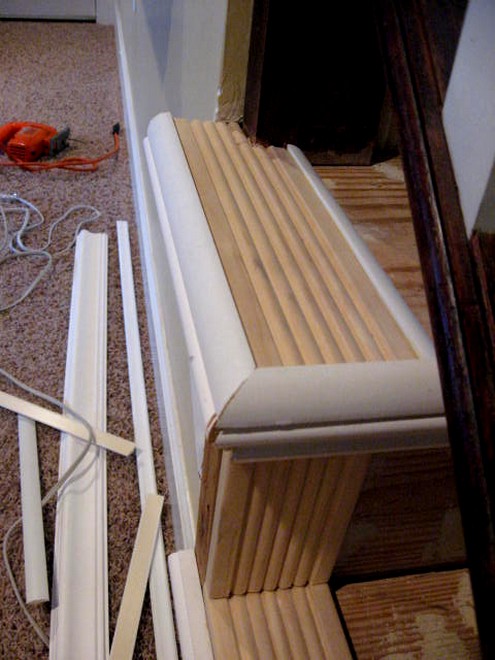
And I knew I would need some wider molding to cover the really BIG gaps, like this one that you see above. One nice piece of 3″ reeded molding covered it right up. I had some of this leftover from another project, so I raided my extras for this and used up all my left over pieces.
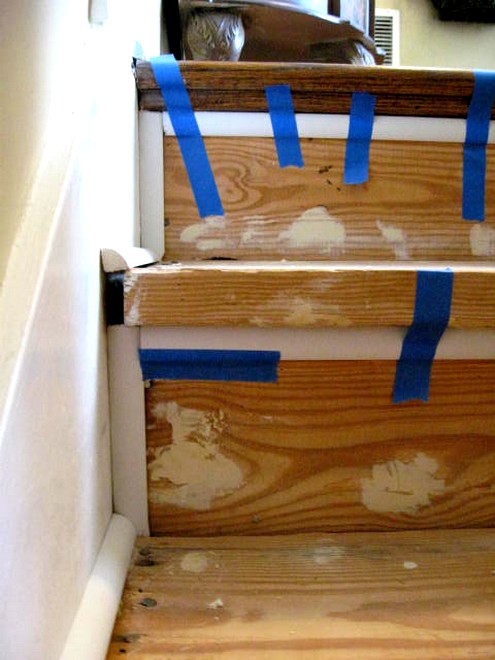
Used quarter round on the edges of the stair treads to cover more gaps. And you can see the big gap on either side of the stair nose. I knew I would have to cover that up, so that’s what drove me to use a nice molding piece on each stair nose. It looked better AND it covered up that gap too. You’ll see more of those down below.
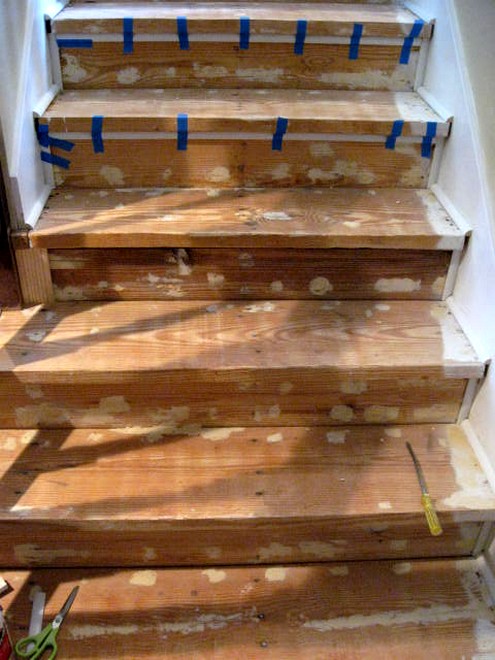
Making progress all down the stairs, one at a time. Aren’t they starting to look beautiful now. Ha! Not yet, but we’re getting there.
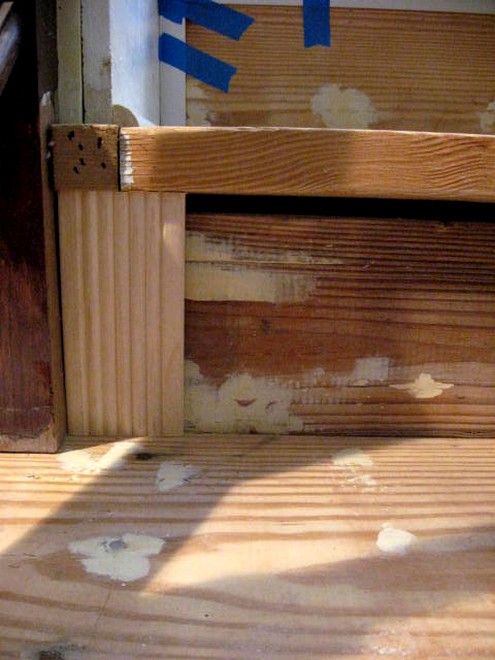
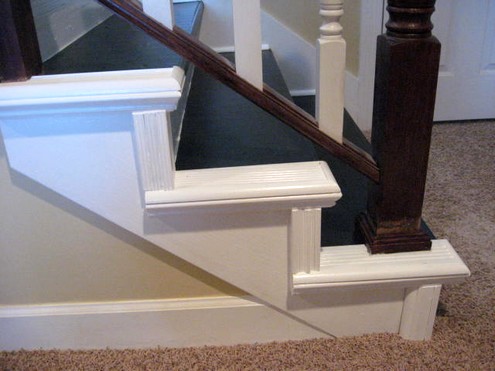
Now, this bottom part down on the edges of the stairs was the most challenging part. I knew I’d have to cover the ugly down here and be creative about it too. Again, left over fluted molding was used as well as some of the quarter round I had bought. I figured it out as I went along and started with a small base piece of molding at the bottom.
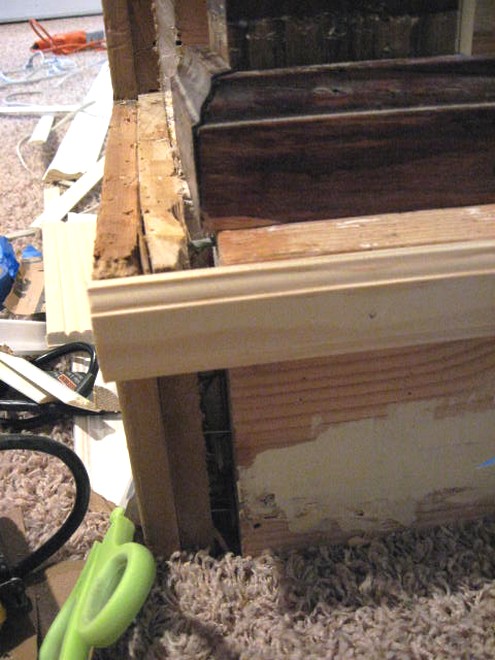
One good thing about the stair treads were that they were nice and thick. I figured out that I need to put some molding on the front of them to help hide gaps on either side of the stairs, so I found this flat piece that fit on there perfectly to make the stair treads look better AND hide the gaps on the sides. This is about 1 1/2″ wide. I used wood glue AND finishing nails on these.
Working on the bottom 3 steps that had more molding to deal with. I just kept going, again figuring it out as I went along. I started with one layer and that wasn’t looking so great, so I just added another layer on top and they started to look decent.
Cut, glue and wait. All the way down. Getting there.
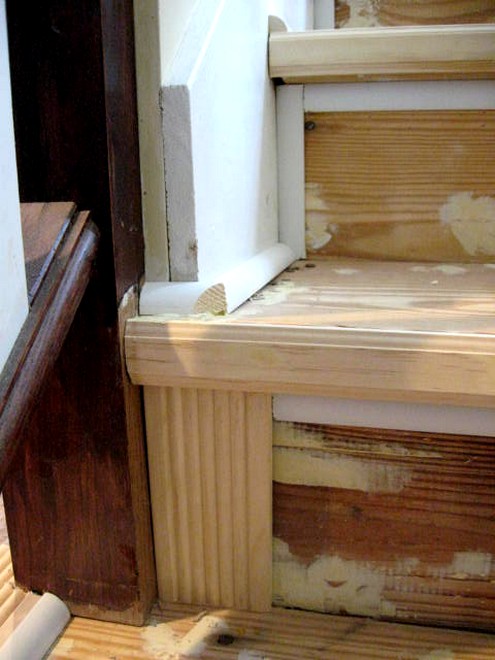
Cut more, glue more, keep on going. Getting to the final part here, this was the last thing I did was figure out this corner.
You can see I used all the leftover pieces I could find in the garage to make it all work. And it did! Once it’s all painted out with my white trim paint, it looks beautiful.

When all the molding was in, it was time to caulk. Again, caulk hides a multitude of flaws. It’s a DIYer’s best friend! I used an entire large tube of caulk in my caulk gun on these stairs.
Caulk, caulk and more caulk hides all those seams and gaps. Another sanding and it was time to prime. Even the primer looks pretty good! I then painted all the white trim with my interior white trim semi-gloss paint, letting it all dry overnight between coats. I figured it would be easier to do that first and then go back and do the stair treads black.
One quart of black porch and floor paint was plenty for this project. I didn’t even use 1/2 of this can.
And I put on 3 coats, letting it all dry at least overnight in between. I used a small foam roller and a tiny craft brush to get around the edges by the white trim.
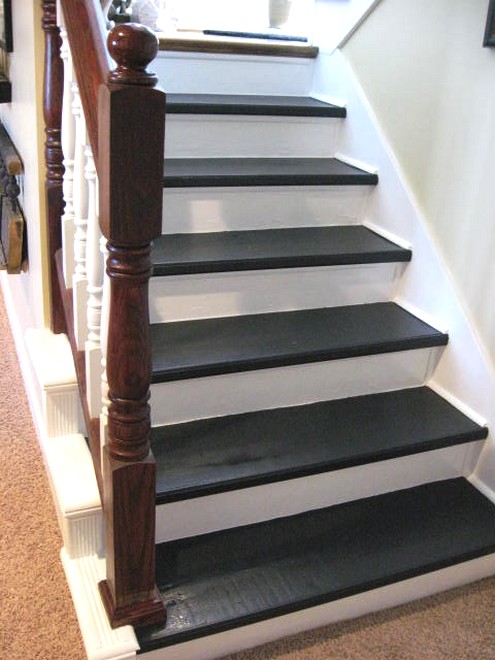
Just a quick visual here…BEFORE
And AFTER….here are the ends all trimmed out and painted. Lots of difference between Before and After on this for sure! These are SO not perfect, but unless your nose is right down here, it all looks great.
After 3 coats, the black painted stairs are done. You can see nails in the stairs. There’s just no way to completely cover them, since they are on each end and in the middle. So, that was one reason I decided to add a runner. That and the fact that I really love natural runners. But, really if you have steps that are in pretty good condition, I think the 2-3 coats of black porch paint look pretty fabulous too and I would not have had a problem leaving them like this. But, I like that extra touch that the runner added.

And one final addition of molding here at the back of the stair treads. It was impossible to keep a straight line back here. So I just added an additional small shoe molding on top and that hid all the wavy lines.
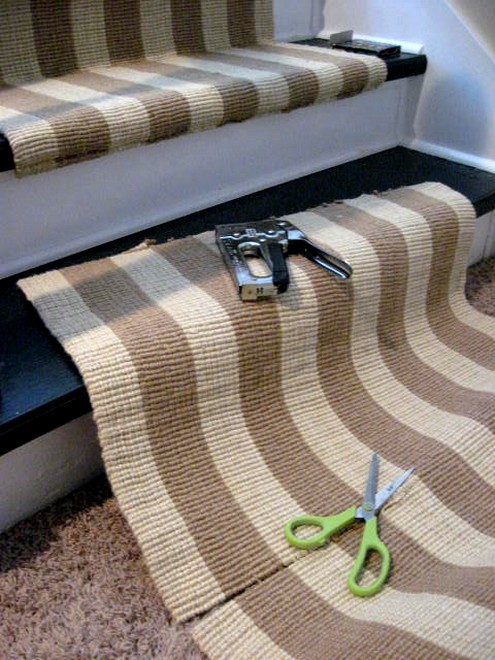
Next, stapling on the jute runner which I got from Overstock. I had to order 2 of them, since one wasn’t quite long enough. I needed to cut an extra foot or so off the 2nd one to fit that last step and it was easy enough to cut with scissors. And I have a whole section from the 2nd runner in case I need to replace one stair tread later on (like if something gets spilled, etc.). Nice to have a backup piece.
I did go back and add a little jute twine at the back of the stair treads to sort of hide the staples, since I had 6 of them that came with my rug. I simply wrapped them around the rug on either side and they are laying in place just fine. But really, those staples don’t bother me a bit. I had the twine so I used it.
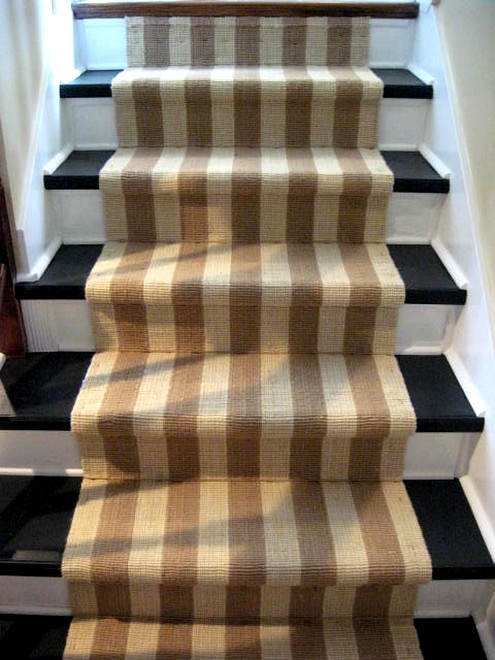
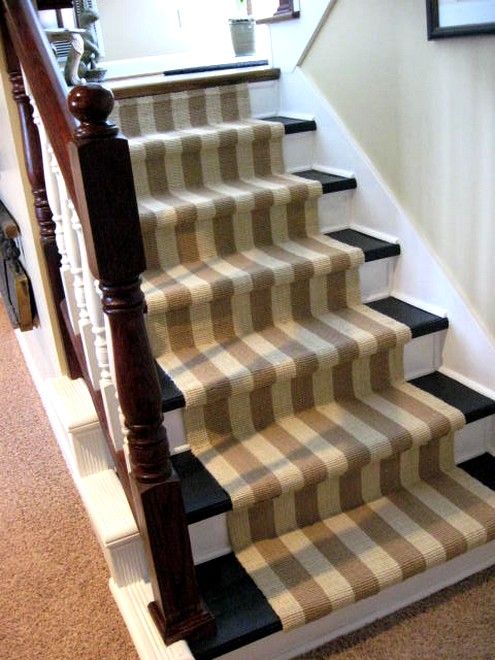
Dramatic AND beautiful, a great combo! We will definitely be enjoying these stairs for a long time to come. When the runner wears out or gets too dirty, I can pull it up for something else.
This whole project cost around $200:
1/2 for the molding, paint and supplies and 1/2 for the runner.
It was very cost effective and SO totally worth every penny. Keep in mind, I only had 6 stairs here, so if you have a whole staircase, it will be even more work. But, it is TOTALLY worth every minute of pain.
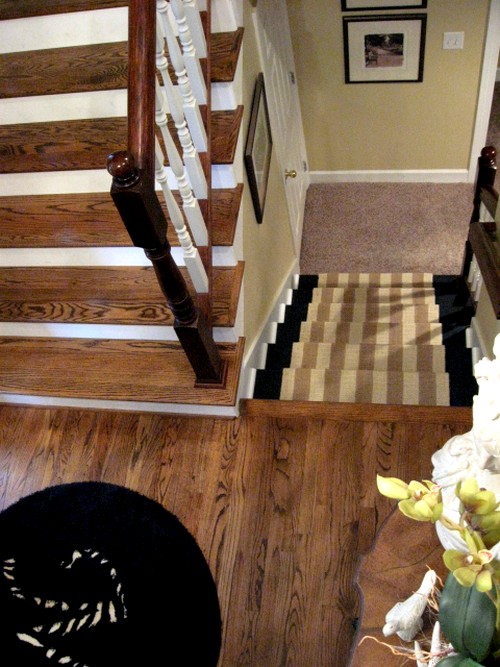
Here’s a visual from the top of our upper stairs looking down towards the foyer landing, and down to the newly painted stairs, so you can see how it all ties together.
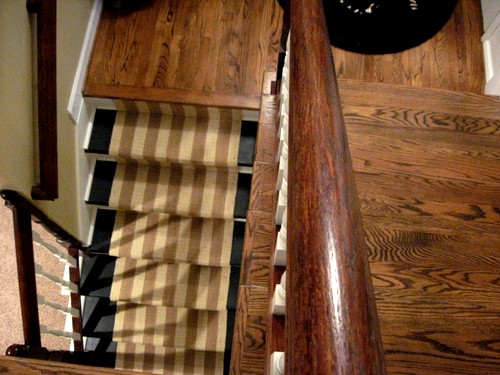
As you can see from the pics, our foyer landing already has beautiful finished hardwoods, as do the flight of stairs going up to our main living area. I simply wanted to tie these down stairs into what we already have and get rid of that ugly carpet! Mission accomplished!
Thanks from One Project Closer!
Rhoda, the stairs look great! Thanks so much for sharing your renovation story with us.
Habitat Quick Fact
From the World Habitat Day Photo Wall:
For the second year, Habitat for Humanity is collecting photos to send to leaders in Washington, D.C., to persuade them that adequate housing for all should be a priority. Take a stand this World Habitat Day and add your photo to the World Habitat Day Photo Wall.

Will you add your photo to the wall?
Submit Your Own Entry!
There’s only two weeks left! Submit your own entry to beforeandafter@oneprojectcloser.com. Include your Before and After pictures as JPEG attachments and tell us a story about your remodel in the body of the e-mail!
Update: I’ve added pictures of the completed wall! 28 August 2010
It’s that time again! Last week kicked off our 3rd annual Before and After series- posts dedicated to highlighting fellow DIYers and raising support for Habitat for Humanity. I look forward the this time every year and am very impressed by some of the projects our readers have submitted.
Email Your DIY Project
Every week we pick a new DIY project to feature and next week could be yours! Send your pictures and a “how to” story to beforeandafter@oneprojectcloser.com for your chance to win a $50 gift card!
If you’re a blogger, please consider writing an article on your site about the Before & After contest. Want a button for your sidebar? You can find the buttons and more information on our main Before and After article.
This weeks winner shows a super creative way to add texture using shutters purchased from a Habitat ReStore! Laura from Olive and Love has a whole wall of personality where none existed before.
For her submission, Laura gets a $50 gift card to either Lowes, Home Depot, or Amazon, and we’re making a $100 donation to Habitat for Humanity in her honor. Check out Laura’s story, today’s Habitat Quick Fact and information on entering your own project!

The Shutter Project by Laura @ Olive and Love

Ah the shutter project. Sorta my baby….I love it, it’s kinda messy, takes up a lot of my time, and has been fun to show off. But you know how when you get a new car, you notice everyone else driving it?….in the same color? Or when you name your kid, or dog something creative and unique, suddenly you hear it all the time? Well, I’ve had a little of that too. My inspiration for this project came from a display at Anthropologie. The display used shutters but in no way was it close to how I chose to recreate my dining room wall. Since beginning my project I’ve come across a couple similar ideas. My friend Melody who lives in Davis, CA mentioned that one of her favorite restaurants in Sacramento has walls covered with shutters. I googled sacramento restaurant shutters and look what I found:

It seems as though they used shutters of mostly the same size, which I have to add would probably be a lot easier when it comes to fitting them together. I also like their use of an occasional horizontal shutter. They covered their ceiling with the shutters which really intensifies the motif but is sort of like considering a fourth child in my house…..NOT going to happen. On a side note, I like their use of three stacked coffee tables for display purposes. I could imagine that in a corner of a room near a window, used for plants.
Flipping through the new Pottery Barn catalog I came across page 45, with a picture of the Como Headboard. The website didn’t show the wall to the extent that the catalog did so I took a picture of it.

Uh, shutters? On the wall? Did they not get my fax about the copyright on that idea? In fact it looks quite similar to my guest room wall.

Which, by the way my husband thinks we should consider taking this down so we don’t over use shutters in our home. What do you think? I don’t mind it and think it adds enough character to the room and is far enough away from the dining room to not matter. (Ironically the shutters in the dining room are on the other side of this wall.) This collection of white shutters with hinges used to be the actual headboard of the queen bed we had in this room. When we moved our master bedroom (cal king) furniture into the guest room, we left it on the wall behind the iron head board.

…Anyhow the shutter project is coming along. I invited friends over to paint with me….Thank you Robin, Caroline and Rachel! My daughter also painted a few and besides working next to me, she mentioned that she enjoyed the time she spent painting them quietly by herself. This is my four year old I’m talking about here….enjoying the tranquility of a little art therapy. Interestingly my artsy 6 year old son wanted nothing to do with painting the shutters, but quite enjoyed helping his daddy with attaching the wooden support beams.

After priming 5/8 inch OSB plywood, my wonderful supportive husband Dan, ran them through his table saw, cutting four inch wide strips. What is OSB plywood you ask?

Working with the table saw in the front yard always brings the neighbors asking questions ….”Laura’s covering our dining room wall in shutters.” “….She’s what?”
After priming and trimming two sheets of the OSB plywood, Dan and Riley attached them horizontally about every foot or so on the wall. Additional small pieces of the plywood needed to be attached to insure the shutter was not at an angle on the wall.

Using a stud finder (convenient when I was in college), Dan made sure the support beams were screwed into the studs. He even climbed them to prove their stability. No pictures of this stunt unfortunately…just my stud. I had planned to paint all of the plywood the same color as the wall but after getting about two thirds finished I decided to only paint where the shutters didn’t line up perfectly.
Getting these guys lined up just right was like a giant game of Tetris. Micro cuts here and there were made to get them to fit just right. Most cuts were made on the top or bottom, and many of the double opening shutters were cut in half. We plan on going back with small cuts of wood to fill in any spaces left when we’re finished attaching all the shutters. We’ll either use remnants of shutters that have been trimmed or small pieces of MDF.
One of the giant shutters that was not a double opening shutter was cut in half. This had to be done at just the right spot on the sides to account for the shutter part being left intact. So far the only shutters that have needed a vertical cut have been the bottom two shutters on the far right.

We have some shutters left, but not quite enough to finish the job. I decided to stop with a few left so that I can complete the project evenly once I have all the shutters ready. I had abdominal surgery 2 weeks ago and can not lift anything over ten pounds for 4 more weeks so this project has been put on hold for a bit. I plan to make a trip out to the Habitat for Humanity thrift Shop soon to see what treasures are waiting.
The shutters have started a domino effect of upgrades (good-bye chandelier) and I’m gathering ideas for other evolutions for my dining room like table, chairs and lighting.
Many months after I figured I’d finish my shutter wall, it is finally done! It looked finished by last June after my in-laws came to visit.
Arnold and Andy helped Dan with the final cuts and holes while I painted the last pieces. Thank goodness for family that likes to be busy. It was quite the game of Tetris to get the wall covered.
Thanks from One Project Closer!
Laura, I think it’s really inspiring how you recycled shutters into something beautiful! Be sure to send us a picture of the finished product and we’ll update the post. Thanks again.
Habitat for Humanity Quick Fact
Habitat just wrapped up its 2010 Habitat World photo contest with more than 350 people from around the world submitting photos representing the homebuilding organization’s life-changing work.
[Excerpt from Habitat.org]
 |
| Photo contest winner Neil Reid captured his photograph “New Hope” while building with Habitat in Mozambique. |
“We received more than 650 entries for our contest, and the photos truly capture the heart of Habitat’s work around the world,” said Shala Carlson, managing editor of Habitat World. “We are pleased that so many people shared with us their images of the housing need that exists everywhere and of Habitat’s efforts to meet that need, and we congratulate our winner Neil Reid and our four finalists.”
Reid, a 33-year-old civil engineer, submitted “New Hope,” a photograph he took while volunteering with Habitat in Mozambique.
“To me, ‘New Hope’ summarizes all that Habitat stands for. We see a group of children, all of whom have a new home and all of whom have been given a new start in life,” said Reid. “I truly hope my photograph will inspire even one person to undertake a trip with Habitat and help give a little something back.”
If you want to partner with us, you can visit Habitat’s online donation page, or you can sign up to volunteer in your community.
