
We have a lot of great information about sheds covering everything from building a foundation to characteristics of a high-quality shed. If you haven’t seen them, here’s a list of the articles:
- Building a post & beam foundation
- Pouring a concrete shed pad
- How to build a shed
- Building storage shelves in a shed
- 8 thing to look for when buying a shed
One aspect we haven’t covered is how to build a shed ramp so I was glad to help a friend build a ramp for his shed a couple of weeks ago. If you’re looking closely, you’ll see this is the same friend that I helped with the post & beam foundation.


Materials
- (1) pressure treated 2 x 6″
- (9) pressure treated 2 x 4″
- (5) lag screws
- (5) washers
- Paver base
- (7) solid concrete blocks
- Galvanized screws
- 5/4 deck boards
- Concrete screws

Tools
- Shovel
- String Line
- 4′ level
- Tape measure
- Miter saw
- Circular saw
- Drill / driver
- Speed square
- Powder actuated nailer

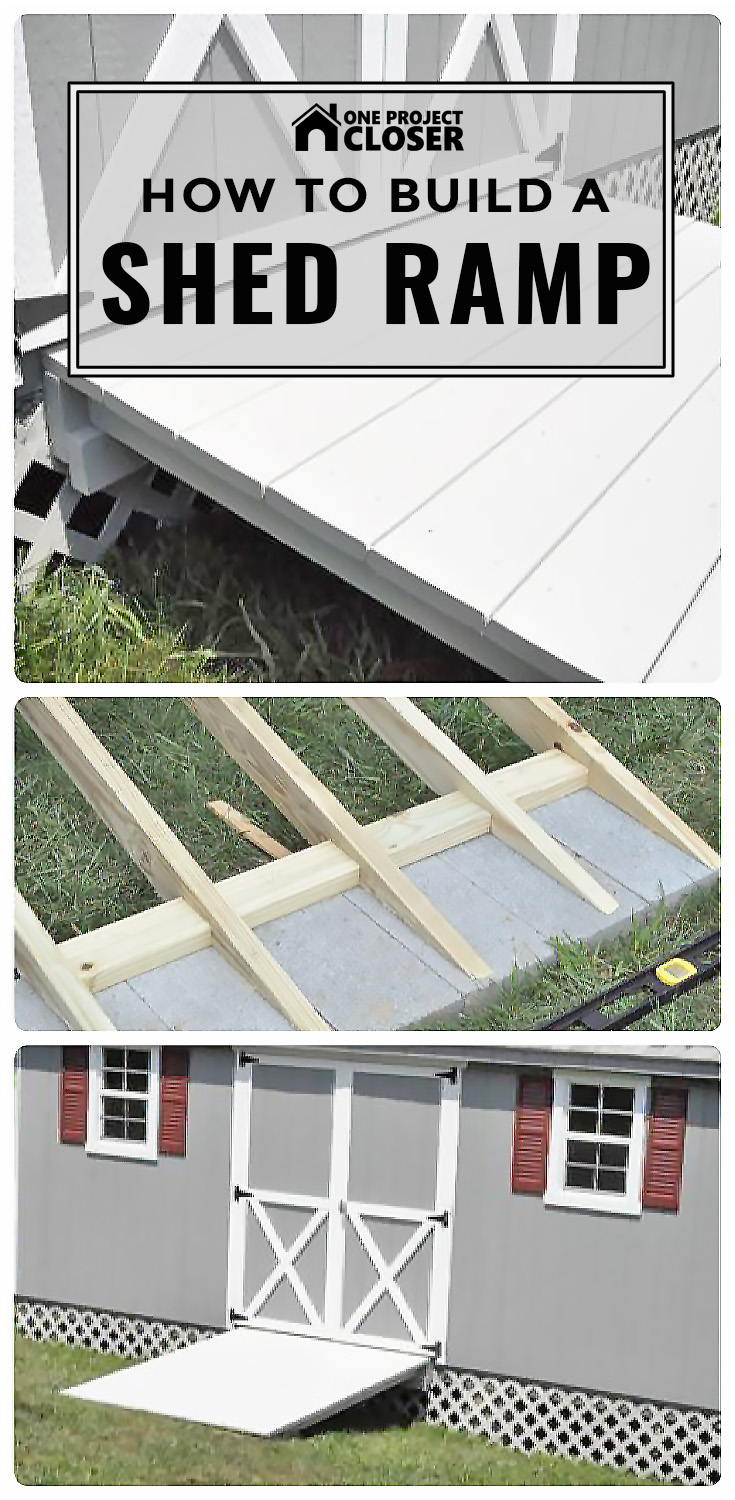
Step 1: Attach “Ledger” Board
The framing of the shed has a little lip underneath the door, and to begin, we ripped a 2 x 4″ so that our ledger board would mount flush with the face of the shed.

Making sure it was completely level, we anchored the 2 x 6″ ledger board underneath the shed doors with lag screws (and washers). We predrilled all the holes, and you can see we staggered the screws. Thinking back, we should have marked the locations for our ramp stringers beforehand to ensure the lag screws wouldn’t be in the way. Also, we purposefully left room along the lower edge for another support board.

Step 2: Mark and Dig Area for Concrete Block
We used a 2 x 4″ to estimate a comfortable slope for our ramp, and we staked out an area just big enough to fit the concrete blocks. Next, we measured the diagonal distance to the shed to check that it was square. After that, we dug a shallow (~ 4″) hole for the concrete blocks.


Step 3: Set Block
We used paver base to help set and level each block, making sure everything was straight and tight.


Step 4: Attach Support Board
While my friend began working on the ramp stringers, I screwed a 2 x 4″ along the bottom side of the ledger board. The stringers will sit on top of that board for additional support. We could have ripped it to size. However, my friend wasn’t concerned about the bottom overhanging so we left it.
Step 5: Measure and Cut “Stringers”
We measured the distance from the ledger board to the far edge of the concrete blocks and cut our stringers to length. Next, setting the stringer on the support board and using a piece of scrap, we scribed a line for the angle between the stringer and the block.


To determine the angle between the stringer and the ledger board, we set the stringer at the corner of the support board and used a speed square to mark a plumb line.


We secured each stringer with screws into the ledger board.

Step 6: Block In Between Stringers
After setting the stringers, we cut and screwed blocking between them to maintain the spacing.

Step 7: Anchor Stringers
We used a powder actuated nailer to drive a few nails through the blocks into the concrete to prevent any side-to-side movement.


Step 8: Cut Ramp Boards
We cut the deck boards to length, predrilled holes and screwed the boards to the stringers. For the last couple of boards, we drilled through the stringer and into the concrete (using concrete anchors). Also, the very bottom board extends beyond the stringer a couple of inches.


Finished
My friend painted the entire ramp to match his shed, and this has the added benefit of another protective layer. The ramp is strong, and it can definitely handle a riding lawn mower. I think it looks really professional too.


The 10-3/4″ stringer spacing seems pretty stout. The ramp really improves the functionality and looks of the shed.
All of these shed posts over the last few months makes me really want to get going on building my own. Ramp looks really good. Is the last board cantilevered off the end? “The very bottom board extends beyond the stringer a couple of inches.” Think that will stand up to a riding lawn mower over time? Does it touch the ground on it’s leading edge?
did you think about putting some rock or blocks under the end, to take most of the weight from the mower?
Hey Joe, are you talking about putting block under the highest point of the ramp? If so, we didn’t really consider it. I guess we could have built up some block and cut a sort of birds mouth seat. Not a bad option.
Hey Jeff, the last board on the ramp extends beyond the stringer a couple inches, and the edge actually sits on the concrete blocks. It’s pretty well supported, and I expect it to be able to handle a riding mower (even though my friend doesn’t own one).
Looks good. I probably would have used some kind of joist hanger rather than the support board.
We thought about that. Unfortunately, we’d have had to modify the hanger to fit the angle of our stringer, and I’m not sure how well that would support.
Yea, that makes sense. I’m sure the support board will work really well, too.
They make a special type of hanger for that:
LSU26Z/LSSU210Z Hanger
http://www.strongtie.com/products/connectors/LSU-LSSU.asp
It adjusts from 0 – 45 degrees of slope. Back in the day, people would just use heavy metal strapping and a lot of nails through the strapping.
That is sweet! Great tip Joe. I’m sure I’ll be using them in the future.
Looking really good – have you thought about covering up the sides to try and prevent little creatures creating their homes underneath? Think it could also make the ramp even more aesthetically pleasing.
That lattice was a recent addition, and I’m not sure if my friend is planning on adding it to the ramp too. Thanks for the comment!
The ramp and lattice really finish off the shed nicely. I’ve never really been a fan of lattice, but I have to say I really like it on this shed.
The ramp looks good and this is another great post. I’ll file it under things to do when I have a house.
Any thought about using something for anti- skid feature on the ramp?
Hey Handyman,
The slope is pretty gentle so I don’t think anti-skid products will be necessary. For those building this ramp with a steeper slope, that’s a good recommendation. Thanks.
Great plans! However, I do have one question. Does the top lip ramp meet the the floor of the shed? Or is it positioned lower to accommodate for the shed doors? Or have you cut the bottom of the shed doors to accommodate for the ramp meeting up with the shed floor? Thanks
Hey Jim,
The top of the ramp is about 1″ below the floor level, and that sits just underneath the doors. I wouldn’t want to cut the doors and possibly make them look awkward.
Ethan, I’m in the same position where My doors overhang about 1″ below the floor. I’m curious how bad is it getting the tractor over that lip? I don’t want to cut my doors either, but I may try and cut about 1/4″ but angle it up so it follows the slope of the ramp more so it can be less than 3/4″ drop.
I built two fo these ramps for my shed over the summer. They are rock solid and use them for a Craftsman riding lawnmower, snowblower, and dirt bikes. Just an FYI,.. I made the slope 1:6. Meaning for every inch of rise, I added 6 inches of length. I would not go any less than this because I have about an inch with the mower deck set on next to highest setting. When researching I found recommendations from 1:4 to 1:8. The top of my ramp is about 13.5 inches above the ground and chose to go middle of the road and didn’t want the ramps too long. 13.5 inches height x 6= 81″ length of ramp. Thanks for an awesome ramp design and I hope the ramp calculation helps a few people.
Great comment Marc. We didn’t calculate a slope, and I expect we’re under that. That’s good info for everyone else making this ramp though.
Great tutorial – will be building this in the next few weeks!
What’s the purpose of the ledger board – any reason not to just attach either the support board or joist hangers right to the band board?
Nice dude! I think the toughest part for me with a project like this is getting both the angle of the ramp right as well as the distance to make it comfortable. It’s not one of those things that I can just “see.”
I see you are using a speed square to get that angle, that part is also confusing. You were simply using it to get that line straight right? Not for any type of measurement…
And I see you used a powder actuated driver – dang. You guys own that or just buy one? Lucky. We have two of the gun style at work, not the hammer style.
Again, great work.
Thanks for the great article. I love reading about all the different sheds and this one about adding a ramp is fantastic.
[…] How to Build a Shed Ramp – One Project Closer. Jun 26, 2012 – One aspect we haven't covered is building a shed ramp so I was glad to … The framing of the shed has a little lip underneath the door, and to … […]
This is exactly what i need to build, thanks for the step by step instructions.
However you have me really confused at two of the steps
step 5 “Next, setting the stringer on the support board and using a piece of scrap, we scribed a line for the angle between the stringer and the block.”
For the life of me i do not understand how this works! Surely when you mark the line and cut the stringer it will drop to meet the pavers and be below the support board on the ledger?
step 6 how do you screw the blocking to the stringers?
thanks in advance!
Step #5 had me confused as well. Looking at the photo above I eventually realized that before scribing, you have to put a scrap piece of 2×4 (on it’s end) on top of the support board, then the stringer on top of that. This compensates for the height of the piece being cut off at the bottom of the stringer so that the correct angle can be achieved. I would also scribe each stringer independently so that any unevenness between the shed and the concrete block is accounted for. I used my first stringer as a template to cut all the others and ended up with gaps that had to be shimmed.
Thanks to Ethan for the great design of this ramp!
I’m going to give this a try because your instructions are dummy proof. Since I do not have anything heavy to put on the she, can I use 1 1/4 plywood instead of 2×4 as the deck board?
I meant 5/4 deck boards.
Pile up old tires and cover with cardboard, makes a fine ramp.
That might work fine in the stix where you have no neighbors (Or no shame;))
Hi Ethan,
Great project! I was just wondering how the blocks were screwed into the stringers. How were they (end) nailed/screwed?
Thanks!
Question, it does not appear that pressure treated lumber was used? Is this correct, and if so, why not?
Ethan,
Thanks for the pictures and walkthrough.
I ended up with a variant of this when I went to build a ramp for my 10’x 8′ shed; I used the same blocks you did in the front ( they are concrete block “caps”, 16″x 8″x 4″ thick ) on a bed of all-purpose gravel and opted for 2″x 6″ ground contact treated stringers cut at 48″. I also used LSU26-type adjustable slope hangars off a 2″x 6″ ledger instead of the 2″x 6″ / 2″x 4″ combo, which I figured would give me a bit more strength and longevity overall.
Finally, I spaced out the stringers at 20″, which gave me a total of 4 of them over a 5 foot width, and cut a piece of 5/8″ GC treated plywood to cover it all.
Total price was a bit over $100 for the materials, and it will last a long time.
My ground is a little sloped, left to right, at the front of the shed. So, what would be a good way to make the ramp so it will be not sloped also?
A fixed ramp should end at a level landing. You really need to level your landing area if the ramp is going to be of any use. Once the landing area is level, this method should work. In your case, take from the left, give to the right, fill, level, tamp and set your base block. Keep the block on the right side of the newly built landing captive.
You can set posts inside the outside stringer(s) to use as anchor points as another option to the spacers between stringers
Used your plan with 2 exceptions. My height was 16.5 inches on a down slope. I placed cinder block under the ledger board because I was not confident that the shed was strong enough to hold the ramp. I used 3.9 for the calculation but the 65 inch ramp was too steep because of the slope and the mower deck hit at the doorway. Instead of changing the ramp, I attached 2 5/4s across the ramp about 15″ from the top of the ramp. It was enough to raise the rear of the mower when climbing the ramp and clear the doorway with ease. Thanks for the help.
[…] How to Build a Shed Ramp – One Project Closer […]
where do you put the screws inti the stringers when you attach them to the ledger board?
I wanted to say thank you for making these instructions available. I replaced the ramp on my mother’s shed last summer using these instructions and she’s very happy with her new ramp. The old one was about 3.5’ and the riding mower would always get stuck on the fulcrum; the new ramp is about 8’ so she doesn’t have to push the mower in or worry about slipping in the winter.
i think you did a awesome job on your ramp.your not driving a car up the ramp.when i built it i put a piece of flashing between were the ramp meets the building and the floor of the building.goo job