

Welcome to OPC’s The Better Half. My name is Jocie, and I love to craft and DIY my home into something wonderful. I hope you enjoy this tutorial on Dollar Store Christmas Trees. It’s been a popular article with over 22K pins and growing! If you enjoy this article, check out some other recent crafts and consider subscribing to The Better Half (email or RSS). Also, feel free to share this tutorial on Facebook and give it a +1. All the buttons float along the left side of your screen. And, if you love DIY projects and a good deal, check out our awesome coupons for all your local Home Depot and Lowes needs!Thanks!
I began this Christmas tree endeavor with one really good idea and it snowballed into making MANY trees! No surprise there.
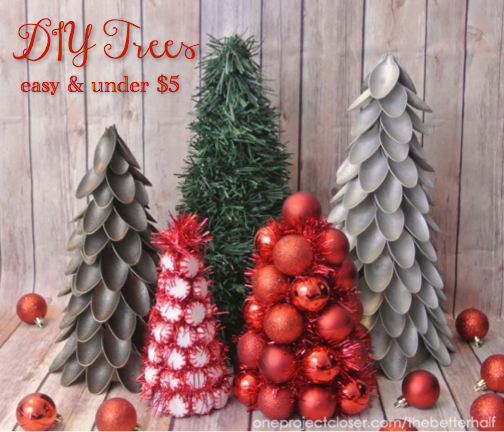
All the trees turned out super cute and, best of all, they were all made for under $5 each and from materials mostly purchased at the Dollar Store! Crazy, huh? So here’s how I made four FAB trees and the number is still growing.
Plastic Spoon Christmas Tree
If you’re a fan of Pinterest, you know that about 6 months ago plastic spoon mirrors were all the rage. A week or two ago I was racking my brain for new and interesting ways to make Christmas trees, and thought of those mirrors. It is my favorite and most unique of the four.

Materials:
- Cardboard tree form
- 120 plastic spoons
- Hot Glue
- Spray Paint
I bought a two packages of plastic spoons from Target, which wasn’t enough. I ended up going back for more, needing a total of 118 spoons.

Once home from my Target trip, having bought way more than just the spoons, I cut the heads off all the spoons. My kitchen shears, with the little notch in them, worked really well.

I then grabbed some spray paint I already had lying around and sprayed all the spoons, both sides. I think I’ve said this before, but I really hate Krylon spray paint – it sprays uneven and thick. Its nasty and my hands are still covered in it. 🙁 Moral of the story, buy Rustoleum.


I found a bunch of CHEAP cardboard Christmas tree forms at Michael’s for $0.49 each (on sale). I used the taller one for the tree – about 10 inches. While the spoons were drying, I sprayed the paper tree also, in case some shows through.
Once the tree and spoons were dry, I began at the bottom of the tree and started gluing the spoons in rings, working in circles around the tree.


At the top, I glued three together tightly. I thought about adding a star, but decided against it.

Ornament Christmas Tree
This is my second favorite tree I made for a total of $3!! So cheap, but so pretty. I saw an almost identical one at Target, complete with glitter ornaments and red garland in between in the balls for $15. I could believe how simple it was to make.

Materials:
- Small Ornament Balls
- Hot Glue
- Garland
- Cardboard Tree Form
Sometimes, buying supplies at the Dollar store is not always cheaper, but it totally was in this case. The ornaments were 12 for $1 and the garland was $1. I priced out the same things at Target and both were $3 each – so I saved $6 for two packages of glass balls and one package of garland.


Once armed with my supplies, I took all the little metal tops off the balls…you know the metal thingy that holds the hooks. Yeah, I’m so technical.

I then started gluing the balls on the tree, starting at the bottom and moving upward in circles. Since the balls are so much heavier than the spoons, it was a slower process. I had to hold the balls in place until the glue was firm but not completely dry so they wouldn’t slide.


Also, I found it really helpful to place the balls around the tree, on circle at a time, to test how well the balls would fit. In some cases, I have to really press the balls close together and in other cases they had to be more spread out. Either way, plan first, and then if you glue is still a little soft, you can shift them slightly as needed.

Midway through, I freaked and thought the card board form would show, so I painted it. Turned out that was unnecessary. Skip that part. 🙂

After all the balls were firmly in place and the glue was dry, I wove the red tree garland in between each of the balls. It was sorta like flossing teeth! lol! It was so easy and looked amazing. I also needed very little glue to hold the garland in place because the balls were so tight together.

Classic Christmas Tree
Growing up, my two siblings and I all had individual Christmas trees we kept in our room through out the Christmas season. It was really special to me and it not sits in my oldest daughter’s room for Christmas. Now that I have two daughters, there is a need for a second tree. While I’m sure small Christmas trees are not that expensive, I made this classic Christmas tree for $1.50!

Materials:
- Hot Glue
- Garland
- Cardboard Tree Form
I bought this Garland from the Dollar Store and while it doesn’t look really great in the package, it looks really wonderful on the tree itself. In these pictures, I chose not to decorate it, but may eventually put lights, mini ornaments, and a topper on it.

Just like the two previous trees, I used my cheapo cardboard form and some hot glue to affix the garland.
I started at the bottom, using hot glue to keep the end in place, and kept winding the garland around the tree, working upwards. As I wound, I pushed the garland downward, to keep it as tight as possible.
I periodically glued some of the garland in place to keep in from moving up the tree. That’s it – crazy simple!
Candy Christmas Tree
This was another cheapo $1.50 tree but super cute. I’ve seen a lot of candy trees on Pinterest and all are adorable. A faithful reader, Carol, also made the suggestion of a peppermint candy tree on Facebook last week. I may end up making some more candy trees, maybe some with and some without the garland. Maybe M&Ms or gumdrops…any suggestions?

Materials:
- Round Peppermints (or candy of your choosing)
- Hot Glue
- Garland
- Cardboard Tree Form

This was almost an identical process to the ornament ball tree except a lot quicker since the candies are lighter and easier to glue.
I added garland to the tree, but wasn’t sure I was going to do that, so I first painted the tree. Next candy tree, I will probably do it without the garland and just paint the tree form white.
Then, I glued all the candy on, again working in circles upward. BTW, take the wrappers off. It’s a little sticky, but cuter. Another lesson learned from a previous project – Elmer’s glue melts some candies (like Candy Corn), so I stuck with my handy-dandy hot glue.
Once the glue was dry, I laced the garland (still left over from the ornament tree) in between the candies and added a little poof on the top.
And the fab four… They are sitting on my mantel right now, and even though it’s not time to break out the Christmas decor, they are so pretty its hard to take them down.

What do you think? What have you made trees out of? Any suggestions for my next tree?
As Always, thanks for reading! Hope to see you on Friday for another great link party – we will be giving away another week of FREE ad space too.


inspired! I’ll be trying something like this with my boys this weekend…I’ll send you a photo of how it turns out!
Hey Amy, Please do send pix!!!! I’ll also stalk your FB! lol!
I absolutely love the spoon tree. 🙂
Thanks, Megan!
Ok Jocie, you are out of control. That’s all I’ve got to say. This is amazing and adorable. I want to make some!!!! Hmmm…. Friday I can get a babysitter :O)
COME OVER! We’ll be home Friday, awaiting your presence!
I love your spoon tree! It looks awesome!
Thanks so much, Katie!
Wow! Those are all just lovely!
Thanks so Much Danni, and thanks for visiting!
they are all great, can’t choose a favorite! Hmm, what should I try first?
Hey Sheila! Thanks for visiting!! Let me know if you try any!
Great ideas! I love the spoon tree!
I like the spoon tree…looks like tedious work though!
I’ve wondered…for projects like this (seasonal ones) do you keep them from year to year?
I do keep them year to year, although I didn’t have a lot of decor to start! My family often trades decor through the years, too.
WOW, these are amazing. I adore the spoons- too too cute
Thanks Jen, the spoon tree is my fav too. 🙂
They all look great!
that spoon one is killing me!! so great, and so creative!
Thanks so much and thanks for visiting! Hope to have you back again – we have a link party on friday and will be giving away free ad space. 🙂
Love the spoon tree!
I’ve been looking for ideas for DIY Christmas trees and these are fantastic! I love the spoon tree. My fav!! Great job on all of these!
The spoon tree is my fav too! (love your name btw)
Thanks for visiting! Hope to have you back again – we have a link party on friday and will be giving away free ad space.
I have a little tree on my desk at work. But I never thought of putting one in my children’s room. What a great idea!
Just linked up!
Jocie, I love them all! I can see how they’d be addicting.
This tree is fabulous- love it! I am featuring it on my Saturday favorites! Have a great weekend-Claire
These are so awesome! Love the spoon tree. 🙂
Hey Kathy, Thanks! Saw your a new FB fan – we love new fans…thank you!
These are so fun. My fav is the red ball and garland tree.
Hi Callista! You are the first to have the red ball ornament tree as your favorite! Thanks and thanks for visiting!
The one with the spoons is such a cool idea! They all look great together!
Thanks so much Tina! And thanks for visiting!
Love the collection! Easy enough for my daughter to help with too!
Where did you find cardboard tree forms?
Thanks so much Michelle! I bought the cardboard tree forms from Michaels, in the back of their Christmas section with the other Christmas crafts. let me know how it goes!
What fun and thrifty trees!
Thanks Sharon! Did you get my FB message? We’re not too far from you!! 🙂
Nice job on all the trees. Boy those plastic spoons are so versatile.
Thanks for sharing.
Thanks so much, Angie!
I love the spoon tree, but they’re all cute
Thanks, Mel!
I LOVE that spoon tree. How clever! I’d love for you to share this at my link party going on right now:
http://sewingbarefoot.blogspot.com/2012/11/the-weekly-creative-9-and-giveaway.html
Have a great week!
Shannon @ Sewing Barefoot
You are…. AMAZING!!! What a GREAT GREAT post!!!!! LOVE all of the trees!!
Thanks for sharing at The DIY Dreamer… From Dream To Reality!
Thanks so much Christine!
They’re all SO CUTE, Jocie! I don’t know which I like best. I want to try them all! Thank you so much for sharing!
Thanks so much Roeshel! Hope you had a great Thanksgiving!
Great ideas Jocie!
<3 Christina at I Gotta Create!
Wildly Original linky party is open
Oh my goodness what adorable trees! I am so in love with the spoon tree, so beautiful. I love all of these, you have some fabulous ideas!
Thanks so much Taryn! Hope you had a wonderful Thanksgiving!
Your spoon tree got me thinking…
So tonight, when I slid my grocery store deli pizza into the oven, I snagged the circle of white cardboard, cut it in half, and twisted it into two cones. My son begged me for a bag of pistachios last week, and I just knew I could use the shells for SOMETHING. Ta-da! same basic shape, but smaller, as plastic spoons, and FREE.
I love how it looks like raw wood, but since I’m not into the woodsy thing anymore, I’ll probably spray paint it.
Susie, what a great idea!!! Can you send me a pic? 🙂
Great work! These are such good ideas. Thank you!
Thanks so much Jodi and thanks for visiting!
I love these! I’m featuring your post tomorrow. Thanks for linking up at Doodles & Stitches 🙂
This is awesome. I was looking for a project to do with the teenagers I work with and this spoon tree is perfect. Thanks for the adorable idea!
Thanks so much Ronda! Let me know how it goes!
Awesome projects!
Where do you get cardboard tree forms/cones?
Thanks!
Hey Nikki I got them at Michael’s in with their seasonal crafts! 🙂
I hate spray paint on my hands! You can get it off really easy with some olive oil though! I’ve used that to get Krylon off my hands before. And I love that spoon tree, it’s my favorite too!
That’s a great tip, Neda! I’m totally going to try that next time. 🙂
Wow that spoon tree is crazy cool!! =)
Ergo-Blog
Just have a quick question about the cardboard trees. You said you got them at Michaels? Know of any other place to get them? I live out in the country and it’s about 45 minutes to town and, of course, no Michaels. 😉 Thanks
I did that when my kids were little too. And, the deal was, they could have whatever was under their little tree whenever they woke up Christmas morning. A Rice Krispie treat, a Hardy Boys book for my son, a magazine for my daughter. It was a special treat and gave this swing shift working mommy a few extra winks. My kids are in their 40s now and I still put up that a little tree somewhere in the house. They always love to tell others that story.
I meant I put up a small tree in the kids’ rooms.
OMG!!!!!! THANK YOU SOOOOOOO MUCH FOR THIS TUTORIAL DEF GOING TO MAKE THESE !!! 🙂
Wouldn’t it be much easier to get the spoons in the color you need? From a party store as a suggestion?
For sure easier, but the painted look is much prettier than glossy spoons! 🙂
Some where I saw them use a wire cutter to cut the spoons instead of scissors. Might be an idea, I have no idea. However, it looked like they were cut more straight and not so jagged although you don’t see them in the end as they are covered up.
I love these trees to cute, I’m thinking about making one for my kitchen table and I have one question where would I buy the cardboard tree?
Card board ones at craft stores, the Styrofoam trees for the small ones work from the Dollar Tree. However, not all DT has them. I had to go to two of them to find them. I did the spoon tree in white. Waiting on a topper I ordered from ebay.
Hi, I love your trees! All great ideas. Regarding the one made with spoons, I want to try it soon. One question, though, I think it would benefit from a ‘topper’ – any ideas about that? I’m working on it.
Thanks so much for the ideas.
ljb
[…] Silver Pennies This is gorgeous. I want a beach house and I want this in my beach house. Â Â OPC The Better Half I would’ve never dreamed that a plastic spoon tree would be so cool! I must make one of […]
I just found you and love all the tree’s! I am a tabletop Christmas tree-aholic! I saw the peppermint free and you asked if we had any other ideas? Hershey Kisses, yes they are pricey, but everyone can enjoy it over the season! (jk Not in my house! They would be eaten! A friend made me one 40+ yrs ago and I was able to keep the kids away until Christmas!). Thank you for sharing, I can’t wait to get started – ornament tree first!! 🎄
Finished spoon tree and it doesn’t sit straight on table. Help. What went wrong and how can I fix it.
[…] Trouvé d’ un projet plus proche […]
[…] 10. Plastic Spoon Christmas Trees […]
Thanks for a great tutorial! I will be asking everyone at our Wednesday night church meals to let me have their spoons so I can clean them and make these trees for next year (this year is already done). I usually decorate 30 tables as cheaply as possible for our Christmas tables so all your trees will be awesomely beautiful and low cost to mix up on the tables and stage . I will have to spray the peppermints with a sealer if some type as we live in a very humid area and the candy will start to melt and drip if unwrapped. I will be buying supplies after Christmas for all trees, thanks again for sharing your ideas.
do you unwrap your peppermints?