
How to Paint a Basement Ceiling with Exposed Joists for an Industrial Look
April 8, 2008 | by Fred (email) |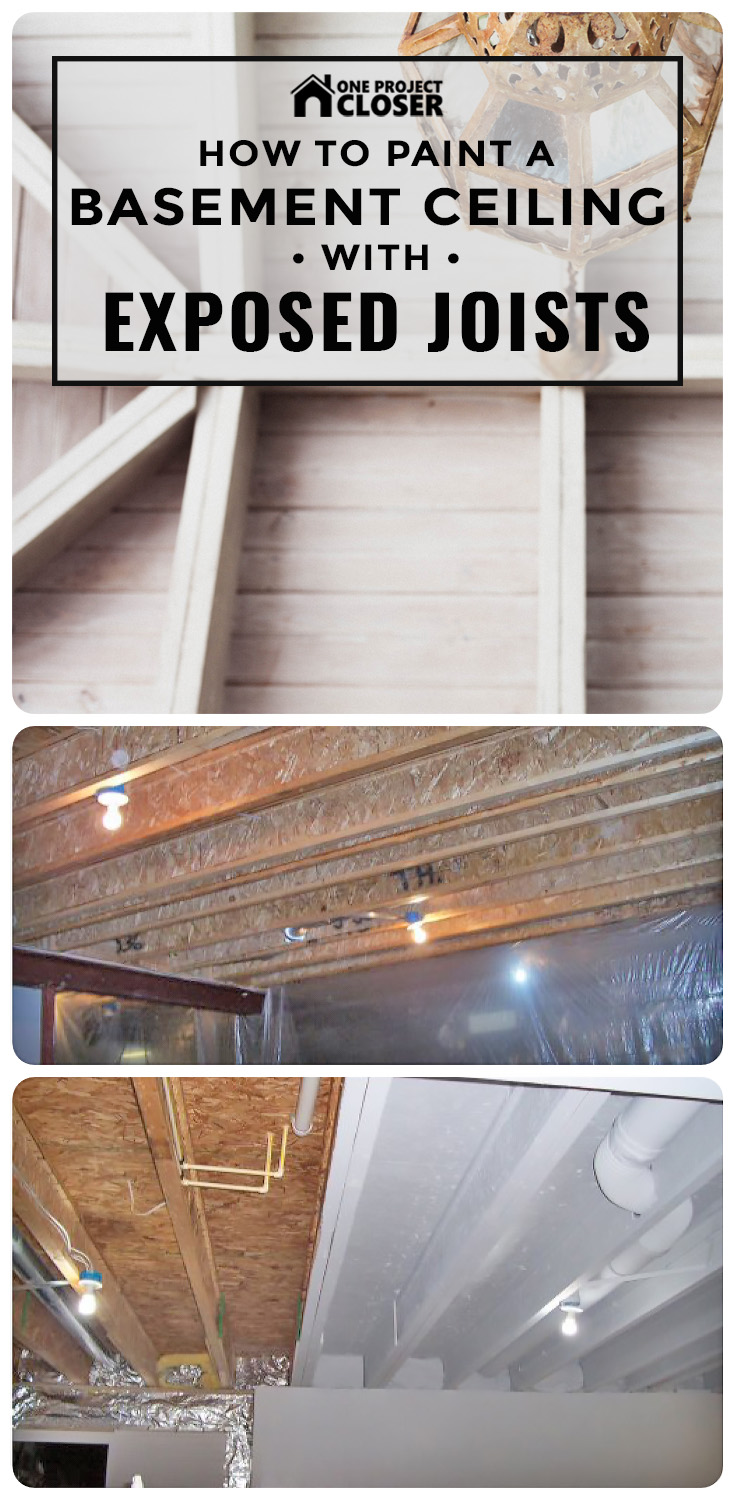
This guest post on How to Paint a Basement Ceiling with Exposed Joists comes from a reader and friend of One Project Closer, Chuck Williams. Chuck is an amateur carpenter and DIY weekend warrior.
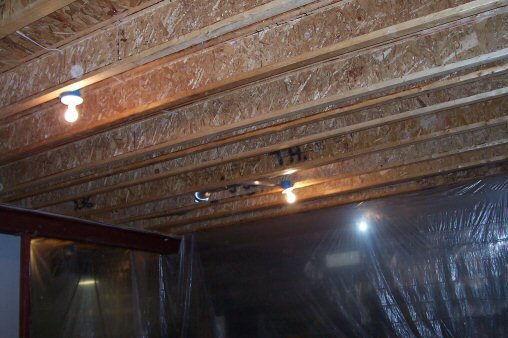
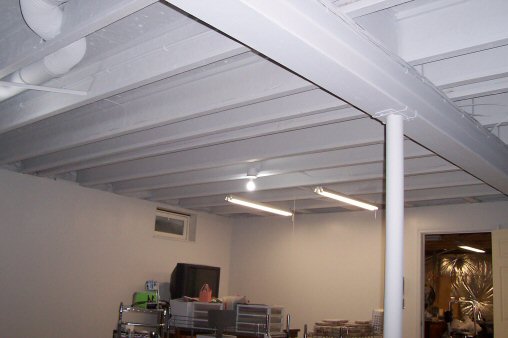
During my efforts to upgrade my unfinished basement, I wanted an alternative to the typical acoustic tile drop ceiling or drywall ceiling. Fred told me of his tentative plans to paint his open basement ceiling dark brown. After some research, I decided to go with a light color to keep a more open feeling. Airless spraying seemed the only viable option to achieve this, and Fred offered me the use of his Wagner Airless Sprayer. Here’s a picture of the ceiling before the job.
My plans were to spray a primer, followed by a flat, off-white paint. I had some Killz 2 primer left over from a previous project, so I decided to get more of the same for this one. I’m sure any primer/sealer for bare wood would work.
I was hoping that 2½ gallons would cover the area, but the open beams and bare wood took almost seven gallons to cover with a light second coat. Five gallons of flat latex paint was enough for a first and second coat over the primer. Overall, I’m very pleased with the results. My wife will use this as her craft workshop for stamping, and with a some more finish work, it should work very well for that. Here’s what the ceiling looked like after the job.

[See also: Valspar, Behr and Kilz Primer Comparison]
How-To, Tips, and Lessons Learned for Spraying the Ceiling
1. Isolate your work area with drop cloths on the floor and hanging plastic sheets covering the walls / other areas. Paint sprayers produce some overspray, and you’ll want to protect all the surrounding areas from paint dust. Cheap .3 mil plastic sheeting from Walmart works great and is only $1.39 for a 9′ x 12′ sheet.
2. Use an airless sprayer. Attempting this job with canned spray paint or a traditional brush and roller will not yield good results. The airless sprayer I used is particularly nice because the hopper is on the ground with a long, pressurized hose leading to a lightweight nozzle. (Some airless sprayers hold the paint in the nozzle area).
2. Set up fans for ventilation so that air from the area you are painting is pulled outside. No matter how well you isolate your work area you will get some overspray, but this should help minimize it.
3. Cover the outside of the paint sprayer, hose, and spray handle with spray silicone to make clean up easier. Cleaning up the painter sprayer was very tedious. After cleaning it up from the primer I decided to put a light coating of spray silicon on the body of painter and spray handle. The silicon prevented the paint from sticking and made cleanup the second time much easier.
4. If the ceiling is a bare wood ceiling, it will require a lot of extra primer/paint. I needed 7½ gallons of primer and 5 gallons of paint on an area 20 X 25 ft area. (Remember, with joists the surface area is more than two times that of a flat ceiling).
[See also: Valspar, Duron, and Behr Paint Coverage Review]
Additional Painted I-Beam Joist Pictures
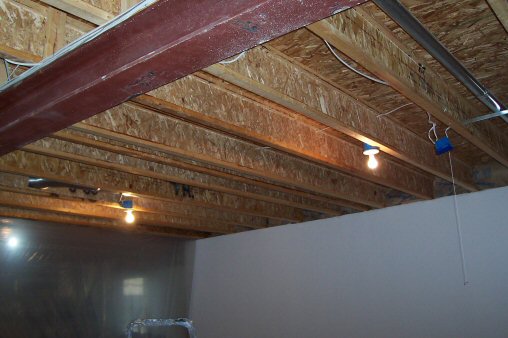
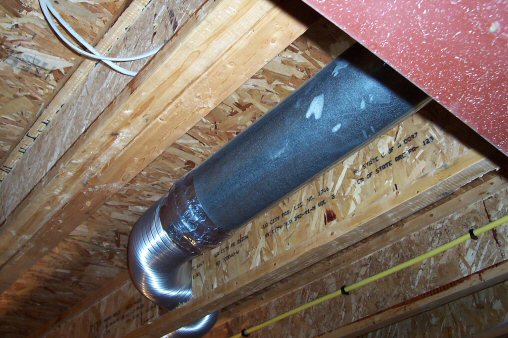
Here’s some additional before pics of the unpainted joists and steel i-beam:
The following pictures shows the hanging plastic sheeting from the ceiling, essential to keeping the overspray from floating into other areas:

And finally, here’s some additional finished shots, and one showing a side-by-side comparison of the before and after shots:


Overall, I’m pleased with how bright the basement is, and I like the industrial look! I’m happy to answer questions in the comments section below.

Wow! What a perfect solution for a basement ceiling. I would love to do this in mine. Unfortunately there is insulation in between the beams. Can you paint insulation? Probably not. 🙁
I was wondering the same. It looks like he did.
That’s my question too! We just did ours and aren’t sure about whAt to do with the pink insulation at the ends. I saw tin foil in one of the pictures but wasn’t sure ….
I have seen plastic placed over the insulation and it looked very neat
First of all, you should never insulate between your full basement and the floor above. The enclosed basement should keep a steady temperature of 60-65 degrees in winter, since it receives heat from the earth. In addition, if you have a moist, damp basement in the summer, the insulation tends to get damp and may get mold and mildew. I bought a 100+ year old home in northwestern Pennsylvania and had to remove the insulation in the basement. It was damp and moldy on the surface and made the underside of the floor above very damp, too.
I think it depends on your house and your basement. We insulated parts of our basement ceilings using rock wool, primarily for sound-reducing purposes under the bedrooms. However, our basement has R-10 floor insulation and R-20 on the walls and is dry as bone. I wouldn’t try the same in a pre-2000s house because you are never going to have a dry basement.
A dry basement is definitely possible in a pre 2000’s home and I have one for sure. I insulated the walls with closed cell foam and insulated the rim joists with open cell foam to prevent any kind of air drafts. I can confidentially say my basement is dry and doesn’t even have a use for a dehumidifier. It’s definitely possible if you are remodeling a basement correctly
We just built a house in north east Pa and in order to receive occupancy letter and move into your house you have to insulate the basement ceiling if it is not finished or no heat in the basement. We actually had to try and trick the system and put R 13 in when you needed R 30. That way when you finished the basement you can reuse the insulation for the walls
Will have to consider this when I renovate my basement. I have a low ceiling height, so this could help the space feel a bit larger.
Also, do you know the electrical rules about running wiring through the basement? I had thought if the basement was unfinished, that the cables had to be in conduit. Do you know if this is true? If so, the above basement may not be quite up to code (though I’m sure it is safe).
I’m a Electrical contractor,and to answer your question.Where I live you can just use romex even when not finished.You will have to ask your electrical inspector to ask what they prefer since they have the authority in your jurisdiction.
NEC will not allow Romex to be installed in conduit. In certain circumstances an inspector will allow it. “Susceptible to physical damage!!”
Corey, don’t quote me on this because I’m not an expert, but here’s my understanding: If the basement is completely unfinished, you can have neatly secured romex wire that is not in conduit. This also applies in a garage. If the basement is converted to living space, you cannot have any romex showing and all exposed romex must be in conduit.
Now, I don’t know what officially constitutes converting a basement to living space, but I would guess it has to do with how a house is marketed. You can’t include unfinished space in the square foot count, and you can’t advertise bedrooms in unfinished spaces. There’s probably some judgment involved in this. I’ve never heard of a locale penalizing someone for using an unfinished basement as living space, even if you haven’t converted the space.
In Maryland, the codes differ from county to county and Baltimore City. I’m only familiar with Balto. County, so this might be different for you.
It does look a lot nicer! I would say that is a fairly quick, easy, and cheap way to create a good looking basement space.
This looks great, although, as I said before, I don’t think it’s what I want for my basement. Just personal preference.
But check out my blog, Fred, as I know you’re brainstorming your basement ceiling as well…the hamsters are turning the wheels in my head now. 🙂
This is EXACTLY what Im looking for! I have an unfinished basement but with a little (affordable) Love – a white ceiling to brighten it up, a classy color on the concrete walls, and maybe some all-weather carpeting, it could turn into a very functional space! Your pics have inspired our new summer project. My husband will be pissed!!!
your comment made me laugh so hard!! my husband will be pissed too! MORE PROJECTS!!!! YAH-HOO!!
I live in Cincy too and your comment cracked me up! I’m staying home this summer and this is going to be my project! Did you ever finish yours?
Cincy, I’m really glad this inspired you! Chuck did a wonderful job on their ceiling. We considered doing a brown-out ceiling in our room (a little different look). We’ve since decided to go ahead and sheetrock it … but I still think a painted ceiling can really go a long way in making a space look better on the cheap.
This was the greatest solution for an unfinished small efficiency apartment I have. Worked great. The Wagner Crew Plus Painter was terrific. Didn’t take as much paint as I thought it would. The process was great and the room ceiling looks awesome for the type of ceiling that it is.
im a beginner do it yourselfer. i love the look of the ceiling. we currently have a drop ceiling that take away probably more than a foot of headroom and have been looking for an alternative
anyways my questions are (1)how did u go about insulation. we live in chicago and out basement is curently not insulated. but we plan on doing this to make it more livable. from the pic it look as if u just pained over the insulation (or at least thats what i think i saw) what kind of insulation do u recommend and question (2) does it matter about spraying paint over the pipes?
Hi krystal, here’s your answers:
(1) I would definitely recommend insulating. You can use standard R13 “pink” insulation on the walls. If you plan to frame out the basement, you’ll space the studs on 16″ centers and put the insulation between the studs. Otherwise, you can buy R13 in large sheets that can be fastened directly to the concrete walls with a special tool.
(2) No, it doesn’t matter about spraying over the pipes with standard latex paint. The paint may not form a good bond and might peel, though.
How did u cover the insulation?
I did this in my basement and it turned out great. I had to cut boards to fit between each floor joist and tacked them up. Time comsumming but the result was worth it.
the basement is already framed and has some paneling up but no insulation so needless to say that during winters in chicago no one went down there.
we had a closet or what someone considered a weird version of a closet on the back wall. i say this because it had only one door but expanded the entire length of the wall and was only maybe 18 inches deep. so anything that was in the back u had to either crawl over a mountain of other thing to get to it or take everything out to get to it. last week i took the paneling off that wall and put up some drylok.
i want to insulated the other three wall because there is nothing behind the panels other than frames and brick.
ok so the R13 i should use is that fiberglass or the styrofoam ?
Krystal, either will be fine to use…
Is it ok to paint your waterpipes with this kind of paint? I read in a magazine to use cold/heat resistant paint.
Jennifer – it is something to consider. It certainly won’t damage the pipes to paint them with latex. The concern is that under constant temperature fluctuations, the paint might peel. That hasn’t happened in the basement where this was applied; however, time will tell.
can I paint over insulation and duck work in the ceiling in the basement. Thank You
I’m inspired! I just started revamping a creepy basement and am only at the point where I’m scraping paint and fantasizing about how the space will be. Not only am I going to paint the ceiling and steel beams white, but I’m going to color code all the various pipes. The cold water pipes will be painted blue, hot water red, grey water pipes will be painted grey and the sewage pipes will be painted chocolate brown. 😀
Gas pipes will stay copper.
Aside from that, electrical wires will get yellow lightning bolt tags, phone lines will be tagged with little soundwave tags. I’m keeping the heat ducts silver, but wrapping them with silver insulation wraps.
I’m also planning on putting plaques on everything labeling, for instance, what each knob will turn on or shut off (i.e. main water source, bathroom cold water, kitchen cold water, etc.). I have a chalk board in the basement that I will use for scheduling the maintenance of the water heater, furnace, etc. Essentially, I’m going to make it purdy and dummy-proof!
I’m psyched! Thanks for sharing–I’ll be taking before pictures tomorrow, but it’ll probably take me months to finish up.
Did you by chance put any moulding at the top of the drywall? We are considering painting our ceiling, by the drywall at the top is kinda choppy. Any suggestions?
Your basement looks beautiful!
Just one more question…in the side by side photos it looks like the insulation up in the basement ceiling on the exterior walls had “foil” over it in the before photo. Was that just painted over? thanks again!
Hi folks, LOVE this idea. I was wondering the same questions as Sandi’s last two as well. Any chance you can post an answer on those? I would really appreciate it! 🙂
Also, is it necessary to turn off the electricity before painting ceiling electrical boxes/conduit lines? Thanks a lot!!! 🙂
Hi Tricia (& Sandi),
Sorry for missing this. Yes, I believe the insulation was just painted over. Although, in most finished basements it would be unusual to have insulation in the ceiling itself (since you would want heat transfer between the first floor and the basement).
If the conduit is tightly sealed you’re fine painting it while the power is on. You’ll probably want to cover up the receptacles though…
As for the top of the ceiling, crown molding is certainly an option, or some other type of molding.
I will say that we ultimately decided against this plan, even though Chuck is very happy with it. We’re going the drywall route, believing this will be better for resale value…
great piece of work.
question: did you paint over the pink insulation or first foil it up and paint it?
your project has inspired me to do the same.
thanks.
Your photos are great! This is what I want my sweetie to do for our home. You did all the research for me thanks again. My husband thought this would make our home even more attractive to potential buyers. Thanks,
Joyce
would a wagner sprayer work for painting the ceiling?
Josh – Yes it will. IN fact, this one was done with a $200 wagner model from home depot. You can see our review here:
http://www.oneprojectcloser.com/review-wagner-paint-crew-airless-paint-sprayer/
There’s a link to purchase this model refurbished from amazon for $99.
I was planning on doing the same thing and found this site when looking for spray painters. I am more confident tahn ever that it will look great. I am also planning to put in ceiling fans (a 8’6″ basement ceiling) but am unsure how to mount them and make them look decent. Any recommendations would be helpful.
I will let you know how the ceiling comes out.
Patrick – the wagner i linked above should work well for you. Good luck and be sure to share the pics – you can do it on our forums (look at the top of the site for a link!)
i used regular paint on my wall heater ; is that ok ?; starting to peel; should i use a different paint
what about sound travelling through the floors? how would you stop that?
We did this in our basement according to the above article. it took far more primer than expected. Other than that we love the result. Our summer kitchen and the “grand hall” are wonderful for entertaining. Our family loves the “finished” basement.
Tyler, there is some discussion on sound proofing at the bottom of this article:
http://www.oneprojectcloser.com/how-to-install-recessed-can-lights/
Joyce, glad to hear it went well. It can take a lot of paint to accomplish this, especially depending on the type of joists.
hi Fred… i loved what you did on the ceiling…
anyway,… what do you think of Gray for paint?
Can i rent this sprayer(wagner) from Homedepot?
I have been planning to do this for some time and am glad to find someone with “experience” to ask questions about this project. The color I have chosen is a very deep brown/red color for a rustic look. I DO HAVE QUESTIONS THAT FOLLOW IF YOU WILL BE SO KIND AS TO TAKE THE TIME TO READ WHAT i WROTE AND COMMENT. Thanks!
1. I probably should make sure all my wiring is done for receptacles and light switches before starting? Correct? Done by a certified electrician?
2. Is there something special to do before, during or after painting over the following things:
insulation,
existing wiring,
existing wires for cable/satelite,
iron beam (with a little rust),
hot and cold copper water pipes,
plastic drain pipes,
heat and cold air return ducts,
light coating of dust remaining on pipes and etc..
Instead of crown molding, I playnto put guttering around the top with lights running inside the guttering for indirect accent lights. Any tips on where to get?
How would I add in a 1/2 bathroom later which would need a ceiling and sound proof walls? I am guessing that I would need a drywall ceiling with insulation in them?
Would I need a building permit to do any of this work for any reason as I am converting my split foyer basement into an activity room/office/family room? After the ceiling, I am going to paint the existing drywall and
Hi Kathy, welcome to the site. I hope you’ll stick around and read more about our projects.
1) You don’t necessarily have to have the electric done. I probably would, but if you want the wires painted, you’ll want them run first. There is no danger in painting Romex wire as long as the wiring is done to code (certified electrician is probably a good idea, and may be required in your area).
2) Honestly, this work was done by a friend and I think he painted EVERYTHING. Key is to prime first. I’ve never heard of paint doing anything bad to any of the stuff you mentioned. Worse case scenario I think is that it would peel off of vents/pipes etc., but I believe my friend has had a good experience. You shouldn’t need a building permit for this type of work, but if you are doing electrical work you will most definitely need an electrical permit. Note that you can’t just leave Romex exposed in a “finished” area – it has to be inside conduit or inside walls. Technically if you don’t have it “finished” you can’t claim the extra sq. footage when you sell the house and an appraiser will give you at most a “partially finished” marking.
Fred,
I like this idea. We have insulation between the basement and the first floor and large hanging hvac hoses.
1. What can we do with the hoses?
2.. Is there a spray product that we can use to insulate?
or
3. Should we just rip out the exhisiting insultion ( may loose noise and heat protection) and spray with wagner after priming?
Dwayne
I love this idea!
I am concerned about the fumes. Did Chuck do anything special to protect the air ducts?
If I wanted to paint the pipes another type of paint to prevent peeling what’s the safest paint to use?
I have two small children that would be using the basement a lot so I want to make sure it’s safe and looks nice.
Thank you,
Sarah
I was going to go for a black ceiling, but after looking at these pictures I think a white ceiling would look a lot better.
It sure looks a lot brighter compared to other images of basement with black ceilings.
I am just getting started on this, and I was concerned about white ceiling vs. black. Since I have one tiny window, I appreciate all the photos of the white and black ceilings I have seen online. As I understand it…black “disappears” but white will make the space appear lighter…Thanks!
One room in our basement has ceiling tile, the rest is exposed joists. I really like the looks of the white painted ceilings. This should make an older basement look far more appealing.
Looks great! I have been wanting to find an inexpensive way to upgrade my basement (so the kids can play in it), and this idea just might work!
I am going to hire someone to paint my ceiling with a sprayer. 1000 square foot ranch. what would you say is a fair price?
No question but rather a statement. I painted my basement ceiling white also. But my difference is I used paint brushes and small rollers. It was a very hard job but I got it done and it looks great. I also used KILZ primer and KILZ latex. White! The spiders hate the white and have basicallly moved out. I used to have spiders galore before painting but now with the white beams and bug spray a couple of times a year, no spiders! Do not do black or brown if you have spiders, spiders love the dark colors, it lets them blend in and hide.
Amazing tip re: the spiders! Did not think about that!
Am considering having the unfinished basement ceiling–exposed joists with insulated wiring running through holes to the panel. In addition some water shut off , copper lines are overhead. Other than marking the various lines, will there be an adverse effect on the joists and or the various wiring/lines if sprayed with Speedwall Interior 1251 Latex Mat Flat?
Your reply will be most helpful and even more appreciated.
Thanks.
I’ve gutted our basement ceiling — It was unsafe, unsightly and low. All along I was planning to do black-out (cost-effective, cool) but thinking about it I felt it might look too gritty (punk-rock) and incongruous with the rest of our home (eclectic but traditional).
The idea of flat white occurred to me. Clean, bright, reflective… heavenly. It brings to mind modern art from to 70’s. Happily I googled upon this sight — THANK YOU! Seeing the photos have me convinced it is the way to go (plus we have spiders galore!).
As of today White-out is the plan.
OK… I’m inspired! Love the industrial look. I’m going to tear down the disgusting, yellowed, 1970’s ceiling tiles.
There is currently insulation and panelling on the walls, and I’m not sure how the joint at the top of the panelling, end of joists, is going to work out, but I’ll post photos and maybe you guys can help me work it out.
First … MUST… DESTROY… UGLY … CEILING… TILES!!!
Wish me luck! 🙂
Hey Fred,
Did you cover the wires before painting?
I’ve got a low (7feet max) basement ceiling in a 75-year-old house. I’ve got a ton of pipes and electrical wires attached to the ceiling… oh, and a million spiders. lol.
Aside from vacuuming up the spiders, do you suggest I do any prep to the ceiling before painting? I’d love to paint over the electrical wires and pipes but I don’t know if that’s something I shouldn’t do.
Any advice?
-Matt
Chuck painted the pipes and the electric with no problems. The pipes will likely peel eventually, in my opinion, but there’s no danger I know of in painting them.
Thanks Fred!
🙂
Also Fred, sorry to bother again but, do you know what type of paint Chuck used/recommends? I’ve got a similar basement ceiling, only with older wood (100 year old house) and more metal beams.
Matt, not sure but I suspect either Behr or Valspar. I know the primer was Kilz and if you’re going for a light color, once the primer’s on you’ve probably got two more coats regardless of which brand you choose. Good luck!
This project looks great! I love how it turned out very urban looking (like those restaurants that charge you 80 bucks for a meal… I always think, $80 and you couldn’t even afford sheetrock for the ceiling??) haha seriously it looks really cool. As someone else asked, any plans for molding to cover the ends of the drywall?
How did you finish the sheetrock where the joists meet at the top?
I’m going back and forth about wether to just paint the joists or sheetrock with a lot of access panels? If I paint, I would have to wrap a lot of electrical cords in conduit. I have sheetrocked before so I would save money doing it myself. I saw the newest thing for basement walls called insofast @ http://www.insofast.com…check it out…it has the insulation, studs and space for electric all in one and is mold resistant. I saw it on TV “This Old House”. Definatly going to do that for the walls instead of drywall and 2×4’s. We also put the foam interlocking mats for a kids room or gym area that they sell at Sam’s club down as our flooring. I plan to put down indoor/outdoor carpet tiles on top of that for a cozy look…and if water gets in the basement it wont be a huge mold problem.
Candace- Thanks for the mention about InSoFast on http://www.oneprojectcloser.com/painted-basement-ceiling-how-to-tips-and-lessons-learned/
Wow!!! This is exactly what I am looking to do in my basement!! I am so thankful I came across this site. I spent the day vacuuming the ceiling to remove all of the cobwebs. Now off to buy paint:) thank you so much for the inspiration!!
Hi. I’m considering doing this. Is it ok to paint the metal that the air from the furnace goes through? (my mind is blank as to what you call these things!). anything that should NOT be painted? we can’t afford to hire anyone except for some electrical work. i’m thinking the electrical work should be done after the painting? wanting to put in some nicer lighting… if we wait, then we won’t have to worry about covering the new fixtures….
Hi Fred!
Great information! I am shocked at the amount of paint and primer this required! Holy cow.
My question: I’m having a hard time finding information on ventilating an enclosed basement while spraying…. I only have two “vent” windows in the entire basement. They are on the side of the basement I want to paint, but incredibly small. I can of course blow fans… but that will just blow the fumes and spray around, not necessarily ventilate it out of the basement….? How do people do this with a traditional below ground basement? – AND thank you for posting the tip on the refurbished Wagner!
We are planning on doing this in our new house! I showed my boyfriend the pics and he was amazed how good it looked.
What is the risk of fire if spraying in the winter with gas water heater and furnace?
Should they be turned off while spraying?
I agree Paulette. I am planning on doing this next week in my basement and want to make sure to prepare everything accordingly beforehand. All valves need to be covered as well as any vents (don’t want paint going up into the whole house) and lights as well. I am then epoxy coating the floor this summer too. Next year I’ll insulate and frame the walls. If I have enough money left over I am planning on getting the drywall up as well. I am planning on putting crown moulding at the top where the ceiling meets the wall and baseboard where the floor meets the wall. Where should I rent an airless sprayer from? Never used one and am a little anxious about it.
We painted our basement ceiling and it worked great. Several suggestions:
1. Don’t use a primer, just use the finish flat paint. Easier planning of the amount of paint needed.
2. Wear a Tyvek suit, goggles, sock hood, and respirator.
3. Use Floetrol paint conditioner. Easier application.
4. For clean up, use hand sanitizer on spray gun, goggles etc.
Hi,
I know it’s been awhile but would you kindly post pics of the end results?
Thanks
Did you just spray the wiring? We thought we might need to cover/enclose it in something but it doesn’t look like you did that.
Thanks for the info!
This is great and I love the white painted joists. I have originally started painting the joists with a small roller and brush and is was too time consuming and a real pain. Is the airless sprayer very heavy? I think my basement is about a20 X25 (60 yr old house) poured concrete basement. I used swimming pool waterproof paint on the floors and walls to waterproof but still had some issues so had amvic insulated subfloor installed…I can’t afford to lose height so plan to paint. I saw you used silicone spray on the handles….I don’t know much about the sprayer…is the nozzle easy to clean up?
Thanks for your time and comments.
Jeanne
my question is can you take all those wooden criss cross pieces of wood braces down from the ceiling and leave them off? Thank you.
Esther – I would leave the hiss-cross pieces, since they stabilize the joists and the floor above. I had my ceiling painted flat black and those pieces are a visually interesting detail, that don’t stand out after paint. Of course, if you’re using a light-colored paint, you’l see them. The thing I worked on the most before paint, was changing low-hanging gas pipes to flex, run along the joists and invisible after painting.
Someone murdered your HVAC. You do not cut gaping holes in your floor beams to add head room. Picture 4 and Picture 7
Lol structure is compromised. Let me know when you fall through the floor.
I have a hung ceiling in my basement with 2×2 ft sections. Many of the sections are stained due to an upstairs water leak. I want to remove the padded sections to repaint them. What type of white paint should I use ?
Did you have to use any special paint for the metal vents and duct work?
If I missed it, my apologies, but what was the cost of this paint project? We are planning on doing this. Thank you.
Did you use a latex or oil based primer?
Can you paint over pipe foam insulation?
Love this. Exactly the idea I needed to finish my basement for the kids
[…] source […]
I’ve done this on several of my rental properties…
1) if it is an old basement, you will need to knock down cob webs and dust. Use a power washer and don’t forget to kill the electric to the areas being power washed!
2) Drywalling a ceiling is NOT that difficult. Consider it. Spraying a ceiling is a MESS.
3) Exposed romex is fine, but code MAY require it to be covered up if it is over a certain length (say 18″)
4) Wear paper painter cover alls, hat and mask.
5) Even in 5 gallon pails, the costs add up. Drywall is cheap, fast and if there are 2 of you easy to throw up. And it can be bid out at a decent rate and will add to the sound proofing. Also, if there is any sagging or bounce in the floor, if you use plywood, it will make box trusses out of the joists and stiffen the floor.
I did dry wall after tearing out tile. Both became a big headache trying to service or change cables, etc. i finally opened up the ceiling , and even though it’s not painted yet, it’s quite a relief. Buy the cutting and sanding drywall also makes a very unhealthy mess.
Excellent Post. 🙂 Almost cover everything.But what is the best way of painting ceiling that has a halfroof and compartment attached to ceiling.
I think I would have left the steel beam red and just repainted it with fresh paint for some contrast personally.
I came across this and decided it was exactly what I wanted for my unfinished basement ceilings. It looks fabulous but be forewarned this is a HUGE project. It took way more paint than I could EVER imagined (16 gallons) and a week of neck/back breaking work (8 hour days) to finish. i love it but don’t think I would ever tackle it again!
we are hoping to do the same in our basement, starting with the laundry area (about 20×13), how large is your basement? Did you spray? and could you post a pic?
Can I use killz paint on the wood and piping in my basement
Doing this in my basement as we speak! Pulled down all the drop ceiling and removed all nails and screws. Thought of doing white but painter told me all spaces from floor boards would show so we are doing a medium dark grey ceiling and light grey walls. Gained so much height cant wait to finish! So many wires from cable, old phones, computer and more out of date stuff. Just be forewarned when you pull down ceilings.
I’m inspired and going to do this to my baseboards ceiling!!
Has anyone used dryfall paint?? Heard it’s best option. One coat, sticks to everything and done. Need a small sprayer. Any recommendations on sprayers?? Only need it for this project so don’t want to spend too much.
Do you still like the white or did it turn a yellowish color eventually? If you were to do it again would you go with white again?
I’m planning on painting my ceiling black. Would you say I should drywall and sand it down first and then paint the ceiling or paint the ceiling and then take care of the drywall and sanding?
In the process of buying a 1960s brick house outside of Atlanta. The garage opens up into an unfinished basement with low ceiling height (about 7′ in most places), this is exactly what i’m looking to do for my motorbike collection. Thanks!
Is it ok to paint everything in the ceiling? Wondering if this is a code violation thing? Painting black pipe for natural base ok? grounding wires ? Don’t want to get dinged when selling the house for any code violations. Paining electrical wires so you can’t tell what is 15 amp and what is 20 amp?
Thanks
Did you have a lot of exposed nails in your ceiling? Did you just paint over them? We are trying to decide between white and black paint. Many people say the white shows all the imperfections and the black hides them. I’m worried about the black making it too dark.
Hi Carly! I was wondering what did you end up picking? Black or white? I too have a lot of nails on my ceiling as well, and I really want to do this for my ceiling too, but can’t decide what to do about the nails? What did you do?
Hi! I loved your tips. I am writing about how we made over our basement space and I linked to this article in case people want tips to paint their ceiling. I ended up using a drop ceiling tile product/cover to go over my current system since I was too lazy to tear everything out and paint! Thanks for this info!
Did you do anything in particular with lights and conduit boxes? Cover them with plastic bags or paint them?
We moved in a year ago and the former owners painted the basement ceiling a flat black. It makes the space soooo dark. We have thought about repainting it a lighter color (most likely a light gray). What problems do you foresee.
Also, I have heard that you should paint the walls the same color. Why? I would like to paint the walls a lighter color than the ceiling. Again, what problems do you foresee?
Thanks
How did you end doing this. Did you paint over the insulation in the joists above the exterior walls
Thanks for the ideas and tips! Your work looks great.
I saw your post and article about painting a bare ceiling. The space I am considerng has plumbig pipes, vent piping, etc. Is it okay to paint pipes, etc?
Hello! HELP!!! Would you kindly give an update on this project. Have anyone come across a easier way to apply the multi-layers of paint? Also, is it ok to paint furnace, ducts, pipes and wiring without repercussions if you decide to sell the home in the future?
Where did you buy the lights? So beautiful