
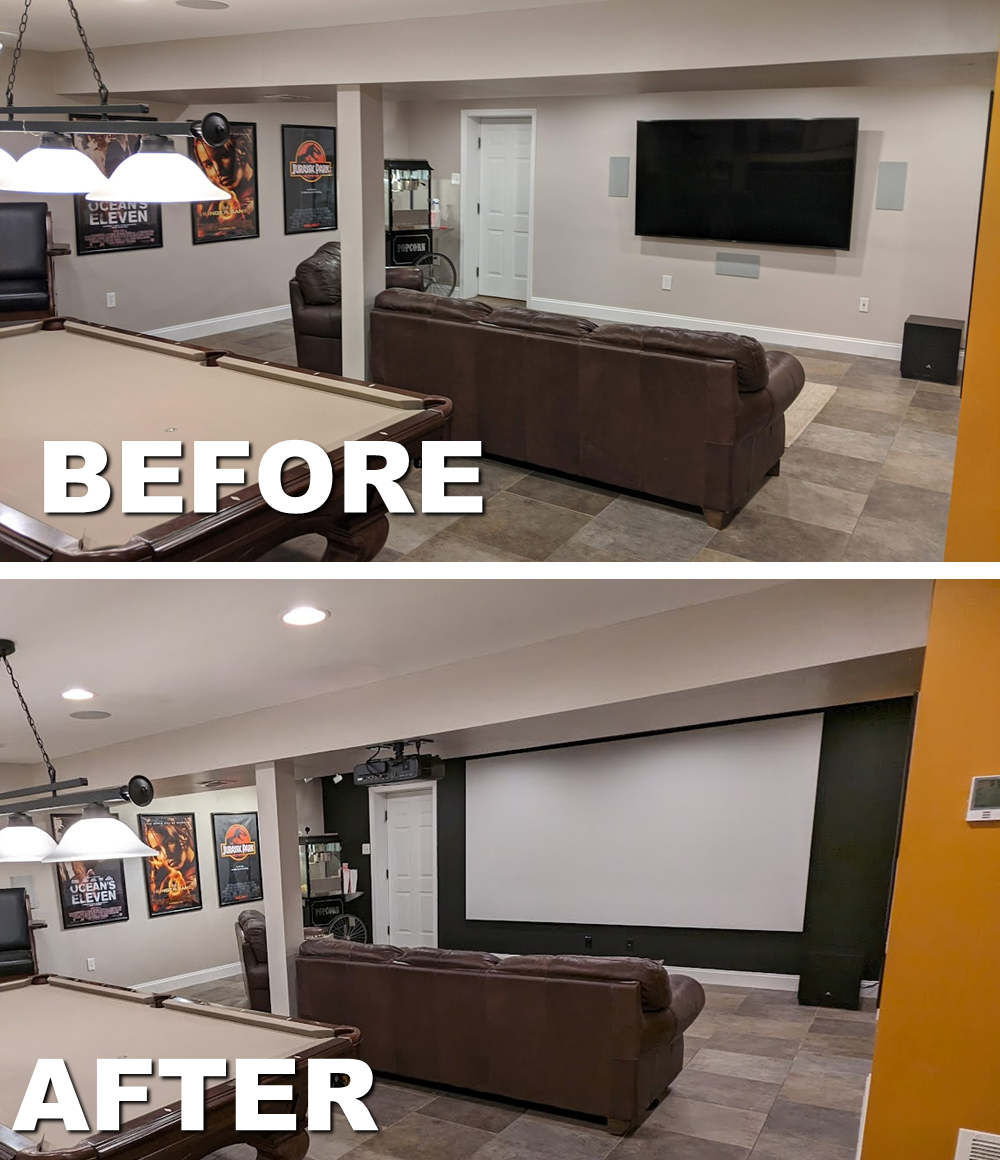
We recently upgraded the TV area of our basement family game room from an 85″ Sony 4K TV with a 5.1 surround sound system to a projector and 142″ screen with a 6.1.4 Dolby Atmos system. This project has been a journey because of the unique challenges our basement presents, including the lack of a dedicated home theater room, a large soffit/bulkhead that runs down the center of the space (limiting projector placement), and lighter-colored walls that make the space otherwise inviting but create reflections that tend to wash out projected images.
In this post, I cover the soup-to-nuts planning, design, and implementation process, how we selected the projector, screen, and speakers for our setup, and some initial performance reviews now that the system is running. My hope is that if you’re planning a home theater for your house — especially if it is in a shared space like ours — this post can help you along in the journey. I’m working on a few follow-up posts on specific aspects of the project and reviews of the equipment I used.
Basement Game Room Setup
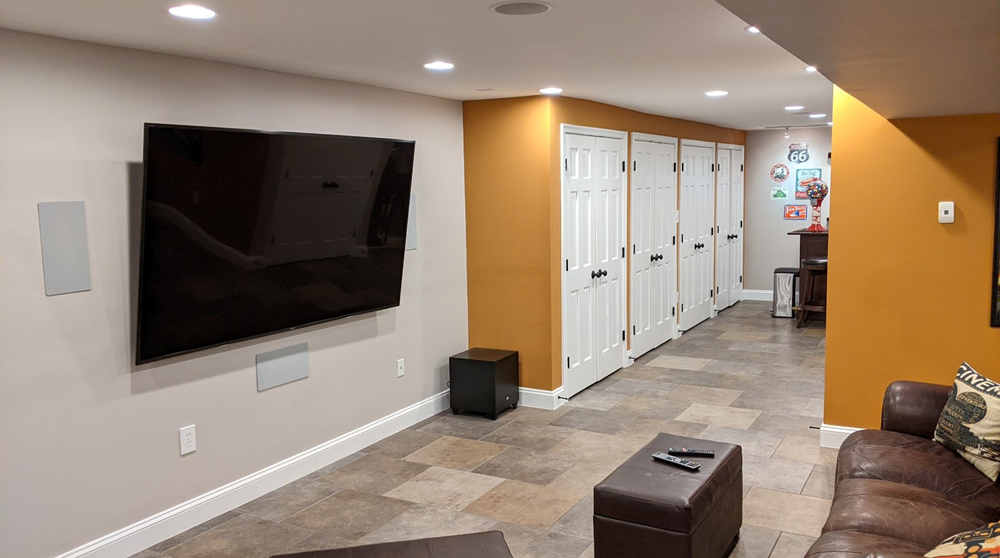
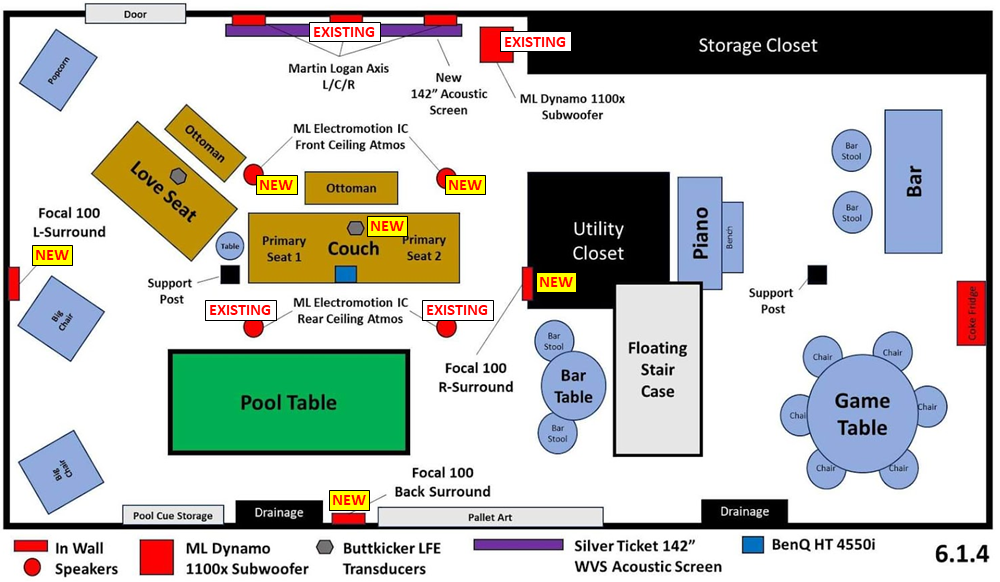
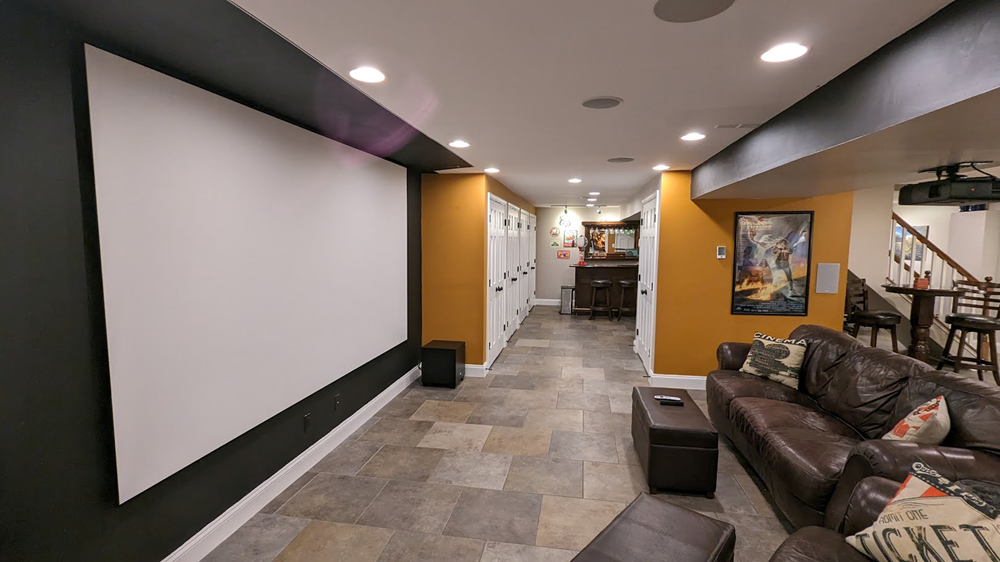
Our house is a traditional center hall colonial with a basement that we’ve roughly divided into four quadrants. Each quadrant has a separately-controlled radiant heated floor with a thermostat on the wall of the central utility closet. As you can see, we have a TV/Theater area, a pool table area, a game table area, and a piano/bar area, along with a long storage closet that runs along the back side of the house. The left-most side of that storage closet is where our A/V equipment (e.g., Receiver, 4K Blu-Ray Player, PS5) are stored out of site. Here’s the plan we created in PowerPoint for re-designing our space.

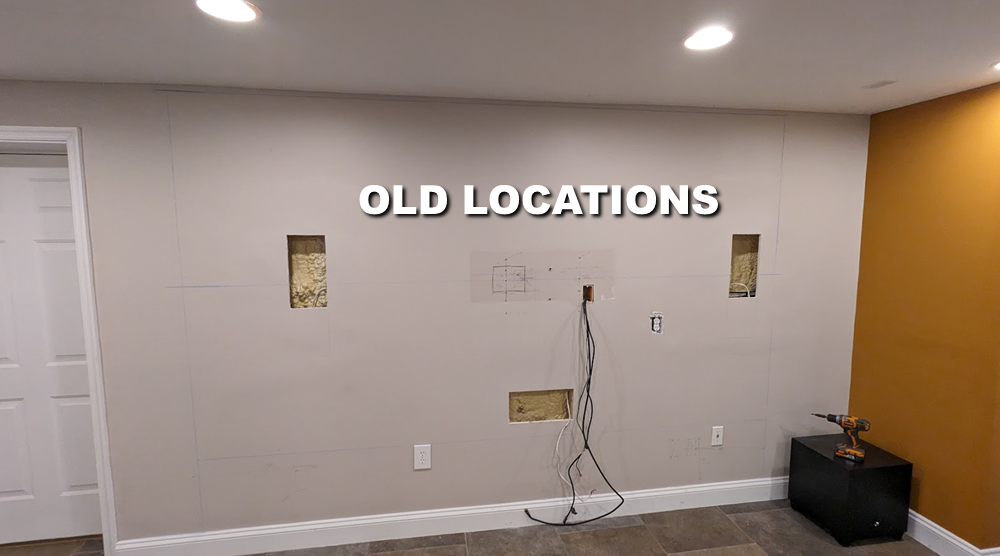
Our existing room setup (shown in the “before” picture above) included:
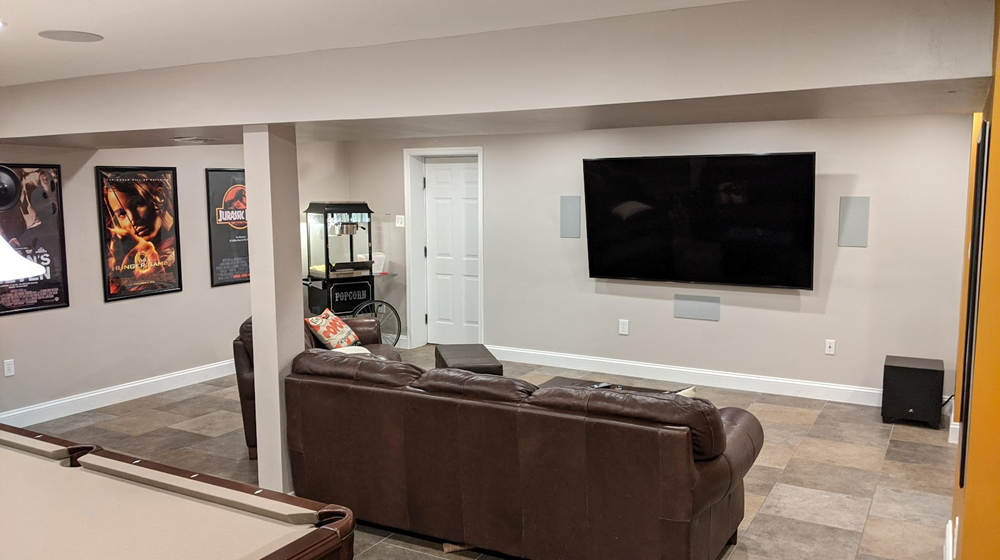
- A Sony 85″ TV
- A Marantz SR6014 Receiver Powering a 5.1 setup that included the following speakers:
- 3 Martin Logan Axis In-wall Speakers (Front Wall – Left, Center, and Right)
- 2 Martin Logan Electromotion IC In-Ceiling Speakers (Behind Couch)
- 1 Martin Logan Dynamo 1100x Subwoofer
Here’s a few pictures of the space with the 85″ TV before we got started on the upgrade:

Goals for the Project
Goal #1: Larger Screen. Of course, the primary goal of the project was to achieve a much larger and more immersive TV- and movie-watching experience. At the outset, we weren’t quite sure how large of a screen made sense for the space. Our couch sits about 11-1/2′ (138″) from the wall. Would a 120″ screen make sense or would that feel too big? What about 135″ or even 150″? I’ll cover more on that below, but ultimately, we landed at 142″ although from a strictly viewing-distance point of view, we could have gone even larger — even to 150″+ without an issue.
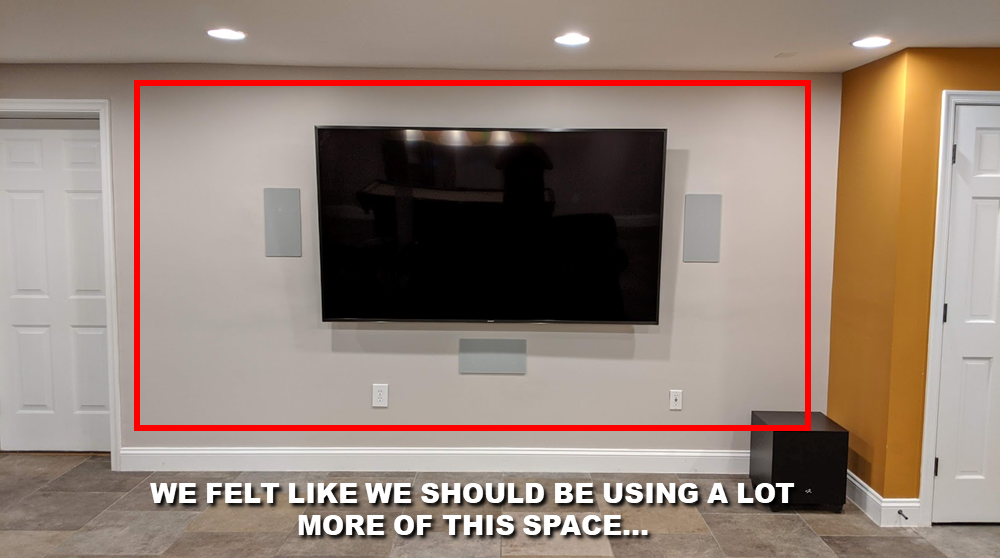
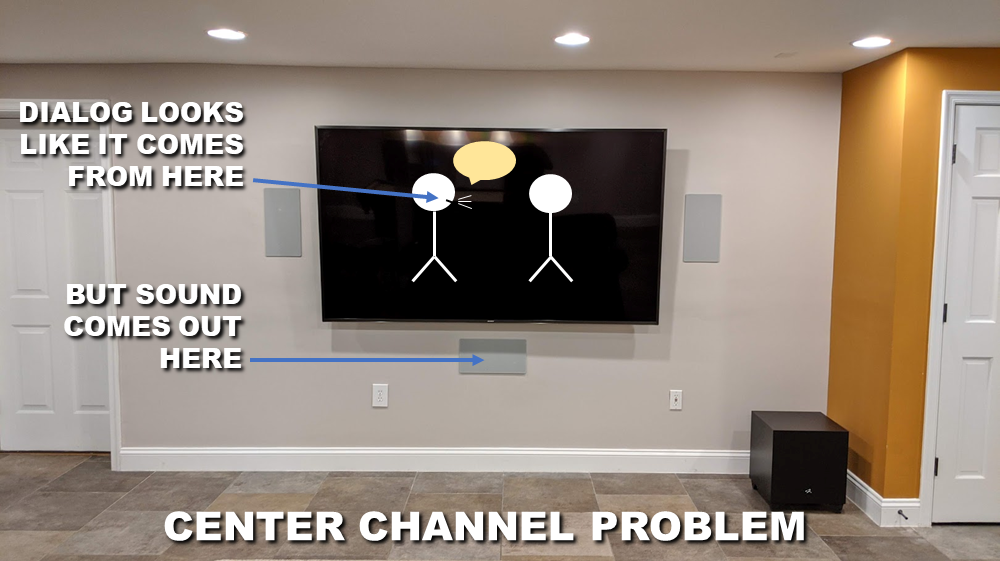
Goal #2, Improve Dialog: A secondary goal for the project was to solve a problem that has long irritated me about our current setup: center channel placement. When you have a large TV with any kind of surround sound system, the front center channel speaker (where most of voice track is played) must sit above or below the screen. An 85″ TV is a little over 40″ tall. If the mouth of a speaker falls around 30″ up on the screen, and your center channel is mounted 6-9″ below the screen (as in most set ups, including ours), it means that the sound of the speaker’s voice and the visual of their mouth are going to be disconnected by a whopping 3+ feet. I would always notice this when we watched TV or movies and it a little bit drove me nuts. Some people won’t be bothered by the visual-audio disconnect, and sometimes I could get lost in a film sufficiently that I forgot about it, but most of the time, it was a persistent irritant. So the secondary goal of this setup was to mount an acoustically transparent screen that allowed the center channel to be placed directly behind the screen, and therefore much closer to any on-screen speaker’s mouth.
Goal #3, Add Dolby Atmos: A third goal that emerged during planning was an upgrade of the sound system from 5.1 (meaning 5 speakers and 1 subwoofer) to at least 5.1.4 (meaning 5 ear-level speakers, 1 subwoofer, and 4 in-ceiling Dolby Atmos speakers). We ultimately ended up with 6.1.4, a somewhat unusual set up that isn’t widely recommended anymore but worked well for our space). This image shows what speakers we already had, and which ones we added. Note: Our Marantz SR6014 is capable of decoding 11 channels (+ 2 Subwoofers) and powering 9. Since we ended up with 10 decoded channels, (the “6” and “4” in 6.2.4) we had to route two channels through an external amplifier.
Goal #4, Don’t Make Anything Worse: And the final goal: ensure we’re actually upgrading from the 85″ TV and 5.1 setup. This may sound obvious, but one concern when moving from a TV to a projector is picture quality due to projector, screen, and room integration. One of the reasons I didn’t install a projector in the first place is because it’s a lot more work to select the projector and screen and make sure they’ll work for the space. In addition, non-dedicated rooms present challenges, like light reflection, that must be dealt with for the picture to look good. Ultimately, we didn’t want a washed-out looking picture.
Screen Size: How Big is Too Big?
If you Google screen size and viewing distance, you’ll quickly be presented with a number of viewing distance calculators (like this one, or this one) that will almost certainly undersize the screen for your space. The primary driver seems to be that for standard TV, calculators recommend a 30°-35° field of view; for mixed use: 35-40°; and for cinema: 40°-45°. Our setup delivers a whopping 48.3° field of view. With potentially one exception, it is not too big. I’ll get to that exception, and why I still think you should target a 48° to 50° field of view, after we discuss aspect ratios.
Aspect Ratios: 16:9, 2.40:1, or Something Else?
As you’re probably aware, video content can be delivered in a wide variety of aspect ratios. If you’re 40 or older like me, the format you grew up with was 4:3. Around the late 90s, concurrent with TV’s transition from analog to digital, the industry migrated to the now commonplace 16:9. Movies are often filmed in 2.35:1, 2.39:1, or 2.40:1 (sometimes called CinemaScope). On a regular TV, Cinemascope will leave you with those familiar black bars on the top and bottom of your screen. And still more formats are in use today, including a new 1.90:1 IMAX format that is in-between 16:9 and Cinemascope and will leave you with smaller black bars at the top of bottom of the screen. Top Gun Maverick streamed via Prime and a number of Disney+ movies offer this format.
So which to choose? Well, it’s going to depend on a few factors: what content you watch the most; what your selected projector will support; your wall size, and your viewing distance. There are even solutions that involve projectors with lens memory and motorized masking screens that will allow you to have the best of all worlds. For us, those options were out of budget.
So, we selected 16:9 (in my view the “easy button” for a few reasons: 1) We tend to use the projector for TV (40%), Gaming (40%) and Movies (20%). And, because of our room layout, our projector options were very limited. The one we landed on happened to support 16:9.
But What About That “Too Big” Comment?
So when is a 16:9 aspect, 142″ screen too big for an 11.5″ seating distance? The answer is with a few TV shows that use a lot of camera movement. An example would be certain HGTV programs, which use a lot of changing angles, zooming, panning etc. to keep you engaged in the show. With such a large screen, a lot of rapid panning and camera movement, especially with very bright content, can be a bit overwhelming.
But let’s talk about what absolutely DOES look amazing on the 142″ screen: everything else. Sitcoms, news programs, football, the olympics, most everything available on streaming services, and all types of movies are absolutely stunning at a near 50° field of view. And if you were to downsize your screen to make it suitable for the occasionally rapid-panning HGTV program, every other content format would suffer. So it’s a trade. In this case, I think the old adage is true: the bigger the better.
A Strategy for Testing Various Screen Sizes
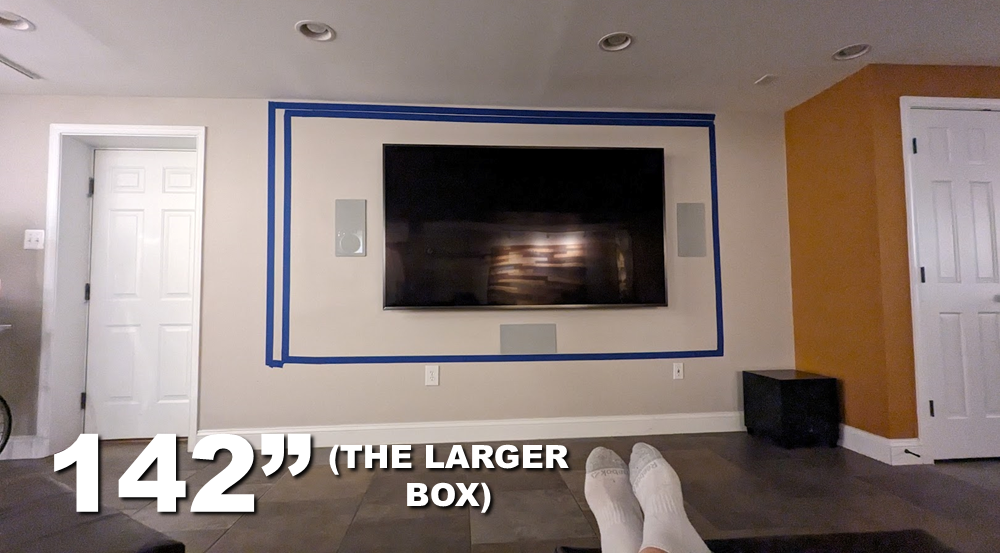
We started the project by using blue painter’s tape to mark out potential screen sizes around our existing setup and going slightly larger than the internet calculators recommended. I marked out 120″. At first, this larger space seemed really big. But as we sat with it for a few days, it seemed like we maybe could go larger.

Around this time, a friend invited me to the Home Theater Enthusiasts forum on Facebook. I shared my space, plans, and a picture of our space and I got almost universal feedback: go bigger. So we taped off 135″ and after sitting with that for a few days, it seemed much better.
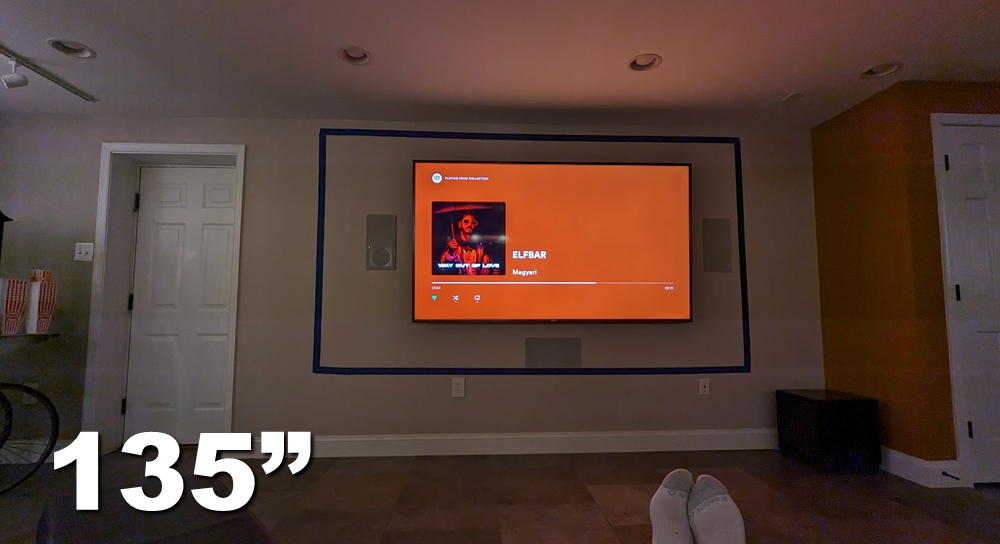
But then my son asked, could we go any bigger? I started looking around at screen options. Many screen manufacturers make a 120″, 135″ and 150″ screen. Unfortunately, the projector that seemed to work for our space could not be properly located in our room to throw a 150″ screen. But I did find that a popular screen manufacturer, Silver Ticket, made a thin bezel 142″ acoustic screen that was a possibility for our space. So we taped out 142″ and sure enough, it still looked great.
My recommendation if you’re thinking about screen size and worried about going too big, tape out various screen sizes on the wall and sit with them for a few days. Remember: if you install a 16:9 projector and you watch Cinemascope (2:35:1) content, you’re going to have a lot of screen real estate lost to black bars at the top and bottom.
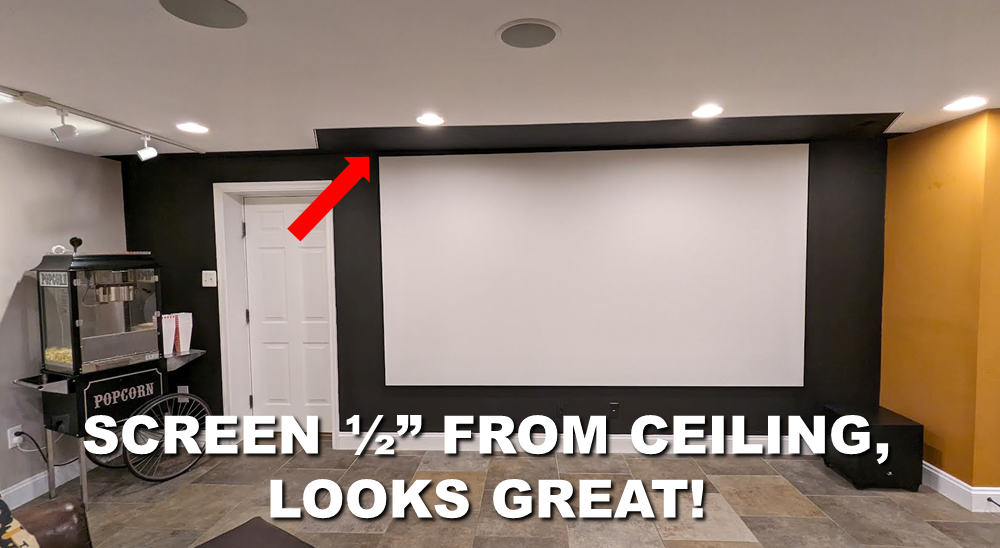
Can the Screen Touch the Ceiling in a Home Theater?
This question really concerned me when designing our space. We have 8′ ceilings and I didn’t know if it would look weird for the screen to be adjacent to the ceiling. The answer: it’s totally fine. You may have to deal with some light reflection issues off the ceiling that could impact contrast, but there is absolutely no drawback to watching a screen that is touching the ceiling and the light issues can be mitigated.
How to Select a Projector & The Throw Ratio Challenge
Selecting a projector is challenging. There are literally thousands of projectors for sale ranging in price from a few hundred dollars to $100,000 or more. They have wide variation in specs and it’s hard to figure out which one makes the most sense for a particular space. So how do you get started? Well, first things first, you need to understand the most important specification that makes projectors different from TVs: throw ratios.
The throw ratio of a projector is defined as: distance (from lens-to-screen) / screen size. So for example, if a projector has a throw ratio of 1.50x, it means that for the projector to throw a 142″ screen, the lens must be located 213″ (1.50x) back from the screen. For a throw ratio of 1.00x, a projector would need to be 142″ away to throw a 142″ screen. A projector whose widest throw ratio is 1.00 cannot throw a 142″ screen from 120″ no matter how you configure it.
So available throw ratios in your space create a major filter in the projector selection process. In our room, the back of the projector can sit no further than about 14’6″ from the screen. If it were to sit further back than that, it would be in the walkway that surrounds our pool table and tall people would hit their heads on it when playing pool. Since we knew we wanted at least a 135″ screen (and preferably a little larger) and the projector lens could sit no closer than 13’6″ from the screen, we were limited to projectors that with a throw ratio of 1.16x or less.
This shorter throw ratio, it turns out, dramatically limited our projector options. Many of the most recommended 4K home theater projectors have a minimum throw ratio of 1.35x or higher. This includes projectors like the JVC DLA-NP5, the Epson LS12000 and UB5050, and others. Here were the other important criteria we considered:
- Throw ratio of 1.16x or shorter
- Native 16:9 aspect ratio
- 4K (3840 × 2160) resolution
- Low input lag (<20ms) to support gaming
- An LED or laser light source (these last 5-6x longer than bulbs and do not dim nearly as fast if at all)
- High brightness (3000 ANSI lumens or higher)
- Lens shift capability that allowed for mounting in the right location to project the screen where it is located in our room
- Good reviews
The best resource on the internet for determining which projectors can work in your space is Projector Central’s Throw Ratio Calculator. Once you know the throw ratios that will work for your space, you can load them up into the calculator and have it spit out every projector that might work for you.
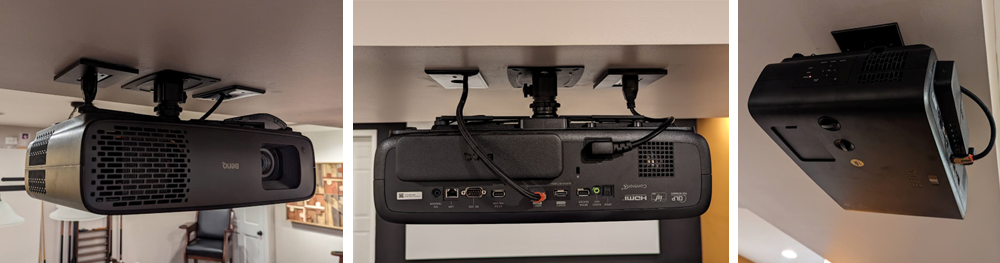
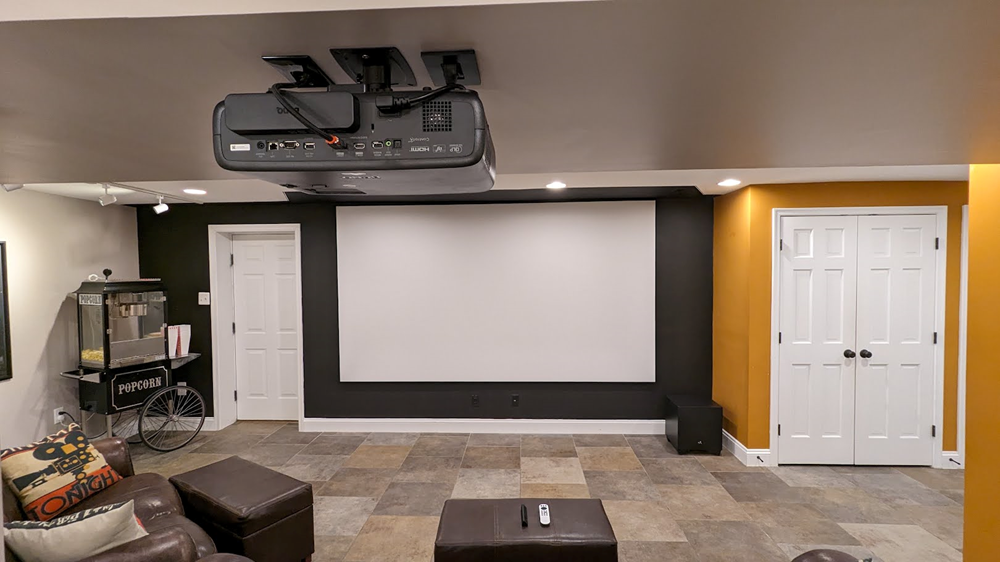
Our Projector: BenQ HT4550i 4K LED DLP Projector
After factoring in our other criteria, we backed into only one projector that met every one of our needs: the BenQ HT4550i. A detailed review of the BenQ HT4550i is forthcoming. I’ll link to it here when it’s posted! In brief, the BenQ HT4550i offered everything we needed for our particular space. Of course, it may not work for your space/needs, but if it does, we can wholeheartedly recommend this projector. It’s been great (with a few provisions we’ll share in the detailed review.)
How to Select a Screen for Your Space
Once you know your target screen size, and the projector that you want most for your space, I recommend buying the projector and having it delivered and setup before finalizing a screen choice. The reason for this is simple: with the projector in hand, you can order screen samples and actually project onto your wall (with the samples hung up) and decide which one looks the best for your space. As with projectors, there’s a lot of options out there for screens. Here’s the main options available when it comes to selecting a screen and some links to read more:
Fixed vs. Motorized: We knew we wanted a fixed screen for our setup. I would recommend motorized only if there is another purpose to the wall you’re using besides the home theater. Some folks may also choose motorized if the screen is in a formal (i.e., upstairs) living space and they want it to remain hidden much of the time.
Acoustic vs. Non-Acoustic: An acoustic screen acts as a window to sound, whereas non-acoustic screens do not. If you want to mount your speakers behind your screen, you’ll need an acoustic material. A secondary issue is how the acoustic capability is achieved: either by perforating the material or by using a woven fabric that is naturally acoustically transparent. Perforated screens can give rise to the Moire effect, but are available in a wider range of options.
White vs. Grey: Since the early 2000s most screen manufacturers are offering both white and grey screens. In general, white screens offer superior color reproduction and are appropriate for 100% light-controlled spaces. Grey screens will lower the black floor of a projected image and can be useful to obtain darker blacks in non-light controlled environments.
High Gain vs. Low Gain: High gain screens reflect more light back to the viewer, while lower gain screens reflect less. High-gain grey screens can offer lower black levels while still reflecting enough of the picture to show vibrant colors.
Ambient Light Rejecting (ALR) vs. Non-ALR: Some screens have physical properties that allow them to reflect light coming from a specific direction while rejecting most other light. ALR screens tend to have a narrower watching angle but can allow a projector to be used in a brighter environment. Note: Some ALR screens are specially-designed for Ultra-Short-Throw (UST) projectors, while others cannot be used with USTs.
Regular Bezel vs. Thin Bezel vs. No Bezel: This is exactly what it sounds like. Most screens have a 2-3″ black velvet bezel around them. Thin-Bezel screens have a much smaller bezel (often <.5″) and No Bezel screens have… no bezel at all.
There are a few more factors, but these are the most important. I can’t stress enough that trying screen material in your space with your projector is really important. So plan to buy the projector first, and then purchase screen samples.
Where to Order Screen Samples
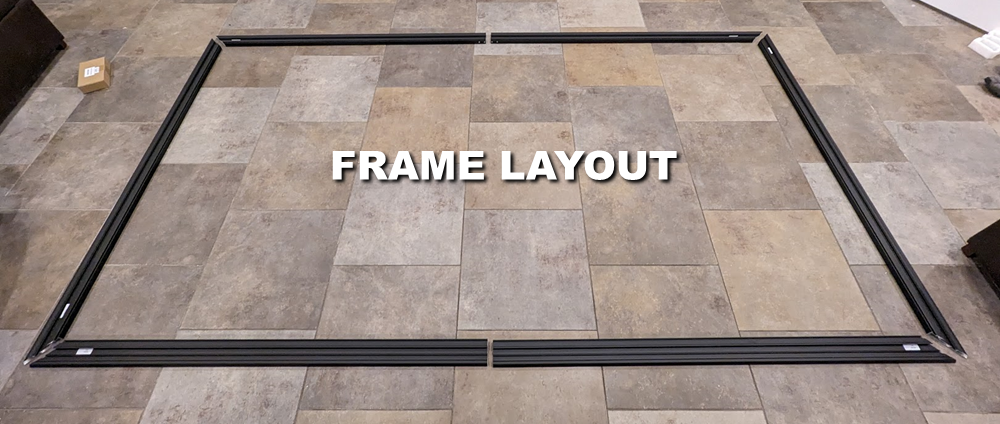
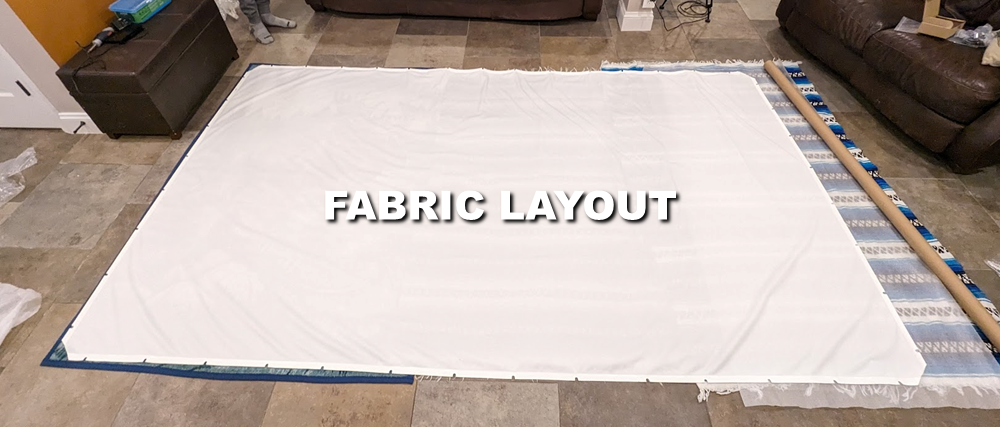
Our Screen: The Silver Ticket 142″ Thin Bezel WVS Acoustic Screen
Ultimately, we ended up choosing the Silver Ticket 142″ Thin Bezel Frame with ST’s WVS (Woven Acoustic) Material. It’s a white, 1.1 gain, non-ALR screen material that offers great color reproduction at a fraction of the cost of many other screens on the market. Our screen came in under $1,100 with shipping. It is a self-assembly item. It took us about 90 minutes to put together. The instructions were easy to follow, and I didn’t snap pictures through the whole assembly. Silver Ticket has a nice YouTube Video of the assembly process.


Audio Considerations & Dolby Atmos
I last upgraded our audio system in 2019 to a 5.1 setup with a fairly powerful receiver: a Marantz SR6014, which could decode 11 channels and power up to 9, even though we were only using it for 5.1 at the time. If you’ve followed audio at all, you know Dolby 5.1 surround sound has been around since the 1990s. Basically, the 5.1 means 5 speakers (Front Left, Front Center, Front Right, Surround Left, and Surround Right) and 1 subwoofer. After 5.1 came 6.1 (adding a single surround back speaker directly behind the primary listening position (PLP)), and then 7.1 (splitting that surround back into 2 separate channels), then 5.2/7.2 (adding an additional subwoofer), and so-on.
In the 2012 timeframe, Dolby released an entirely new specification called Dolby Atmos. The new specification decoupled the actual speakers in the room from underlying logical “objects” in a dome-shape around the listener, leaving it to the receiver to map the objects to the speakers in the set up. Atmos also gave rise to the addition of new height/ceiling channels that could augment the bed-layer channels. There are a wide range of possible speaker setups with Dolby Atmos, but the most recommended we’ve seen is 7.2.4 (7 ear-level channels, 2 subwoofers, and 4 ceiling channels – two in front of the PLP and two behind it.) I’ve heard of set-ups as crazy as 9.6.9.
Based on recommendations from my newly acquired forum buddies, I decided to pursue a Dolby Atmos setup for our space with a goal of expanding our 5.1 to 7.1.4 or 7.2.4 depending on whether I wanted to install the additional subwoofer. Ultimately, I decided that two surround back channels really didn’t work in our space, and landed on 6.2.4 with the following configuration:
- 6 bed-layer speaker: Front Left, Front Center, Front Right, Surround Left, Surround Right, Surround Back
- 1 Subwoofer and 1 Low Frequency Effects Transducer (runs on the second subwoofer channel).
- 4 In-ceiling speakers (called Atmos speakers by most folks).
Repurposing My Existing Speakers
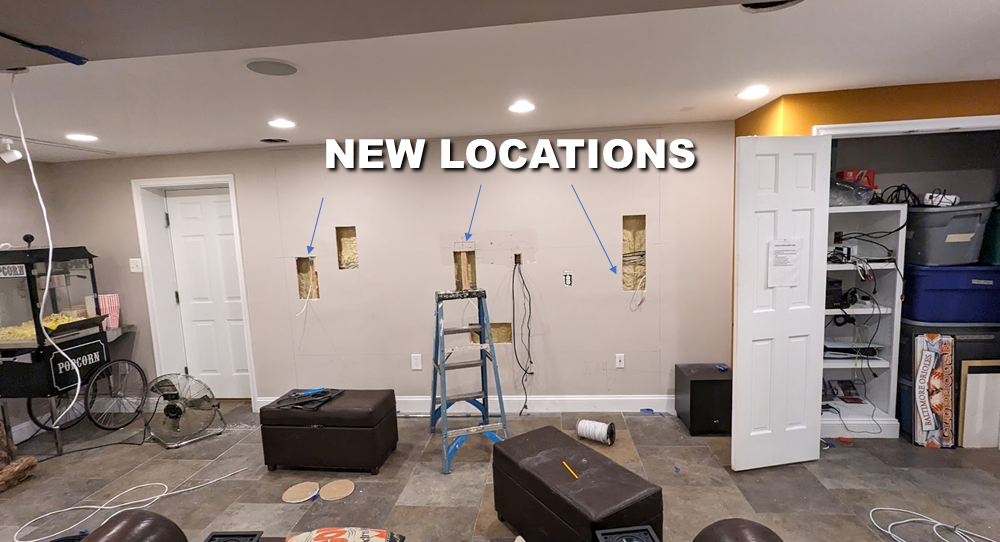
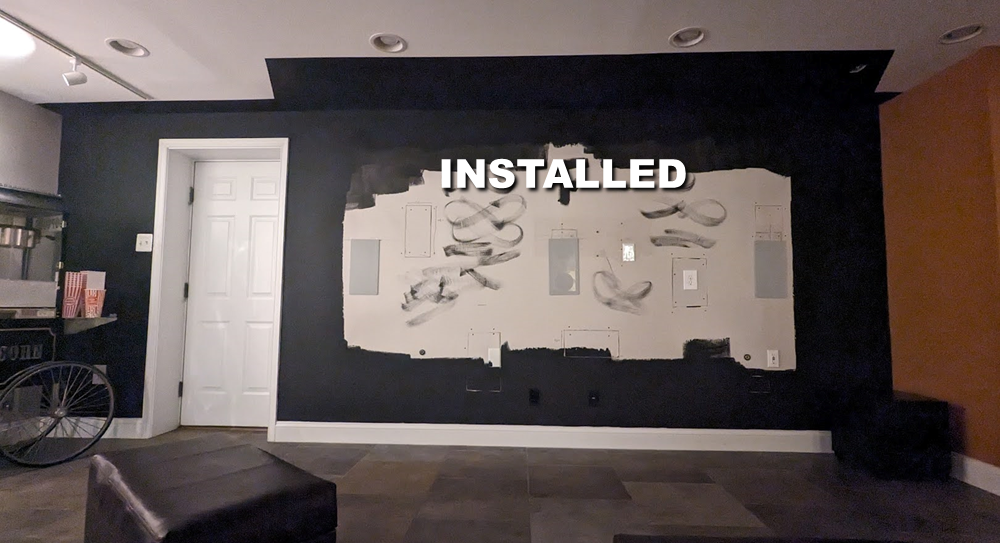
Front Sound Stage: With the new, wider acoustic screen, we set about to re-arrange our front sound stage to put the L/C/R in-line across the front of the room. This required some relatively easy (but tedious) drywall work. Fortunately, with the screen hanging in front of the speakers, there was no need to do a lot of finish work.
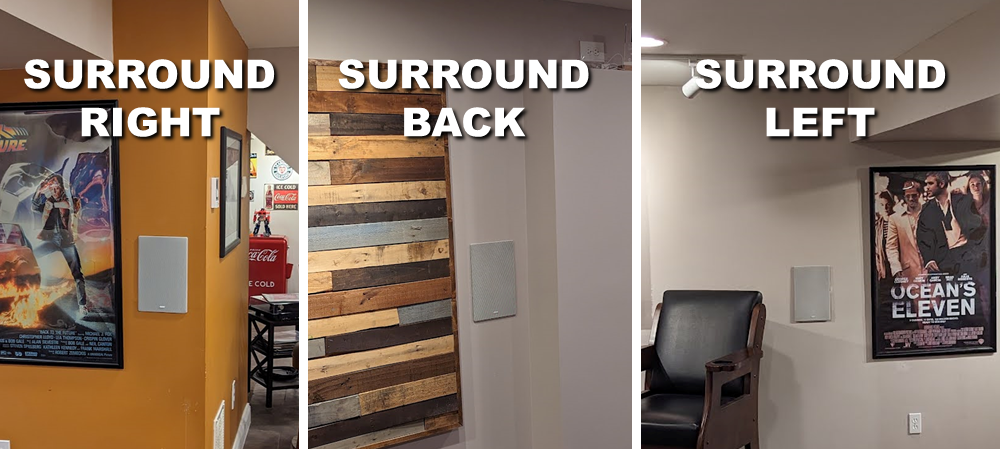
Surrounds: In the old 5.1 system we had been using two Martin Logan in-ceiling speakers as the surround-left and surround-right channels. Technically, in-ceiling isn’t the best setup for 5.1, as all five speakers should ideally be located at ear level; however, many people use ceiling speakers for the rears when placement otherwise is not ideal. We repurposed those for Dolby Atmos speakers (see below). That left us needing new surround speakers at ear-level. We selected Focal 100 In-wall Speakers for our surround-left, surround-back, and surround-right. We chose to use a single surround back channel (instead of surround back-left and surround back-right) because with our existing artwork we couldn’t mount two speakers, but had a nice space where one would fit. Here’s our surrounds:
Dolby Atmos Speakers:
As mentioned, we re-purposed two in-ceiling Martin Logan Electromotion IC speakers that had been used as the L/R Surrounds for Atmos Ceiling Rear speakers. I was able to find two additional ceiling speakers to add in the Atmos Ceiling Front Speakers. Each of these ML Electromotion speakers has a built-in tweeter and woofer that can be aimed at the primarily listening position.

Pictures of the Finished Room
Here’s a few pictures of the Home Theater in Action! You’ll have to just trust us that it sounds amazing!

Pictures of the Home Theater In Action
Here’s a few pictures of the BenQ HT4550i in action!


Performance Review
I’ll have more to say in individual reviews of the projector and screen. But suffice it to say, this setup is absolutely awesome. A 142″ screen is 179% larger than an 85″ TV. In fact, it’s equivalent to four 71″ TVs arranged corner-to-corner, meaning a classic 4-player game of Mario Kart gives each player their own 71″ screen to play on!
We have zero regrets about this upgrade. It’s truly a much better TV- and movie-watching experience vs. the standard 85″ TV. We use it all the time, having logged a few hundred hours on the projector already after just 2 months of having the system installed!
Questions & Comments
I certainly hope this helps you out! Stay tuned for a few follow-up articles on the screen and the projector itself.
Howdy Friends! It’s been a while since we’ve gotten a review out, but we’re back today! Two weeks ago Lowe’s shipped us their new KOBALT 80v Max, 21″ Brushless Lithium Ion Push Mower for test and review. This is our first time using one of these latest generation, high voltage, extended-life mowers that have become very popular over the last two years. While Lowe’s provided this tool for free, they are not compensating us for this review and these thoughts are entirely my own.

Key Features of the KOBALT 80v Max Push Mower
Let’s get started with the key features of this mower:
- 21″ cutting deck – comparable to most small gas mowers on the market
- Three modes for handling clippings (bag, mulch, or throw)
- 7-level adjustable deck height w/ easy adjust lever
- 80v Max Battery w/ up to 80 minutes runtime and smart battery management
- Comes in standard push design as well as a self-propelled version (for an additional $100).
- Eliminates the need for gas and oil as well as oil changes.
Here’s my impressions of the mower, starting with right out of the box!
It’s Easy To Setup!
One thing we loved above the mower right from the start is the super-easy setup. Basically take it out of the box, straighten up the handle, charge the battery, configure it for either bagging, mulching, or throwing, and you’re ready to go. As you are probably aware, bagging grass isn’t great from an environmental perspective nor for lawn health. (We follow the old adage, “cut it high and let it lie”. This, along with other lawn care steps, provides optimal lawn health). My sons rotate through our lawn duty and were super excited to try this mower.

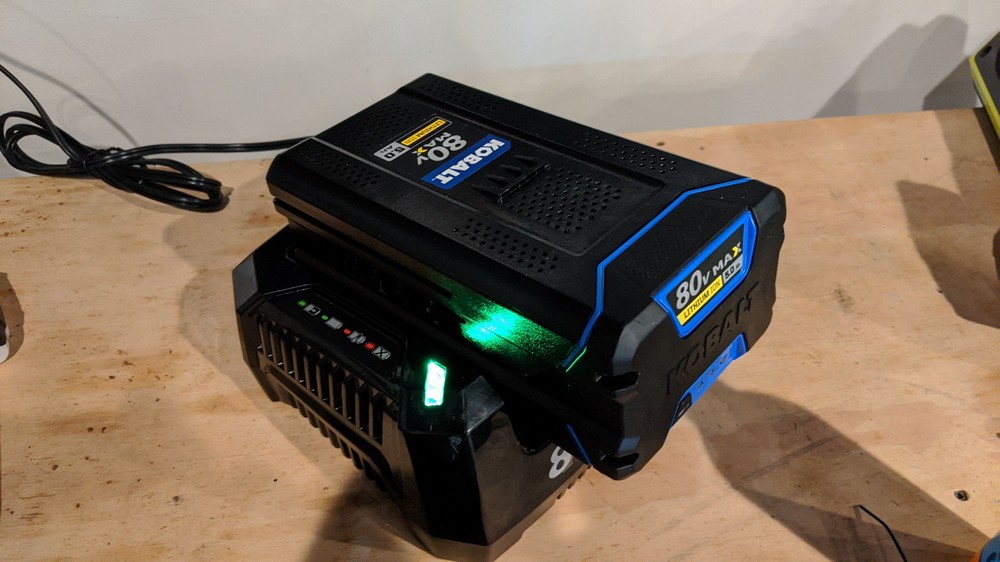
Battery Life is Good Enough for Our 1/4 Acre of Lawn
The single most important question we ask when we’re considering a battery-powered lawnmower is, How long will the battery last? Lowe’s says you get up to 80 minutes of runtime with this lawnmower. We’ve used the mower twice now to cut our lawn (each time removing approximately 3″-5″ of grass height), and it has been able to complete our quarter-acre yard without stopping in about an hour, leaving just 1 bar (out of 4) on the battery remaining. Given that we were down to 1 bar after a 1/4 acre, we suspect you’d need two batteries for anything larger than about one-third of an acre.

Battery Charge Time Is Just Over an Hour
A full charge requires an hour and fifteen minutes, but you can get over half charged in about 30 minutes. Still, this is probably a little too long for most people if you’re trying to use the same battery twice for one job. If you spring for the second battery (a fairly pricey option — see the price section below), you’ll get virtually uninterrupted mowing since the charge time is about the same as the run time.
Here’s a picture of the battery on the included charger.
7-Level Adjustable Deck Height
One really nice feature about the KOBALT is the ease of deck height adjustment. The mower has 7 settings (ranging from 1-3/8″ to 3-3/4″). Instead of needing to adjust height on each of the 4 wheels, you pull one lever (and it’s easy to move) and the entire mower adjusts. You can see the lever over the rear right wheel here.

Solid Mowing Performance
So far, the mower has performed great for us! We’re super pleased to finally be off of gasoline and the associated hassles of engine maintenance, oil, and regularly hauling gas cans to/from the gas station. We usually cut our grass when it’s 3-5″ higher than we like it – so the KOBALT is removing a fair amount of grass height for us.
Very Low Maintenance
It probably goes without saying, but the best part of owning a battery-powered mower is the elimination of gas and oil from the setup. No more trips to the gas station with gas cans is a really nice thing. The only regular maintenance this mower requires is blade sharpening, which you should be doing on your gas mowers anyway, but which is more important on this mower since dull blades can negatively affect battery life. If you’ve never sharpened a mower blade, it’s simple and you can follow that link for tips.
Price & Recommendation
The KOBALT 80v Max Mower comes in two varieties, the standard push mower (shown in this article) which retails for $499, and a self-propelled version of $599. Here’s the links for both.
You can also purchase the mower without a battery or charger (currently $329 for this option which makes sense if you have other KOBALT tools already)
Perhaps the biggest drawback of all these large battery tools is the price of extra batteries. A second 6.0Ah 80v Max battery runs a whopping $229. We know there’s a lot of technology that goes into these batteries and we are hopeful that prices will come down on them. That said, this battery replaces hundreds of gallons of gas you’d otherwise have to buy, so in that sense the pricing isn’t insane.
After just two rounds of mowing with the KOBALT we can definitely say it’s a huge improvement over our gas mower. The major pluses are elimination of the need to keep gas on hand and the instant-on nature of the mower (no gas means no choke/start-up activities). We recommend this mower to anyone looking to cut out the gasoline.
Thank you so much for joining us at One Project Closer for this Snow Blower Help trouble-shooting guide on How to fix a snowblower that won’t start. This post is sponsored by the Home Depot Prospective Campaign. Post may also contain affiliate links. Opinions (and typos) are 100% our own, and we appreciate you supporting our site in order to continue to provide free content to our readers.

It’s a frustrating thing… to have a snowblower and not be able to use it. If you’re in this situation, there is hope… Here’s some things to check.
Snowblower Start-up Maintenance

Check for Bad Gas – Many people don’t add stabilizer at the end of the season and the gas goes stale / collects moisture. If you’re in this situation, the solution is to drain the gas tank, and refill it with new gas. Manufacturers recommend filling the tank with new fuel and adding stabilizer prior to storage. This will maintain freshness for about 9 – 12 months. It used to be the case that draining the tank was the best method for storage. However, due to the ethanol fuel blends, this has changed.
Check that the Gas/Oil Mixture is Correct – If you have a two-stroke snow blower, you need to be sure the gas/oil mixture is correct. Our Toro snowblower takes a 50:1 mixture. Other blowers will take 40:1 or 30:1. Check the owner’s manual. Most 2-stroke oil cans will give you instructions to get the proper mix.
Make Sure You’re Using the Electric Start Option – Most mid-to-high end snow blowers come with an electric starter and a pull starter. The only time you should use the pull starter is if the snow blower has already been running and you’ve turned it off briefly to clean it or add gas.
Check the Choke – Just like a riding lawn mower or gas string trimmer, you may need to choke the engine increasing the fuel to air ratio. There’s usually a slide lever somewhere on the blower used to control the choke level.
Prime the Engine – Most snow blowers have a primer button on them to prime the engine. This is very important, particularly if you previously ran the lawnmower out of gas. Priming the engine moves fuel through the fuel lines and into the carburetor. Our Toro snowblower recommends pressing the primer button twice. We’ve found it actually requires more like 8-10 pumps to get going. Be careful not to over-prime, however, since it can flood the engine. Prime the least number of times required to get it started.
Check the Throttle – For starting, the throttle should be set to full-open to get the most amount of fuel flowing to the engine. Some snowblowers have throttle control, and will usually indicate the ‘start’ position on the throttle selection lever.
Check the Blades for Lock-up – Ensure that the blades can move freely. Make sure the snow blower is off and disconnected from power, then check whether the blades can be moved by hand. When in neutral, locked blades shouldn’t prevent a lawn mower from starting, so this is rare.
While you’ve outside fixing your snowblower in the cold, be sure to bring your Ridgid 18V Heated Jacket with removable hood. I love this jacket for working in the snow. It has three heat settings and three different zones, so as you get working and warmed up, you can reduce the heat or target where you are still cold. might be a great holiday gift for that special person in your life (or yourself)!

Snowblower Engine Checks
If you’ve made it this far in the list and you still aren’t getting it started, it could be something a little more complex. Consult the owner’s manual for assistance with these.
Check/Replace the Spark Plug – You should be able to find a replacement spark plug at the local big box.
Check/Replace the Fuel Filter – Some snow blowers will have a small fuel filter on the fuel line. This can become clogged over time and constrict fuel flow to such a great extent that it won’t run.
Check/Replace the Engine Air Filter – If the snow blower has a dirty engine air filter, it can degrade performance. We’ve never seen an air filter prevent a snow blower from starting, but it’s still something to check.
Check/Clean the Carburetor – If you let untreated fuel sit in the snowblower from last season, there’s a chance the carburetor needs to be cleaned. The carburetor may be gummed up or rusted due to moisture. The number one problem for small engines (like on a snowblower) is problems with a restricted carburetor.

(photo: joebeone)
P.S. Our friends over at Charles and Hudson give us some more Blizzard Preparation Tips … worth a read on a cold Winter day.
This post was sponsored by The Home Depot.
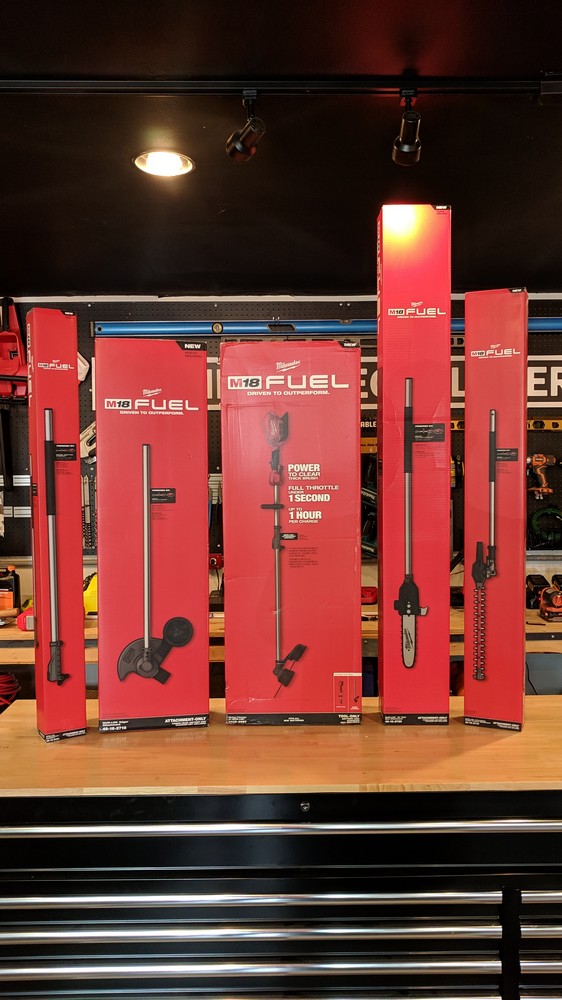
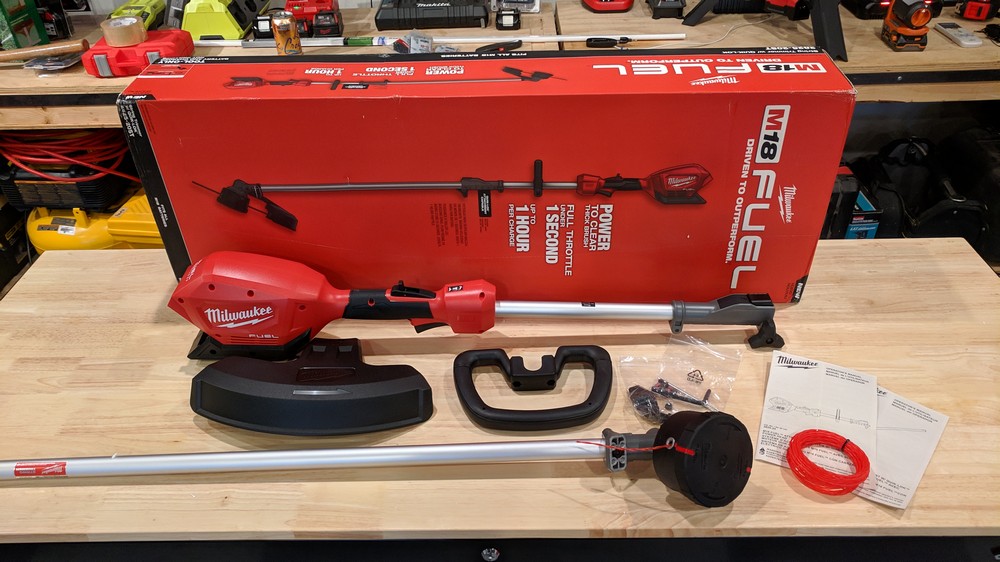
Spring is just getting started here in Maryland (finally!) and with it comes our annual spring garden and lawn prep activities. As I write this post, Kim and our kids are out front mulching the gardens and getting a head start on planting. But before all that, this morning we finally had a chance to break out a brand new set of Milwaukee yard tools that have been sitting in the workshop for the last two months waiting for warmer weather: the new-for-this-year Milwaukee M18 FUEL Battery-powered Quik-Lok 4-in-1 Outdoor Lawn and Landscape Tool Set!
Why are we so excited about Milwaukee’s new offering? Well, I’ve been long-tired of having to keep gas and oil mixture on hand (in all different ratios) for the wide variety of power tools we use, but the truth is that until recently, battery-powered lawn tools have been a substandard choice due to their complete lack of power and run-time. My kids have been using an old Black-and-Decker string trimmer for years with 1.5Ah batteries, but we’ve always kept a gas version on hand for tougher jobs or when they’re mowing lawns in the neighborhood. The battery-powered tool needs 4 batteries to complete the edging on our 1/2 acre lawn and is more suited to occasional use around a postage stamp of a lawn.
Milwaukee’s new M18 FUEL 9.0 and 12.0Ah batteries represent a generational leap in power and run-time that opens up all new possibilities for battery-powered tools.
What’s in the Kit?
Milwaukee’s new Quik-Lok line-up offers four tools: a string trimmer, edger, pole chainsaw, and pivoting hedge trimmers. They also sell a 3-foot extension pole that brings the total length of the tool to a whopping 10 feet. We’ll walk through each of the tools including our impressions below.
Getting Started: Home Depot sells the motor base, 9.0Ah battery, charger, and string trimmer as the starter kit for this group of tools.
Up First: The M18 QUIK-LOK String Trimmer
Right out of the box the string trimmer requires very little assembly. You need to put the handle on the base (screws and a small hex wrench provided), but otherwise, Milwaukee even gives you a pre-filled spool of string loaded on the trimmer to get started.
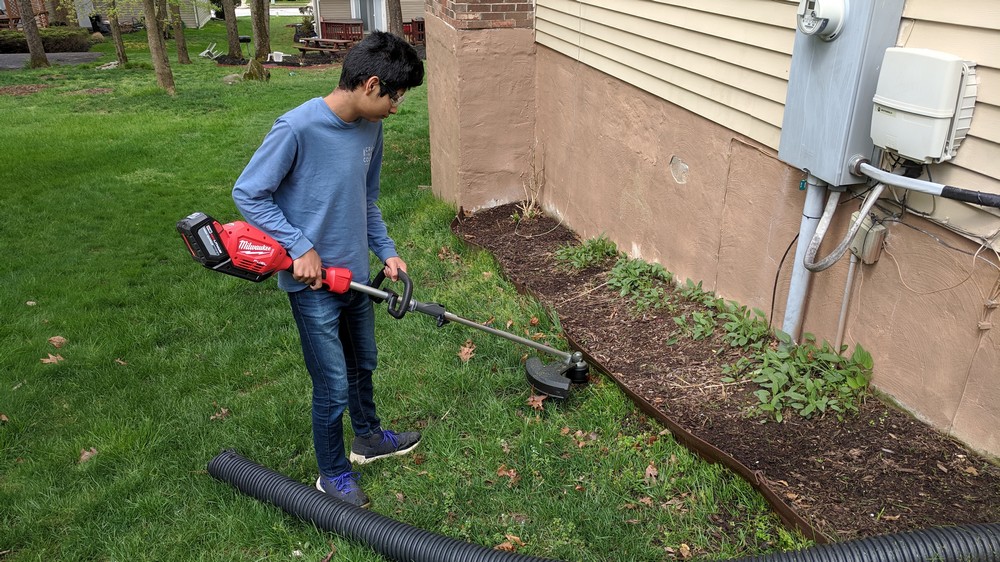
After I ran the trimmer around a bit, my son Jose was excited to give this tool a try. They are super excited to not have to manage gas this summer for the lawn-cutting business and also to be able to cut a whole lawn with one battery.
Impressions: the string trimmer drives as strong as a lightweight gas trimmer and definitely feels comparable to a gas trimmer as opposed to the ultralight electric models that have been on the market for years. This trimmer is a major leap forward in string trimmer technology and will be a welcome addition to our stable of tools.

The tool has a decent weight balance with the battery installed.
Second: The M18 QUIK-LOK Edging Tool
Impressions: The edger attachment for the M18 provides a stabilizing wheel and metal blade for edging along sidewalks and curbs. We love that we can own this tool without needing either a different gas mix nor another engine base. The edger attachment is lightweight and easy to connect. Jose ran the edger along our sidewalk, where previously we had just used a string trimmer, and he was definitely impressed the edge the tool created.

As you can see, the edger creates a nice clean line against the sidewalk.

Third: The M18 QUIK-LOK Pole Chainsaw
Next up we tested out the pole chainsaw on a few low limbs on trees in our back yard. We used the pole saw with the 3′ extension which allowed us to reach branches 9-10 feet off the ground. The saw had no trouble going right through the branches.
The pole saw is the only tool in the group that requires one extra step — adding bar and chain oil to the reservoir on the saw to keep the chain lubricated while cutting.
Impressions: The saw made quick work of branches from 1″ to 3″ in our testing.


And Finally: The M18 QUIK-LOK Hedge Trimmers
This is the one attachment for this tool we don’t see ourselves using on a regular basis, mainly because we don’t have particularly large hedges and we already have a set of battery-powered trimmers. The very neat this about these trimmers is that the head can rotate nearly 360 degrees, enabling you to cut the top of a hedge taller than you are (and potentially eliminating the need for a ladder). We gave them a quick try-out, but honestly our hedges were already trimmed last fall.
Here’s a picture of Bear demonstrating that their a little unwieldy for up-close work!
Impressions: A really great tool for someone with tall hedges.

Prices, Overall Impressions, and Where to Buy
The one area where we know our readers will have concerns is on price. For the entire kit you’ve seen here you will be well north of $800. That’s a hefty sum, for sure. The big breakthrough with these tools is a battery-powered system that finally performs as well as gas (and it really does!).
To a degree they are for early adopters or those serious about saving the time associated with not buying and maintaining gas tools. Here’s the links for all of them, available at The Home Depot:
- Base Kit (Base, String Trimmer, Battery, Charger) $329: M18 FUEL 18-Volt Lithium-Ion Brushless Cordless String Trimmer with QUIK-LOK Attachment Capability and 9.0 Ah Battery
- Extension Pole $54: M18 FUEL 3 ft. Extension Attachment for Milwaukee QUIK-LOK Attachment System
- Pole Chainsaw Attachment $164: M18 FUEL QUIK-LOK 10 in. Pole Saw Attachment (Tool Only)
- Hedge Trimmer Attachment $173: M18 FUEL Hedge Trimmer Attachment for Milwaukee QUIK-LOK Attachment System
- Edger Attachment $119: M18 FUEL Hedge Trimmer Attachment for Milwaukee QUIK-LOK Attachment System
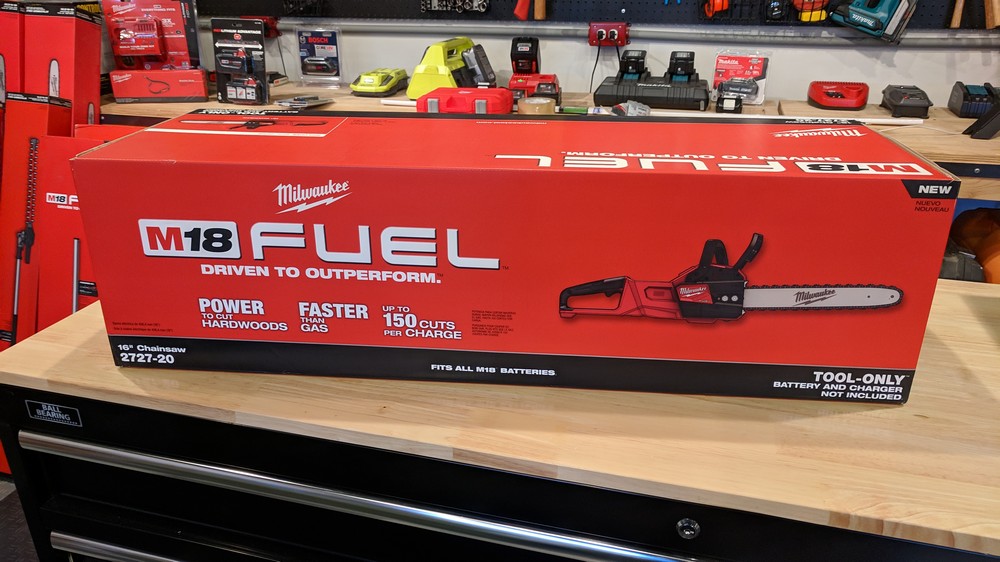
Today we’re taking a look at the Milwaukee M18 FUEL 16″ Chainsaw powered by Milwaukee’s new high capacity 9.0Ah or 12.0Ah batteries.

Stuff Lawyers Made Us Say: We’re are continuing our partnership with The Home Depot to provide candid reviews of tools from a wide variety of manufacturers. The Home Depot is both providing the tools for free and compensating us; however, the opinions we express here are our own. Remember, we’ll always be up-front with you when we’re receiving a free product, compensation, or both. And of course, we always strive for objectivity in our reviews.
Is a Battery-Powered Chainsaw a Tool, or just a Toy?
It wasn’t long ago when a battery-powered chainsaw seemed like a non-starter. There was simply no way to obtain enough power or run time from a reasonably sized battery to make a battery powered unit a serious option for anything other than incidental use. In the last 5 years, though, battery technology has experienced many incremental improvements. Milwaukee’s new high output 12.0Ah RED LITHIUM batteries make this chainsaw not only a real tool, but a contender for folks who use a chainsaw on a daily basis.
What Comes in the Box?
Milwaukee sells the M18 FUEL 16″ Chainsaw as both a kit and a bare tool. The kit comes with the chainsaw, high output 12.0Ah battery, and charger for $449. The bare tool comes only with the chainsaw for $299. The only thing neither comes with that you’ll need to use the chainsaw is bar and chain oil, which is a few bucks at your local Home Depot.
Performance Review – We Try Out the Milwaukee M18 FUEL Chainsaw
Test #1: We first tested the Milwaukee Chainsaw equipped with 12.0Ah battery by cutting discs off a 6″ diameter log in our shop. The chainsaw went through a whopping 83 discs before we ran out of log to cut! The 12.0Ah battery was still reporting 2 bars (out of 4) remaining when we finished. Milwaukee says the M18 chainsaw can provide “up to 150 cuts per charge” on the 12.0Ah battery. Given our experience on a 6″ diameter log, we think their claim is reasonable.

Test #2: Next, Aaron and I compared the Milwaukee chainsaw against our tried-and-true Stihl gas-powered 30cc chainsaw. In this test, Aaron and I raced to see who could cut 6 discs off a log fastest. We YouTube’d that portion of the review and you can see it by clicking the picture below. Spoiler: The Milwaukee proves a bit faster at this task due to not needing to be started.

Test #3: For our third test, we used the Milwaukee to cut down downed trees in the forest by our house. Again, the Milwaukee performed great, easily slicing up downed tree limbs in quick fashion.

Battery Power vs. Gas Power
The clearest advantage of a battery-powered chainsaw is the elimination of the cost and time associated with obtaining, preparing, and storing gas/oil mixture for the saw. This makes the Milwaukee a clear winner for occasional users who don’t want to have to keep a separate fuel mixture in their shed. The battery powered saw also doesn’t require multiple pulls to start. Simply pop in the battery and it starts instantly, every time.
There are a few drawbacks to battery power, though: the saw isn’t as powerful as the most powerful gas chainsaws on the market. If you are regularly cutting multiple 12″ discs (or more), a high-cc gas-powered chainsaw will serve you better. Also, if the battery runs out, you can’t simply pour more gas in the chainsaw, you’ll need to wait for the battery to charge, or own multiple batteries you can swap-out.
Who’s the Chainsaw Right For?
The Milwaukee M18 FUEL Chainsaw is right for DIYers, Tradesmen, and landscaping companies with low-to-moderate chainsaw use requirements – including clearing the occasional small tree or brush from a property, pruning branches, etc. The saw will also work for those using a chainsaw all day, but expect to buy several high output batteries and a multi-charger for those batteries.
Price and Where to Buy
Milwaukee’s chainsaw as well as spare batteries are available at the following links from The Home Depot:
- Milwaukee M18 FUEL 16″ Chainsaw (bare tool) – $299
- Milwaukee M18 FUEL 16″ Chainsaw (kit w/ 12.0 Ah Battery) – $449
- Two 12.0Ah Batteries + Charger Kit – $249
This post was sponsored by The Home Depot and includes affiliate links.
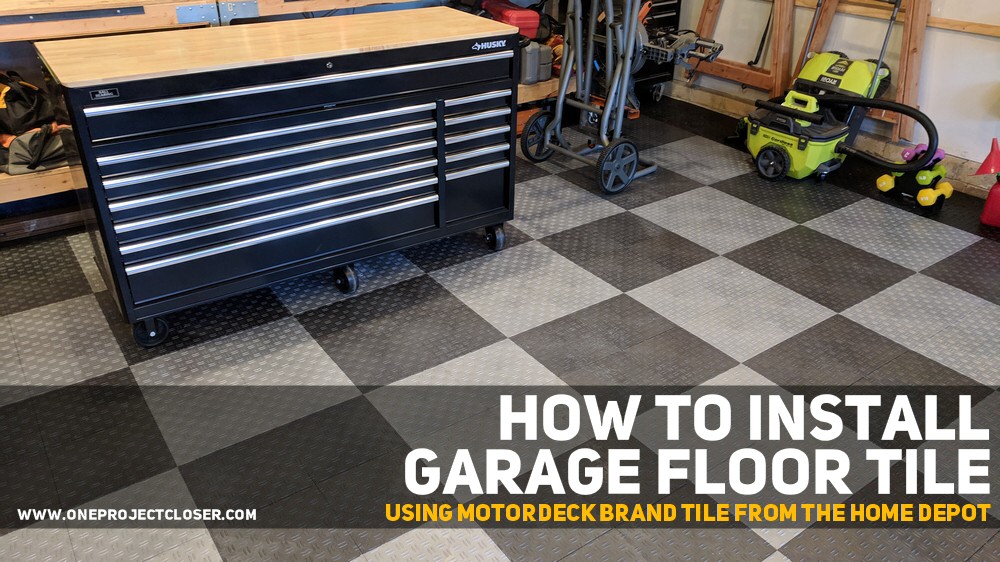
Last month (February, 2019) we installed Motordeck Polypropylene Garage Floor Tile from The Home Depot in our two-car garage workshop. We absolutely love the upscale look the tile provides for the space and how easy it was to install.
For complete installation instructions and additional pictures, visit our How to Install Garage Floor Tile tutorial.
We intend for this article to be a long-term review of the tile that we’ll revisit in future years to see how Motordeck is holding up 1, 3, 5, and 10 years out! We hope that our initial impressions will be confirmed over the long run.
Initital Impressions – 1 Month (March, 2019)
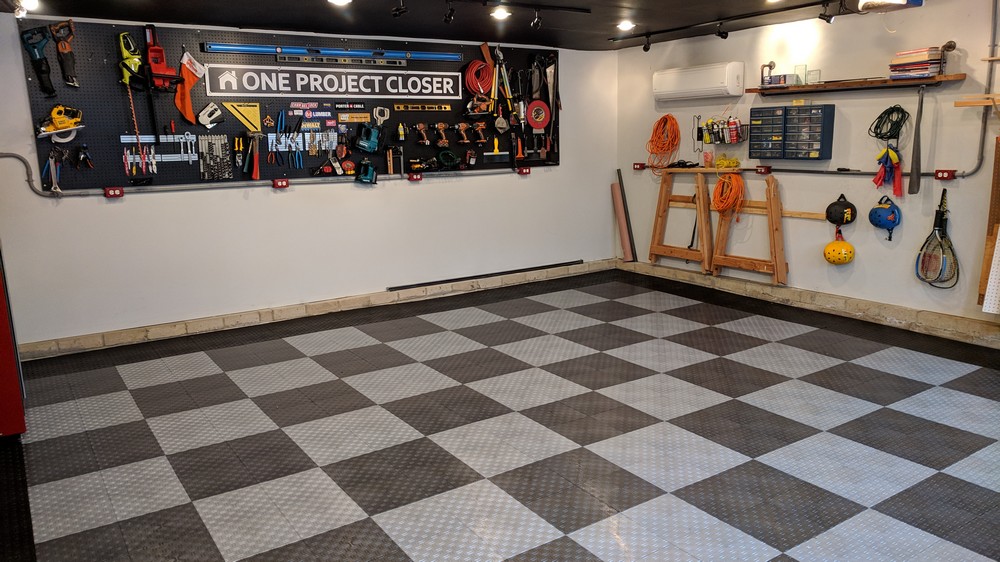
Here’s the space after 1 month of use:
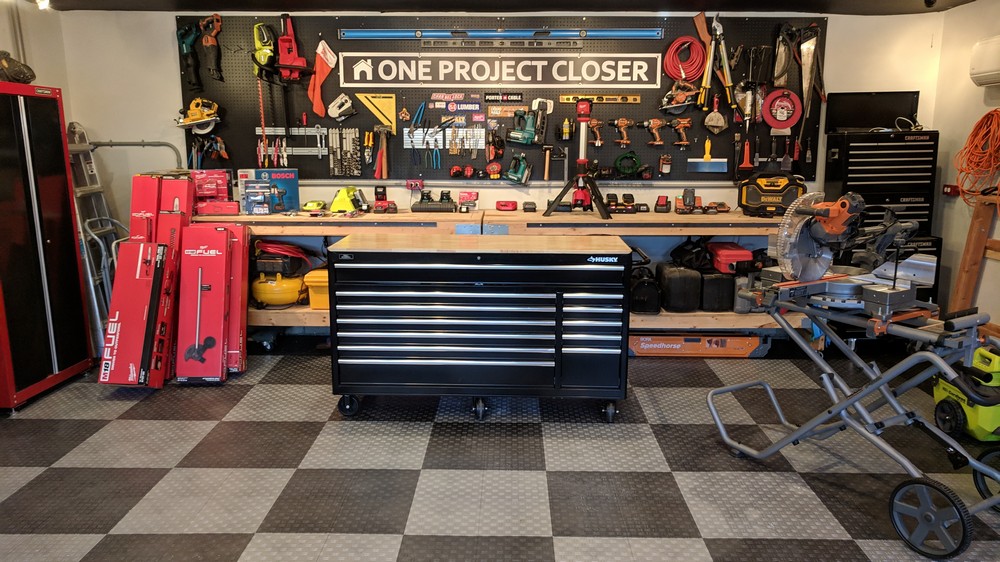
Looks: So far the tile is looking fantastic.
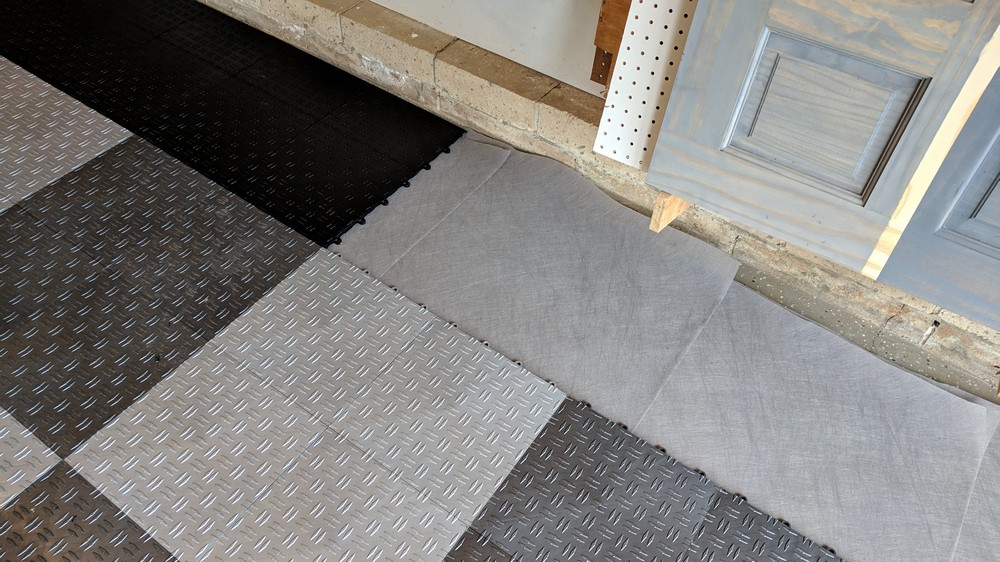
Sound: We installed Motordeck with a double layer of landscaping fabric between the slab and the tile. In reading several people’s posts about the tiles, we found one complaint was that the tile can sound “clicky” on the slab and that landscaping fabric tends to mitigate this. So far, so good. The double-layer of fabric has significantly muted any clicking sound from the tile.
Clean-up: We also have found the tile cleans up really nicely. If someone tracks dirt or mud in on the floor, a quick cleanup with a damp mop seems to do the trick. The tile is also very easy to vacuum. Some sites promoting other garage floor methods have noted that plastic tile can dull over time. We’ll be looking for that with these tiles.
Issues: So far, we’ve encountered no issues with the installation.
Check Back in the Future!
We’ll be updating this post in March, 2020 with additional details on how our installation is performing! If we’ve forgotten, shoot a quick email to fred@oneprojectcloser.com and I’ll be happy to update it with a few pictures!
Want to See More Pictures and the Installation?
Check out our article on installing garage floor tile that features this Motordeck product.
Links to Motordeck Products
Motordeck Tile is available exclusively at The Home Depot and comes in 10 colors as well as two patterns (double diamond plate and coin). These links are affiliate links, so if you buy any product through these we get a small commission. We always appreciate it when you use our links to buy things as it helps us keep producing these guides and reviews!
Double-diamond plate style tiles:
- Black Double Diamond Plate
- Alloy (Light Grey) Double Diamond Plate
- Graphite (Dark Grey) Double Diamond Plate
- Red Double Diamond Plate
- Royal Blue Double Diamond Plate
Coin-patterned style tiles:
- Black Coin Tile
- Alloy (Light Grey) Coin Tile
- Graphite (Dark Grey) Coin Tile
- Red Coin Tile
- Royal Blue Coin Tile
If you have an entry into the room you’re finishing, you’ll need an edging kit. Edging kits come in male and female varieties for use on either the hoop or peg side of the tiles.
Male Edging Kits:
Female Edging Kits:
This post was sponsored by The Home Depot. We love THD and do about 95% of our home improvement shopping there (whether they’re sponsoring us or not). It doesn’t hurt that their nearest store is about 5 minutes from our house! Today’s article is about the installation of Motordeck brand polypropylene tile flooring, a product available exclusively at Home Depot’s online store. Remember, always check our Home Depot Coupons page for the latest deals from the Depot!
Our Workshop Floor Situation
If you’ve been reading here for awhile, you know that the One Project Closer workshop is actually a two-car garage attached to the side of my house. About six years ago we applied an epoxy garage floor coating to this floor. It held up well for about three years. In years four and five we saw a significant amount of flaking. By year six we had significant flaking and knew we needed another solution.

There are plenty of sites online that warn about DIY epoxy kits not holding up, especially on older garage floors. The reality is that when we applied that coating our garage floor was already 25 years old and there was simply no way to get all of the oil out of the slab. If you can’t fully clean the slab, you are guaranteed to have problems with an epoxy coating adhering over time.
So I went looking for another solution that would make our workshop floor look good. Specifically I wanted a product that would:
- Look really good, since we take a lot of photos in our garage
- Not require significant prep work or be dependent on a “clean” slab to work
- Be able to handle the load of cars and rolling tool chests without issue
- Last for at least 10 years
- Be simple to install (not a requirement, but definitely a preference)
Garage Floor Tile Types
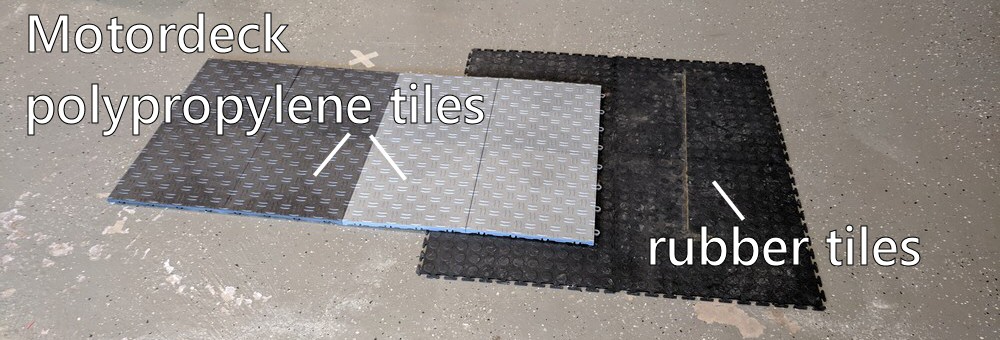
If you search around online, you’ll find that this list of criteria is fully met in a range of garage floor tiles. These tiles come in two primary varieties: rubber and polypropylene (plastic). We bought a few sample tiles just to see how they performed sitting on our shop floor for a few weeks.
Both rubber and polypropylene tiles:
- come in square tile sections (typically 12″ x 12″ up to 20″ x 20″ tiles).
- “float” directly on the garage floor (i.e., they are not glued down).
- require almost no preparation of the flooring surface.
- can handle automobile and rolling tool chest loads.
- run between $2-$4 / square foot – with polypropylene typically more expensive.
The major differences between the flooring:
- Rubber tiles typically have a surface-visible interlocking mechanism that makes them easier to replace but also is not as strong as the plastic interlocking mechanism.
- Rubber tiles are a little quieter to walk on since the polypropylene tiles “click” against the concrete slab (we found a way to help abate this described below).
- Rubber tiles get dirty more easily, and because they have a surface interlocking mechanism don’t look as “clean” as the polypropylene tiles. (Ultimately this was a major reason we chose the polypropylene tile.)
- Rubber tiles are slightly harder to keep clean.
Our Selection: Motordeck Tiles from Home Depot
We selected Motordeck tiles not only because polypropylene tiles have the look we wanted for the workshop, but also because they are backed by a 12 year limited warranty (e.g., the manufacturer will replace a tile that breaks or warps under load for 12 years after purchase).
Motordeck tiles come in ten colors and can mixed and matched in your design.

Planning a Tile Design for the Garage Floor
After deciding on Motordeck, I was very excited to begin planning the pattern for the floor. Our garage is approximately 22′ x 22′ (484 sq. ft.). I decided to use Microsoft PowerPoint to design the floor, basically by creating a grid of small squares (each representing as 12″ x 12″ tile) and coloring them using the “fill color” tool in PowerPoint.
You can download my PowerPoint Tile Design Ideas file if you’d like something to start with for your own design.
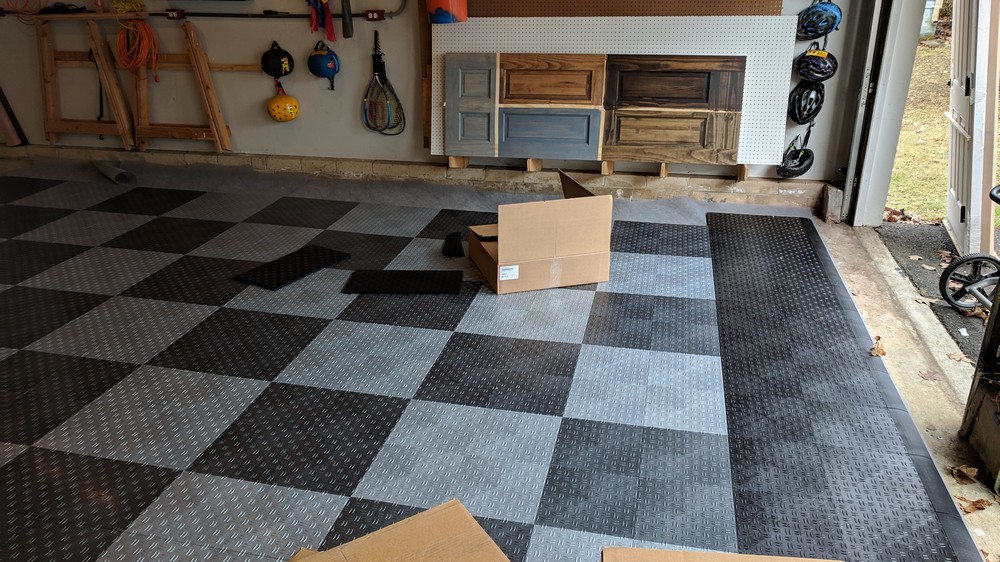
The sky is the limit with regards to tile design – you can do anything from individual tile patterns to 8-bit art drawings. We knew we wanted the floor to be predominately greys and blacks to match our color scheme on the blog. We also knew we wanted something that wouldn’t detract from photographs and would also hide dirt and dust.
Ultimately we went with the simple (some might say “boring”) pattern in the upper left.

Beware Complex Designs!
The one good thing about picking the simple pattern: it turns out Motordeck tile is shipped in 2 x 2 squares (i.e., four tiles are pre-attached to one another for a 24″ x 24″ block). If you choose a design that uses individual 12 x 12 tiles (as many do above), you’ll have to separate the tiles before you lay them, and as we learned during the install, separating tiles is a pain.
Tools & Materials You’ll Need for the Install
- Motordeck Polypropylene Tile Flooring in the quantity needed for your design
- Motordeck entry tiles (for the area that faces the garage doors)
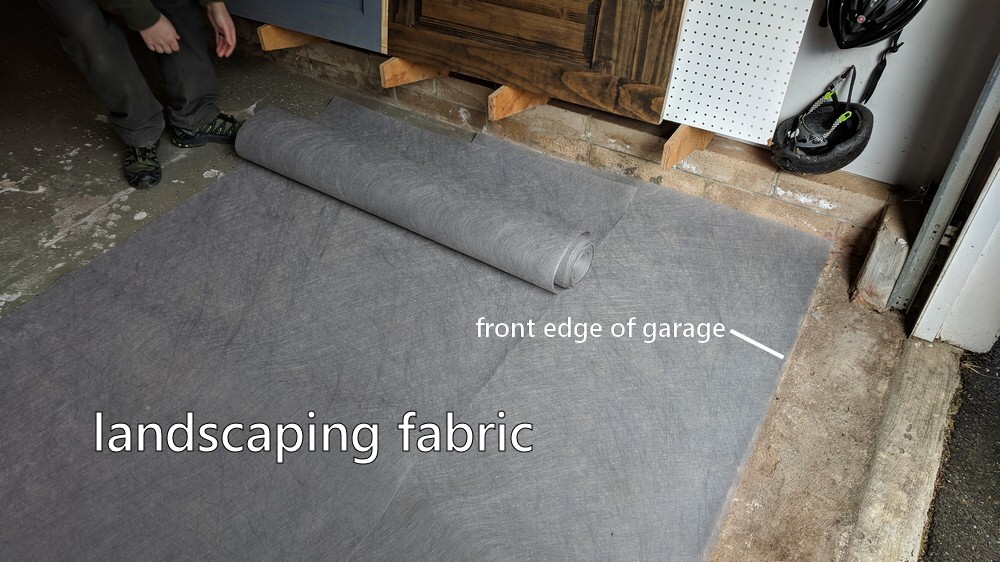
- Landscaping fabric (optional) (we recommend 2x the square footage of your floor so it can be doubled-up)
- Table saw (preferable) or miter saw w/ at least 12″ cut capability. An all-purpose blade will work.
- Note: a table saw will allow you to cut the 24″ x 24″ tile sheets for up against walls. A miter saw will require you to separate the tiles in 12″ x 12″ individual tiles to cut, which is a pain.
- Scissors (for cutting landscaping fabric)
- Vacuum (for cleanup after cutting)
- Broom (for prepping the floor)
Garage Tile Flooring Installation Instructions
Step 1: Prepare the Floor for the Installation
The best part about polypropylene tiles is that they require very little installation preparation. Clear everything out of the floor and sweep the room clean.
Step 2: Roll out Landscaping Fabric
This is a completely optional step, but we found that landscaping fabric significantly muted the “clicking” sound between the tile and the garage floor, and that doubling up the landscape fabric had an even better muting effect on the floor. You don’t have to be exceptionally precise with the fabric, as you rarely walk up against a wall. We rough cut the fabric leaving an inch or two gap up against the wall.
Step 3: Start Laying Tile According to Your Pattern
One of the things we liked best about Motordeck tile is it can be laid starting at any end of your garage. We started at the front end of the garage with a whole row of tiles.
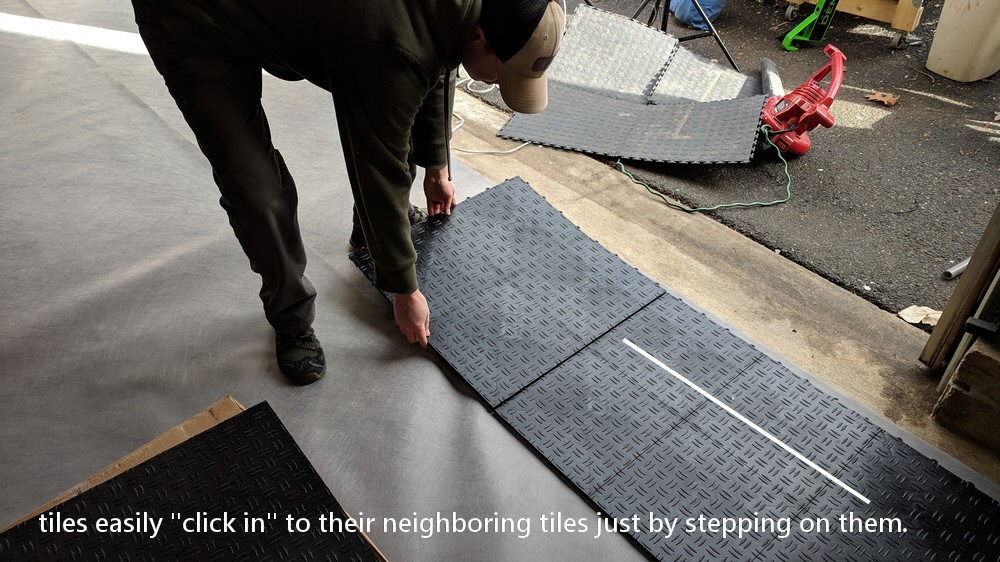
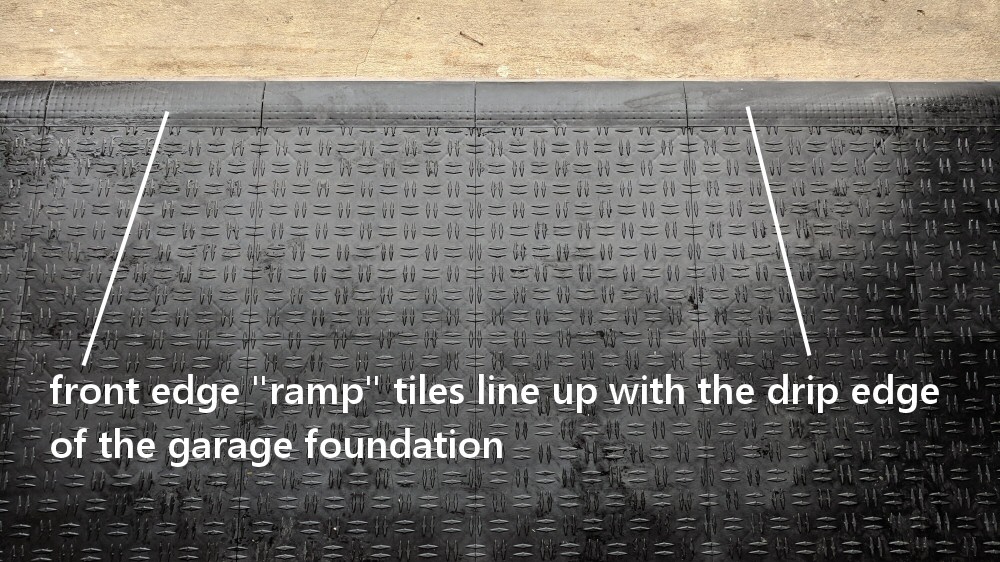
Then we connected the front ramp tiles, aligning them with the front edge of the garage floor.
The tiles snap together very easily. You just lay the tiles adjacent to the laid floor and then “snap” the hooks from one set of tiles into the loops on the other set.
When the floor is relatively small it’s easy to reposition it. As the contiguous floor gets larger, the weight of the tiles becomes noticeable and the tile group gets much harder to move. After you’ve connected 20-30 tiles, make sure the floor is in the position it should be as it will be impossible to move after that.
Step 4: Continue to Lay the Tiles
In our installation we decided to lay all tiles that did not require cuts first. It’s definitely easier to set up the table saw one time at the end of the installation and knock out all the cuts at once.

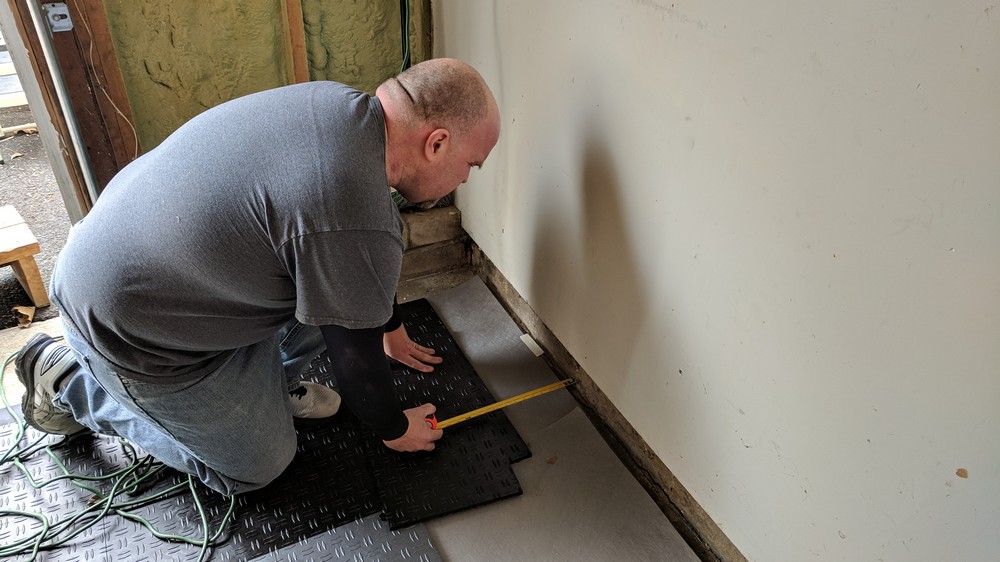
Step 5: Cut Tiles to Fit Against Walls and Obstacles
The final part of the installation involves cutting tiles to fit against walls and obstacles. Motordeck tiles cut very easily with an all-purpose blade on a table saw. The only thing to remember is Motordeck recommends a 1/2″ expansion space against each wall – so cut the tiles to leave that small gap all the way around the perimeter.
Step 6: Cleanup and Marvel at Your New Floor!
Installation really is simple. We completed our 420 sq. ft. floor in just five hours and that included taking photos and videos as we worked. As long as your installation pattern is simple (so that you don’t have to break apart the two-by-two tile groups, we think you can lay about 100-150 sq. ft. per hour depending on obstacles.
Total Cost to Install Motordeck Flooring
Motordeck’s tiles range from $2.90 – $3.04 per square foot (the colors have slightly different prices). We purchased a little more than 484 sq. ft. since Motordeck is sold in 24 sq. ft. packs (basically 6 sheets of 4 pre-connected tiles). Due to the pattern we chose, we ended up with a total of about 24 sq. ft. of waste comprising a few of each of the black, grey, and dark grey tiles.
21 boxes of tiles + 1 set of “trim tiles” + landscape fabric = just shy of $1,800 for this two car garage.
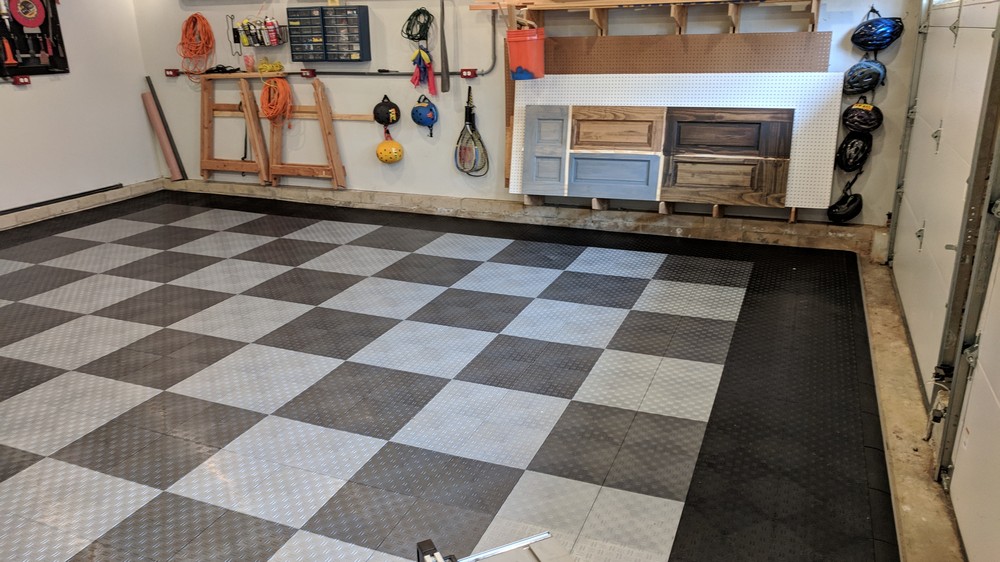
The Finished Project w/ Stuff Moved In
We’re loving this new floor! It feels and looks great. Our tool chests move around with ease (which is something we were concerned about with the install). Overall the Motordeck has classed up our garage/workshop quite a bit!
Links for Buying Motordeck Tile @ The Home Depot
Motordeck Tile is available exclusively at The Home Depot and comes in 10 colors as well as two patterns (double diamond plate and coin). These links are affiliate links, so if you buy any product through these we get a small commission. We always appreciate it when you use our links to buy things as it helps us keep producing these guides and reviews!
Double-diamond plate style tiles:
- Black Double Diamond Plate
- Alloy (Light Grey) Double Diamond Plate
- Graphite (Dark Grey) Double Diamond Plate
- Red Double Diamond Plate
- Royal Blue Double Diamond Plate
Coin-patterned style tiles:
- Black Coin Tile
- Alloy (Light Grey) Coin Tile
- Graphite (Dark Grey) Coin Tile
- Red Coin Tile
- Royal Blue Coin Tile
If you have an entry into the room you’re finishing, you’ll need an edging kit. Edging kits come in male and female varieties for use on either the hoop or peg side of the tiles.
Male Edging Kits:
Female Edging Kits:
Milwaukee M12 12v Dual-Power (Battery & AC) Cordless ROCKET LED Tripod Light Review
January 30, 2019 | by Fred (email) |Note: This article originally ran on our tool site, Toolbox One.
There is no substitute for good lighting in your workshop or on the jobsite. We’ve seen many manufacturers focusing in on mobile stand lighting over the last few years and today we’re taking a look at Milwaukee’s M12 12v Dual-Power 1400 Lumen ROCKET LED Lamp.
Stuff Lawyers Made Us Say: We’re are continuing our partnership with The Home Depot to provide candid reviews of tools from a wide variety of manufacturers. The Home Depot is both providing the tools for free and compensating us; however, the opinions we express here are our own. Remember, we’ll always be up-front with you when we’re receiving a free product, compensation, or both. And of course, we always strive for objectivity in our reviews.
Key Features of the M12 ROCKET LED
- Runs on Milwaukee’s M12 12v battery-line or on 120v AC (standard outlet)
- Outputs 1400 lumens of directed, white (daytime) light
- Max standing height of 5’8″; collapses to 31″ when folded
- Smart tripod design is very stable, even when fully extended.
- Built-in handle design makes carrying easy when folded and prevents accidental unfolding.
- Weighs less than 7 lbs.
- 5-second setup and tear-down (we verified it – see the video below)
- Light rotates 210 deg. in each direction and 270 deg. around, providing virtual 360 deg. lighting capability.
Our Take on the ROCKET LED Light
We really like Milwaukee’s ROCKET LED Light. It folks up tight. It’s very portable. It’s easy to break out and and to put away. And it’s plenty bright to illuminate a dark work area.
At 1,400 lumens, if you’re working in a big room you’re going to want more than just one of these. But for the electrician or plumber who is working in a confined space and needs to illuminate a small work area very brightly, this light works perfectly without taking up too much space.
Who This Light is Right For
If you’re already on Milwaukee’s M12 battery line, this light is a great addition to your tool kit. If you’re on Milwaukee’s M18 line, they also make a set of ROCKET LED Lights that run on the larger 18v batteries. Other brands also make these lamps so if you’re committed to another brand’s battery, you’ll need to decide whether you want to expand your collection to include Milwaukee tools going forward. Since this isn’t sold with a battery, we think most people who buy this will already be on the Milwaukee line or plan to grow their Milwaukee collection.
Price and Where to Buy
The Milwaukee M12 ROCKET LED Lamp is available from Home Depot as a bare tool (i.e., tool only; no battery) for $149.00.
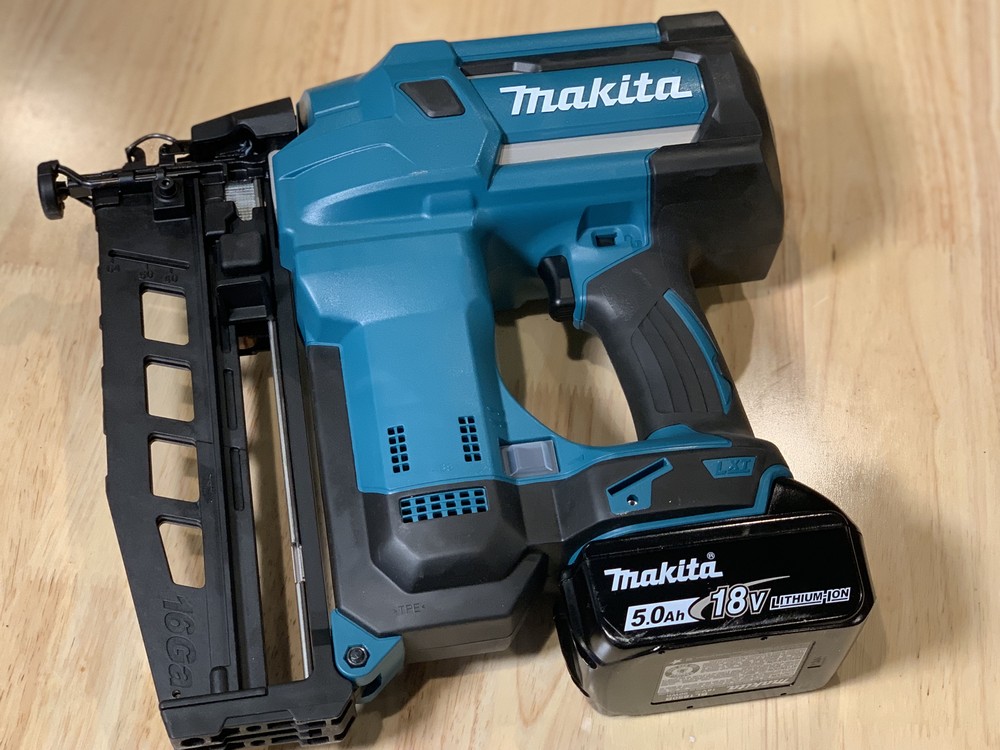
Makita 18V LXT Lithium-Ion 2-1/2″ Straight Finish Nailer (16 gauge) Review
January 13, 2019 | by Fred (email) |Note: This post originally ran on our tool-focused site, Toolbox One.
Today we’re taking a look at another of Makita’s battery powered nailers – the Makita LXT 18V Lithium-Ion 2-1/2″ 15GA Straight Finish Nailer. This review is a part of our continuing #PROSpective partnership with The Home Depot.
Stuff Lawyers Made Us Say: We’re continuing our partnership with The Home Depot to provide candid reviews of tools from a wide variety of manufacturers. The Home Depot is both providing the tools for free and compensating us; however, the opinions we express here are our own. Remember, we’ll always be up-front with you when we’re receiving a free product, compensation, or both. And of course, we always strive for objectivity in our reviews.
Key Features of the Makita 18V LXT Finish Nailer
- Drives 16 gauge, 1″ to 2.5″ nails – pretty typical for the category.
- Compact Center Height – at just 4-1/8″ across the top, it’s easy to see around the base of the nailer to the nose tip when fastening in tight spaces.
- Built-in LED Light – one of the notable advantages of battery over pneumatic is the addition of a light – very useful when working inside cabinets or in dark corners.
- Tool-less Depth Adjustment – it’s easy to adjust depth drive without the need for a hex wrench.
- Tool-less Nose Tip Cover Opening – makes clearing jammed nails a little easier.
- Killer Battery Life – Makita claims the nailer can drive up to 1,000 finish nails on a single charge with a 5.0AH battery.
- Convenient Trigger Lock – includes simple, one-handed operation.
- Anti-Dry Fire Lock – helps prevent firing blanks and limits the tools ability to engage when unloaded.
- Two-mode Nailing w/ Selector Switch – allows you to switch between “trigger activated” and “push activated w/ trigger down”
Why Choose Makita’s Finish Nailer?
- You need the portability of a battery-powered finish nailer that will work for most applications.
- You are already on Makita’s 18v battery line or you are willing to start a Makita 18v collection.
By far the #1 advantage of a battery-powered finish nailer over its pneumatic counterpart is eliminating the compressor, pneumatic hose, and the associated need for 120v electric power on the job site. Trading in your pneumatic nailer for a battery powered unit will save you the considerable time required to drag a compressor on site, charge it up, and stretch hoses across your work space. But these added benefits do not come without cost. Like all 18V nailers, Makita’s 16GA Finish Nailer is more expensive than its pneumatic counterparts. It weighs 8.2 lbs. w/ 5.0AH battery installed vs. about 4 lbs. for the average pneumatic. And it’s not quite as powerful, which could make a difference depending on the application. While the tool will work in many situations, for the toughest jobs you’ll still need a pneumatic back up.
Our Impression of the Makita 18V, 16GA Finish Nailer w/ 5.0AH Battery
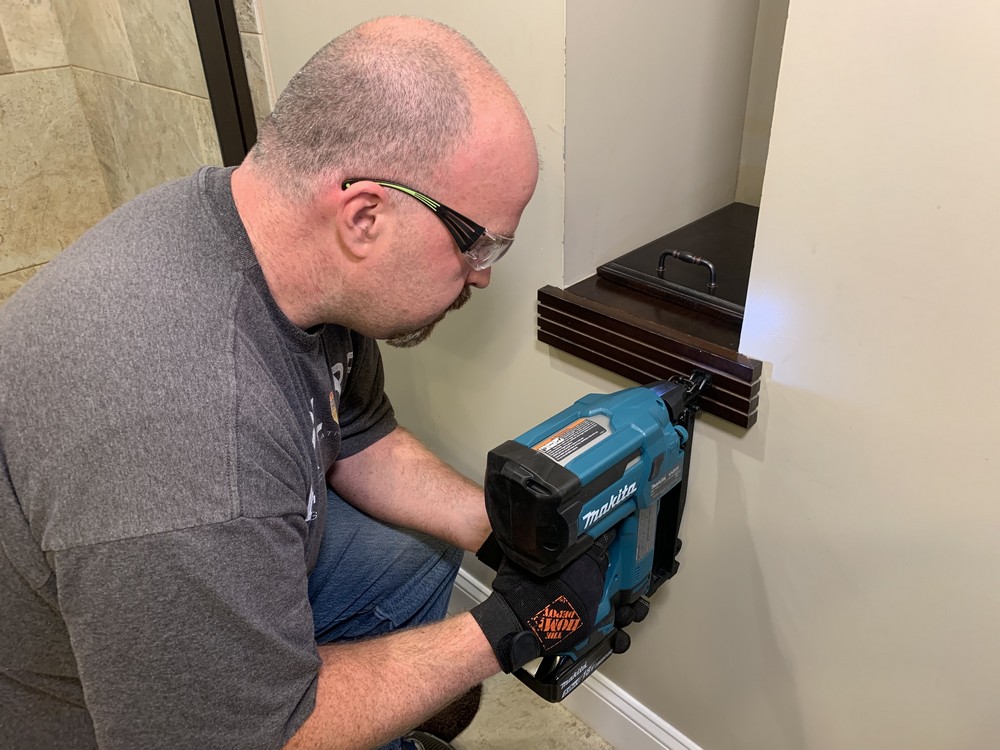
We spent a few hours with Makita’s nailer testing it on a variety of materials. The most common use for this tool among contractors and avid DIYers is fastening baseboard, crown moulding, and other trim to studs. Additional uses might include building furniture, working on the first or last few boards of hardwood flooring, installing board and batten wainscoting, or any other application where a countersunk nail is desired.
Overall, the grip feel on the nailer is excellent. It’s well-balanced and easy to hold, if not a little hefty.
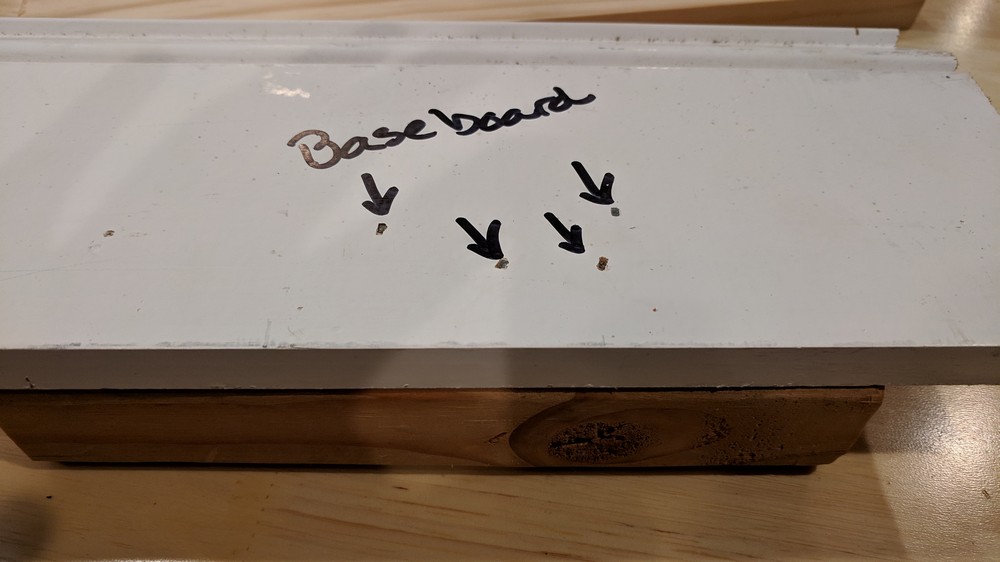
We found that for trim work, the Makita nailer was more than sufficient for driving 2″ finish nails through baseboard into the edge of 2×4 dimensional lumber while also producing the desired countersink.
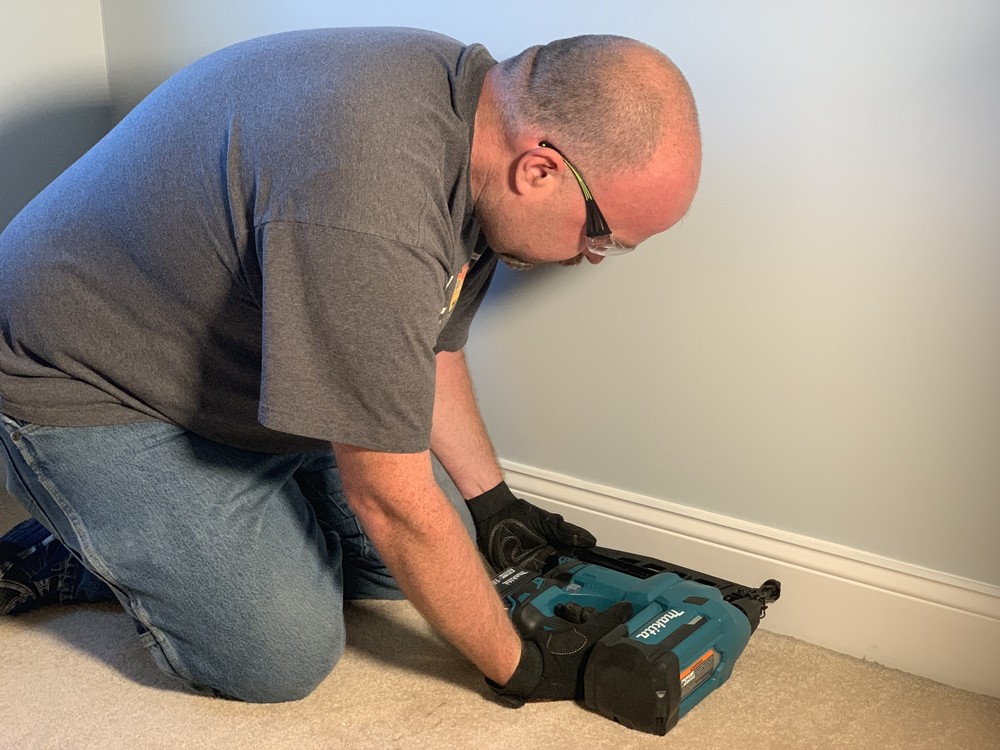
Here’s a picture of us testing the nailer by driving 2″ nails into baseboard and an underlying 2×4.
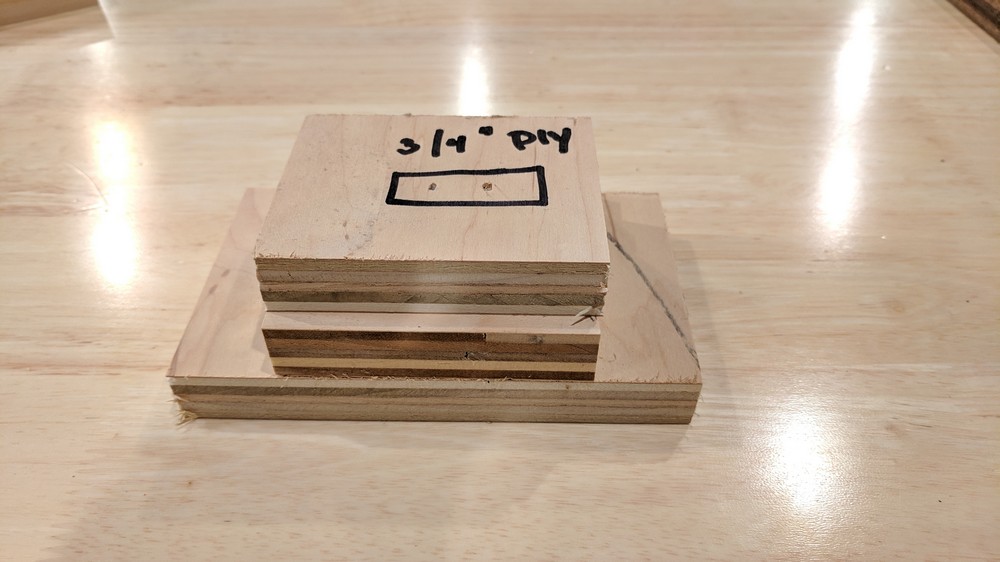
We then put this nailer to a tougher test – driving 2″ finish nails through 3 pieces of stacked 3/4″ plywood. Again, the tool had no problem producing a countersunk nail head with a nail driven all the way through the material.
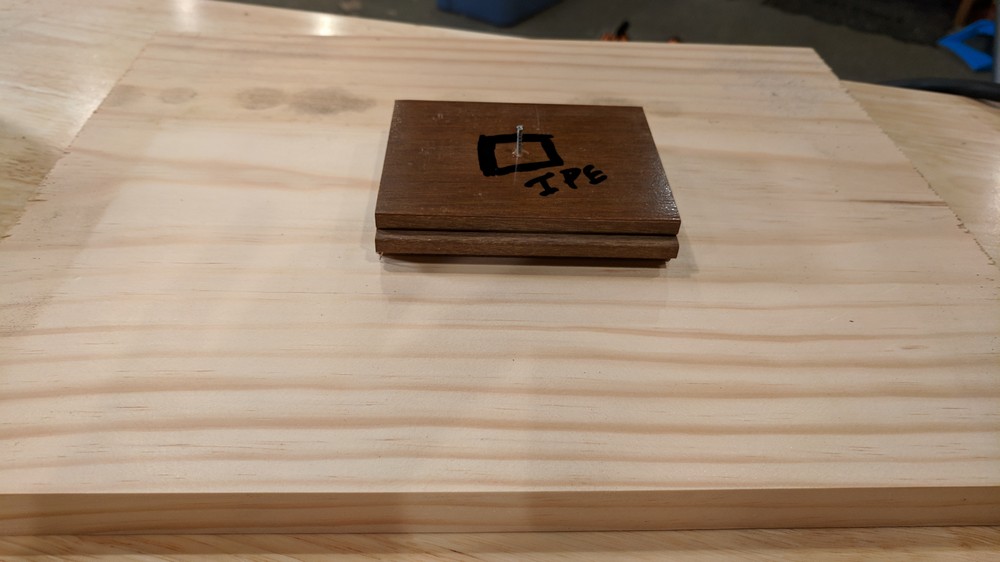
Finally, we put the Makita to an even tougher test – one that we faced several years ago when installing our hardwood floors — top nailing 3/4″ Ipe hardwood flooring (also known as “Brazilian Walnut”) into a 3/4″ underlayment. This test proved to be too difficult for the nailer, leaving our 2″ finish nails about 1/2″ proud of the surface of the wood after repeated attempts. Remember: Ipe is 3.5 times denser than oak and is the hardest of the commonly-installed exotic woods. This is a very tough test.
We would love to report that the Makita was able to power through the 3/4″ Ipe, but that will have to wait for a future model or more powerful batteries.
In all of our tests we experienced the occasional dry fire — which surprised us given the anti-dry fire mechanism on the tool. We did find that it is important to keep firm pressure on the nailer when driving to prevent leaving nails proud of the surface, but even with firm pressure applied we sometimes (though rarely) ended up with finish nail slighter above the surface, especially in more challenging applications.
Is the Makita 18V Finish Nailer Right For You?
Based on our tests, if you tend to use finish nails primarily in trim installations or other applications and you’re on the Makita 18V battery line, the LXT 18V Finish Nailer may be right for you. It saves on the setup and cleanup time associated with charging and emptying a compressor, which is easily 15 minutes worth of work. If you’re in the minority of folks who are installing exotic hardwoods or building furniture with exotic woods, you’ll still need to have a pneumatic finish nailer for that situation. (Fortunately Makita makes a pneumatic version of this nailer which will do the trick.)
Price and Where to Buy
The LXT Finish Nailer retails for $325.58 as a bare tool (which means it doesn’t come with a battery or charger).
This puts it relatively close to other high-end tool manufacturers’ prices, but above discount providers like Ryobi. We haven’t tried another manufacturers’ 18V 16GA finish nailers for comparison yet. When we do, you’ll see the review and we’ll draw some comparisons with this Makita.
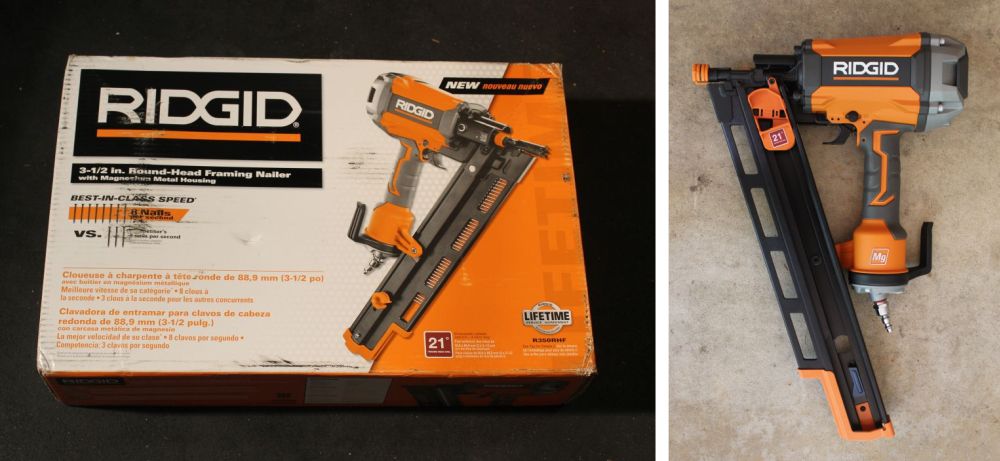
Ridgid 21-Degree 3-1/2 in. Round-Head Framing Nailer Review (Model # R350RHF)
July 15, 2018 | by Fred (email) |This post originally appeared as a guest post by Aaron on our tool site, Toolbox One.
I’ve had a framer nailer on my short list of tools I’ve needed for a while, so I was excited when I got the opportunity to review Ridgid’s R350RHF offering available at the Home Depot. I have a basement remodel in the works and I already own several Ridgid tools, all of which I enjoy.
Stuff Lawyers Made Us Say: We’re are continuing our partnership with The Home Depot to provide candid reviews of tools from a wide variety of manufacturers. The Home Depot is both providing the tools for free and compensating us; however, the opinions we express here are our own. Remember, we’ll always be up-front with you when we’re receiving a free product, compensation, or both. And of course, we always strive for objectivity in our reviews.
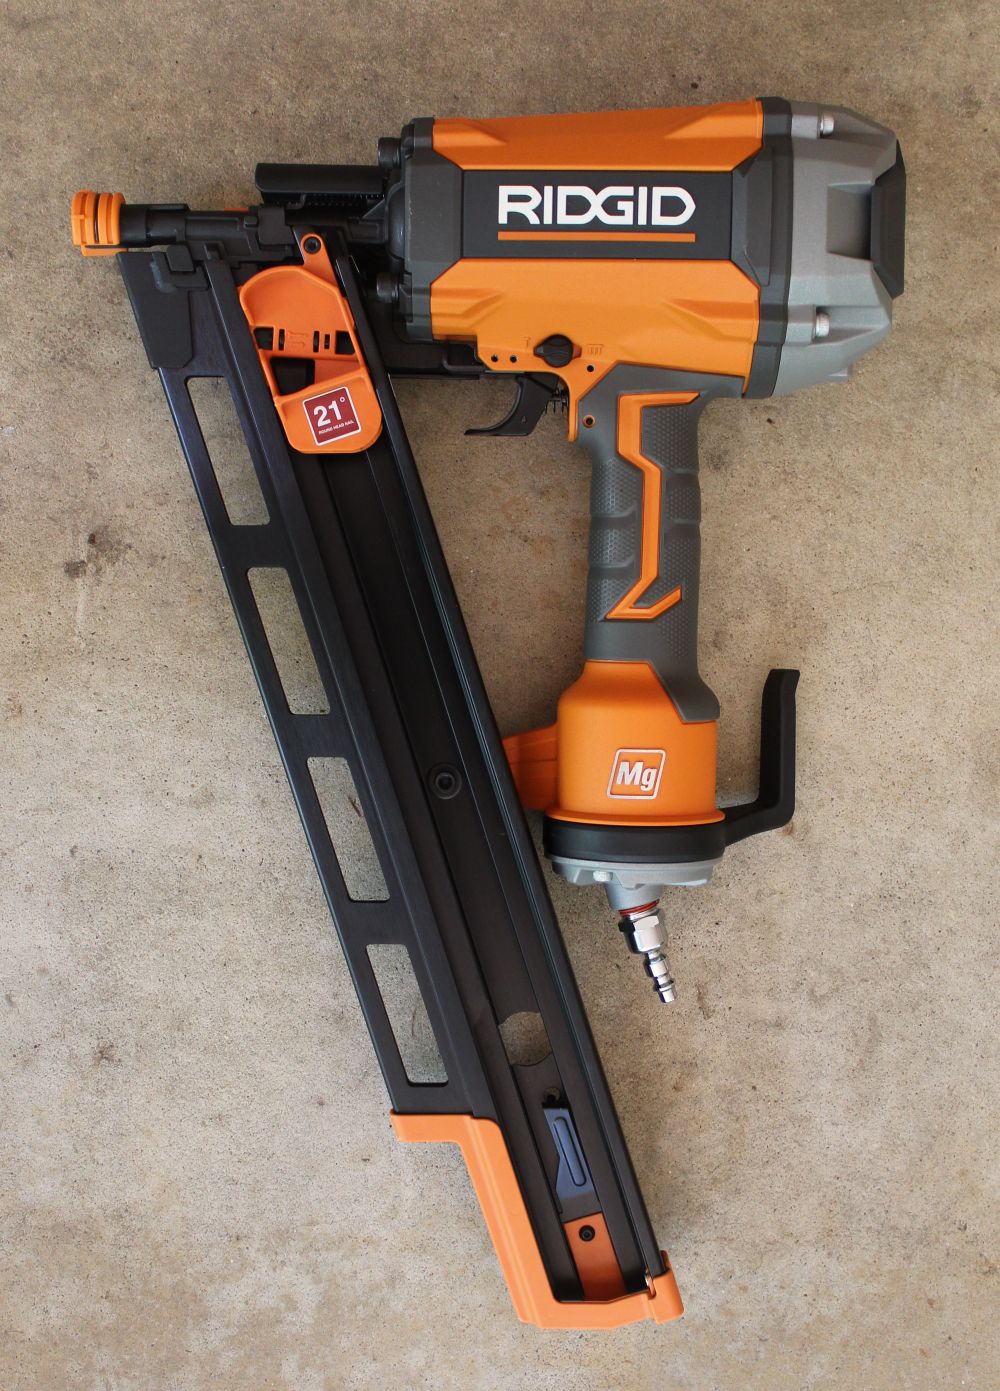
Ridgid R350RHF Round-Head Framing Nailer
Opening the box is half the fun of getting a new tool. Included in the box is a bottle of oil, an allen wrench (presumably for servicing the tool), paperwork, and of course the nailer itself. Right away this gun feels great in the hand and offers a solid grip with Ridgid’s rubber over-molded trigger and handle. There’s no getting around a pneumatic framing nailer being an inherently heavy tool. Nevertheless, Ridgid has done a nice job keeping the weight just under 8 lbs., while still maintaining a high standard of quality for all of the moving parts.
The R350RHF has many nice features that make it easy to use and adaptable to various situations one might encounter while framing.
- Swiveling pneumatic hose attachment
- Nail drive depth adjustment
- Toolless switching between fire modes
- 8 nails per second firing rate (when using fire-upon-contact mode)
- Dry-fire lockout
- Removeable no-mar nailing pad
- Swiveling tool belt hook
- 3 year warranty and lifetime service agreement
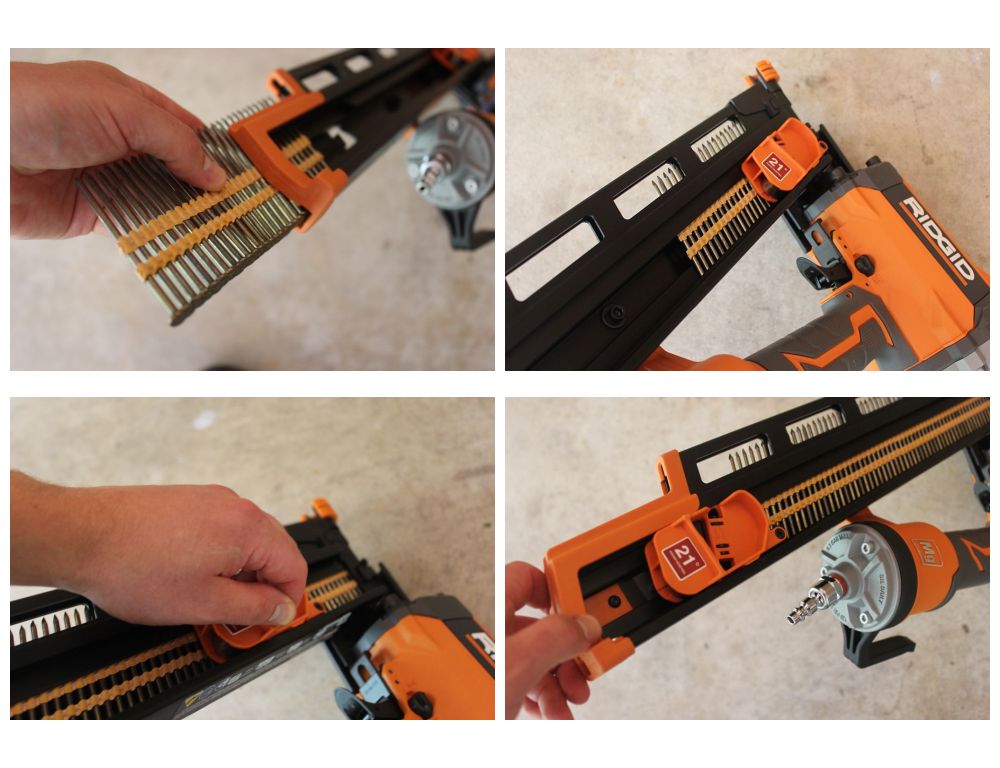
Setup and Loading
Getting the R350RHF ready for action takes minimal effort and time. The gun is designed for use with plastic collated 21 degree framing nails from 2″-3.5″ long. In the testing below I’m using 3 1/4″ nails as I could not find 3.5″ in stock. Loading the nails is as easy as orienting the nails at the proper angle, sliding them down the magazine, and pulling back on the magazine clip. I was able to load 2 clips of nails for a total of about 60 nails. I own a few brad nailers of various sizes and this is easily the smoothest loading nailer I own. I experienced zero binding when pulling back or releasing the clip and it never slipped while locking the nails in place.
It’s important to note that this is not an oilless pneumatic gun. The instructions say to lightly oil with 2-3 drops of oil before every day of use. Or oil it periodically during a day of very heavy use.

After I loaded the nails, I applied a few drops of oil into the end of the pneumatic fitting. Then I attached the air hose and set my compressor to the maximum recommended operating pressure of 120 psi to give the best chance of driving those long 3 1/4″ nails. As mentioned above the pneumatic fitting easily swivels to either side with a quick flick of the wrist. This allowed the hose to drape on either side of the tool and made switching hands and positions much less cumbersome.

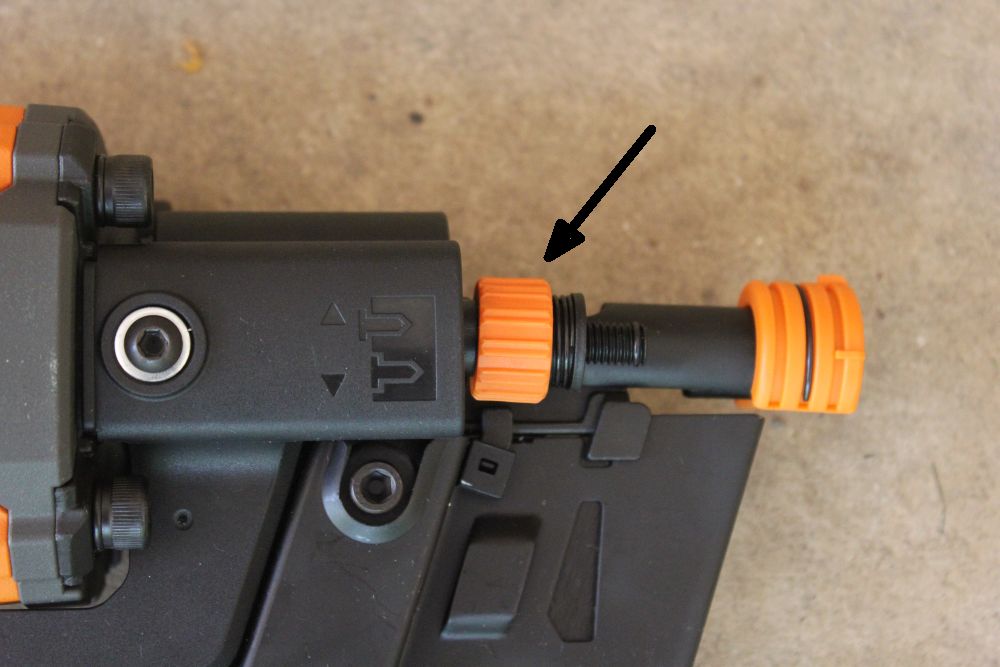
Nail Drive Depth Adjustment
The R350RHF comes with an adjustment knob that allows the user to fine-tune how far the nails are driven below the surface of the wood. I recommend testing a few nails using the same material you plan to use for your project to obtain the best results. It’s also important to mention that the compressor and pressure setting you use will also affect how far the nails are driven. In my testing below I’m using a small 6 gallon pancake style compressor set to 120 psi (the maximum recommended operating pressure). The adjustment knob is very easy to operate with only one hand. It is also clearly marked next to the knob which way to turn it to raise and lower the drive depth.
I tested the drive depth using some scraps of douglas fir I had removed from some walls I took out of my home and a few scraps of new studs I had recently purchased at my local Home Depot. Both samples were tested by stacking them 3 high and nailing through the face grain as one would when building a header. I adjusted the drive depth as far as it would go in both directions and drove a nail using each setting. I used the single-fire mode to ensure the most consistent results.
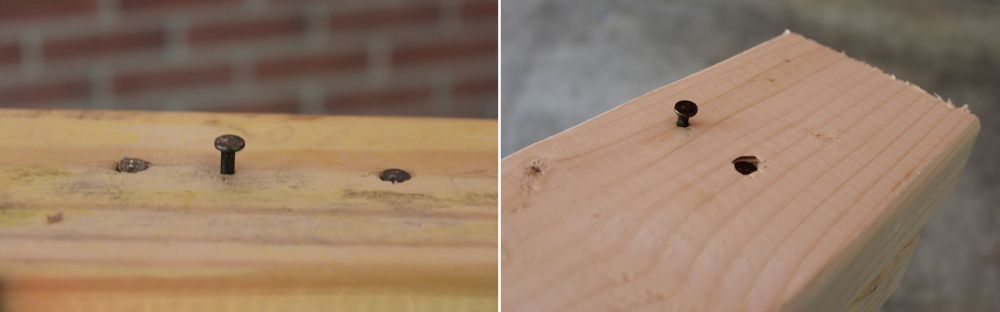
In the much older fir (pictured left) the nails set flush with the surface to a good 1/4″ above the surface. Not surprisingly, the nails drove further into the softer, newer pine (pictured right) that most people will be using for new projects. The nails drove from sub-flush to 3/16″ or so above the surface. After trying different settings throughout my other testing I found myself keeping the R350RHF set to full drive depth.
Switching Firing Modes
Another cool feature on the R350RHF is the ability to quickly switch between single-fire and rapid-fire modes. Single-fire mode requires the user to fully depress the head of the nailer onto the surface to be nailed before the trigger can be pulled. I would implore anyone who is not a professional to always use single-fire mode as it offers the safest and most accurate operation. Rapid-fire mode allows the user to keep the trigger held down and firmly tap the head of the nailer against the nailing surface repeatedly without the need to pull the trigger each time. Switching between modes is easiest with two hands and is accomplished by pushing the button above the trigger on the right side of the gun while turning the knob on the left side of the gun to point to the desired mode. Again, I found the action of the selection tool to be smooth and crisp.

Ridgid claims the R350RHF can shoot 8 nails per second in rapid-fire mode. I did my best to test this claim. However, I found myself lacking the necessary skills to fire more than 2 or 3 nails per second given there was some kickback when firing each nail that required me to refocus my aim. I suspect a professional framer with more ninja-like reflexes than myself will find this feature more useful than I did. During testing, I encountered the advertised dry-fire lockout, which left 5 nails unfired in the magazine. This protects the tool from damage that might potentially occur if it were to fire without a fastener.
No-Mar Nailing Pad
The Ridgid R350RHF comes with a useful no-mar nailing pad on the head of the gun for use on finished surfaces such as decking. When removed, a nailing claw is revealed, which gives a firm bite into the nailing surface. This is particularly useful to prevent slippage while toenailing. Though I built a small wall (see below) using the no-mar pad still attached, I would likely leave it removed for any rough framing projects in the future.

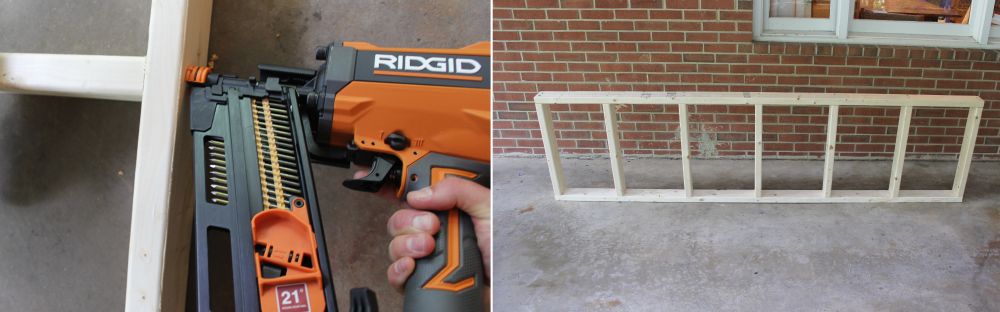
Let’s Build A Wall
I have an eventual need for a small “wall” as the framework of a countertop for part of my aforementioned basement remodel so I decided to put one together. I was curious to see how much time it would take to assemble. The “wall” in question is 8′ x 26″ when fully assembled. Once all of the pieces were cut and ready to assemble it took me just under 3 minutes to assemble the wall using the R359RHF nailer set to single-fire mode.
The Nitty Gritty
The Ridgid R350RHF is a solid buy for any avid DIYer or general contractor to add to their arsenal. At just $199 available exclusively through the Home Depot it’s competitively priced compared to its competitors and offers Ridgid’s excellent lifetime service agreement and 3 year limited warranty.
