

It’s April and that means I get to spend a day with some of my favorite people – that’s you!! – and share a recipe here at OPC The Better Half! If we haven’t formally met yet, I’m Keri and I blog over at Shaken Together. I love to share easy recipes, crafts, DIY tutorials, seasonal projects and more – I’d love to have you stop by!
While it may feel like Spring in Florida, I know that it is still pretty cold in most of the country. With that in mind, I thought something warm and toasty (and topped with melted Parmesan cheese!) would be pretty appropriate!
So, whip up a pan of lasagna, a big bowl of tomato soup or even a hearty rustic salad. Because today I am sharing a tasty accompaniment for any of those dishes … crispy ciabatta Parmesan dippers!
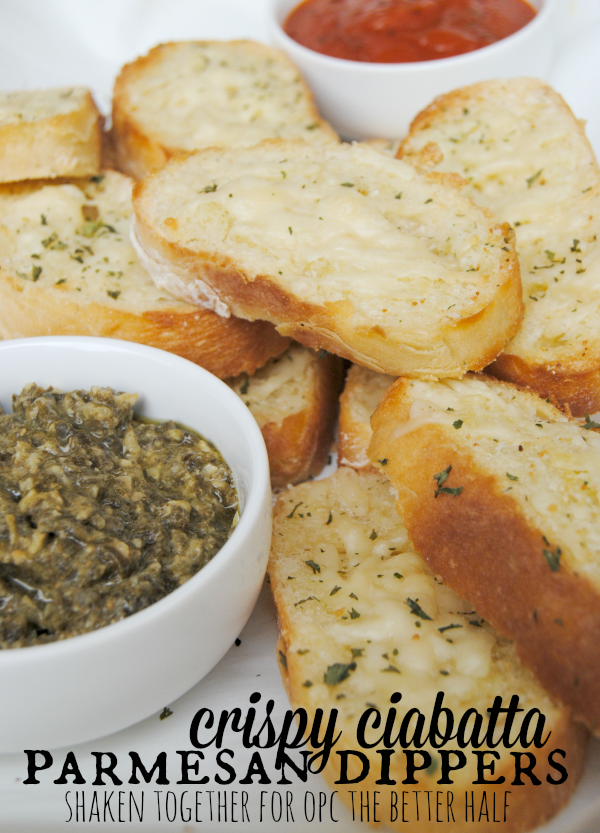
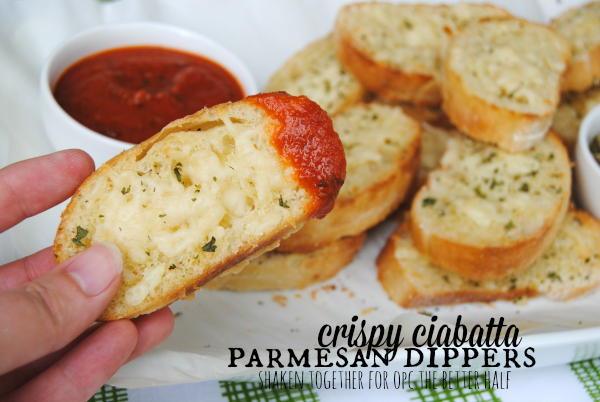
This recipe is a great way to use leftover ciabatta rolls from a Sunday sandwich lunch since ciabatta bread has a great dense, chewy texture that toasts up beautifully and doesn’t get soggy! The trick is to slice each ciabatta roll lengthwise into 6 slices instead of horizontally like for a sandwich. The end result is 12 mini slices of ciabatta that are the perfect size for dipping and mopping up sauce or soup! If you are feeding a crowd, this recipe can easily be doubled or tripled.
- 2 ciabatta rolls, unsliced (mine were leftover from an 8 pack from Sams)
- Unsalted butter, softened
- Garlic salt
- Shredded Parmesan cheese
- Optional (but absolutely delicious!) : marinara sauce and pesto for dipping
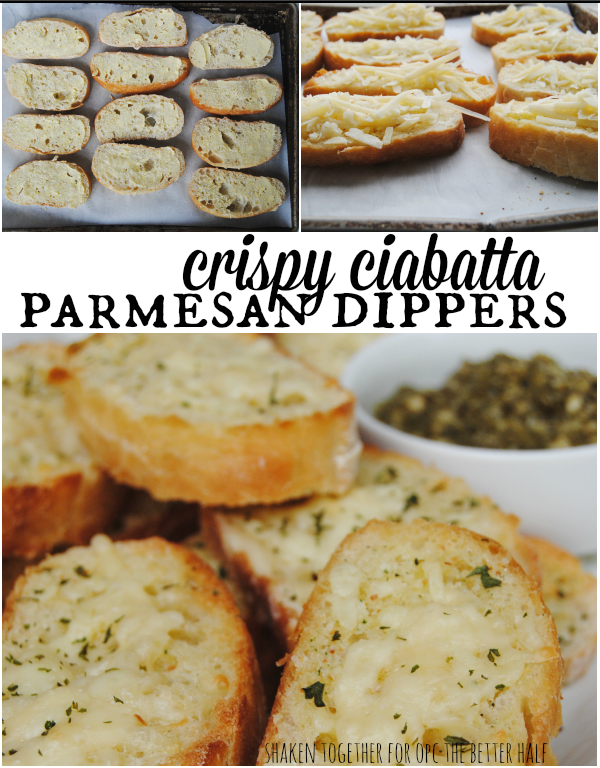
- Slice each ciabatta roll into 6 lengthwise slices
- Spread with a thin layer of softened unsalted butter and sprinkle with a little garlic salt.
- Bake in 375* oven until the butter has melted and the bread is just started to brown a bit around the edges.
- Remove from oven and sprinkle each slice with shredded Parmesan cheese.
- Return to over and bake until cheese is melted.
- Serve with warmed marinara and pesto for dipping.
I love recipes like this – you can always tweak them just a little based on what you have on hand. Don’t have shredded Parmesan? Use mozzarella. If you can’t find ciabatta bread, sourdough or even a day-old baguette would be good alternatives. Get creative and add sun dried tomatoes, roasted red peppers or even thinly sliced pepperoni under the cheese for another added layer of flavor.
If you need a few more quick and easy recipes like this one, you may like my pressed pizza paninis, quick pesto Parmesan chicken salad or cheesy French onion soup bread!
Thanks again for having me, Jocie! Can’t wait to see you all again next month!
I’m baaaaaack! It’s Keri from Shaken Together! I sure hope you don’t mind me crashing at Jocie’s place once a month. At least I bring dessert, right?!
When I was brain storming for this month’s contributor post, I did a little research. I mean it is March after all. ‘Tis the month for soda bread and mutton, corned beef and cabbage, a pint of Guinness and a tea cake. I contemplated a recipe using gorgeous sharp Irish cheddar cheese and debated about making colcannon, a hearty potato and kale dish. But, since I don’t have a drop of Irish blood, I figured it was probably best to leave that traditional fare to the Irish.
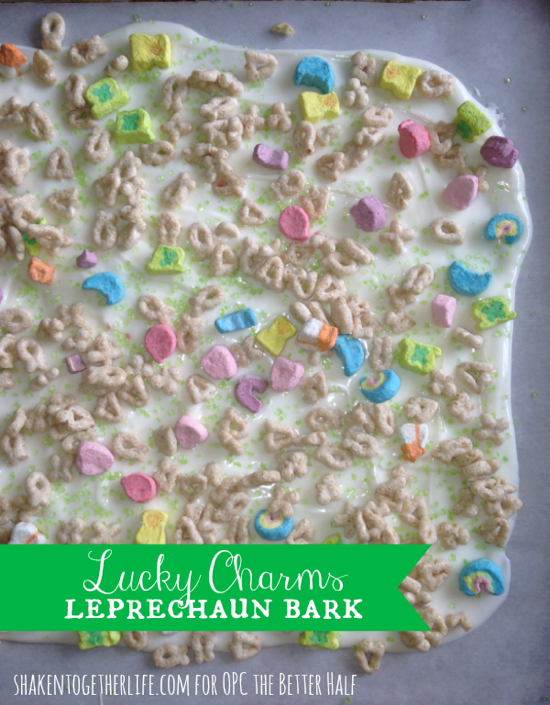
Now, don’t you worry, I do have a super-easy, festive recipe that is perfect for St. Patrick’s Day! This no-bake sweet is sure to lure all your wee little ones … Lucky Charms Leprechaun Bark! Its the perfect St Patrick’s Day dessert!
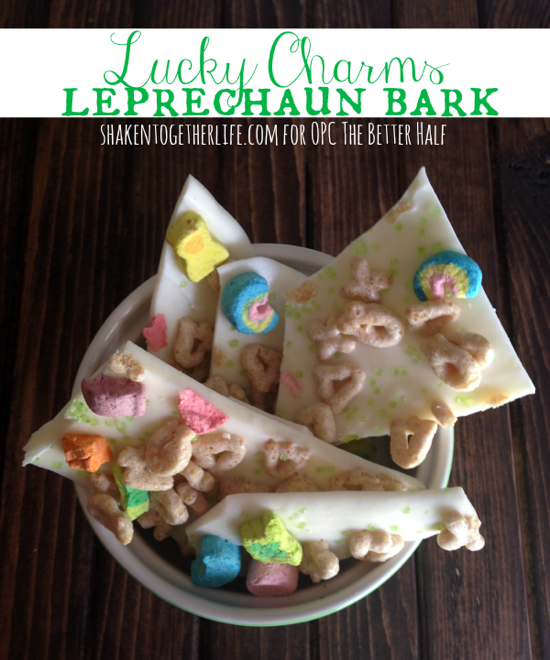
Honesty, this recipe only has two ingredients! Well, three if sprinkles count. But when one of those ingredients is Lucky Charms, you know you have a winner! It is just about the perfect balance of lightly sweetened cereal and crazy good marshmallows. And the festive shamrocks, clover hats and rainbows could not s
So, let’s talk bark. It is basically a melted chocolate-type base with all sorts of yummy goodness sprinkled on top: nuts, chips, candy, crushed cookies, sprinkles. Once the bark is set, you can cut or break it apart into smaller pieces. Because the “recipe” is so flexible, it is the perfect treat to make for holidays!
And speaking of holidays, St. Patrick’s Day is right around the bend, so let’s get to it. Here is what you’ll need for our Lucky Charms Leprechaun Bark:
- 1 lb. Vanilla Candiquik (I am partial to Candiquik for the base because it melts beautifully in the microwave in about a minute. You can also use white chocolate chips or candy melts.)
- Lucky Charms cereal – about 1 to 1 1/2 cups depending on the size of your pan/bark
- Green sprinkles
Prepare a sheet pan by placing a sheet of parchment paper on it. This makes it really easy for the bark to release from the pan. Melt the Candiquik according to the directions on the package. Once it is melted, use a spatula to spread the melted Candiquik over the parchment paper. I try to spread it a rectangular shape, but you can go free-form, too. Sprinkle the top of the melted Candiquik with Lucky Charms. I might have gone back to pick out a few extra marshmallows. Maybe. Finally, add a shower of green sprinkles and pop your pan in the fridge to set up.
Once the bark is set, cut or break it in small pieces. I used a sharp serrated knife and once you begin to put pressure on the edge of the bark, it naturally fractures and breaks apart. And if there are loose marshmallows, no one will have to know!
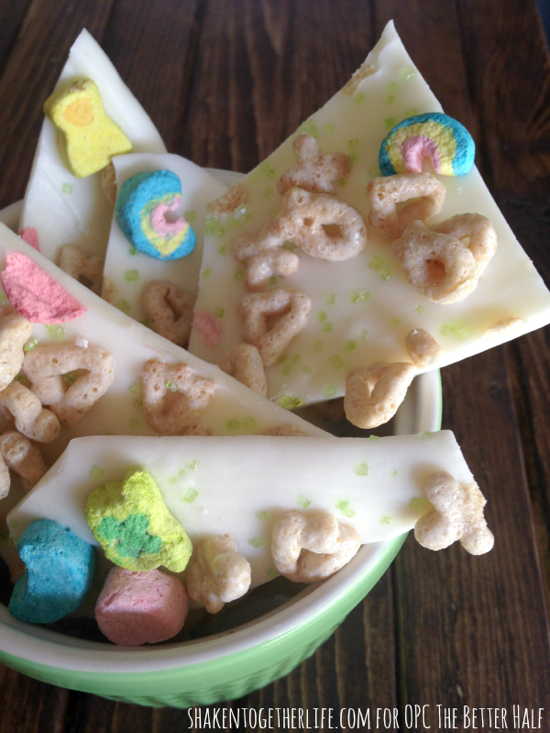
Package your Lucky Charms Leprechaun bark in treat bags for your lads and lasses! Or make it one afternoon with the kiddos. I have the inside scoop that they won’t mind “helping” with the marshmallows 😉
And since I feel so blessed to spend a little time with Jocie and all of you each month, I thought it was only fitting that I end with an Irish blessing:
May your joys be as deep as the ocean,
Your troubles as light as its foam.
And may you find sweet peace of mind,
Wherever you may roam.-An Irish Blessing
See you all again next month!!
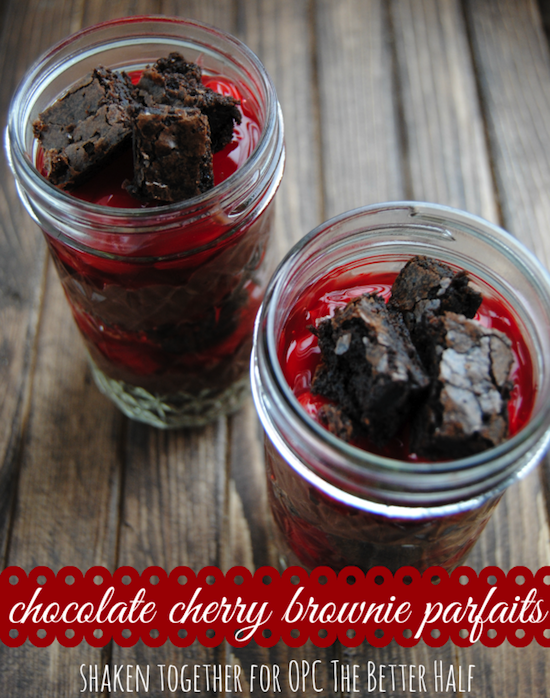
It’s that time again, OPC readers! Keri from Shaken Together, here. As Jocie’s recipe contributor, I get to interrupt her amazing DIY and home decor projects with oodles of calories and something delicious each month. Like Peppermint Brownies and Taco Bites with Salsa Ranch. Yum, right? And since it’s February, the month of love, it was only fitting that I share a dessert recipe that is brimming with bright red tart cherries and double layers of rich, deep chocolate! I hope you don’t mind brownies again. I didn’t think so. I knew I belonged here. Anyway, I think these are just perfect to pack up for a picnic for a pair of lovebirds. What says love more than chocolate cherry brownie parfaits!
But don’t worry – you won’t be spending all day slaving away in the kitchen. These sweetly layered desserts are made with a few time-saving shortcuts that let you spend more time with the ones you love! And while it may seem hard to believe, my hubby doesn’t really even like sweets. I KNOW! But occasionally I can tempt him with carrot cake or ice cream. So this delectable dessert? Is allllll mine!
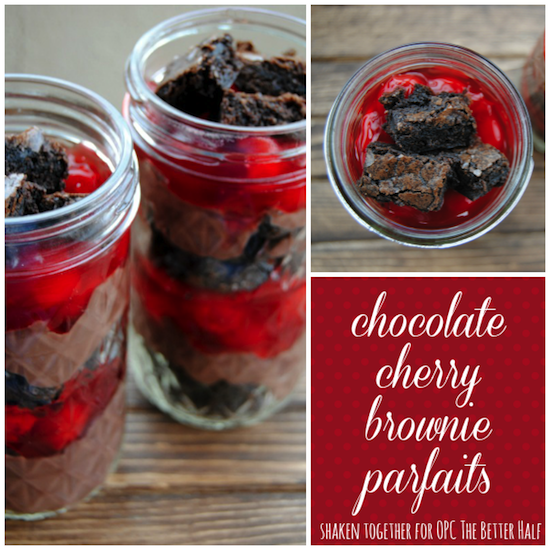
Yields 4 lovely layered parfaits (may vary depending on what you build your parfaits in)
- 1 8×8 or 9×9 pan of your favorite brownie recipe
- 1 can of your favorite tart cherry pie filling
- 1 box of instant chocolate pudding, prepared according to the directions and chilled
Once cooled, cube the brownies into bite sized pieces. Then, begin layering the brownies, pudding and pie filling until each bowl (or mason jar in my case), is full.
Now, if you really want to amp these up, add a sprinkling of mini chocolate chips, chocolate sprinkles or homemade whipped cream between layers. The beauty of parfaits is that you can add layers of whatever yummy things that float your boat. I mean, are sprinkles ever a bad idea?!
Since I used mason jars for these parfaits – glass just really allows you to see those pretty layers that are waiting – I used fun gingham canning lids to add a pop of red. Then, I used striped bakers twine to tie a spoon to each mason jar parfait. Have spoon and brownies, will travel!
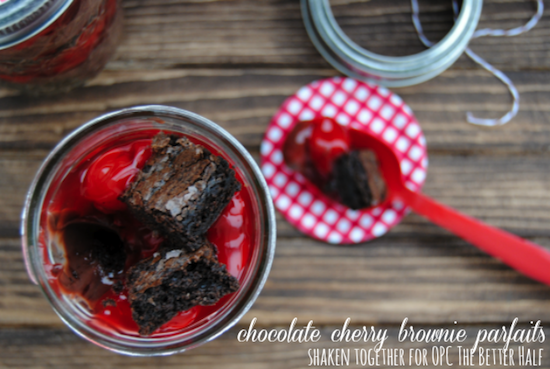
What do you say? Would a parfait with ooey gooey layers of rich dark brownie, sweet pudding and tart cherry make your heart sing like mine?
Here are a few more of my favorite recipes that make my heart (and taste buds!) seriously happy!

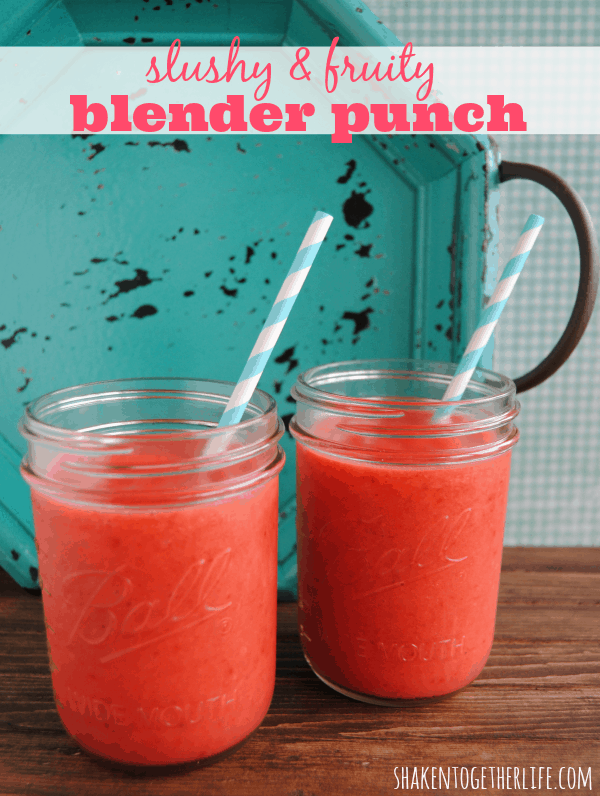
Slushy Blender Punch – only 4 ingredients!
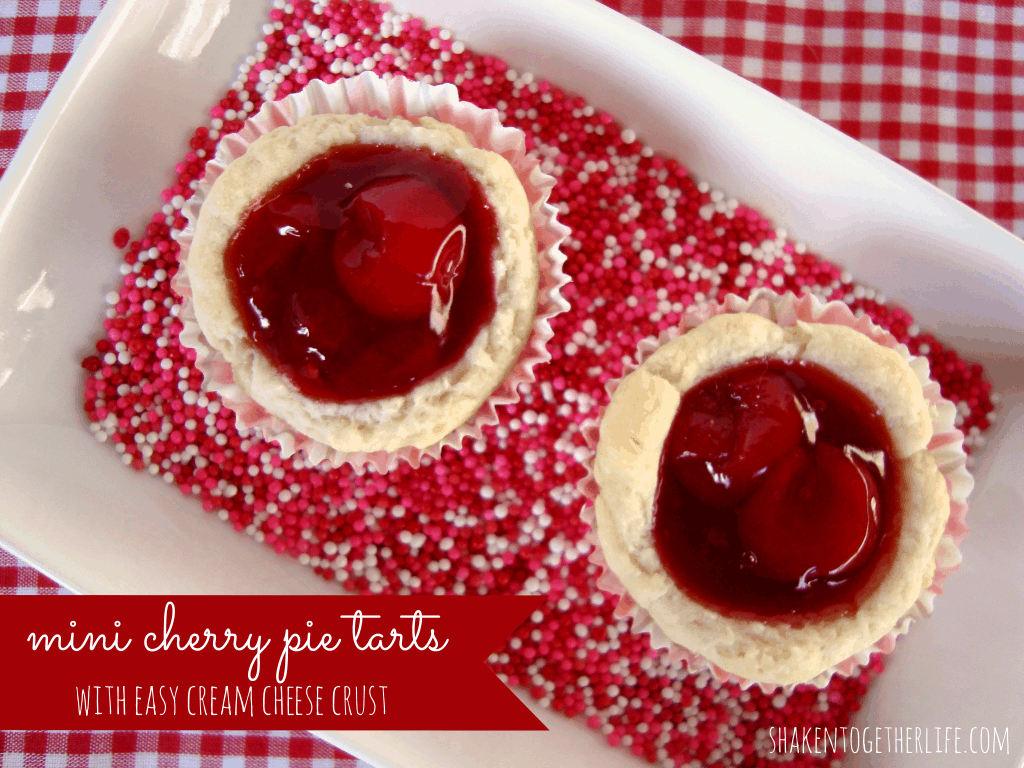
Mini Cherry Pie Tarts with Cream Cheese Crust
Hi OPC readers! It’s Keri from Shaken Together, and I’m back to share another easy, delicious recipe with you! (Did you see last month’s amazing Peppermint Cheesecake Bars??)
Mexican food is one of my go to meals – taco, enchiladas, burritos, salads – and luckily, my family just gobbles it up! But I’ll be the first to admit that I get tired of the same ol’ meals. So, I came up with a twist on taco night that is perfect for appetizers or even a finger food family meal!
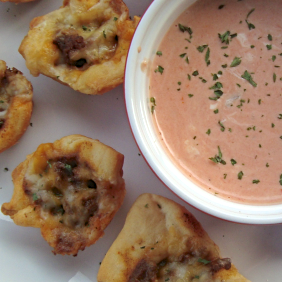
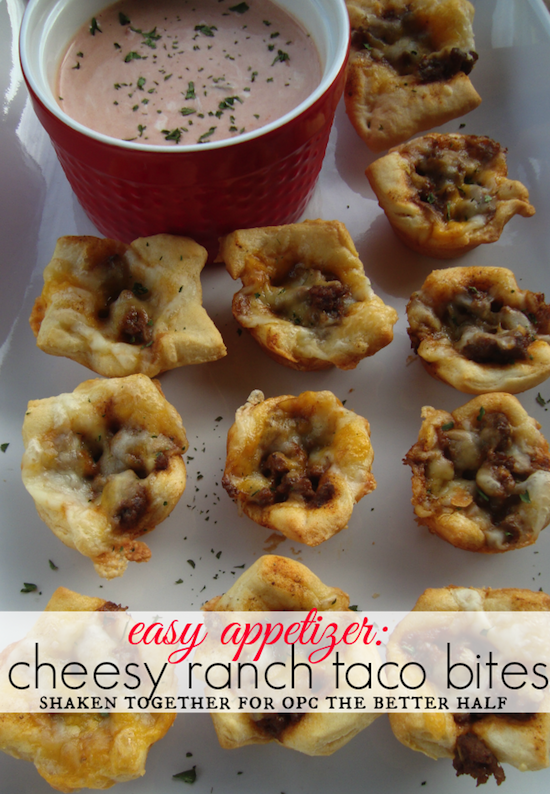
Easy Cheesy Ranch Taco Bites with Salsa Ranch Dipping Sauce
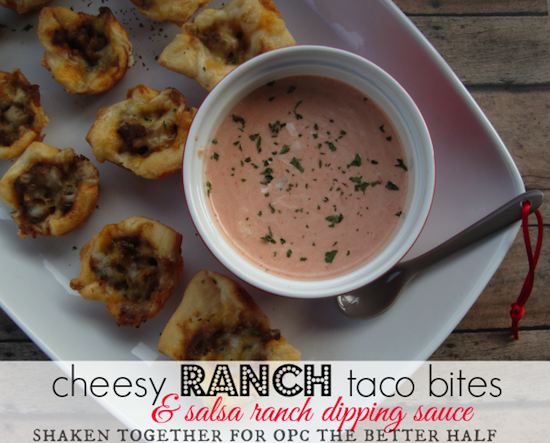
Crescent roll cups are filled with a ranch taco filling, topped with cheese and baked until they are golden brown. Pop them on a platter with a salsa ranch dipping sauce for a pot luck or serve them with your favorite taco toppings (olives, shredded lettuce, jalapeño slices, diced tomatoes) for a quick and easy dinner!
- Two tubes of 8 count crescent rolls
- One pound of ground beef or turkey, browned and seasoned with your favorite taco seasoning
- 1 cup prepared Ranch dressing - divided into two 1/2 cup portions
- 1 cup shredded sharp cheddar cheese
- 1/2 cup of your favorite salsa
- Preheat oven to 375*.
- Unroll the first tube of crescent rolls.
- Take each block of four crescent rolls and press the seams together to form one single sheet of dough.
- Cut into 12 square-ish shapes, roughly the same size.
- Press each square into the well of a mini cupcake/muffin pan.
- Repeat with the second tube of crescent rolls.
- Mix together the taco meat and 1/2 cup ranch dressing.
- Spoon the taco meat mixture into the 48 crescent roll cups and sprinkle the top of each taco bite with shredded cheese.
- Bake until the crescent roll dough is baked and the cheese is melted and browned.
- Serve with salsa ranch dipping sauce: stir together 1/2 cup prepared ranch dressing and 1/2 cup of your favorite salsa.

This recipe makes 48 cheesy ranch taco bites so there are plenty for a party and they reheat well. My boys asked me to pack these in their lunches as an alternative to a sandwich – great idea, guys!
Finger food is way much fun, so here are a few more of my favorite appetizer recipes!
Cheesy French Onion Soup Bread
Orange & Strawberry Guacamole or The Best Guacamole EVER
Thanks for reading and hope you love these amazing and easy Cheesy Ranch Taco Bites with Salsa Ranch Dipping Sauce,

Note from Jocie: Keri is one of three contributors to One Project Closer. To find out more about her, and other other contributors, check out our introduction to Keri from Shaken Together, Kathryn from Blessed Life Atop a Cake Stand, and Katie from Upcycled Treasures! We hope you will visit on Wednesdays for other great contributing articles.
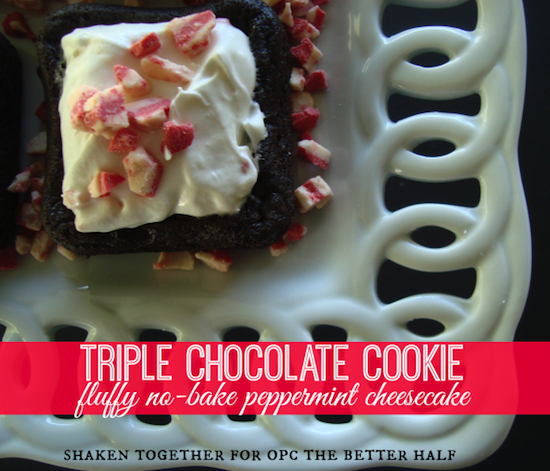
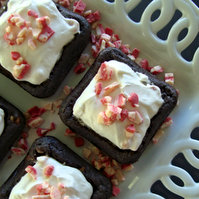
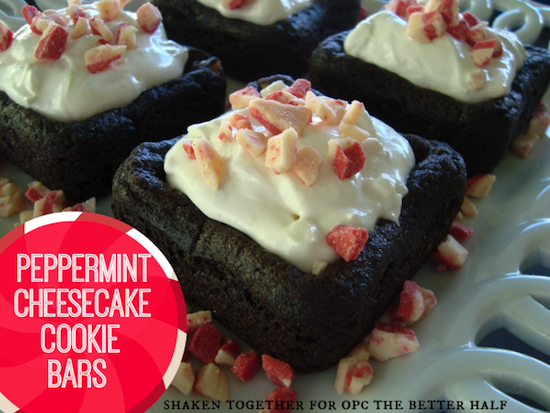
Hey there OPC readers! It’s Keri from Shaken Together and I am so excited to be sharing my first recipe as an OPC contributor!! ‘Tis the season for cupcakes and candies, cookies and cheesecakes, and all things holiday desserts! And today, I’ve got a dessert that is sure to bring smiles to your holiday guests’ faces. Heavenly, rich triple chocolate cookie bars topped with creamy peppermint no-bake cheesecake!
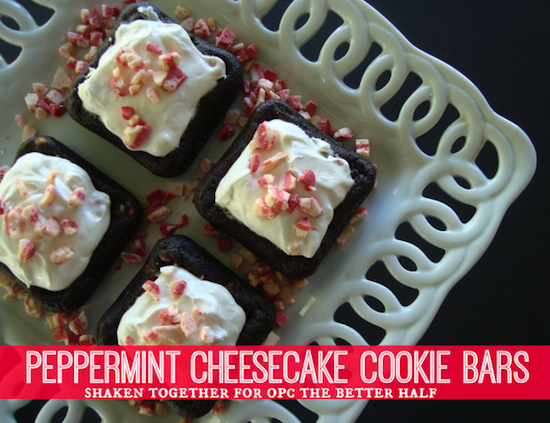
Chocolate and peppermint is one of my all-time favorite combinations, especially around the holiday! These peppermint cheesecake cookie bars start with a pre-made cookie dough but feel free to make a batch of your favorite chocolate cookie dough. Whatever you decide, the chocolate cookie base is the perfect partner to the creamy, no-bake peppermint cheesecake!
Let’s get baking – the sooner these are done, the sooner you can nibble!
- One package of Immaculate Baking Co. triple chocolate chip cookie dough OR a batch of your favorite chocolate cookie dough
- One 8 oz. tub of Cool Whip, thawed (I used lite)
- One 8 oz. block of cream cheese, softened (I used reduced fat)
- 1/2 teaspoon vanilla extract
- 1/2 teaspoon peppermint extract
- 1/2 cup granulated sugar
- 6 tablespoons Andes peppermint chips + additional chips for garnish
- Press two balls of cookie dough into each well of a 12 square compartment baking pan. I used a pan with 12 square compartments but you can also press the cookie dough together to cover the bottom of a 9x9 baking dish prepared with non-stick cooking spray.
- Bake cookies according to package directions
- While the cookies cool, prepare the no-bake peppermint cheesecake.
- In a large bowl, mix together the cream cheese and granulated sugar until light and fluffy. Then, mix in the extracts. On the lowest speed of your mixer, add the thawed Cool Whip just until incorporated. Finally, fold the Andes chips in with a spatula.
- The cheesecake filling can be refrigerated until ready to serve. Before serving, spoon the peppermint no-bake cheesecake on top of each cookie bar and garnish with additional Andes chips.
If you are a fellow mint + chocolate fan, then you’ll love these recipes:
Chocolate Peppermint Krispie Treats
Thin Mint Ice Cream Sandwiches
Thanks for reading and hope you love these delicious holiday desserts including Peppermint Cheesecake Cookie Bars!
Note from Jocie: Keri is one of three new contributors to One Project Closer. We hope you’ll show her a warm welcome to OPC and visit her at Shaken Together and on FB to show her some love. To find out more about her, and other other contributors, check out last week’s introduction to Keri from Shaken Together, Kathryn from Blessed Life Atop a Cake Stand, and Katie from Upcycled Treasures! We hope you will visit again next week for another great contributing article.
