 This week’s Before and After shows us that even a small basement space can be transformed into a cozy modern family room and office. Greg MacLellan over at GroogsBlog remodels his basement, changing it from an old storage area with a spare refrigerator into a modern entertaining space complete with plasma TV and leather sofa and ottoman. Despite the smallness of the space, Greg still manages to squeeze in a work area nook that is looks ready to house his small business right from the comfort of his own home.
For winning this week’s Before and After contest, Greg gets a $50 gift card to Lowes, Home Depot, or Amazon. We’ll also make a $100 donation to Habitat for Humanity in Greg’s honor. Read on below Greg’s article for this week’s Habitat Quick Fact and instructions for submitting your own entry (we still have 8 more winners to select this Summer!)
Small Basement Remodel with Office and Family Room
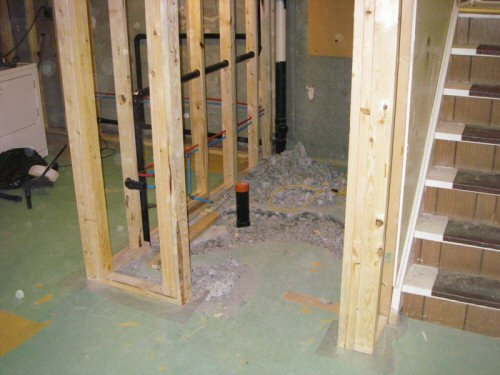
My fiance and I moved into our first house in August 2008. The house was built in 1974, and we bought it from the original owners, so everything was in fairly decent shape. The basement was partially finished, with cement floors, wood paneling, and the old upstairs kitchen cabinets (a reno they did at some point) hung everywhere. The wood paneled half of the basement was insulated, but the laundry room side was not. The crawlspace was also only half insulated – I’m not sure why.
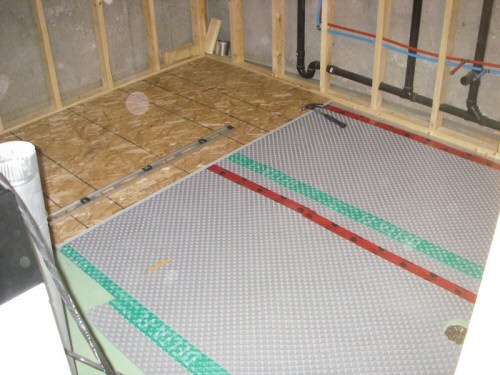
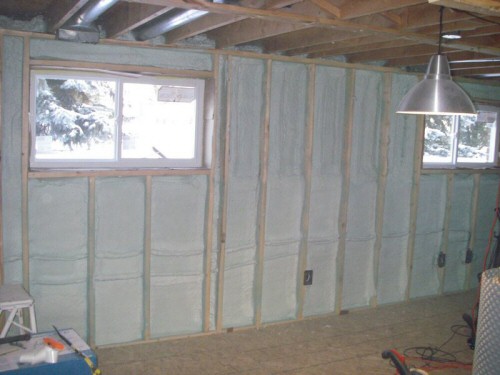
I started by ripping everything down to the cement walls. I added a sub-floor using DeltaFL and OSB plywood, and had closed-cell spray-foam insulation installed. These two things have worked out very well: even during the winter, the floor feels like an upstairs floor, and the basement is actually the warmest part of the house now.


The house had three bedrooms and one bath, so I added a second half-bathroom which should help increase the value quite a bit, and at the least has made our lives a bit easier. I had a pro hook into the sewer line for me but otherwise I did the work of cementing the floor and putting together the rest of the bathroom.

I also added a lot of media wiring, including network/phone/cable jacks, surround speakers, hookups to connect my computer (audio and video) to the TV/receiver, and routed everything so there are no visible wires going to the TV mounted on the wall.
Although I’ve done some framing (and lots of electrical/plumbing) in the past, this was my first full reno, and I did most of the work myself with ocassional help from friends and family. I did have pros do some of the work though: replacing the electrical panel (going from fuses to breakers), hooking into the main sewer line, mudding and taping the drywall, and installing the carpet. The worst for me was the drywall: I did actually do the first coat, but then after a couple months of procrastinating, I paid a pro to get it done – who came in and re-did my terrible job in a matter of hours, and had the whole thing completed a couple days later.
I’m pretty proud of the end result, and we make very good use of it. In total, it took me about 15 months working nights/weekends (with the occasional period of inactivity).
Thanks from One Project Closer!
Greg, this is an amazing transformation, thanks for sharing it with us! We can particularly relate to your experience taping and mudding drywall. When we removed walls on our first floor, we patched the removals ourselves but it didn’t look really good. We ended up hiring a contractor to finish them and they look great. Drywall is really hard to get right if you don’t do it all the time.
Habitat for Humanity Quick Fact
Did you know that Habitat helps builds home in more than 15 countries in Central and South America? While much less publicized than the terrible disaster in Haiti, this last year many in El Salvador have lost their homes due to torrential rains, mudslides, an earthquake, and a severe tropical storm.
If you are inspired to donate to this region, we suggest donating through habitat.org’s online donation page and earmarking the money from the country you want to support. This ensures you get a tax deductible receipt, while donating to the individual branches may not.
How to Enter Your Own Before and After
Want to win $50 and help a good cause? Send your entry to: beforeandafter@oneprojectcloser.com.


It looks like you put the framing against the bare concrete wall, which isn’t good.
First, a below grade basement will take in moisture from the outside, and if you’ve used untreated lumber for the framing it is going to degrade.
The lumber itself will act as a thermal conductor. Insulating between the framing won’t do anything to limit this, and if you sprayed over the lumber, then you encourage the moisture to build up and deteriorate the framing.
It looks like you have a vapor barrier underneath the subfloor, but there’s no thermal break, so condensation is still liable to build up and not be able to properly dry.
That said, I think the best way to prevent future issues might be having a dehumidifier in the basement.
Hemm, the fourth picture down shows that the 2x4s are not touching the wall.
You are incorrect that regular studs will degrade in a below-grade installation. That is done all the time and is a standard practice. That said, you should use a pressure-treated bottom board and I’m not sure if that was done (the pictures don’t appear to have pressure treated wood for the bottom board.
Second, you may not be familiar with the closed cell spray foam use on the walls, which forms a complete vapor barrier and is sprayed into the gap behind the studs to prevent moisture from condensating on the walls. Basement walls should be sealed against moisture before closed cell foam is installed, but the foam does prevent vapor conduction.
I don’t have expertise in the thermal break requirements for basement floors, so I’ll defer to another opinion.
My guess is that with the closed cell foam on the walls, and assuming regular ventilation in the house with a return in the basement, there’s probably little humidity to worry about.
Hemm: I did leave a gap between the studs and the cement walls (at least 1″, and 2″ along the one exterior wet wall in the laundry room because I was being paranoid), and the closed-cell insulation was sprayed in behind the studs.
For the floor, I used DeltaFL (http://www.cosella-dorken.com/bvf-ca-en/products/foundation_residential/floor/products/fl.php) which leaves an air gap as a thermal break (details/pics: http://gregmaclellan.com/blog/basement-sub-floor/). According to the deltaFL site, it’s specifically designed to prevent condensation. I can say after 1.5 years of having the floor down, I haven’t had any problems with moisture or condensation, and would highly recommend doing a basement floor this way.
Fred: There’s a 6″ wide piece of vapor barrier plastic stapled under/around all the bottom boards, which works equally well (I’m told) and is a lot cheaper and safer/easier to work with (PT wood needs to be cut outdoors, with a mask on as the dust contains hazardous chemicals).
Greg,
Sorry my eyes suck. I didn’t see the gap.
The Delta stuff is good as a vapor barrier, but if there’s no thermal break above it, then it’s not doing much to prevent condensation.
If you’re in the right climate, such issues are lessened. And if the concrete was installed a drain system, that helps as well.
Fred said: You are incorrect that regular studs will degrade in a below-grade installation. That is done all the time and is a standard practice.
Standard incorrect practice. If there’s no vapor barrier, then they will probably be fine since they would be allowed to dry from both sides, but then there’s an insulation problem. If they’re installed against the concrete behind a vapor barrier, or with insulation only between the studs, then they’re at greater risk.
But pressure treated isn’t needed if there is a gap and they’re not directly on the floor.
And sealing basement walls before installing the spray foam is most likely unnecessary. I’m also not familiar with any sealing methods that won’t break down. The spray foam is good as both a thermal break and vapor barrier if the studs are pulled back an inch or two.
One way to get the thermal break on the floor is putting rigid foam down before the subfloor.
Hemm, I don’t think its fair to say that using standard studs is a “standard incorrect practice.” When you use standard studs, pressure treated, or metal, you always want to have a vapor barrier in place to prevent condensation on the walls that could lead to mold growth on the drywall. The location of such a vapor barrier should naturally be behind the studs.
Sealing a basement walls is necessary with spray foam installations if there is external moisture infiltration to the level that makes the wall damp. Not doing this will eventually lead to a wet cavity that can actually grow mold. While all sealing methods have their drawbacks, it is imperative to do the best you can before applying the closed cell foam.
Love what you did, great reno
Kathy 🙂