
We are well into our summer Before & After series, and the weekly winners have been spectacular! For the past four years we’ve run this series to help raise support and awareness for Habitat for Humanity (be sure to check out this weeks fun fact), and this year is off to a strong start. If you’d like to participate, there are a couple different ways to get involved. We need to fill up the entire summer with before and after stories, and yours could be next. See the link above for details about submitting your project. We’d also greatly appreciate if you’d help spread the word. If you have a website of your own, consider telling your readers about us.

I am uber-impresed with this weeks winner. Vanessa from Life at our House shares a tremendous kitchen makeover, and like the headline says, she did it all for only $300!
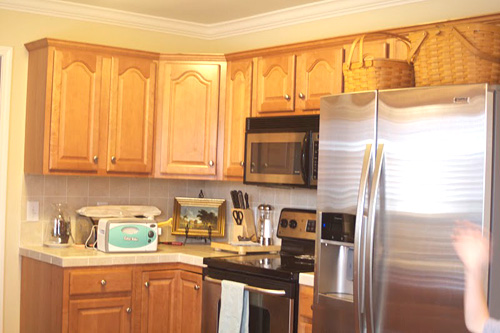
In 11 years of marriage, my husband and I have lived in 7 cities and sometimes have moved multiple times in each city. Needless to say, I have become a pro at making each house a home. One thing I have always wanted to do, but been too chicken to tackle it- is paint my kitchen cabinets. Now, in our 7th home, I finally decided to do it. All. By. Myself. When we moved in, our kitchen looked like this:
Once I decided to tackle the project, I was pumped! I began by numbering the insides of my cabinets and making a diagram to remind myself of where each door belonged! Then I removed all the doors and began the grueling process of priming and painting! (I didnʼt sand.)
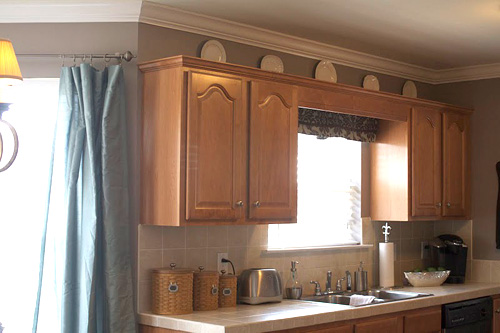
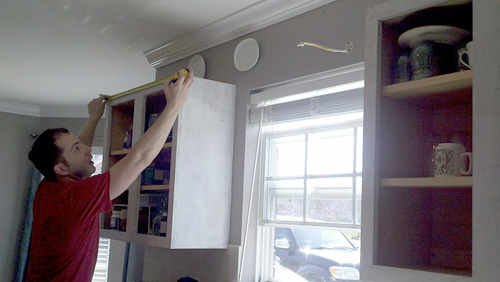
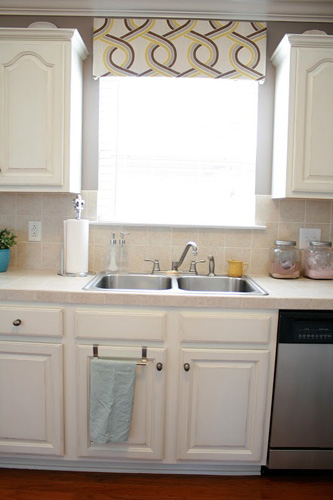
One thing I had always hated about my kitchen was the apron that connected the two cabinets on either side of my sink. This is the one part where I needed a little help. My awesome husband took down the piece along with the cabinet molding. He recut the molding to fit around the two cabinets.
It is amazing how much more light came in with that simple fix. We created another problem, however. You see that wire protruding from the wall? Well, previously there was a fluorescent light attached to the inside of that apron. We planned to add a cool aluminum outdoor sconce, but unfortunately, the wire was not centered over the window and it was impossible for us to move it because it was in a stud. We would have had to call in a professional. We came up with a solution that you will see later, however.
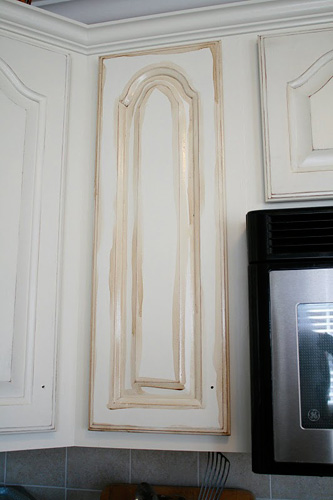
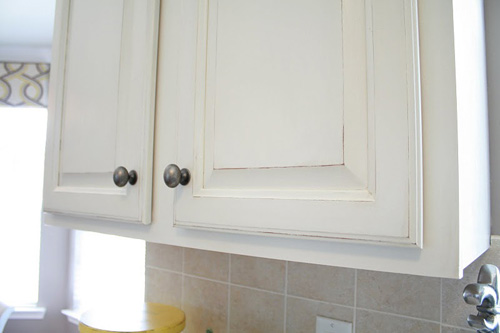
After priming and painting several coats, I rehung the cabinet doors and began sanding the edges. I then used some distressing oil around the corners where Iʼd sanded. After letting the oil sit on the door for a minute or so, I simply wiped it off.
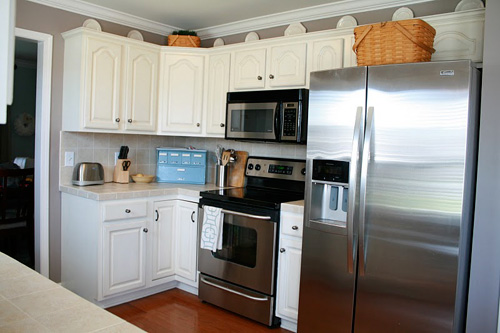
I love the way the oil brought out all the little scratches in the wood and created a sealer of sorts. Once all the cabinets were distressed, I replaced all the knobs that I bought for a steal! I chose an antique pewter to be a nice contrast against the cream, but to tie in with the stainless appliances.
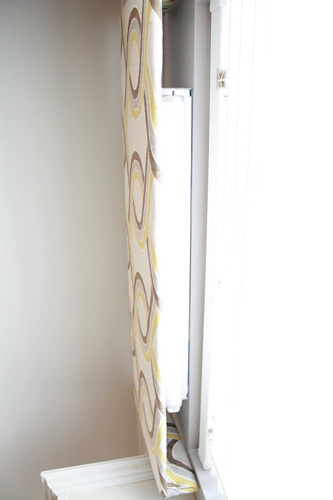
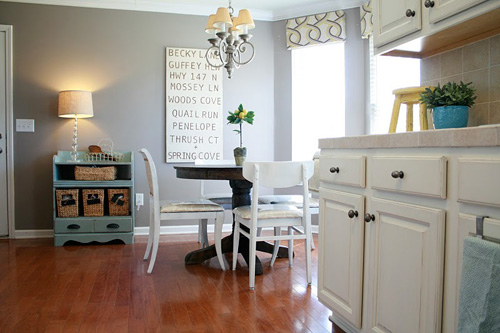
In addition to refinishing the cabinets, I also made new window treatments. I used a tutorial from thelittlegreennotebook.com for some awesome pelmet boards that were so easy to make!
As you can see, this is the window over my sink with that pesky light issue. Well, our solution was to mount the original fluorescent light under the window treatment!
It worked like a charm! I only use this light for a few minutes at a time when I am doing dishes. Although I really wanted a rustic sconce over the sink, there wouldnʼt have been room for my valance and then thereʼs the cost of paying an electrician. So this was the
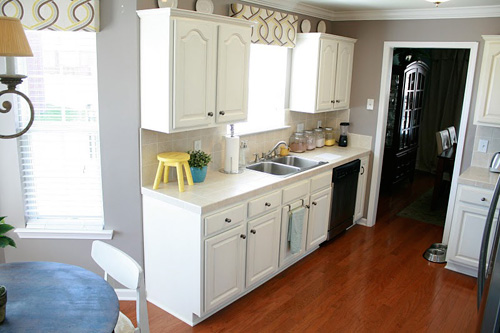
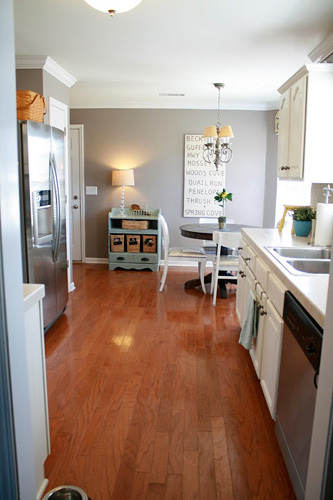
perfect fix!So, on to the after pics:
Source list:
- Paint- Valspar cream oops paint $5, Danish oil for distressing $11
- Primer- Zinser Oil based $14
- Cabinet hardware- Resale shop $10.50 (21 @ $.50 each)
- Valances- P. Kauffman fabric (Old Time Pottery) for $20, other supplies $11
- Accessories- Yellow step stool (Hobby Lobby) $12, small yellow pitcher (Goodwill) $1, 3 glass jars (Target) $6 each
That’s $102.50!! Woo hoo!!
I had previously painted the walls HomePlace Mushroom Taupe before starting the cabinet makeover. The kitchen chairs and blue table were both Goodwill finds that I got a new life for less than $100 for all 5 pieces. The kitchen table was a black one originally from Target that I already owned. I simply stripped it and restained it for less than $20. All the other accessories, I already owned. If you consider these previous projects in the final total, the makeover still comes in around $300. I say, thatʼs not too bad for a full kitchen makeover!
Thanks Vanessa!
Woo hoo is right! That’s an amazing kitchen makeover on a super small budget. I am very impressed, especially with how beautiful everything turned out.
Habitat for Humanity Factoid
Did you know that most Habitat chapters don’t spend every weekend working on homes? In fact, if you check out their calendar of events, you’ll see events like the “Voltswalk” walking tour in Americus, Georgia. Maybe you’re better at swinging a golf club than a hammer. In that case, check out the charity golf tournaments that benefit Habitat. These make for easy ways to play a part in what Habitat for Humanity is doing, and you can have some fun too.
Where’s Your Before and After Story?
We hope you’ll consider submitting a Before & After story. Email your pictures and a “how to” description to beforeandafter@oneprojectcloser.com to join in.
Help Us Spread the Word
Are you a blogger? If you’d like to support us, please write an article on your blog about the contest, and consider adding one of our buttons to your sidebar. You can find the buttons and more information on our main Before and After article.




What a wonderful remake! Those builders-grade cabinets look much more stunning with the new kitchen. Funny you should mention your hatred for the apron across the cabinets over the sink. We got the apron with our kitchen but didn’t like it either. We’ve decided to leave it out of our design but it obscures the window over the sink.
Oh wow. I really like the look of the finish on the cabinets. Very pottery barn. I’m going to have to save that for some kitchen inspiration.
What a great story and I can see that by going with a distressed look, it is possible to paint the cabinets … but it’s a look I still can’t get used to, at least for my own kitchen but someday it might be just the solution. Hardware is perfect and like how you handled the space over the sink – you are so right about getting lots more sunlight.
Home you stay there long enough to enjoy for many years
Kitchen makeover looks great!!
Given the fact that you were able to remove and replace the light fixture… I don’t see why you couldn’t just add the electrical box you needed.
It looks like what was there before didn’t even have a box (I guess its OK since the metal case of the light provides the enclosure for the wire splices) but you would have needed to add that anyways. Its basically everything you already did plus putting it through a hole in a box, maybe a pancake box screwed right into the header for the window, would let you center it easily.
This is definitely a great bang for your buck story! The cabinet hardware was such a good deal!
The kitchen looks great! Good job!
You did a great job painting your cabinets! I love the finish.
We, too, have an apron between our cab’s above the sink. When I painted mine, I replaced a scalloped one with a straight one. Maybe I should look into taking it off. Although, I do use it at Christmas time for hanging ornaments. Hmm, something to ponder.
Thats a brighter kitchen now for sure. I always cringe on painting wood but it does look good after. I like the paint choice too make it easy to pick colored accessories and swap em out when the styles change. Overall good job sadly I’m cursed with patrical board cupboards that are coated in lamenent with tacky oak trim(think 80s). I would do this to our kitchen in a heartbeat if I had oak cabinets.
Chyld, have you seen this blogpost about painting laminate? Might be something to look into if you’re really wanting to do it.
http://livingwithlindsay.com/2009/05/how-to-paint-laminate-furniture.html
Congrats Vanessa, and great job on the kitchen for such an inexpensive budget!!!
Great makeover! I have the same apron between cabinets. Never thought of just removing it – thanks
Great makeover! I love how light and bright it is now.
I’m glad I’m not the only one who has been afraid to paint my kitchen cabinets. I LOVE the reveal. You did an awesome job and I’m just going to have to muster up the courage to take the plunge and paint those cabinets!!!
Love the remodel. Looking to do my cabinets in a similar fashion. Can you tell me the type of paint you used to do the cabinets (flat, satin, water based or oil based)? Did you have to put anything on the cabinets AFTER the distressing oil to keep the finish from washing off? How is the treatment holding up? Thanks!