
Editors Note: Today we’re featuring a guest contribution by Brady, one of our regular readers. Brady built a beautiful, free-standing deck in the backyard of his home in New Orleans. If you have a story to share, we’d love to hear it so check out How to Get Featured on OPC.
The first year in our house, we decided to get rid of a large pine tree in the backyard. It was about 35 feet tall, and the fear in New Orleans is always that a hurricane will drop a tree on your house with pine trees being usual culprits. So I borrowed a friend’s 18” chain saw and set to work. The first task was cutting off all the branches. I left about 1-1/2” on each and chopped them off from the bottom up. I figured this was the safest way. After about 4 hours, I had all the branches removed and had topped it.
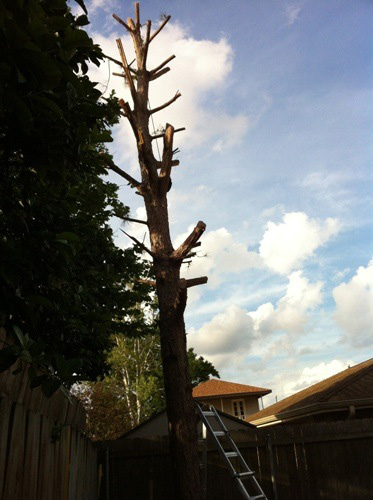
As I went, I had to be sure that the branches didn’t fall onto either our side or rear neighbors’s fence. The tree was about 3’ from the corner of our yard. To do this, I tied a rope to the branch on both sides of a cut. After cutting, the branch would fall a couple of inches, and the rope would go tight. Then the branch would swing back to the tree, missing the fence, and I would untie it and let it fall. Between this tie-off procedure and strategic cutting, I was able to cut all the branches without any fence destruction. Whew!
Then came the task of continually topping the tree in 4’ to 5’ segments.

This happened until I had about 10’ left and the trunk was thicker than the 18” chain saw could handle. I cut as deep as I could from all sides, which got through all but the last 1” at the center, and tied a rope to the top of the piece and yanked until it fell. I had the parish (that’s the same as the county to you non-Louisiana folks!) trash service pick up the tree. There’s a free service here where they bring a dump truck with a crane to come pick up large debris. All you need to do is get it to the street and call to schedule a pickup day. We hired a stump grinder to come in and remove the stump. The best part of that project was that there would be no more pine needles/cones. The yard looked better already.
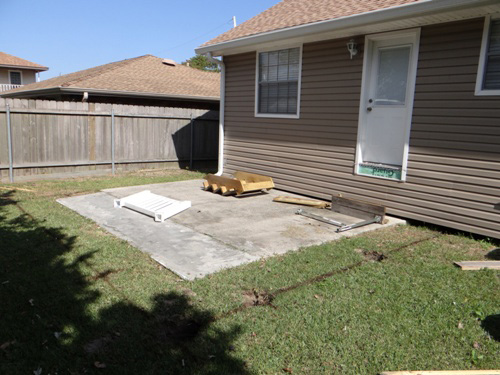
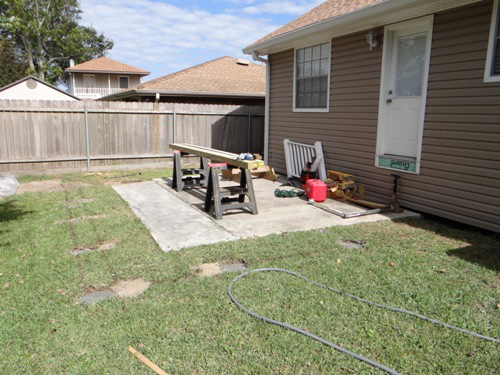
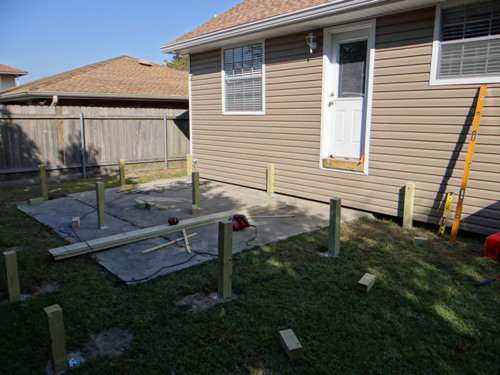
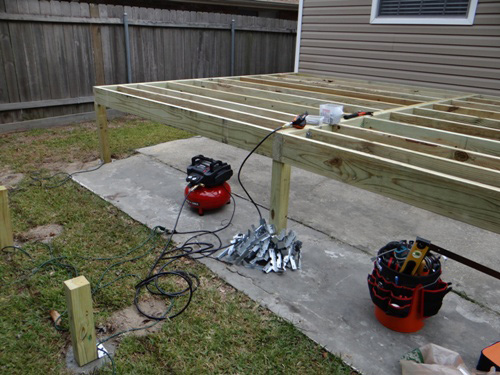
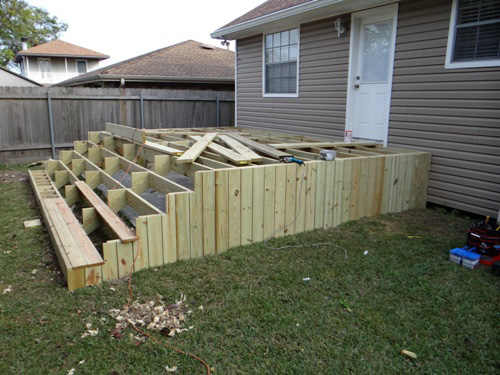
Then after a year in our new house, we decided that the backyard really needed another makeover. The most noticeable feature was a very ugly piecemeal slab. The house is raised, and there was a set of very simple stairs with a plastic railing as you exited into the backyard. It wasn’t terrible, but it wasn’t anything to show off. I started by removing the stairs. I drew up a basic outline of the deck including the number and arrangement of the posts I planned to use. Then I used a leftover can of spray paint to measure out the deck and dig the footers.
I highly suggest the Southern Living Complete Deck Book. I don’t think they still print the book, but you can get it used. It was a great resource with tables showing minimum post, beam, and joist sizing. It also had lots of photos for ideas, plans for a few different types of decks, and generally was a great read as a primer to this project.
After filling the footers with cement (I went through eighteen 80 lb. bags of Quickrete!)…
…I set the 4×4’s posts…
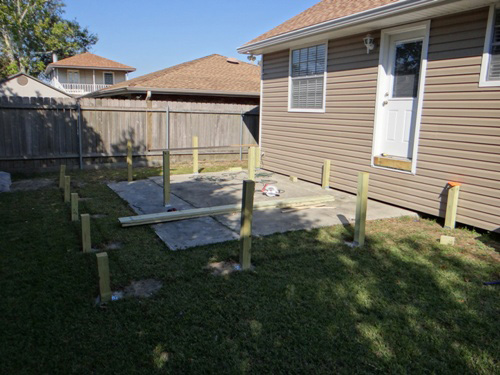
…using Tapcon concrete screws (blue), Spax self tapping wood lag screws (green), and Simpson angle brackets (two brackets per post).
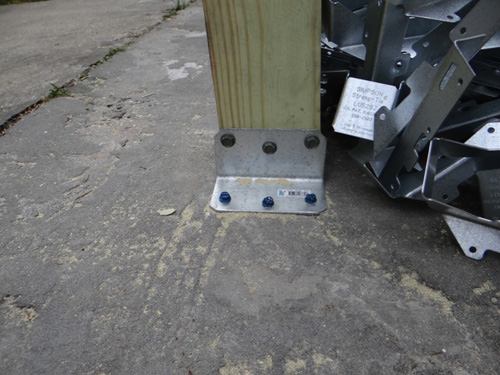
I had to rent a rotary impact drill from Home Depot, and it cut like butter.
I topped the posts nearest the house using a string and string level to get the offset below the door sill correct, then I used a 6-1/2” foot level to top the posts moving away from the house.
Once the lumber showed up, I laminated two 2×8’s to use as beams and set them on the posts…
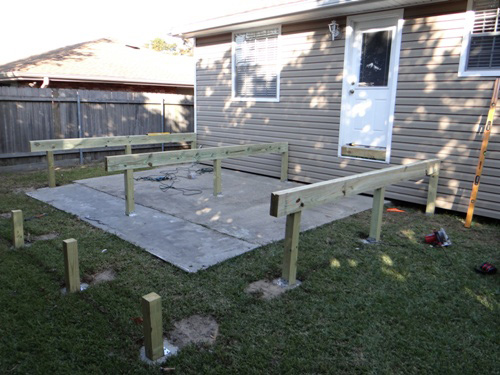
…and cut the ends off, using a string to ensure they were even on the ends.

Then came the fun part. I used screws to temporarily mount the joists (2×8’s though the tables in the book showed that only 2×6’s were required…I wanted to limit the deflection, so I stepped it up).
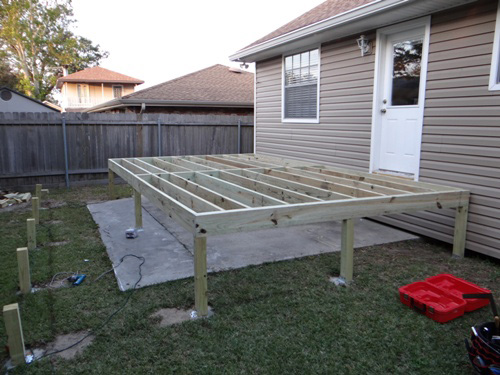
Per the recommendation in OPC’s deck build Pro-Follow, I went and got myself a Rigid Palm Nailer.
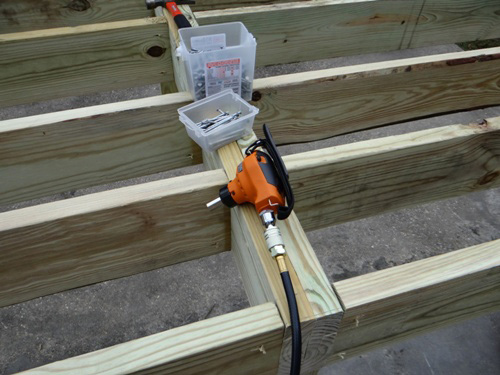
What a great investment! It was actually a blast to use! In only 20 minutes, I had installed 40 joist hangers to serve as the permanent fasteners. Recall that the screws I originally used to hang the joists were only ever intended to be temporary. Using screws first was required in order to hang the joists by myself. If I never use the palm nailer again, it was well worth the $70 investment (FYI, I’ve already used it a few more times…sure beats driving nails the old-fashioned way!).
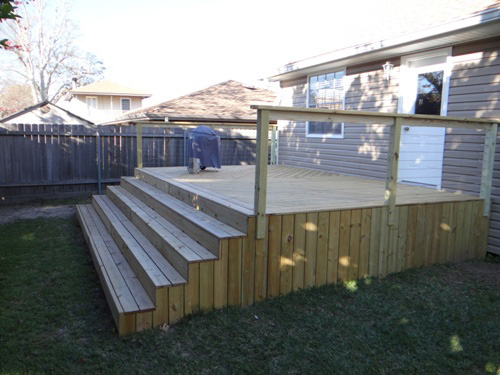
Then came time to do the stair stringers, and I used the long level off the beams to determine the final rise and run of the stairs. The yard slopes away from the house a bit and isn’t, therefore, the same height at the house as at the far end. I had estimated this in my original design and accounted for it in the beginning when laying out the footers. Luckily, I did it well because the resulting stairs came together nicely. Again, whew!
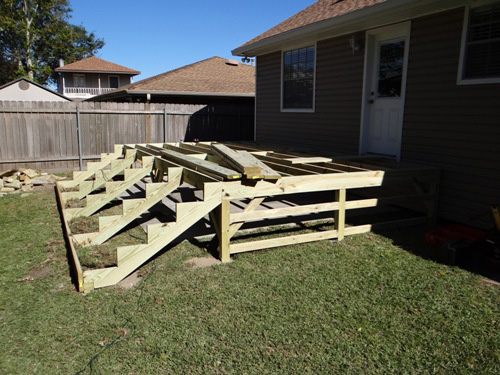
I wanted the stair decking to run lengthwise, so I needed to frame between the stair joists on 16” centers.
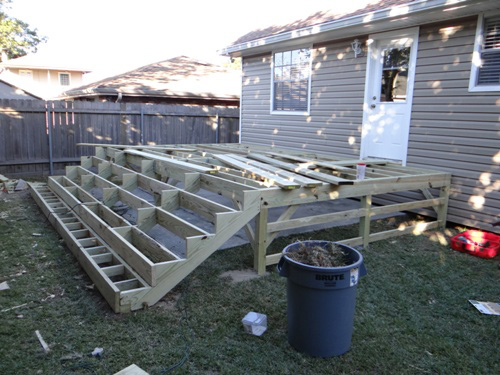
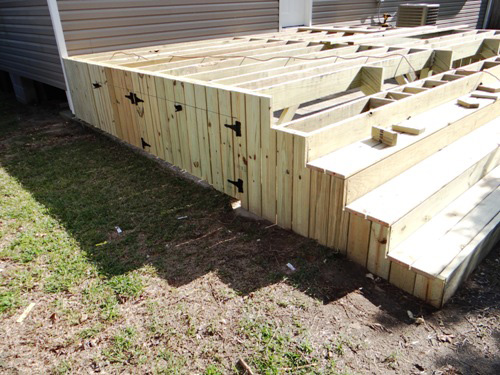
Before I got around to decking the stairs, I decided to deck the sides.
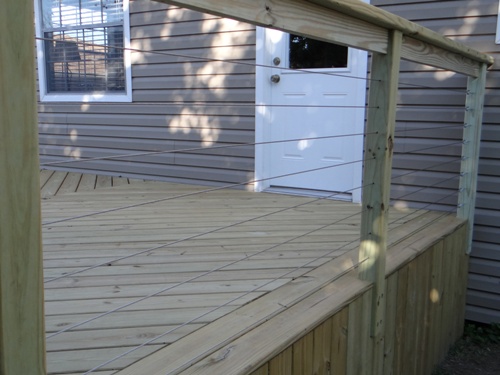
I used the Kreg Deck Jig to install all the decking. This cool little tool is great because all screws are countersunk and concealed in the side of each board. There are no screws exposed, and I really like the look with the fasteners not visible.
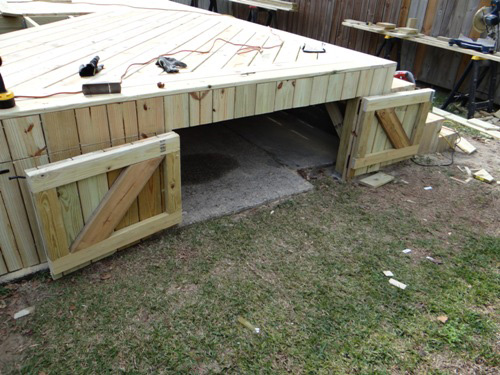
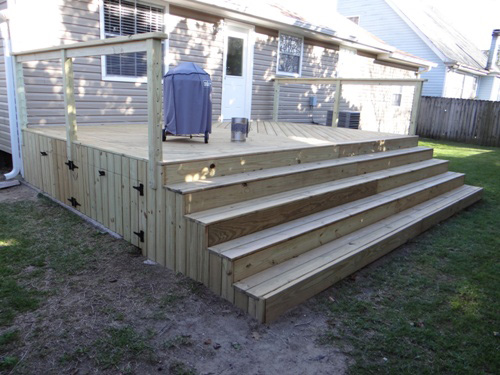
I pre-planned to have under deck storage on the side closest the fence, so I built the doors into the sides before decking that side.
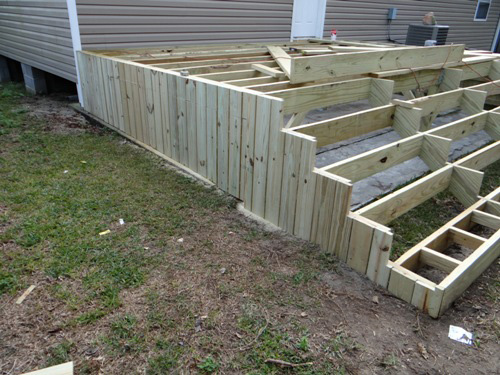
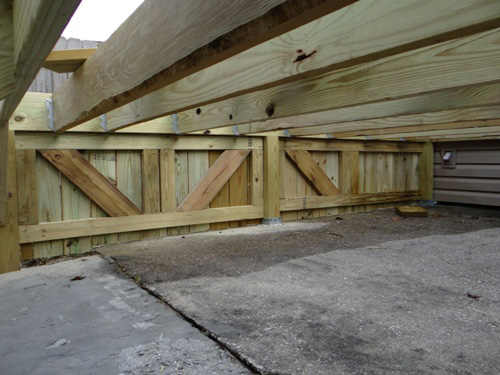
I then simply cut out the shape of the doors after the sides were decked. It seemed like the easiest way to accomplish the task.
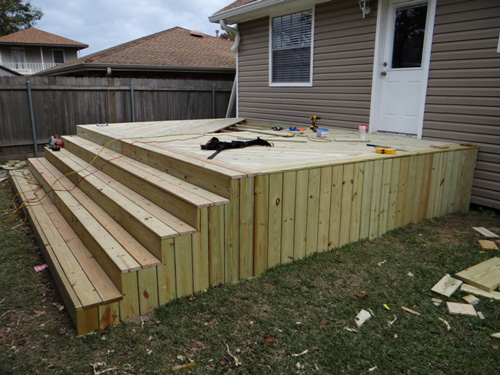
Now I’m off to the races with the stair and top decking.
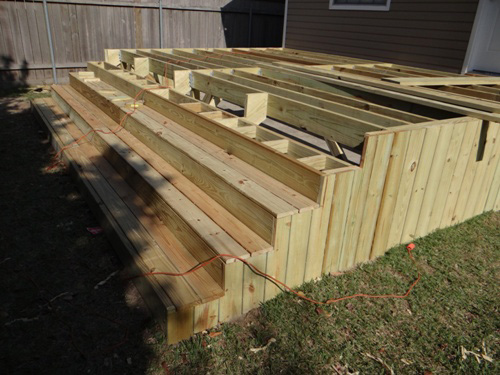
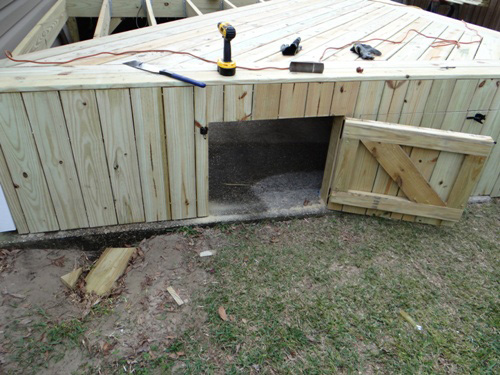
After decking the stairs, I bought the door hardware and mounted that.
I started decking the top…
…when I got a Rockwell Sonicrafter X2 as a gift. I used it to cut the 2×4’s such that the doors could swing open. I didn’t have any other tools that were suited to that job. Man, I love that tool!
After I had decked the top, I got lazy during January and the early part of February (life stops each year for Mardi Gras season here in New Orleans!). Then, I finally got around to the rails. I decided I wanted to do stainless steel wire rope with a wood frame. All materials (the wire rope, compression sleeves, washers, thimbles, eye bolts, turnbuckles, and hanger bolts) came from McMaster-Carr. All in all, we think it came out great!
Now I need The Better Half to choose a stain/sealer color. We’re already planning for the first backyard barbeque party!
A few notes:
- Posts: 4×4’s
- Beams: (2) 2×8’s
- Joists: 2×8’s (though 2×6’s were acceptable)
- Top deck size: about 18’ 9” x 11’ 6” by 34” tall
- Total size: about 18’ 9” x 15’
- Number of actual work days: about 10 (+2 days to remove pine tree)
- The total cost of material and all new tools that I hadn’t already owned (6-1/2’ level, compressor, palm nailer, etc.): roughly $3,500
- Happy wife: Priceless!
I’d like to give a big thanks the Brady for sharing this with us. The deck looks terrific, and I’m sure you get a great sense of pride from building it yourself. Nice work! If anyone else is considering taking on this project, check out our step-by-step Project Guide for How to Build a Deck.

I’m going to be installing a deck this spring and I’m really interested in that palm nailer. Going to check that out right now.
Love the underneath storage. Great idea and a great use of space.
I’m not exactly sure how you set the posts … was that within the concrete? I have no experience building one of these myself, so perhaps I’m all full of hot air, but of the methods I’ve seen for deck posts, the one I liked best involved a steel bracket mounted on or set in the concrete, with the post on top. The bracket was designed to hold the end of the post off of the concrete, so water had a place to drain away without wicking up into the post.
All wood that I used is rated for ground contact so no problems.
Very Nice, great design overall and really love the doors underneath
The beauty of your projects never cease to amaze me. I have a new deck and at my new home and I was wondering how long to wait to apply stain and what kind do you recomend. Thanks
I don’t know how long exactly. Really, I’m just waiting until I know it will have a week with temperatures above 55 degrees since that’s the temp required by the stain manufacturer. I plan on using Thompson Water Seal. I haven’t decided between water or oil based yet though.
Great project! What evidence did you have to suggest that 2x6s would have deflected too much? I have used them in Massachusetts before for a deck and have found absolutely NO deflection. Maybe things are different down there with the warm weather? Thanks so much for sharing it looks awesome.
No evidence. The price difference was very low so I went with the larger size just to be sure. You’re right, 2x6s would have worked fine with minimal deflection.
Love this! We have a concrete slab out our back door, too, which my husband hates. Sooner or later I know I’m going to have to build a deck out there.
Nice build Brady. 🙂 What do you plan to store underneath the deck?
Thanks. Right now I have the wood scraps under there. Also, behind the double doors I stored some firewood.
Careful with the firewood that close to your house/deck… termites like to eat that and use it as a jumping point to the wood you care about.
I keep all my firewood up in the back corner of my yard, and then fill up the hoop on the deck as needed. (I try to do that after a good hard freeze, which doesn’t really mean anything to you LA folk 🙂 )
Very true. In my case, the firewood is 8 feet from the house, 6 inches from any deck materials, and sits on a concrete slab (not on dirt). I feel confident in the location.
oh, and nice work, the deck looks good. Are there code issues with the horizontal wires? or the wires in general?
You should have just kept the pine for firewood, its just fine after you let it dry out completely, burns a bit faster and without much heat, but you don’t really need it for that do you?
Don’t let anyone freak you out about creosote and pine resin, blah blah blah, dry it well, it will burn cleanly.
The only code issues I could find showed that any railing filler must be designed/installed such that a 4″ ball could not fit through. My wires are 3-3/4″ apart. I think it’s probably up to snuff.
I keep the pine for miscellaneous tasks. I only ended up with about 8 feet of 2×4 and other scraps under 3 feet. In New Orleans, half a cord of wood will last two homes through the winter. It hasn’t been cold enough for a fire in the last 3 weeks!
I meant the giant tree you cut down 🙂
Wow, Brady, it looks AMAZING!!!! and seems like your a wise man to keep your better half happy! 🙂
Wow, the finished product is very nice. Kudos to you taking on and accomplishing it yourself! I really like the side decking and the doors for storage
Very nice work. I really like the pattern of the top. I’m jealous I don’t have a nice deck suitable space.
How do you get the right tension on the steel cables? It seems like they would need to be pretty tight for them to be useful as safety rails.
I tried replying. See my comment under this.
I used turnbuckles. We use them a lot on sailboats to keep the rigging tight. They’re very easy to use. Look them up on McMaster.com. That’s where I buy anything that the home stores don’t carry or any time I need to buy in bulk (like 16 turnbuckles and lots of other fittings). That site is geared towards industry, so they present full “engineering data” for all products.
Deck looks terrific. If money were not an object I’d likely design it a little different and have a separate section for the grill
Good choice to make it freestanding. Leaving off the ledger makes it a lot easier from a building and code standpoint. No flashing or through bolts to worry about. Nice job on building your own cable system.