Our two car garage has sported only one working door opener for the last two months. Two weekends ago, we finally had had enough, and decided to spring for a new Genie screw drive system (review). A big thank you goes out to Andy for giving me hand with the install in exchange for a cheap lunch. You’ll need to invite a friend or enlist some unwitting relative’s help for this one, too.
Installing an Opener Is Relatively Simple and Saves Big
Installing a garage door opener may be a lot easier than you think. If your opener no longer opens, or if you’re stuck back in the 70s with a manual door, this article has the easy steps to add this luxury-turned-necessity to your home.
Plus, garage door opener installation can cost anywhere from $75 – $175. By doing it yourself, not only will you get the satisfaction and added value in your garage, you’ll have some extra cash towards your next big tool purchase.
Garage Door Opener Basics
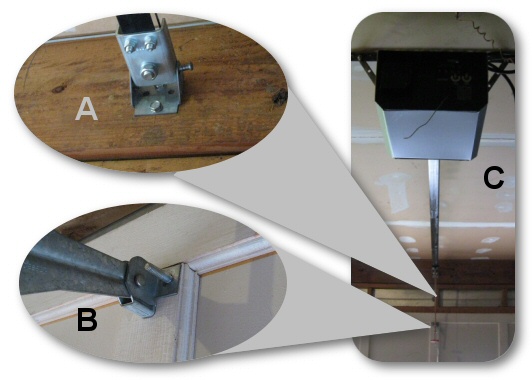
A garage door opener is connected to the structure of the garage in two places: at the front of the garage (picture A) and in the middle or back of the garage where the motor unit is mounted to the ceiling (picture C). The opener connects to the top of the door, just below the top frame on the middle piece of vertical trim (picture B). Note that the opener is not connected to the top frame on the door, as this mounting location is weaker than the vertical member beneath it. (note: vinyl doors may not suffer this weakness).

A garage door opener opens the door with the assistance of springs, and closes the door against the resistance of springs. All openers use some type of slide mechanism that moves back and forth on the long shaft between the ceiling mount and the door header mount.
Required Installation Tools
Most garage door installations won’t require fancy tools. Here’s the short list of tools we needed:
- Flat head and phillips head screwdrivers.
- Drill with wood drill bits (most likely 3/16″ – 3/8″ bits).
- Socket and wrench set.
- Wire strippers.
Garage Door Opener Installation Steps
Every garage door installation will be a little bit different depending on the manufacturer and the type of opener (screw drive, belt drive, and chain drive are three examples). In general, here’s the nine steps that must be taken. For first time installers, plan about 3 hours to get through the installation.
- Assemble the garage door opener. Our Genie screw drive system came with very detailed, easy-to-follow instructions. Genie gets two thumbs up for color-coding the parts bags so that you only open the parts you need at each major assembly step. This made the assembly considerably easier to manage.
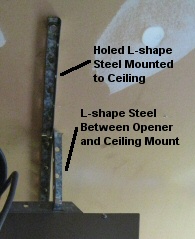
 Install the ceiling mount brackets. If you’re replacing an existing motor, the current mount will likely work unless there is visible evidence of damage. Most garage door openers will come with the necessary ceiling mount components. If your system doesn’t, it’s easy to make your own mounts using a piece of holed L channel steel that can be found at any big box home improvement store. See the picture on the right for an up-close view of the mount. (Note that eventually, the motor must be mounted in the exact middle of the door. If you use a piece of holed L-channel steel, you’ll have plenty of flexibility in the mounting – just ensure each side of the channel is the same distance from the front of the garage).
- Prepare the header mount and door mount. If you’re replacing an existing opener, examine the mounts used by the original door opener and determine whether they are compatible with the new hardware. If they are, it may be better not to replace these components as you would need to drill a new set of holes for either mount. Use good judgment on this step. If it makes sense to install the new hardware, ensure that you are not jeopardizing the structure of the garage door.
- Install safety beams. Every modern garage door system will come with an infrared safety beam system that is mounted six inches from the floor of the garage, directly behind the door. When the beam is broken, the door will not close, ensuring the system doesn’t harm a child. These systems come with a source and a sensor module. If you’re working in a two car garage, ensure that the sources are mounted between the doors facing out so that they don’t interfere with the other opener.
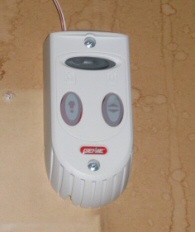
 Install opener switch. Most garage doors will come with at least one hard wired opener that is normally mounted by the door between the garage and the house. Additional wireless systems (including car-based systems and keyless entry pads), can be “joined” to the opener by following the manufacturer’s instructions.
- Mount the new garage door opener. In this step, you’ll mount the garage door opener to the ceiling and door header, and attach the pull bar to the mounting hardware on the door.
- Set up and down limits. Depending on the type of system, this can be done by properly positioning the slider on the chain or belt, or in the case of screw drive systems, by installing magnetic up and down limiters on the screw drive rails.
- Test the garage door. Test the door system to ensure the door opens and closes completely. Most importantly, check the safety features of the door to ensure that it could not squash a child or pet, and that the door won’t close (and stops closing) if the safety beam is broken. Modern garage door openers will include adjustable open force and close force settings. These should each be set to the minimum force required to open and shut the door under normal circumstances. The goal is for the door to sense objects in the way and to stop pushing.
- Configure remote entry systems. These systems include remotes for cars, and in nicer systems, keyless entry pads for the exterior of the house. In modern systems, remotes can be “joined” to the base system using a “learn” feature on the base station.
Garage Door Opener Installed!
That’s it. Installing a garage door opener really is easy. Have you tackled this project already? Leave a comment on this article and let us know how your installation went. Got a question? Leave it here and we’ll do our best to help out.


We probably won’t be putting up a garage for some time yet at The Stone House, but thank you for the installation tips! The will come in handy when we do get to that point.
Baba – thanks for reading and commenting! This was a fun project and one that can seem intimidating at first… but honestly, it’s pretty quick and easy.
Good post. Have to be very careful with that spring though, it can kill someone if you’re not careful.