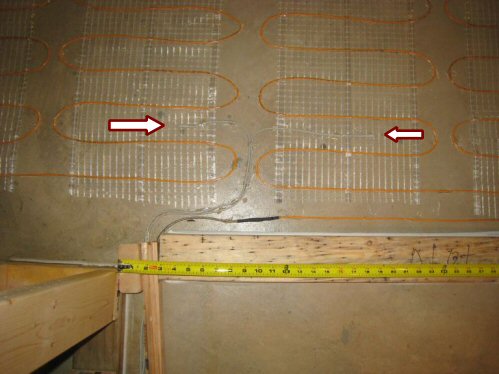
If you’ve been following along, we’re about 3/4 of the way through the installation of radiant flooring in the basement. We’ve divided the basement into 4 roughly equal-sized areas which will each be 1 heating zone with its own thermostat.
To control the floor, we chose OJ Microline Programmable Thermostats at the recommendation of the radiant flooring vendor. These thermostats use a temperature probe embedded between the radiant wires in the substrate to detect the heat of the finished floor, allowing the thermostat to cycle on and off based on the temperature of the floor, rather than the ambient temperature in the room.

While unlikely, it is possible that a temperature probe could go bad. If that were to happen, the repair/replacement job would be extremely difficult. Our floor will eventually be built of several layers that will culminate in stone tile. Digging through the layers without damaging the flooring wires to relay a sensor would be a challenge to say the least.
As a result, we chose to install redundant backup sensors in each zone (a total of 4 extra sensors). The total cost for all 4 sensors was about $75 after shipping. Considering the total installation of the floor will cost more than $5000, and a repair could cost several hundred, we think it’s a small price to pay for added piece of mind.
We followed OJ’s instructions for testing and installing the temperature probes, which essentially involves a resistance test at room temperature to ensure the correct value is returned to the thermostat. We installed the probes in separate radiant wire loops, although they could have been installed right next to one another in the same loop. Both probes run back to the wall, through the baseboard, and up to the thermostat. Only one probe can be attached at any time; so the back-up wire will just sit in the box unless it’s needed.


Fred – Question….in that photo it appears that the wall framing doesn’t have a pressure treated bottom plate…is that true throughout your basement?
Todd-Sorry, just saw this. Yes, it is pressure treated (as it should be) but not the one you can see from this pic. I decided to place the pressure treated boards first and powder-nail them into the foundation, then I built the walls and fastened them to the pressure treated board (there’s a number of advantages to this… one of them is NOT cost.. its a little more $ to do it the way I did).
This could be a whole separate post, but the biggest advantages are:
1) You can build walls anywhere in the room, then “move” them upright to the end location without them hitting the ceiling as you’re carrying them, because you have an additional 1.5″ to work with accounted for by the pressure treated plates the wall will sit on top of.
If you don’t have this, you either build the walls close to where they will ultimately stand (requires moving your “building station” around the floor), or you carry the walls diagonally before you sit them up. This is a royal pain in tight spaces.
2) When putting in a floor with approximately 1.25″ of overall end-thickness on slab, the additional width of the extra bottom board makes it easier to install molding. I don’t have to worry about finding a stud, because I’ll have a bottom plate that runs the whole way.
3) You can frame the room to get a feel of where all interior and exterior walls will be without actually building the whole wall to do this.
Regular framing 2x4s are approximately $0.25/ft. with about 180 linear ft of wall, this amounts to $45.00. I thought it a low price to pay for the convenience 🙂
I think that’s a great tip for the DIY person. My crews don’t do it that way but they build basement walls all the time. We build them to the correct height..slide them along the floor..stand them up…beat them in place with a BIG hammer….great idea though!!!
Greetings once again,
I noticed in your pictures of the wire mesh on the concrete floor that the bends were head to head. Would it not be better to intersperse them? What I mean is to place the bends of one line of wire between the bends of the adjacent line such that you get a move evenly distributed heat. The wire is spread about 3″ apart but not so between each row.
Just a thought…
Bryan,
You definitely want to consult with your radiant manufacturer. It is generally better to intersperse them (something we tried to do in most situations, but in some there were other factors, including location of walls / obstacles).
The important thing is that the wires never cross and maintain a minimum distance (manufacturer-specific) from one another. Our manufacturer recommended 1.5″, however, in talking to other installers, the only *real* danger is if the wires cross, otherwise a lot of it is just ‘margin of safety’ type stuff.
Fred