

Black Friday Giveaway + Holiday Decorating with the Home Depot!
November 12, 2020 | by Jocie (email) |Thank you so much for joining us at One Project Closer for this Black Friday Giveaway + Holiday Decorating Reveal. This post is sponsored by the Home Depot. Post may also contain affiliate links. Opinions (and typos) are 100% our own, and we appreciate you supporting our site in order to continue to provide free content to our readers.

2020 has been a tough year – both my husband and I are working from home, while assisting our kids with virtual school, and we’re all just trying not to kill each other. So this year, I decided to decorate early because we all need a little extra joy in our lives. Home Depot stepped up to help! I was able to decorate the exterior of my home for under $500 and it looks so beautiful! The great news is that The Home Depot is offering savings now until December to help inspire your holiday gift ideas and home improvement projects! Savings start early and last through early December, in every aisle and across the site. And don’t forget to read to the end of the post to enter our giveaway to win a $500 Home Depot shopping spree.
Holiday Decorating with Home Depot
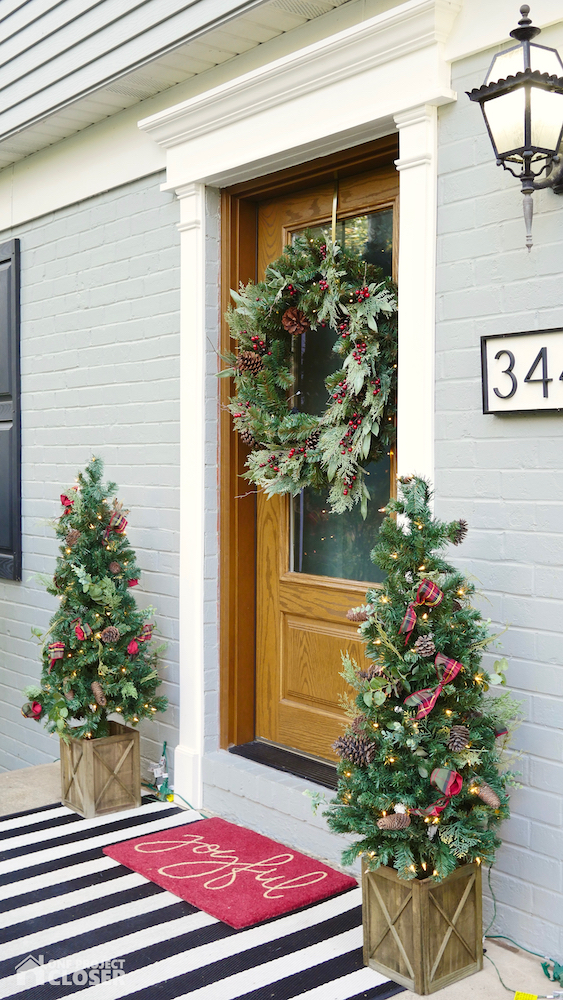
The past few years, we have put up Christmas lights but it hasn’t been anything very special. A few strands of the original LED bulbs that don’t glow very bright. A wreath. That’s it. Every year the kids beg us to go bigger and better. But the reality is that we don’t have a ton of space for storage and don’t want to invest loads of time setting up and tearing down. With my budget set at $500, my goal was to create a simple, classic aesthetic with lots of greenery and white lights that wouldn’t be too much work.
So I started shopping….
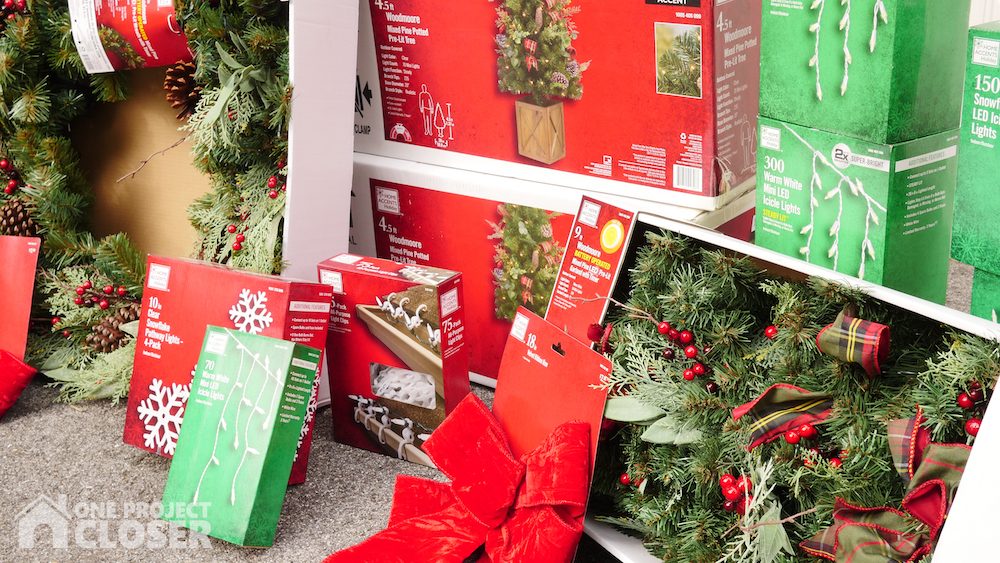
Here’s my quick shopping list of everything I got! I couldn’t believe I was able to get so much and stay within budget. You can also shop from my Home Depot Wish List. Remember, Black Friday savings are happening NOW and last through December while supplies last!
- Home Accents Holiday Woodmore 36″ Pre-Lit LED Artificial Wreath
- Home Accents Holiday Woodmore 4.5′ Pre-Lit Potted Artificial Christmas Tree
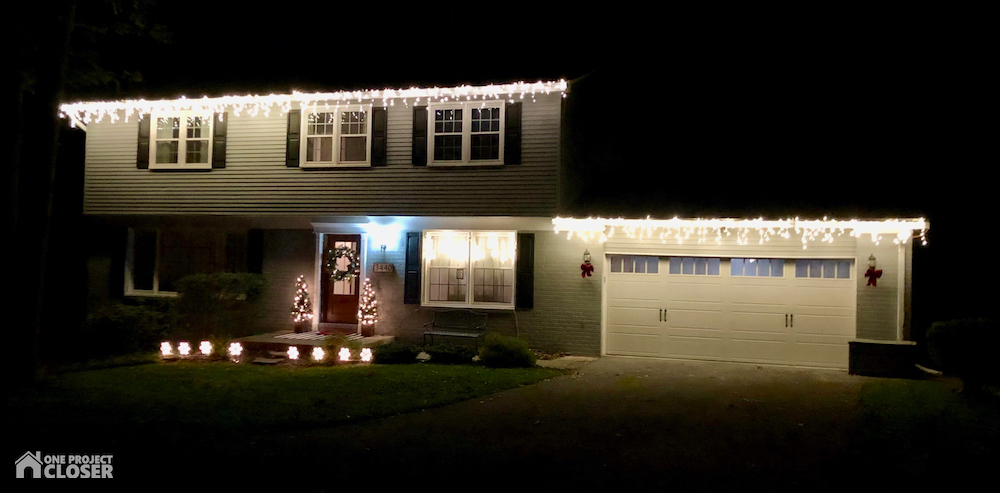
- Home Accents Holiday 300-Light LED Icicle Set
- Home Accents Holidays JOYFUL Holiday Door Mat
- 10 in. 48-Light Snowflake Pathway Lights (Set of 4)
- 64 in. 150-Light Warm White Micro Dot LED Snowflake Icicle Lights
I was also excited that the quality was far better than what we were replacing. I’m sure this is going to last us for many years! Plus, FOR YEARS I have wanted little Christmas trees on either side of my front door! SWOON!
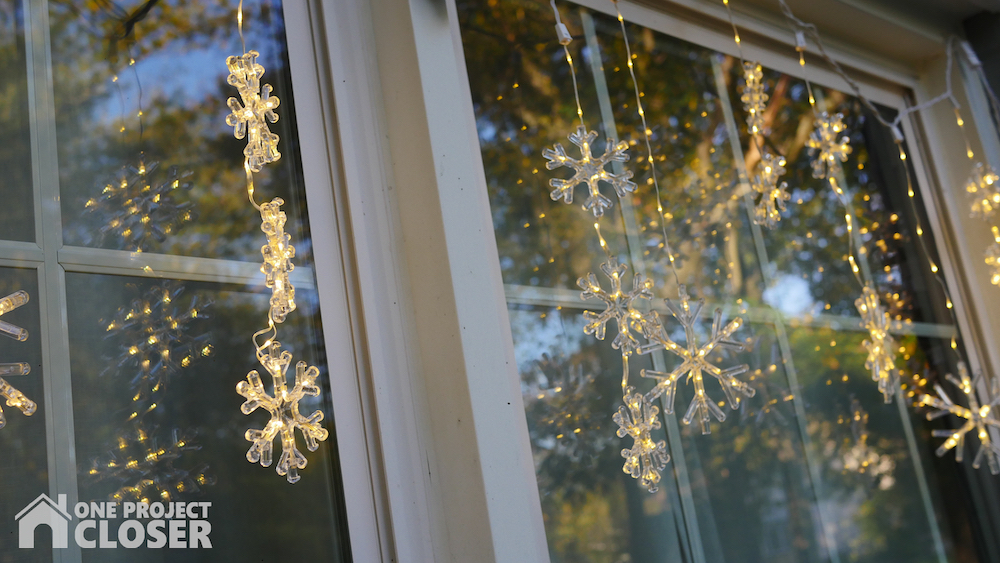
The snowflakes in the window are my fave because they give lots of light, but also sparkle from inside at night!
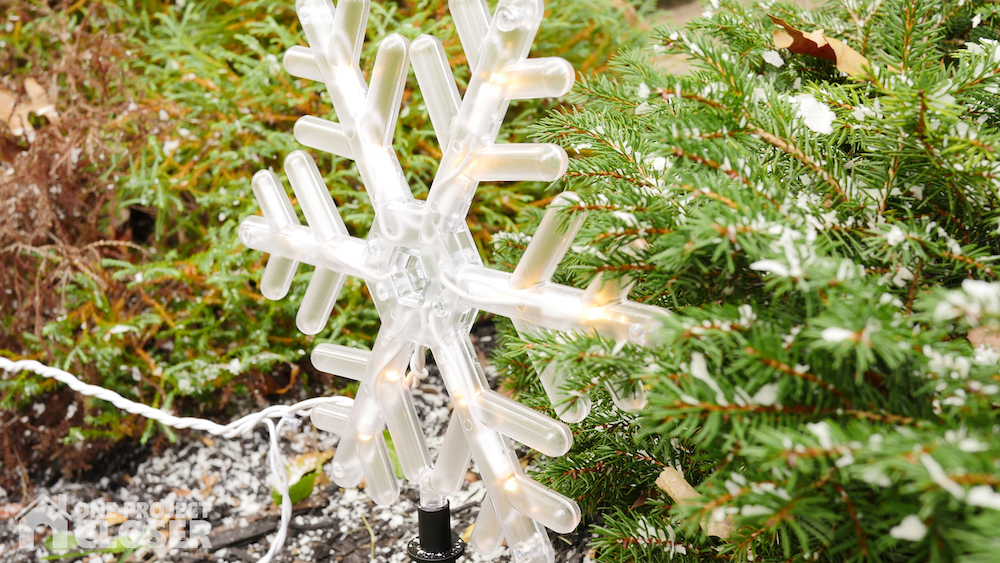
I placed two sets of Snowflake ground spiked lights in the garden, creating symmetry around the front door. In years past we had a few Candy Cane lights by the path, but I like how this draws more attention to the front door.
You know I’m a lover of hand lettering and while I didn’t hand letter this doormat, I’m in love with the scripty font and the reminder to find joy.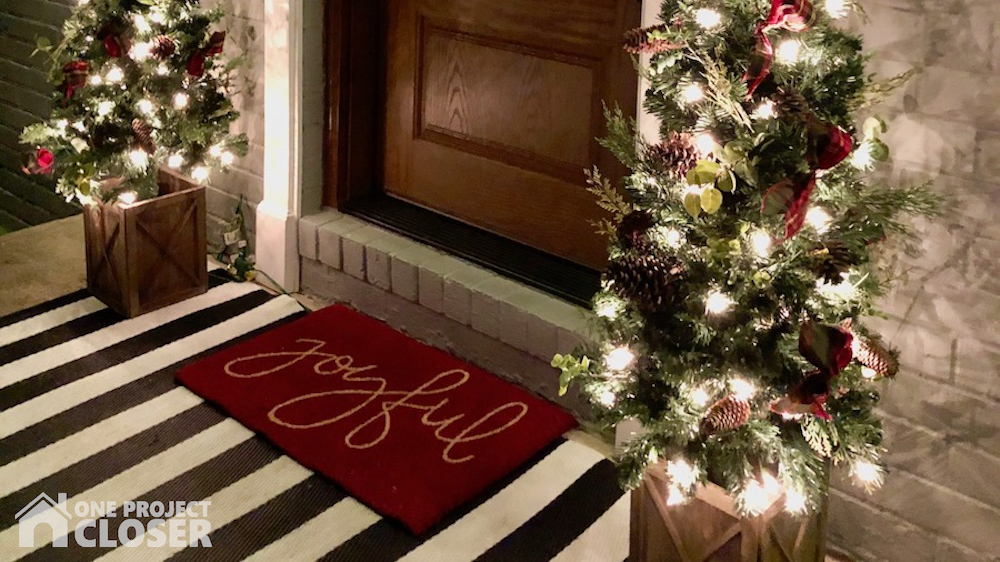
The front door wreath is great because it is battery operated and also has a timer! In past years, I have HATED opening the front door to turn it off and on (mainly because I hate the cold). Half the time, I wouldn’t even bother turning the wreath lights on. So I am LOVING the timer feature!!
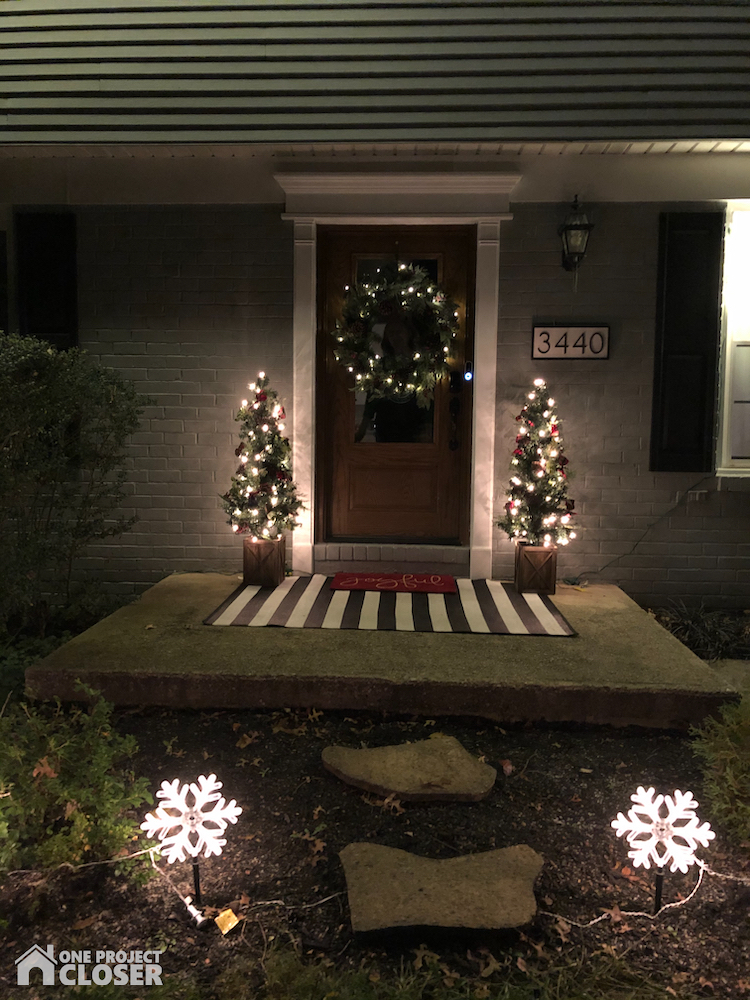
Finally, instead of plain string lights, we added icicle lights to the horizontal lines of the house, which add lots color and light!
$500 Home Depot Gift Card Giveaway
We’re so excited to give one, lucky follower a $500 Gift Card to Home Depot! Because who can’t use a little extra Holiday spending money? Please join and share with your friends as well! You must be 18 years old to enter. Contest ends November 18, 2020 at 11:59 and a winner will be selected and notified by email on November 19th!


Jocie Hagan
One Project Closer
Come say hi on Facebook, Instagram, & Pinterest!
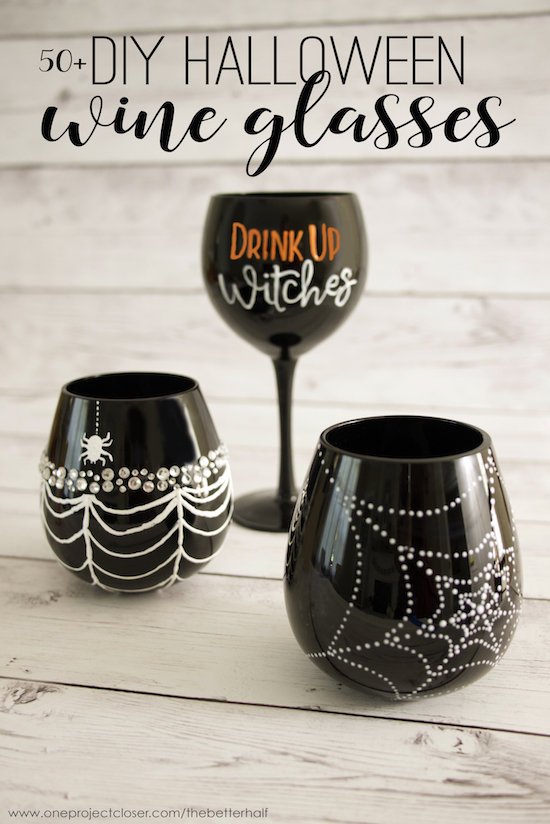
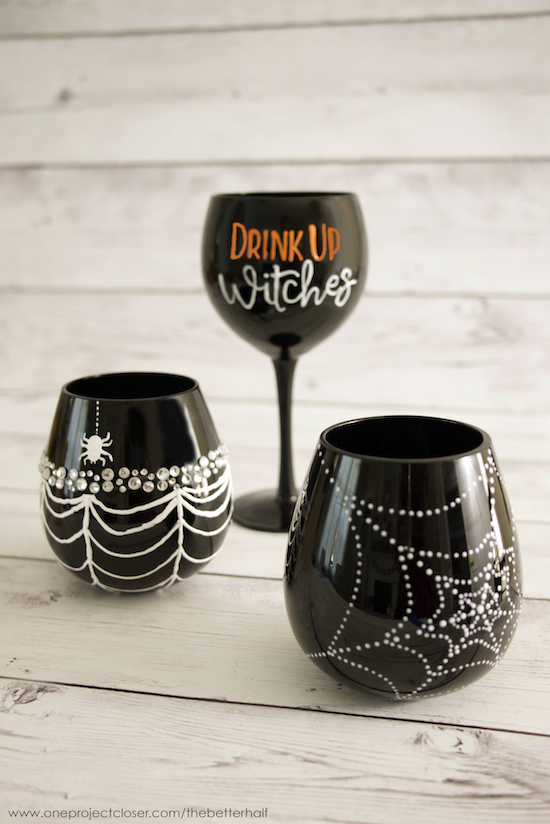
This past weekend, I had a few girls over for a craft night and you guessed it – DIY Halloween Wine Glasses! It actually started a month or two back, when my good friend Jeanine was shopping and saw the cutest wine glass in a store and messaged me saying “Let’s make this!” In the store, it was over $20 and we made them for about $7 each (maybe a little more if you use rhinestones).
I will say, this craft night I wasn’t as prepared as usual. I wasn’t sure if we would have enough wine glasses (because of some shipping problems) so I didn’t do a sample ahead of time. MISTAKE! Always do a sample ahead of time. Because I didn’t we sorta had to wing it and most of the girls pulled up Pinterest for a little inspiration.
That being said, they all turned out super cute and will be lots of fun to take trick-or-treating! These DIY Halloween Wine Glasses would also make a super cute gift idea.
Tips and Tricks for Wine Glass Painting
First off, you need the right materials. I found the cheapest black wine glasses on Target.com, but I will tell you do not order the ones with stems! I LOVE TARGET but they kept sending me only one wine glass (even though it clearly said set of six) and it was broken the first time. I ended up getting 12 stemless glasses and one lonely goblet. If you’re shopping at Target, be sure to check out our amazing Target coupons, updated weekly!
I also used DecoArt’s Gloss Enamels for the glasses, with a fine tip applicator. This worked great (better than a brush in my opinion), but make sure you are using Opaque paint with the black glasses – transparent will not show once dry. DecoArt was nice enough to send me some paint for the project but it didn’t arrive in time so I bought all the supplies, including the rhinestones at Michaels.
For the glass paint, be sure to follow the directions on the bottle for setting the paint. We allowed it to cure and then cooked them, applying rhinestones after they cooled. We also prepped the surface with link-free cloth and Rubbing Alcohol.
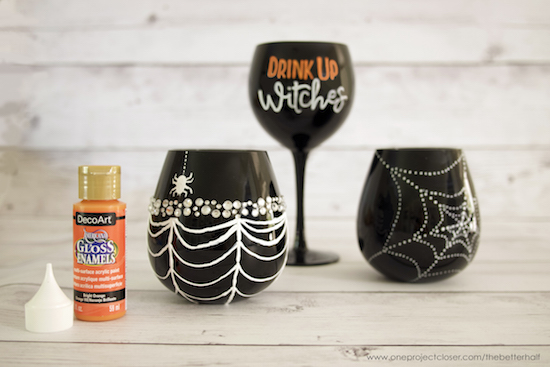
As for the rhinestones, I love the look but I was kinda going out on a ledge with this. They aren’t meant to be permanent so I will be washing the glasses by hand and very gently!
All my glasses I free-handed and the dots were y far the easiest! It’s hard to get the paint smooth and even, so the dots end up looking pretty and don’t require as much skill.
Finally, have a glass of wine and enjoy yourself! Don’t expect perfection – just enjoy the process. 🙂
More DIY Halloween Wine Glasses Ideas!
Three isn’t enough for you? Yeah, me neither. Check out my DIY Halloween Glasses Pinterest Board for over 50+ ideas!

What do you these DIY Halloween Wine Glasses? Do have any other fun Halloween Wine glass ideas??
As Always, thanks for reading!

Don’t forget to check us out on Facebook , Instagram, & Pinterest!

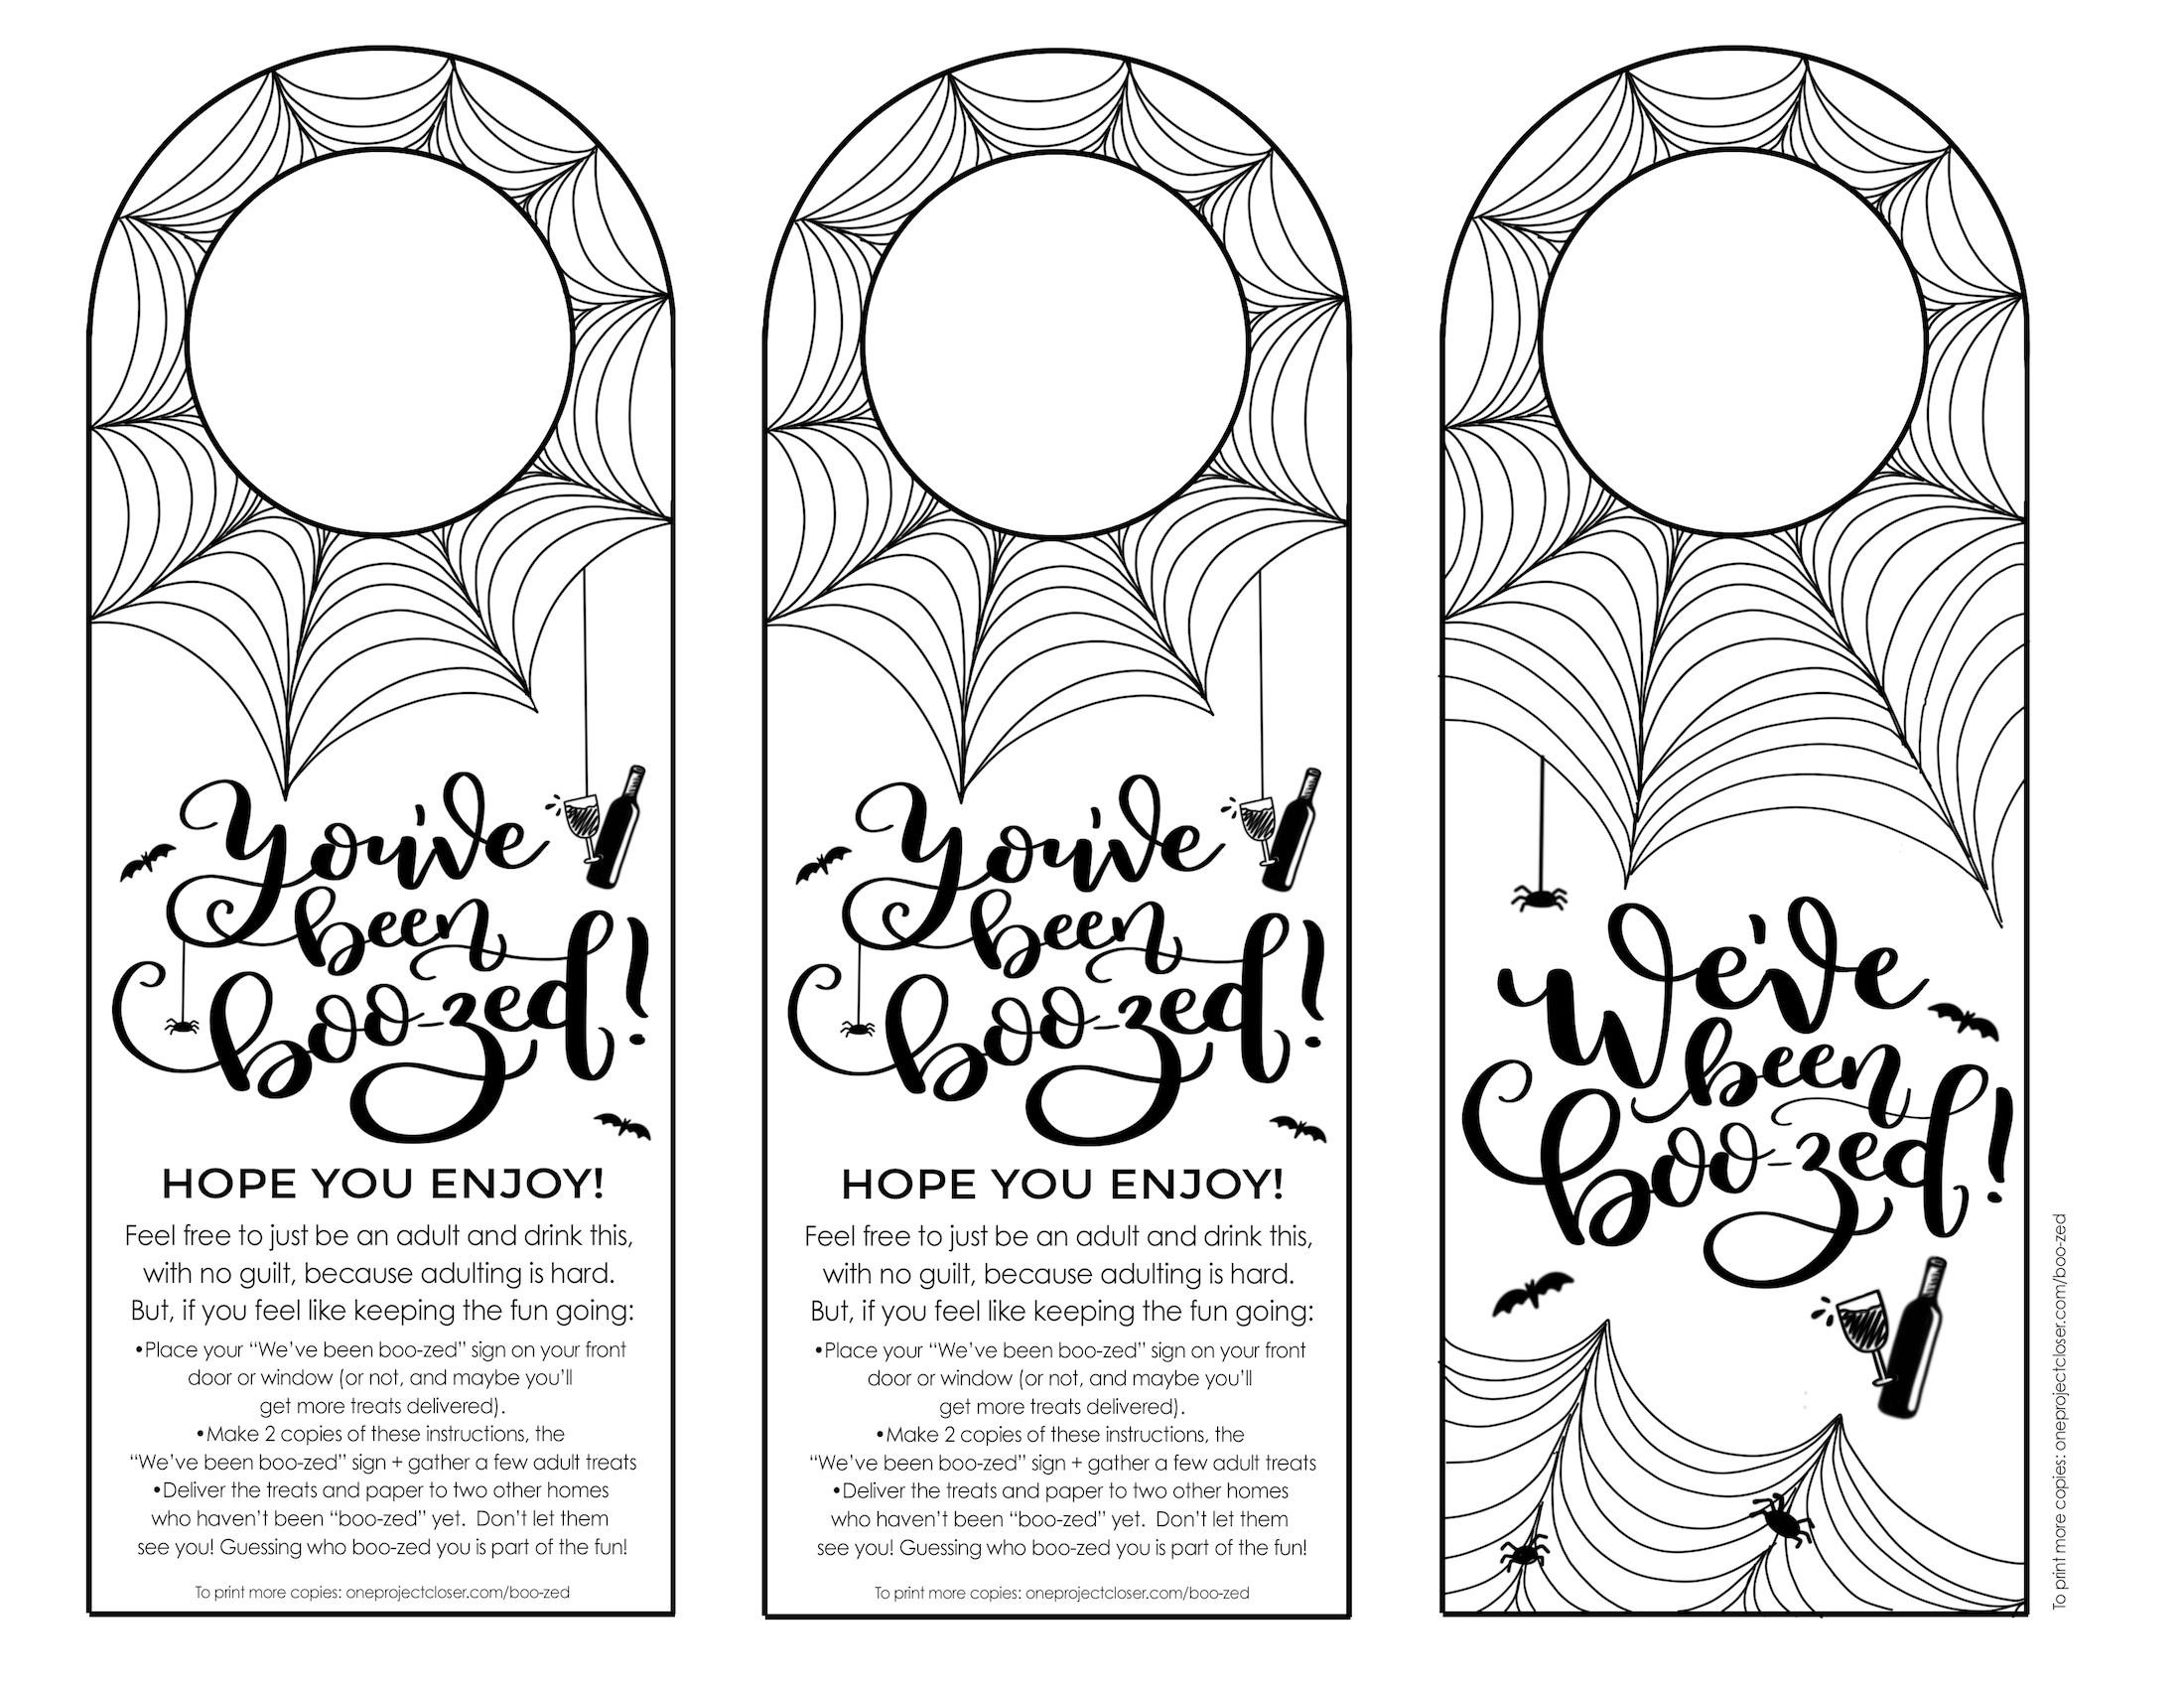
Why leave all the fun to the kids, right? The past few years, we’ve been boo-ed and I thought, wouldn’t it be great to include the adults in the fun? I hope you enjoy this super simple project and You’ve Been Boo-zed Wine Tag Printable to spread some joy and kindness to your communities!
You’ve Been Booz-ed!
This fun tradition will be something your whole community can enjoy, not just the kids!
Make Time: Under 3 minutes
Cost: Under $10 (depending on the price of booze!)
Difficulty Level: Easy
Materials Needed:
- Free printable (see below)
- Ribbon
- Wine, beer, or booze of your choosing!
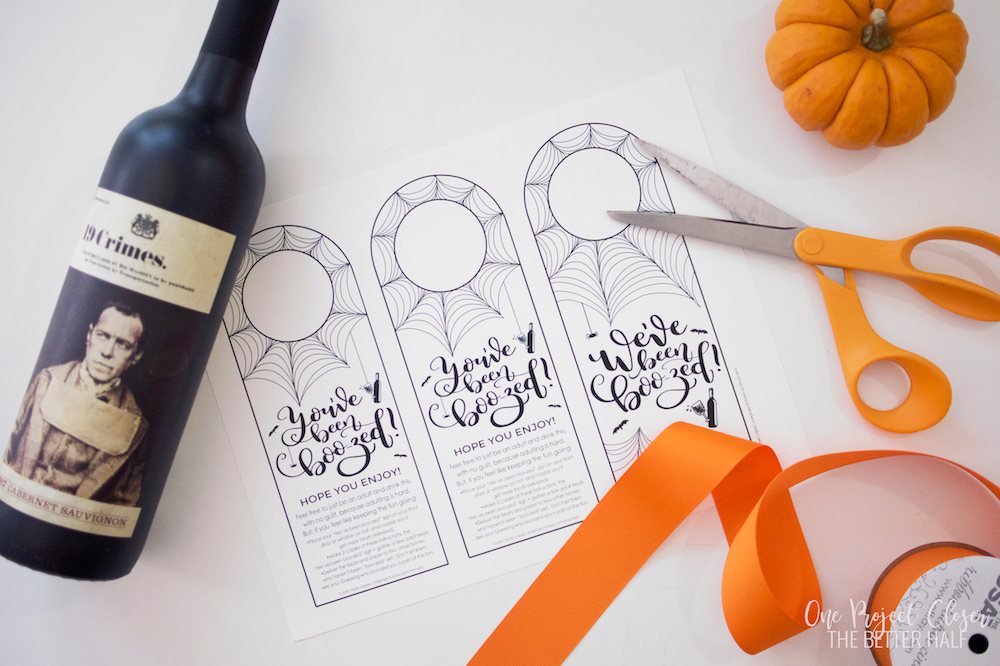
First step print off your free printable here!!!
And if you love this one, make sure and sign up for our newsletter! Subscribers get tons of free hand lettered printables and SVGs!! It’s the best!
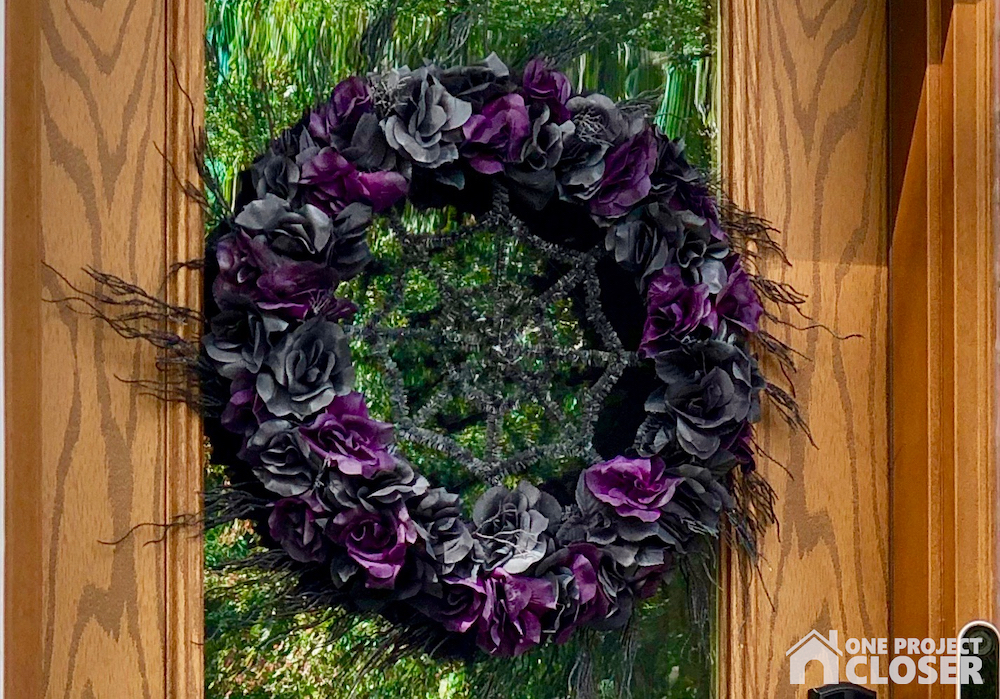
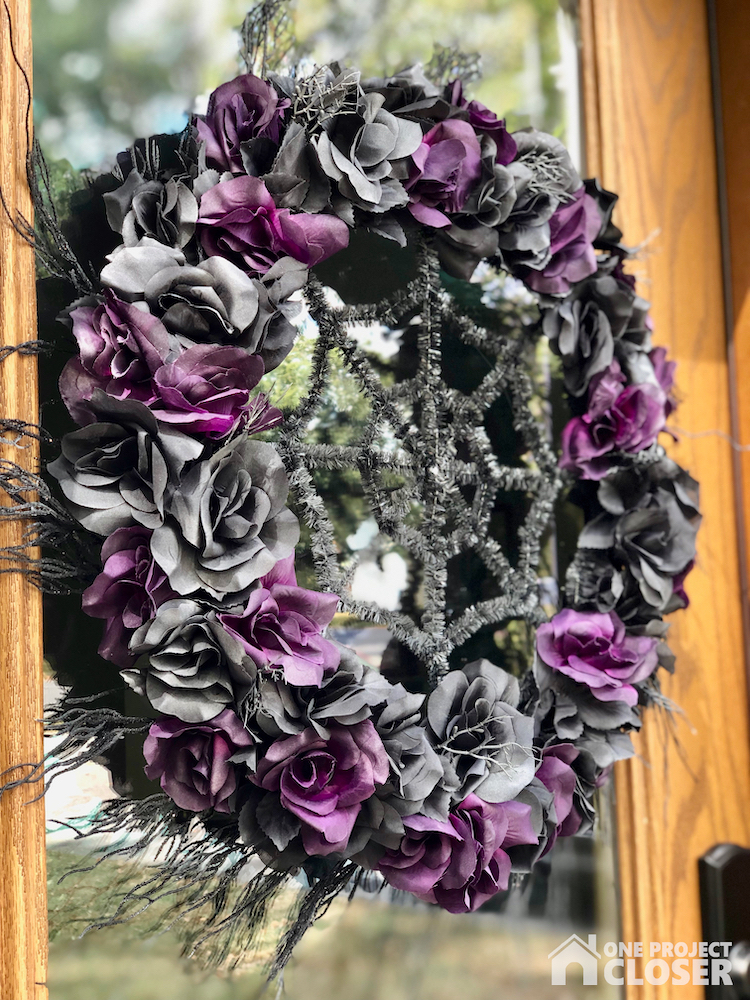
Thank you so much for joining us again this month for another Dollar Store Design Squad, where we team up with a few of my bloggy friends to bring you Dollar Store inspiration. I am so excited to bring you this BEAUTIFUL and inexpensive DIY Dollar Store Halloween Wreath using a a Laundry Basket. And be sure to scroll all the way through to check out some other great Halloween and Fall Dollar Store Crafts from the rest of the crew!
How to Make Dollar Store Wreath using a Laundry Basket
Make Time: 15 minutes
Cost: $20-25
Difficulty Level: Easy – Moderate
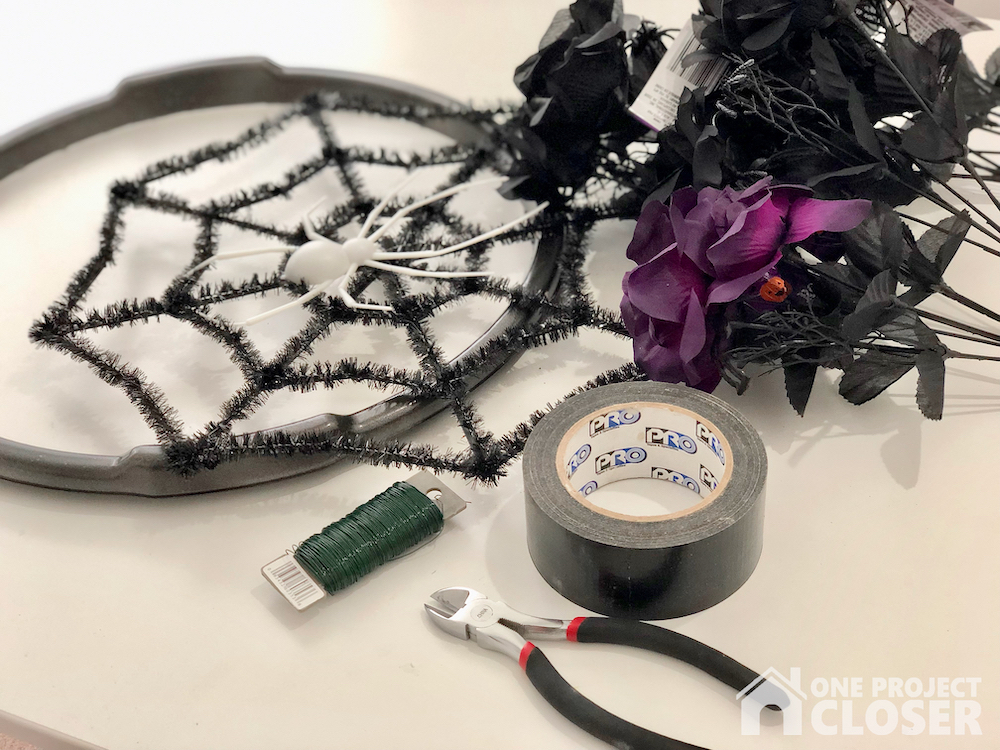
Materials Needed:
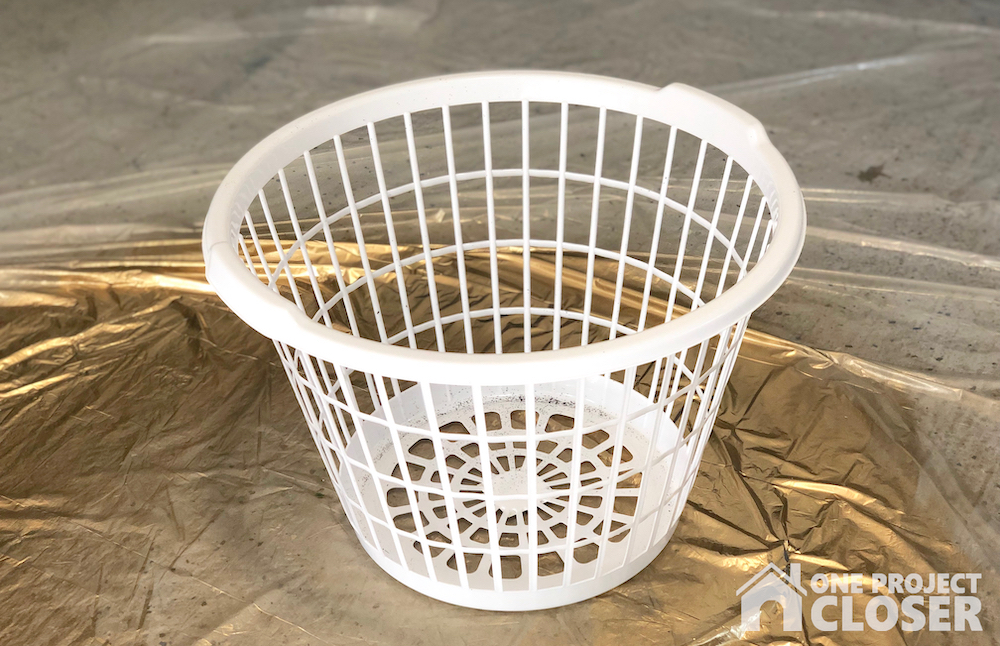
- Dollar Store Laundry Basket
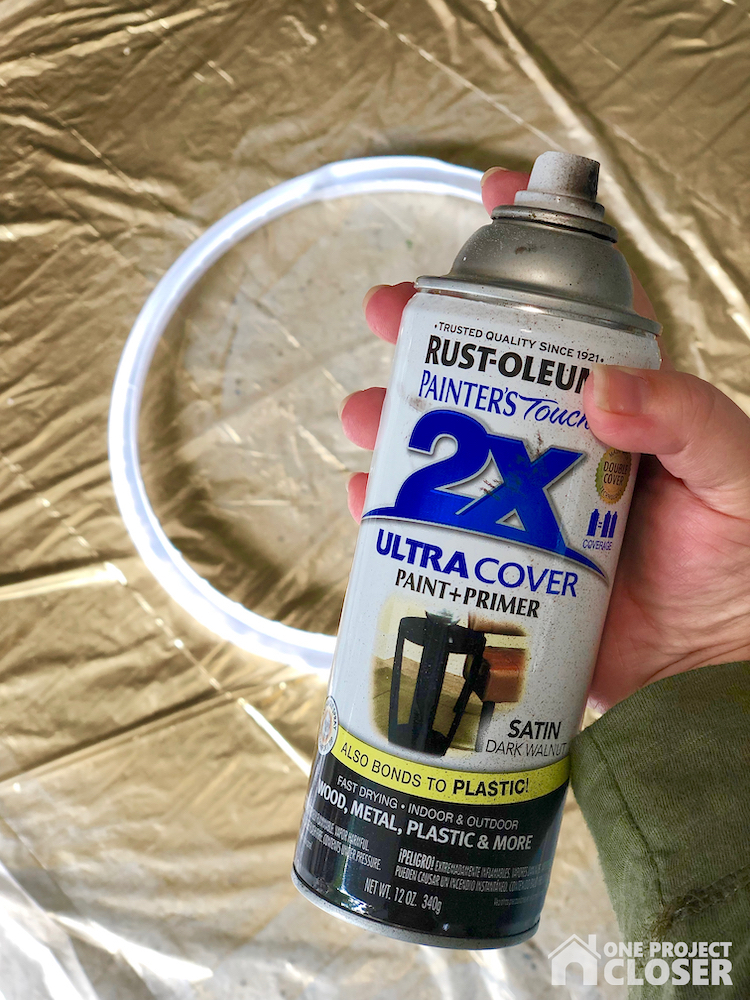
- Spray Paint (optional)
- 15-20 bunches of flowers
- Spider Web Decor
- Floral Wire
- Electrical Tape or Duct Tape
- Scissors
- Hot Glue (optional)
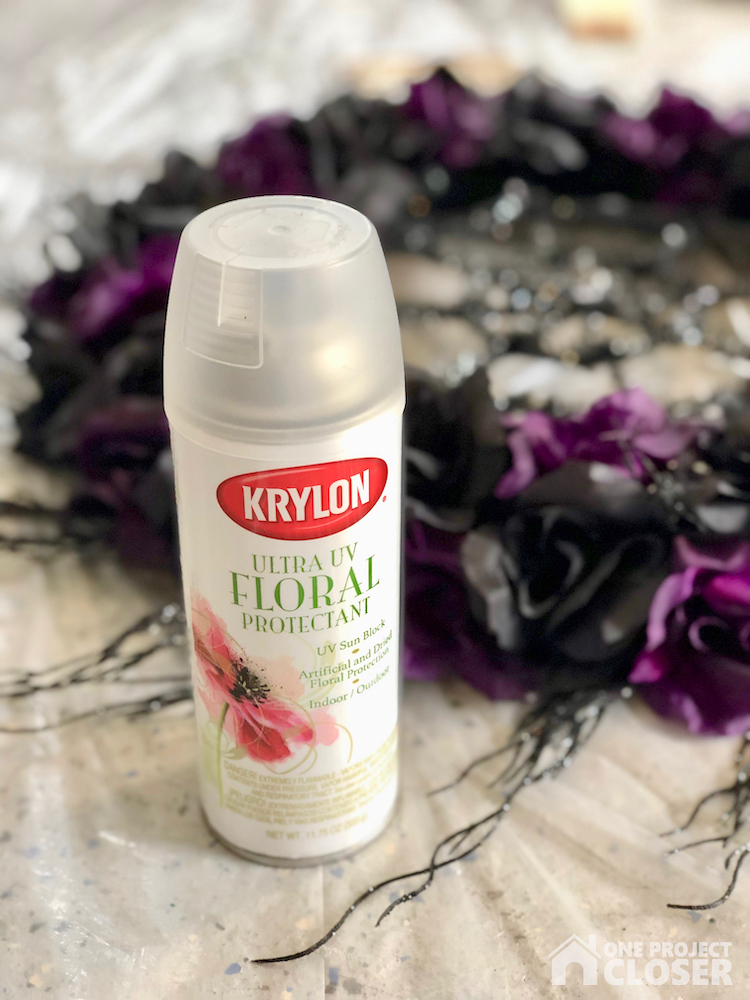
- Floral Protectant Spray
Tools Needed:
- Scissors
- Side Cutter
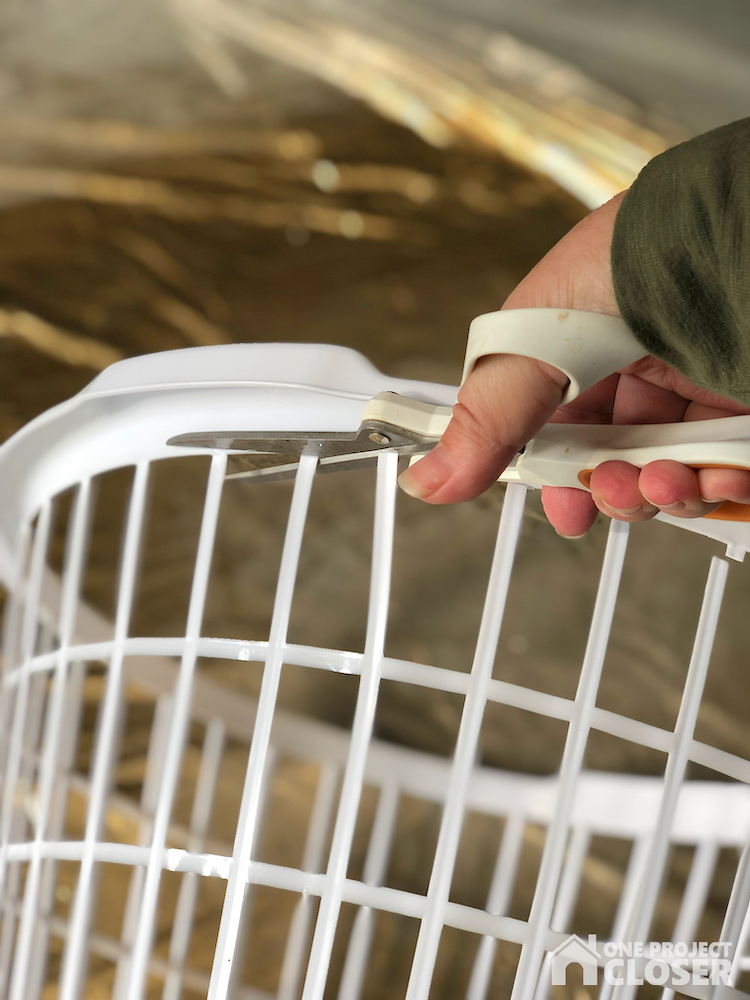
STEP ONE
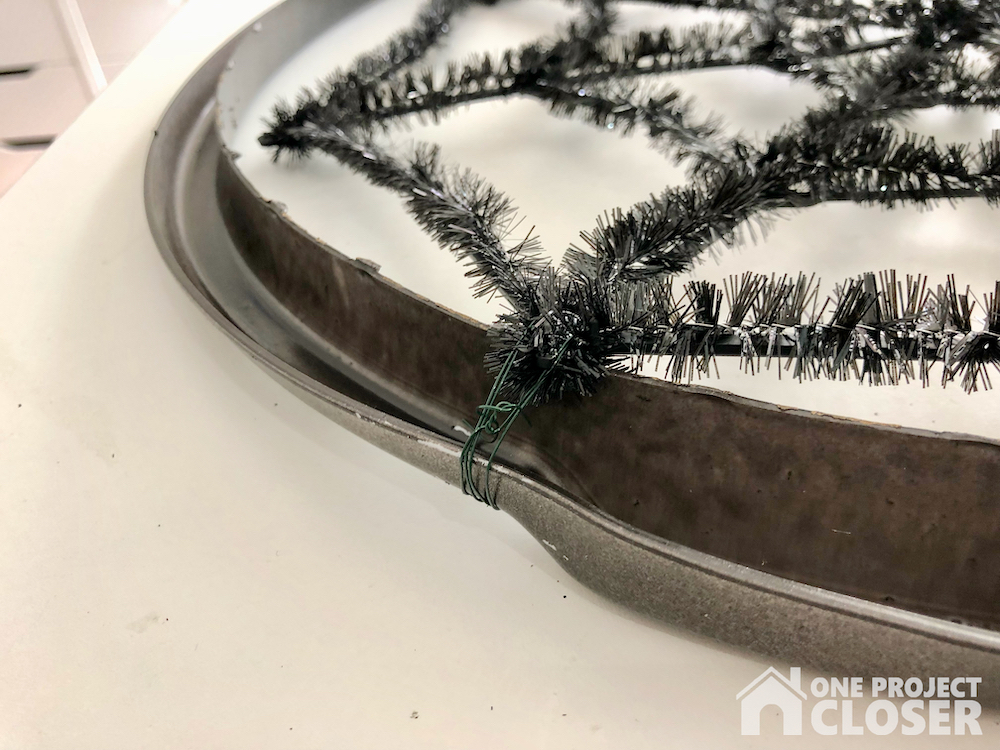
Grab your laundry basket and cut the basket portion away from the top rim.
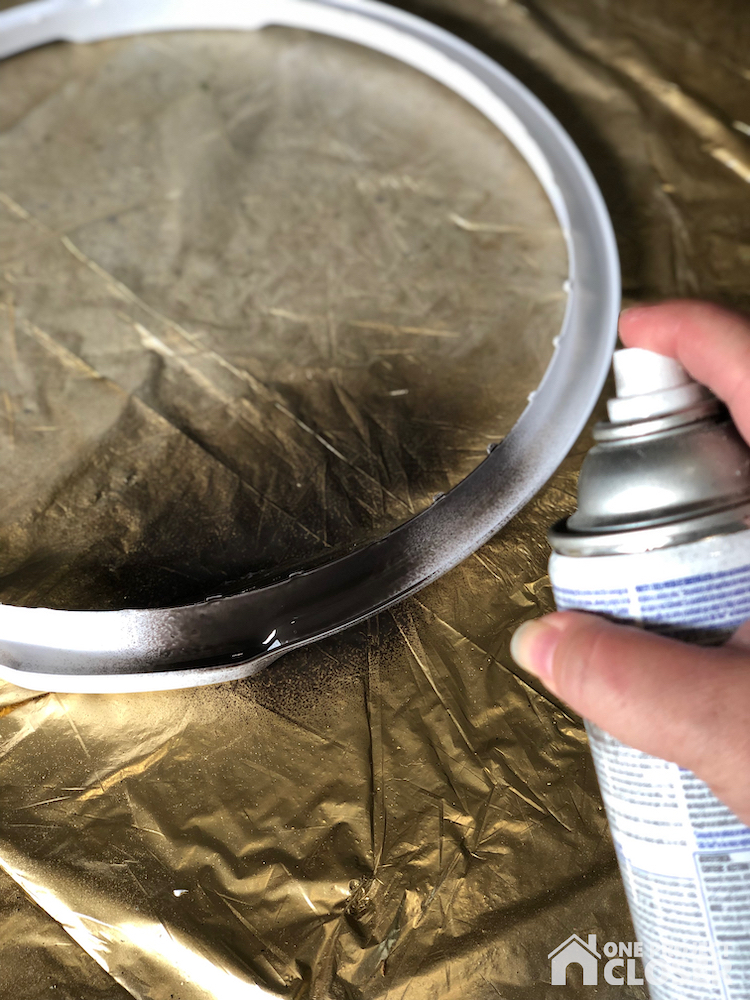
STEP TWO (optional)
Spray paint the rim black. I didn’t really end up needing to do this because I used so much tape, but you do you.
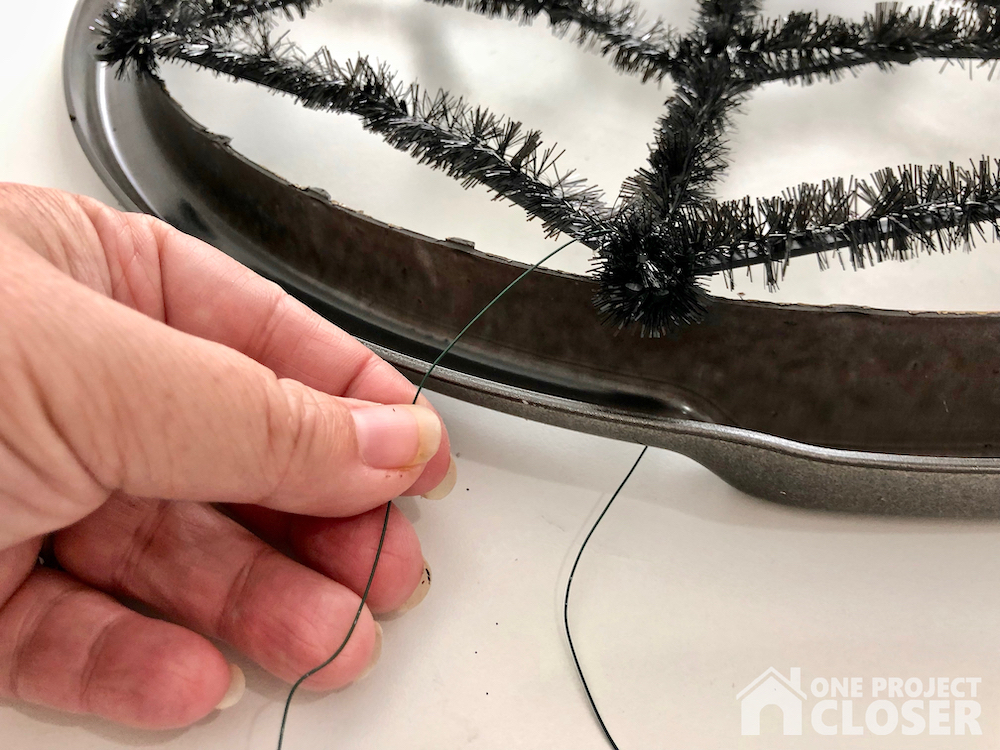
STEP THREE
Using floral wire, attach the spider web to the basket hoop. (Side note: I removed the giant fake spider from the web, but was also debating add some paint and glitter instead.)
STEP FOUR
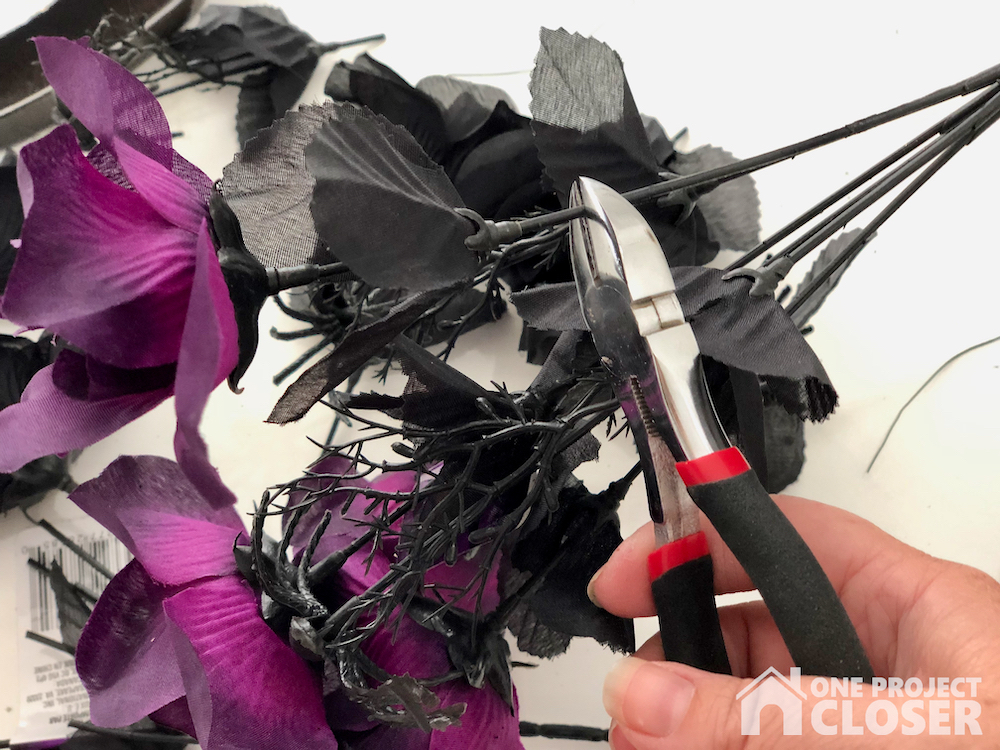
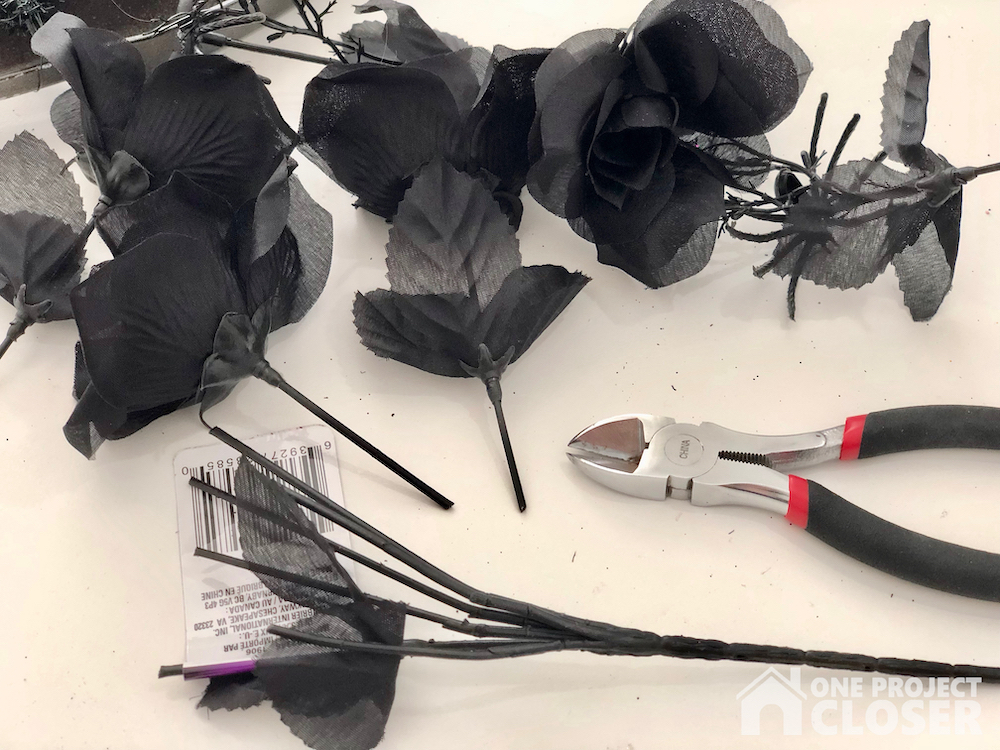
Use your trusty side cutters to cut off the tops of the flowers, leaving a few inches of the stem. Just keep cutting because you’re gonna need more than you expect.
STEP FIVE
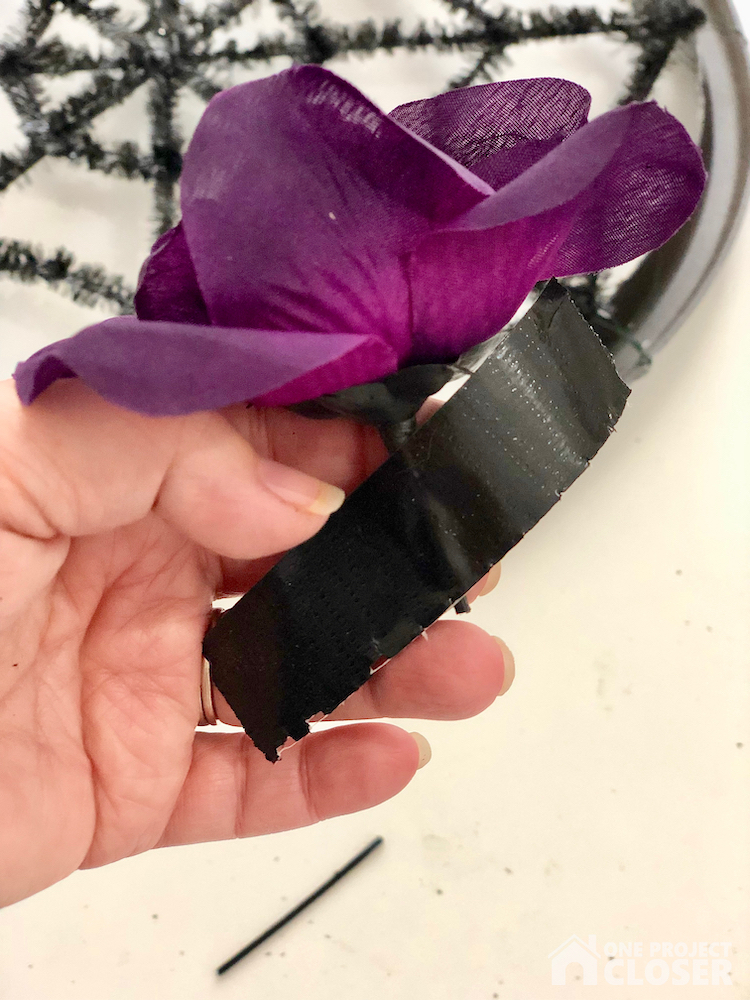
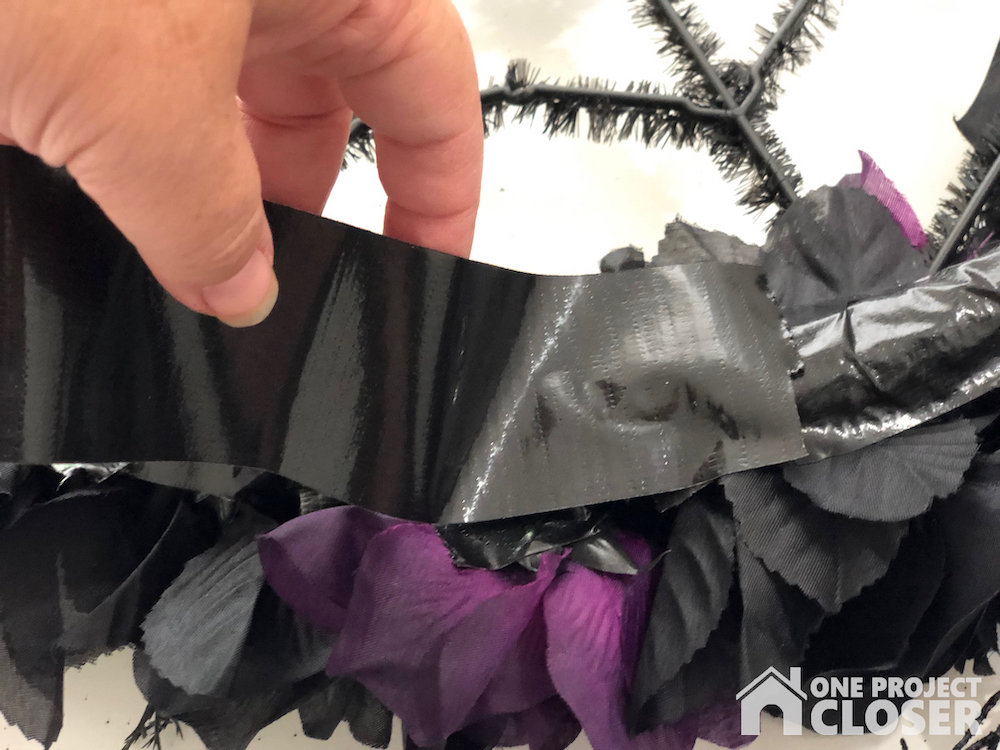
Rip lots of strips of tape and tape the crap outta the flowers. Wind the tape around the flowers, around the hoop as much as possible, working around the edge of the hoop. You can even hot glue it in place first then add tape. But seriously, put a lot of tape on there.
STEP SIX
Once you’ve placed all the flowers, turn the wreath over and tape the entire back so that everything stays in place.
STEP SEVEN
Finally, spray your wreath with UV Proctor if you plan to hang it outside. It added a bit of a dusty finish to the wreath, but I kind of liked that it looked old a spooky as a result.
More Halloween Dollar Store Crafts
Do you love Dollar Store projects as much as I do? Here are a few more!
DIY Dollar Store Halloween Wreath
Pin for Later
Love this project and want to save it for later? Or maybe just share it with your friends? Pin this image!
Jocie Hagan
One Project Closer
Come say hi on Facebook, Instagram, & Pinterest!
Want to learn to hand letter and make amazing, personal decor for your home?
Learn now with Busy Girl’s Guide to Hand Lettering!
**Use the code HAPPY5OFF to get $5 off the course price**
Thank you so much for joining us at One Project Closer for this Kitchen Remodel: Coffee Bar DIY and Fridge Cutout. This post is sponsored by the Home Depot Prospective Campaign. Post may also contain affiliate links. Opinions (and typos) are 100% our own, and we appreciate you supporting our site in order to continue to provide free content to our readers.
If you’ve been following our Insta-stories you may have seen that we are remodeling our kitchen. It has been on our to-do list since we moved into this house in 2014. The kitchen was original, small and the cabinets were made of particle board. Now, I’m not complaining. It was painted white and functional. But over the past year, we had more and more things breaking – the faucet, drawers falling off and unable to be reattached for the 100th time. It was time!
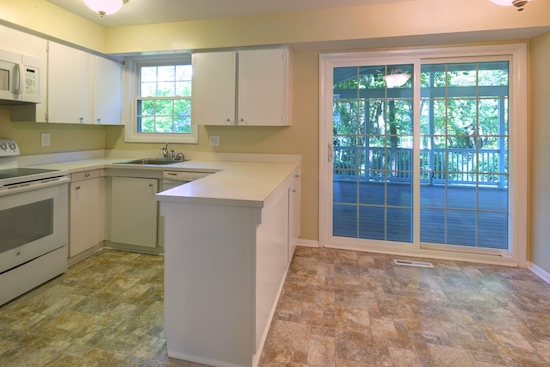
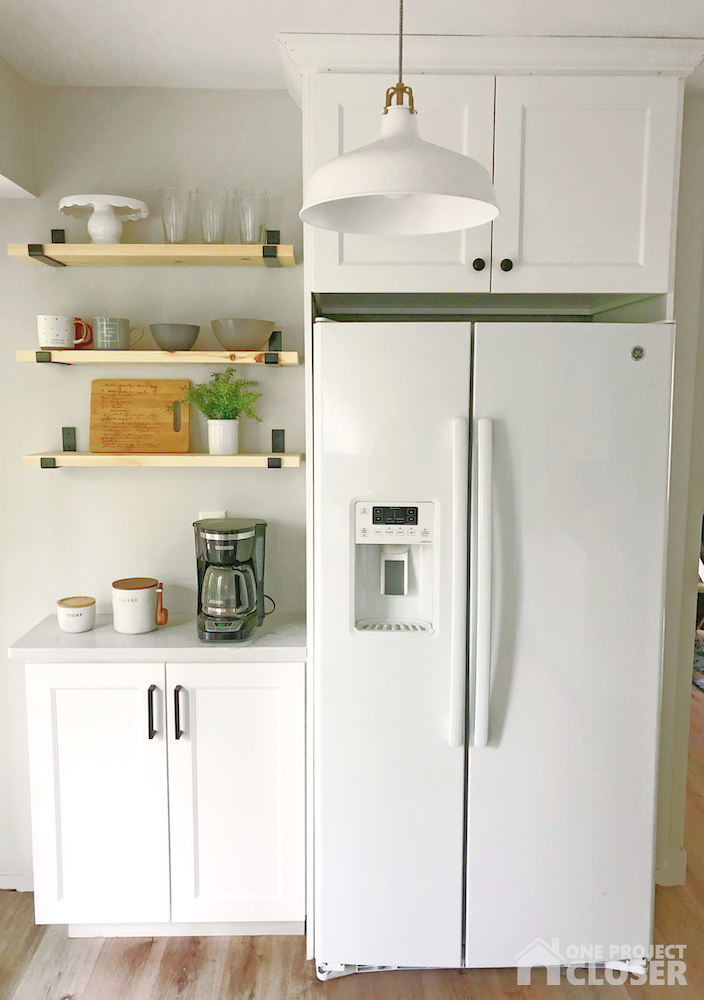
We decided to work in sections so we wouldn’t live without a functional kitchen for too long. Part of our kitchen remodel meant moving the fridge across the kitchen to what was the breakfast nook. This wall was actually the very first project I did when we moved into this house, a stenciled wall:
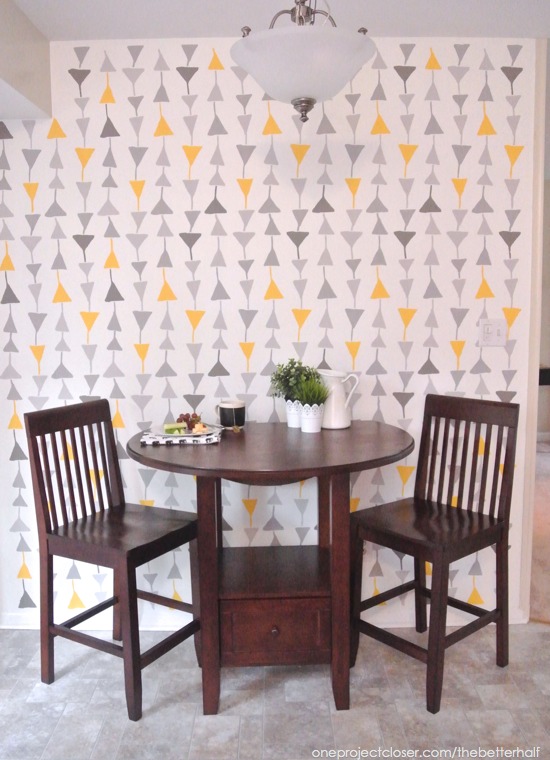
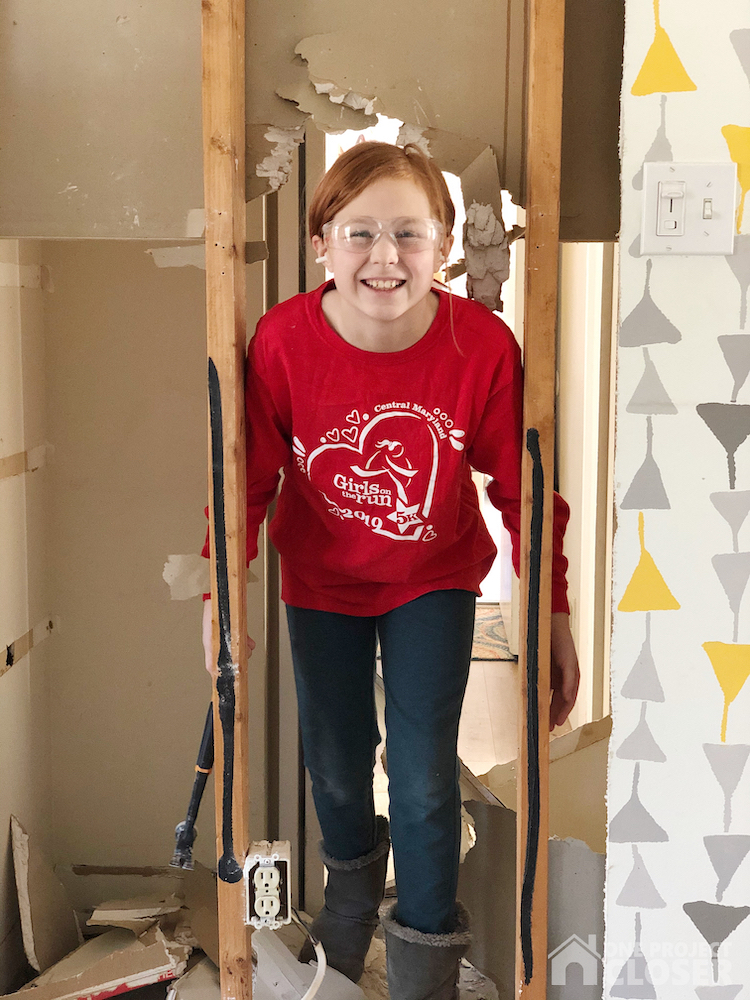
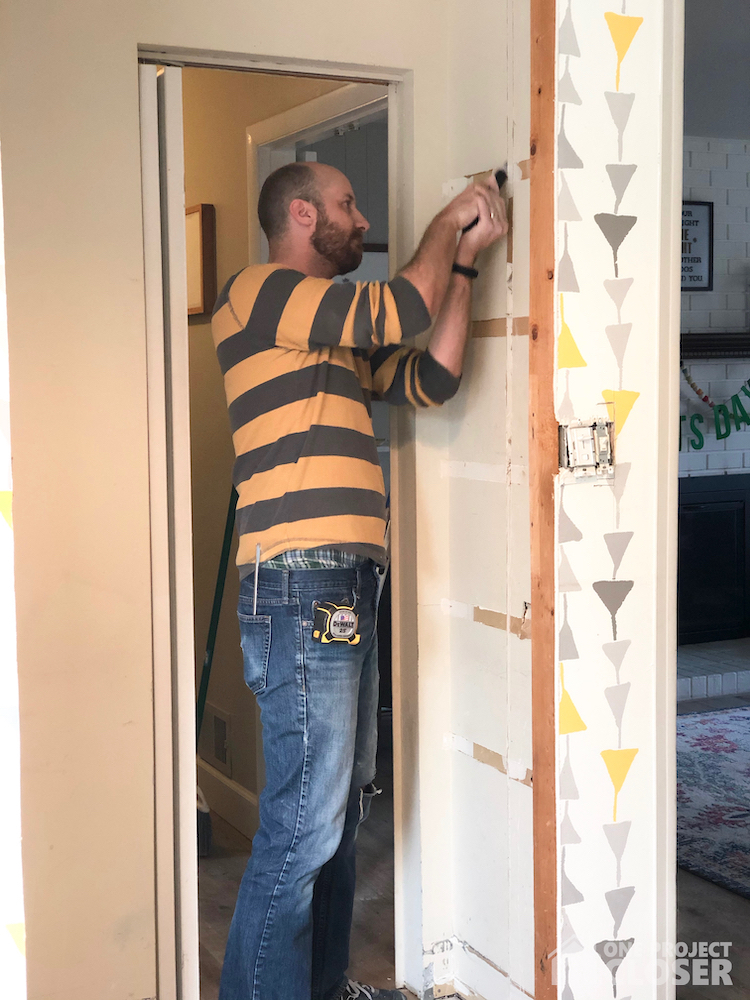
Behind that wall is a half bath (on the left) and a pantry (on the right). We decided to knock out the pantry wall in order to recess the fridge and fridge cabinet, maximizing our space in the room (Special thanks to my sister, Erin for that genius idea!).
The kids had a GREAT time knocking down the wall, convincing my oldest that she would like to be a Contractor when she grows up!
Once the wall was down, Ethan moved studs, moved electrical, replaced floor boards, and moved the fridge water line. Fortunately, we had tons of leftover vinyl planks from when we installed vinyl flooring two years ago.
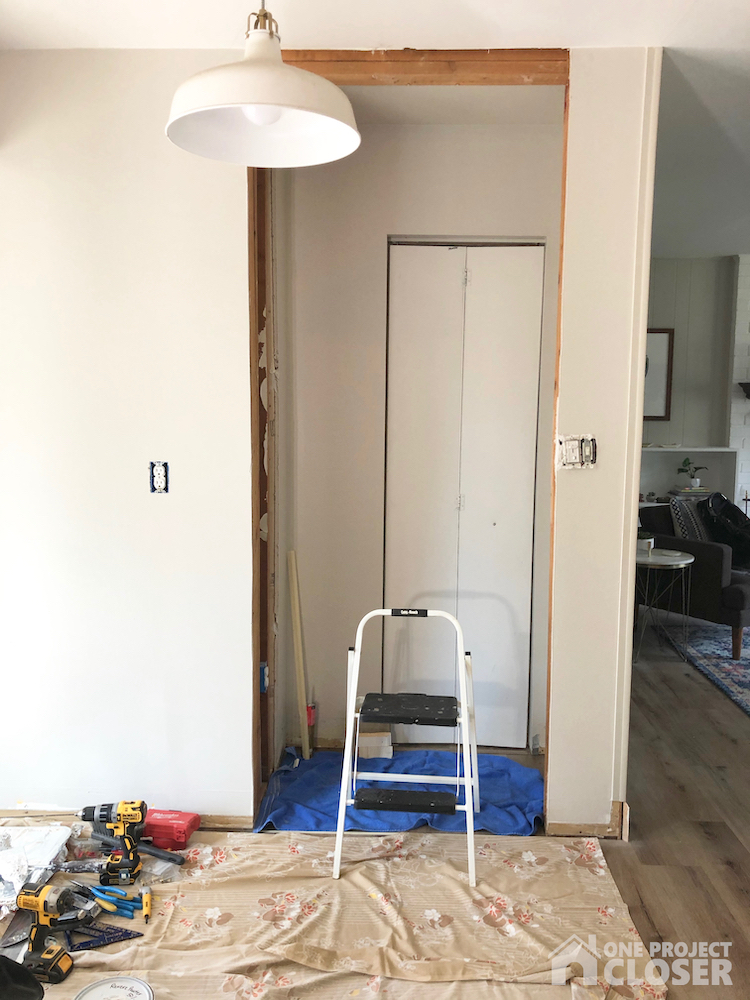
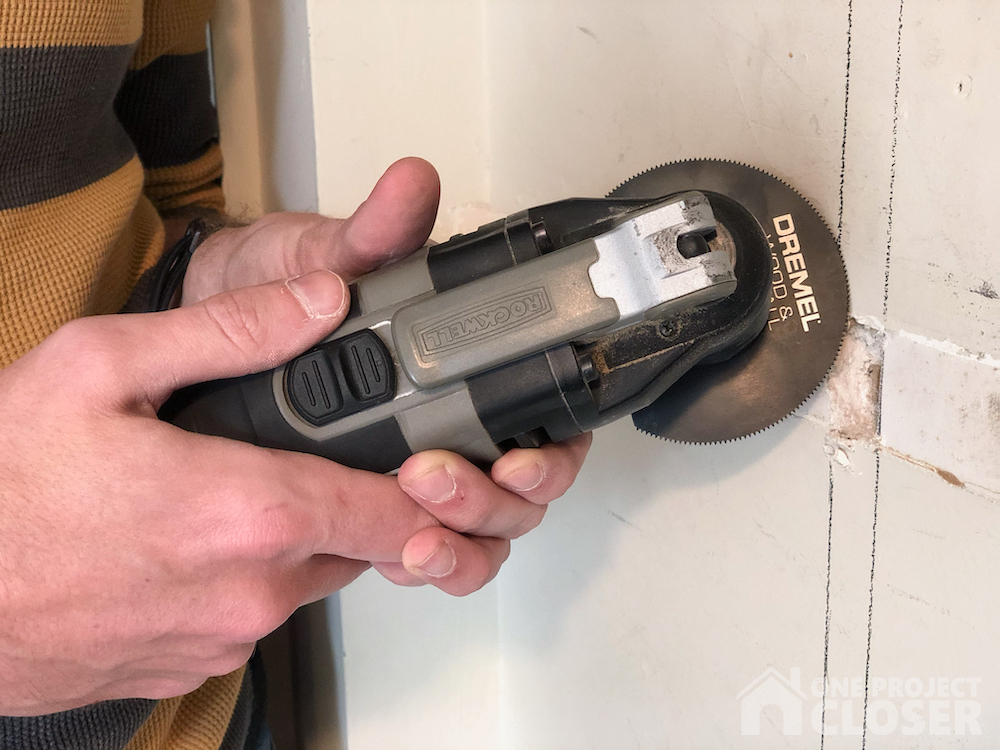
Finally, before placing the cabinet and fridge, Ethan put up a false wall so we could preserve a small broom closet on the other side. This involved cutting the existing drywall from the old pantry. He tried scoring, using a drywall saw, so many things. Then he remembered that Home Depot had sent us this handy Dremel Multi-Max Universal Wood and Drywall Saw Blade. It was a GAME CHANGER! Cut smooth and easy, and made it a much quicker and cleaner job. Well worth the $11 investment!
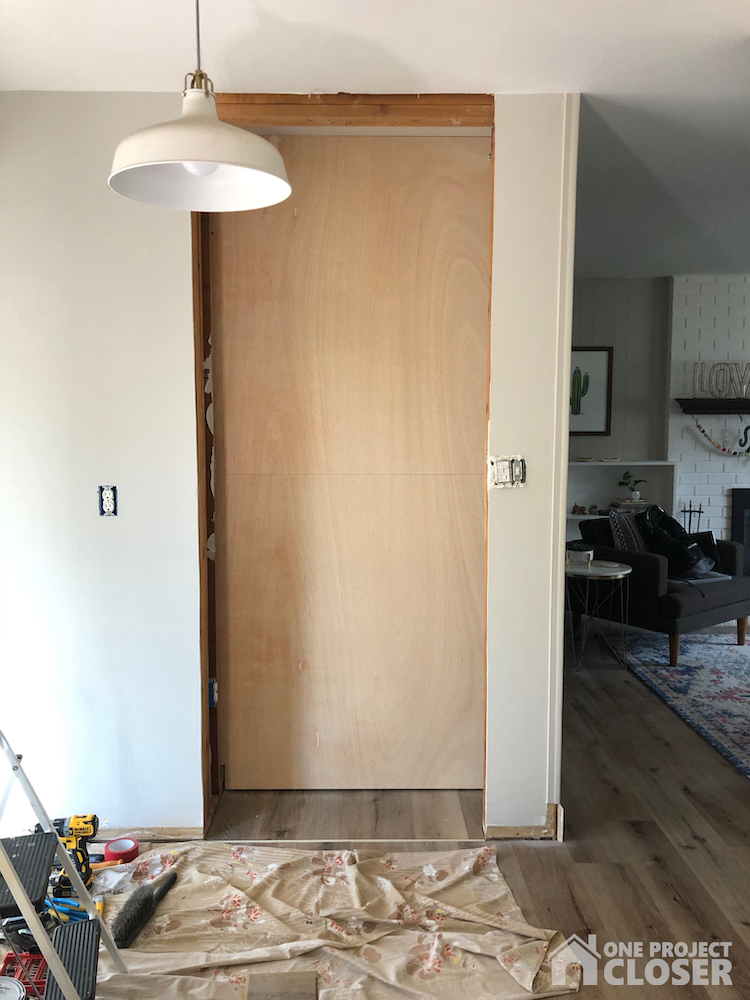
Next came the exciting part – the cabinet installation! Ethan recessed the entire fridge and cabinet into the wall in order to maximize the room available in the kitchen and doorway to the living room.
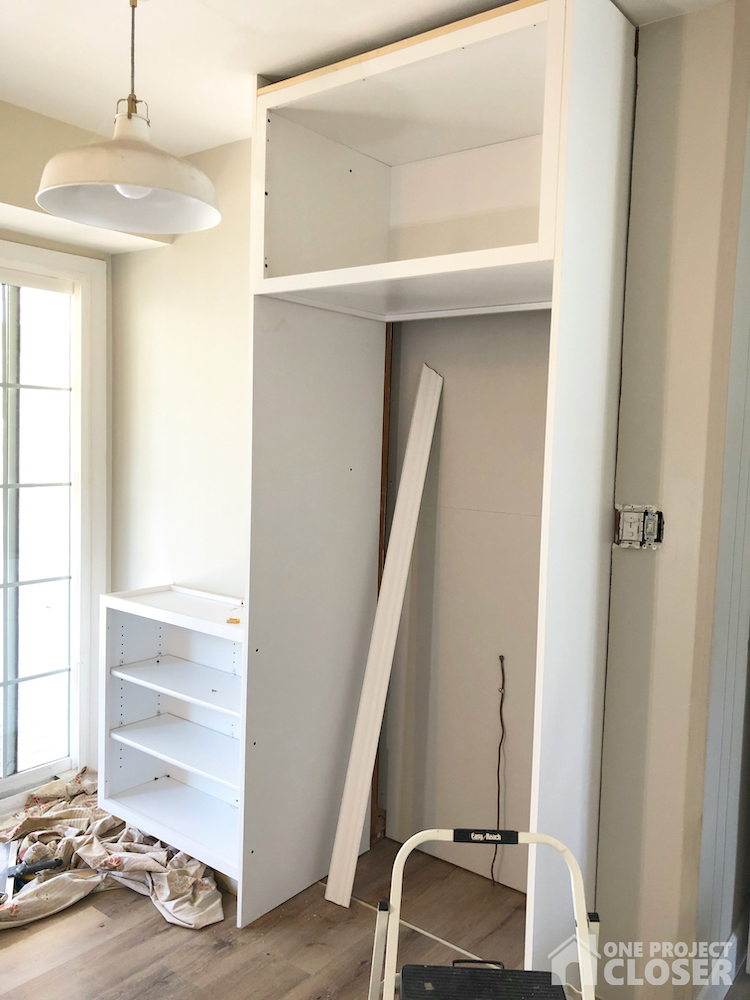
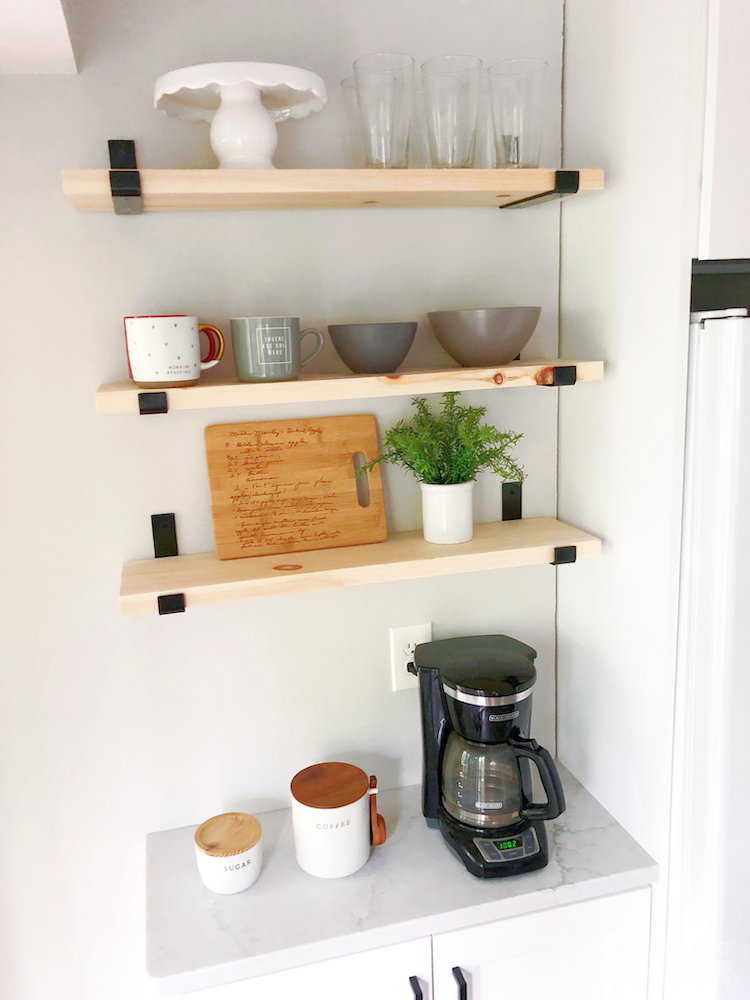
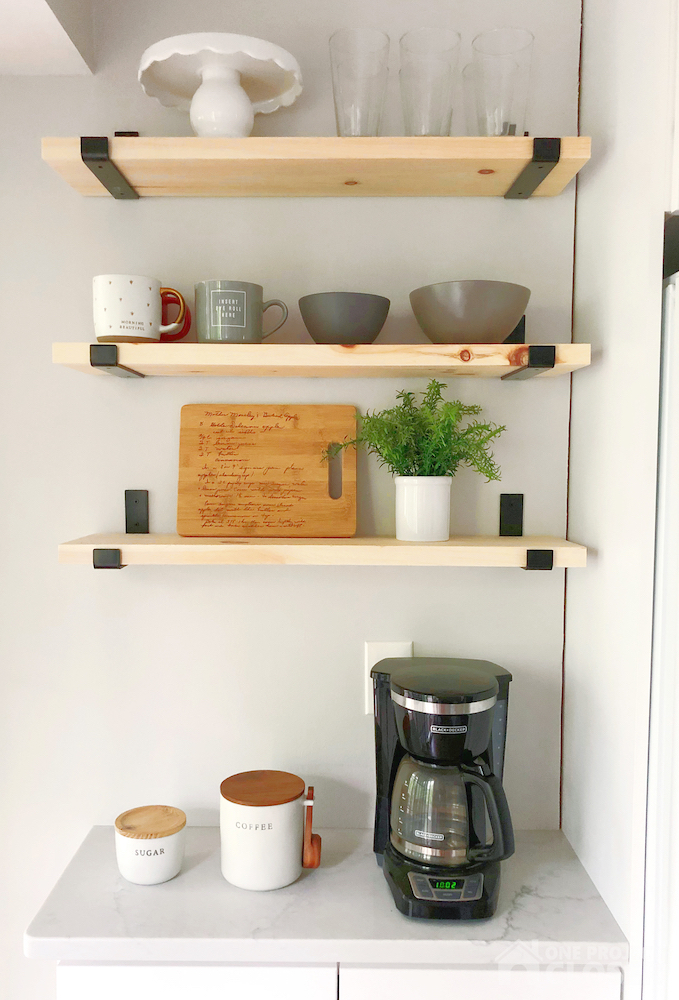
Next, we installed shelves to the left of the fridge to create a small coffee bar. The cabinet of the coffee bar is actually a 12-inch wall cabinet we created a floor box for. This saved us a bunch of money since we didn’t need a custom cabinet. I love these brackets from amazon (a fraction of the price compared to the ones at HD) but the hardware was junk. Do yourself a favor and buy good screws at Home Depot.
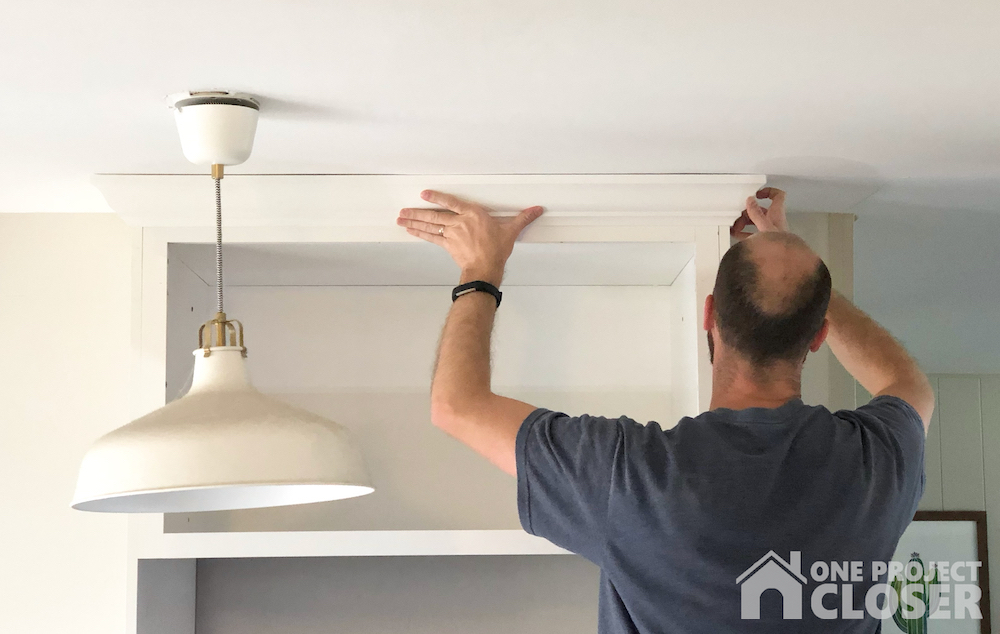
Finally, once we finished the rest of the kitchen a few weeks ago, we had these beautiful Quartz countertops installed! <3
One small note, we do plan to get rid of the pendant light and put in recessed lighting but that probably won’t happen until later this summer. What do you think?
Jocie Hagan | One Project Closer
Come say hi on Facebook, Instagram, & Pinterest!
Thank you so much for joining us at One Project Closer for this tutorial on how to change the blades on a riding mower from friend and guest writer, Jason. This post is sponsored by the Home Depot Prospective Campaign. Post may also contain affiliate links. Opinions (and typos) are 100% our own, and we appreciate you supporting our site in order to continue to provide free content to our readers.
Spring has arrived and here in the Mid-Atlantic that means the sounds of mowers are filling the air! If you are like me replacing your blades with a sharpened set when you prepped your mower for winter at the end of last season was not on your todo list. Maintaining sharp blades on your mower is important for both the health of your lawn and to reduce stress on your mower’s engine. Dull blades pull at the grass stressing roots and tearing the grass blades, leaving your yard more susceptible to disease. Using the right tools makes swapping dull blades with sharp ones a surprising simple maintenance task. Plan to do this at least twice each mowing season.
Changing the blades on your riding mower
Project Time: 30 minutes
Cost: $0 – $25 (if replacing with new blades)
Difficulty Level: Easy
Materials Needed:
- Flat head screwdriver
- Needle nose pliers
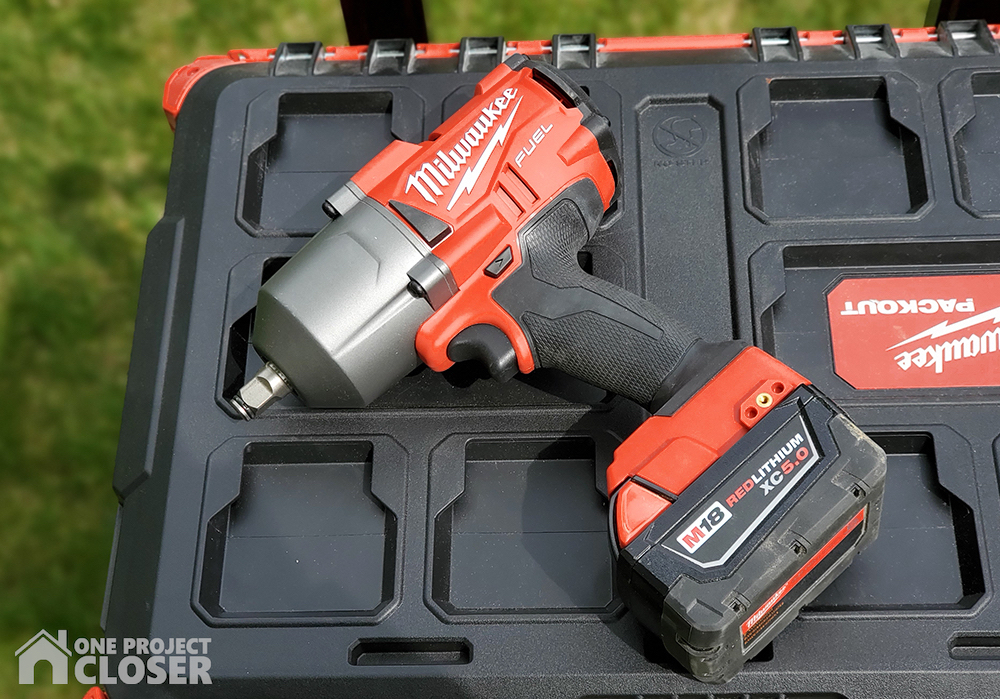
- Milwaukee Impact Wrench
- Impact socket
- Breaker bar
- Torque wrench
- Socket
- Replacement or already sharpened set of mower blades
- Scrap 4×4 wood
- Work Gloves
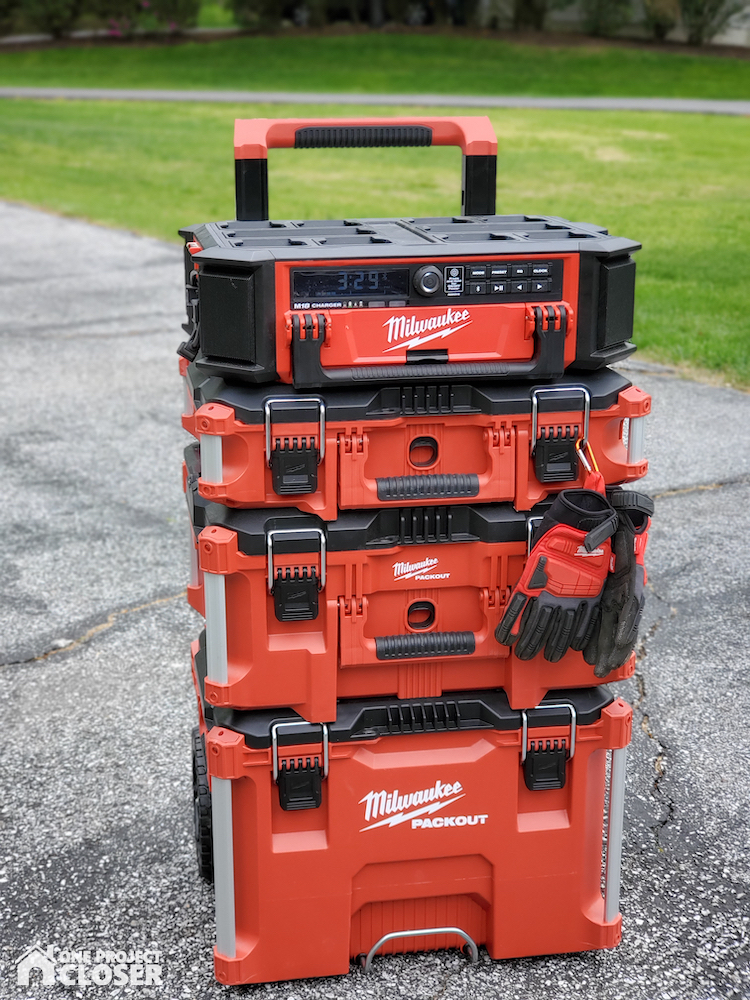
Other Featured Products to help organize and carry your tools:
- Milwaukee 22 in. PACKOUT Modular Tool Box Storage System
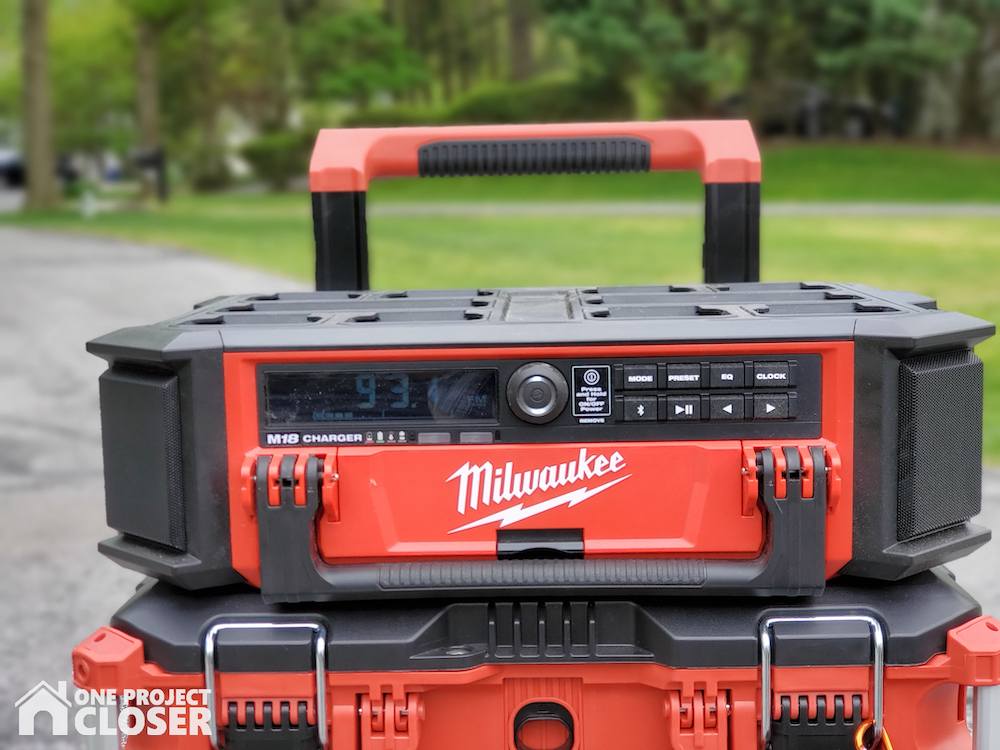
- Milwaukee M18 Lithium-Ion Cordless PACKOUT Radio/Speaker with Built-In Charger
Be sure to check out our amazing Home Depot Coupons before you buy to save yourself some money!
STEP ONE
Gather your tools and materials. In this post, I am using my Cub Cadet XT1 riding mower which has a 42” deck.
*Note: I use Milwaukee PACKOUT Storage System to organize my frequently used jobsite and cordless power tools. Being on wheels makes it easy to transport to the project site and keeps my most needed tools close by. Also, I just acquired the Milwaukee PACKOUT Radio/Speaker System. This was the first outdoor project in which I got to try it. Ten speakers provided a full 360° sound, and kept me jammin’ to my favorite radio station. This speaker system is also perfect for a construction site or an outdoor party, but even when just putzing around the garage.
Position your riding mower on a level surface, disengage PTO, shut off the engine and engage the parking brake!

STEP TWO
Note: Deck removal varies by make and model, so augment this step with instructions from your owner’s manual.
Start by lowering the deck to provide easy access to the deck’s connections.
Remove the bow tie pin from each side located at the rear top of the deck and slide the deck’s lift arm apart from the deck post mount. (Tip: Sometimes these bow tie style cotter pins are a bit stubborn, especially when new. Use needle nose pliers to grasp the pin and a flat head screwdriver to help expand the pin to aid with its removal.) Now move the deck lift lever to raise the deck lift arms, so that they are tucked up and out of the way.
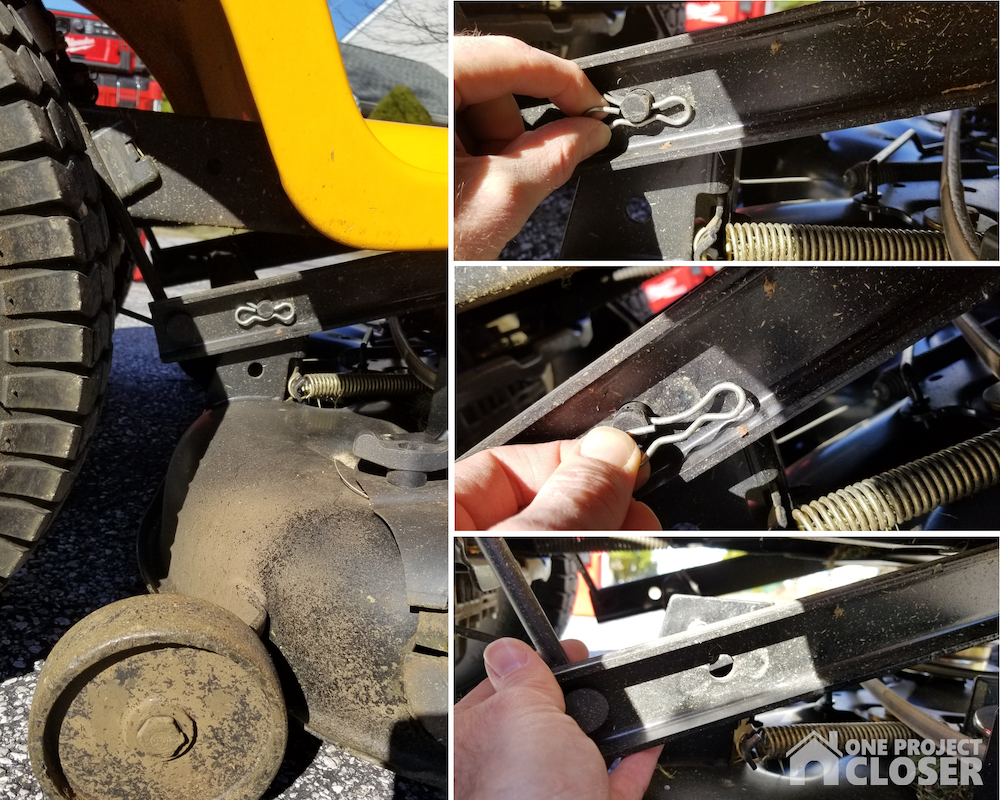
Remove the bow pin from the front deck lift rod and slide out the rod.
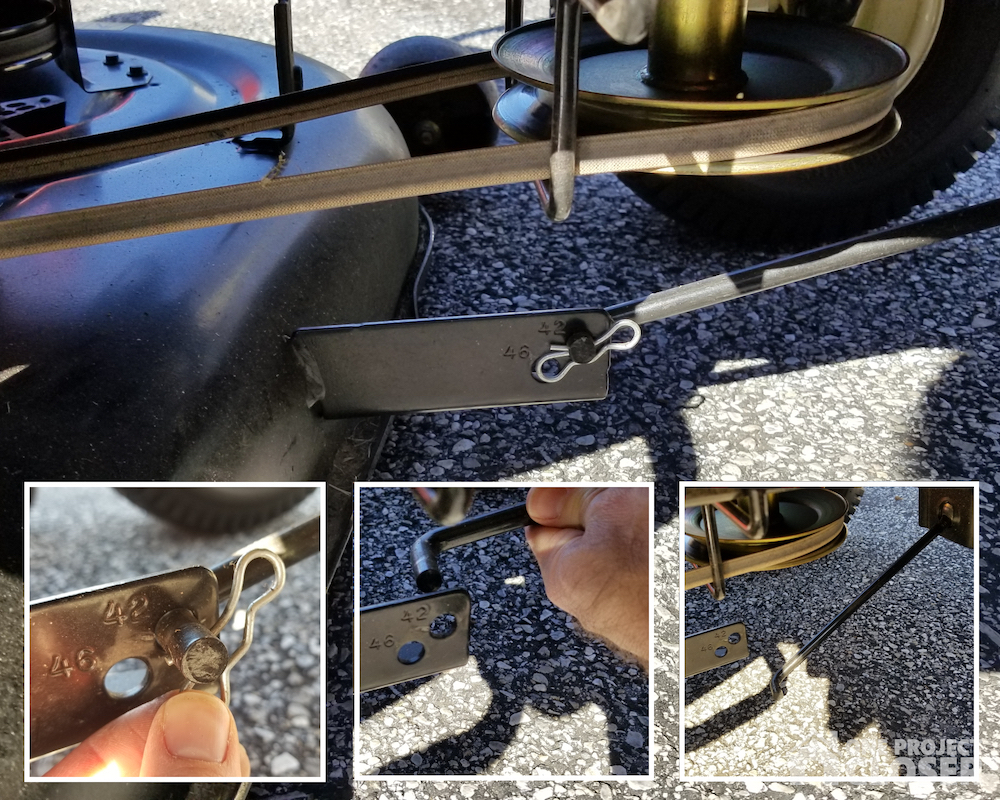
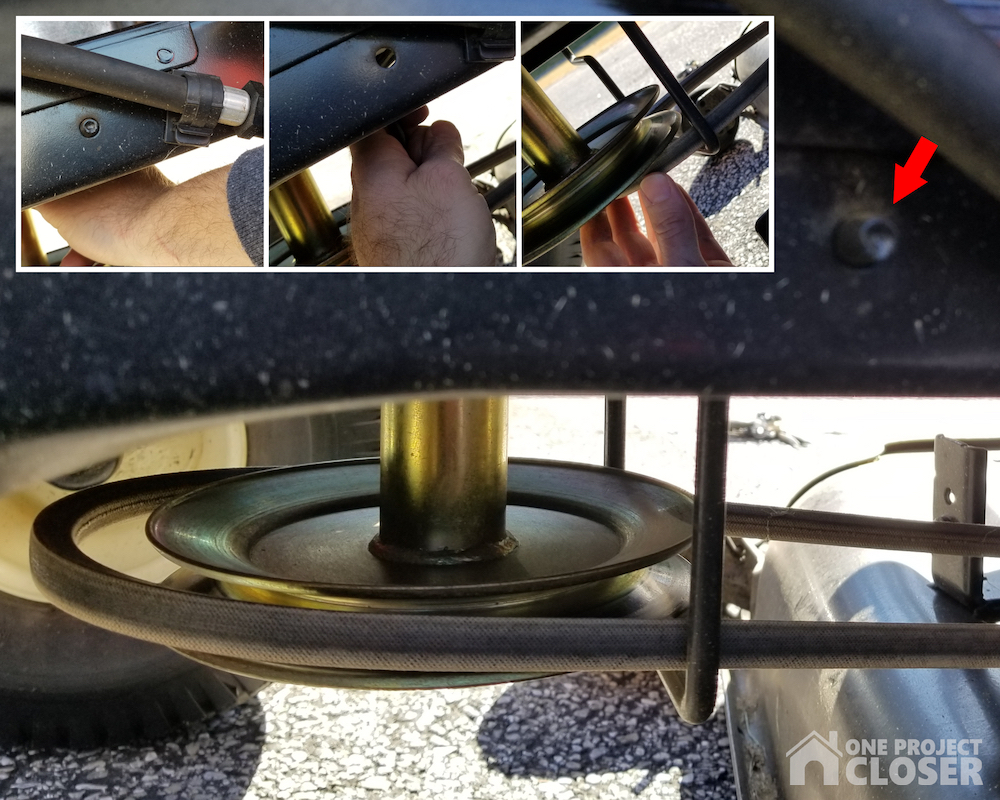
With the deck now detached from the lift arms, slide the deck forward a couple inches to make it easier to remove the belt from the engine pulley (located at the front). On this mower an engine pulley keeper prevents the belt from being fully removed from the pulley. While the keeper can be removed, I simply apply pressure to the keeper on its left (facing forward) until it pops through the hole securing it to the mower’s frame (see red arrow) and slide it downward, creating a gap between the keeper and the pulley that the belt will clear.
The final step required to remove the deck is to detach the Power Take Off (PTO) cable spring from the deck. Carefully slide deck a few inches to the right side of the tractor to provide better access to the PTO cable spring. Then push the idle pulley (arrow in top right picture below) toward the back of the deck to create slack in the PTO cable (middle right picture below) and contract the PTO spring. Then unhook the spring. Be careful to avoid pinching injuries!
Now just one final bow tie cotter pin to remove which secures the PTO cable to the deck.
STEP THREE
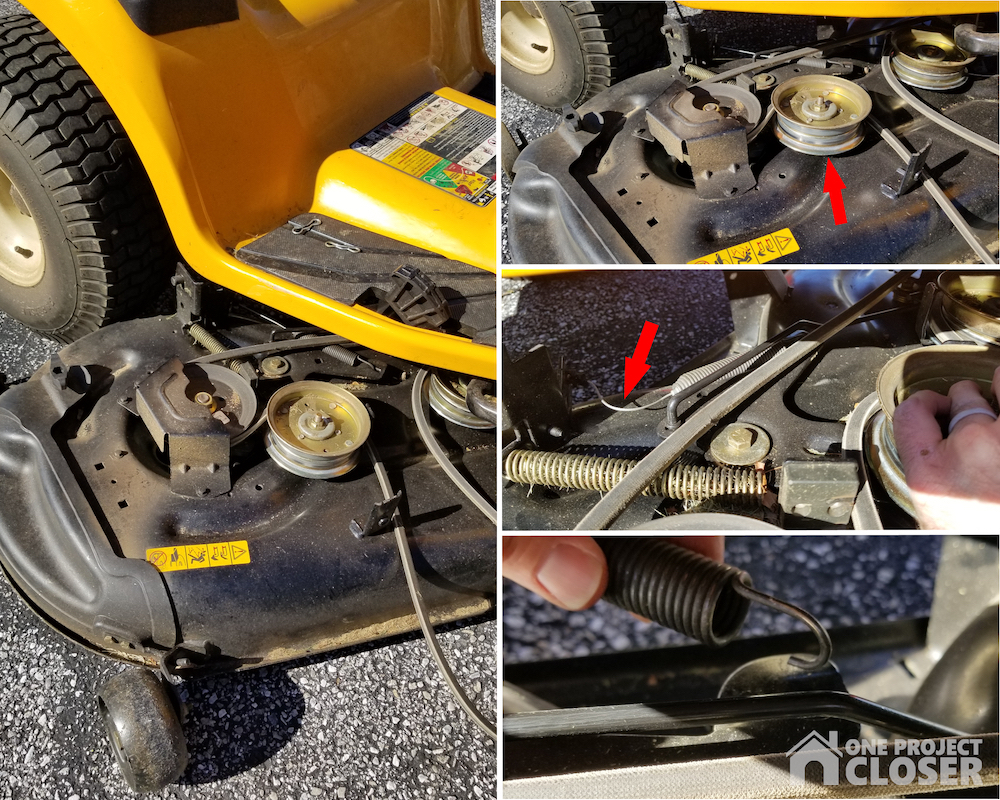
Now that the mower deck is completely detached, carefully slide it out from under the mower. Roll it to a grassy surface and flip the deck over so that it is resting upside down.

STEP FOUR
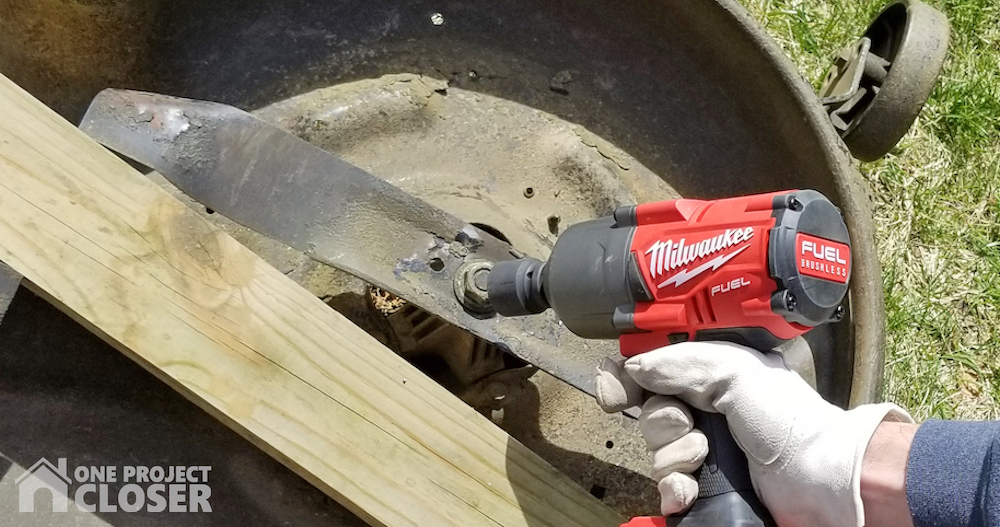
Some mowers are equipped with a lock that prevent the blades from spinning while removing (or tightening) the flange nuts. Chances are that unless you have a commercial mower, you will need to use a block of wood to prevent the blades from turning when removing the flange nuts. I keep a scrap piece of 4×4 for this purpose, but even a piece of firewood will do the trick.
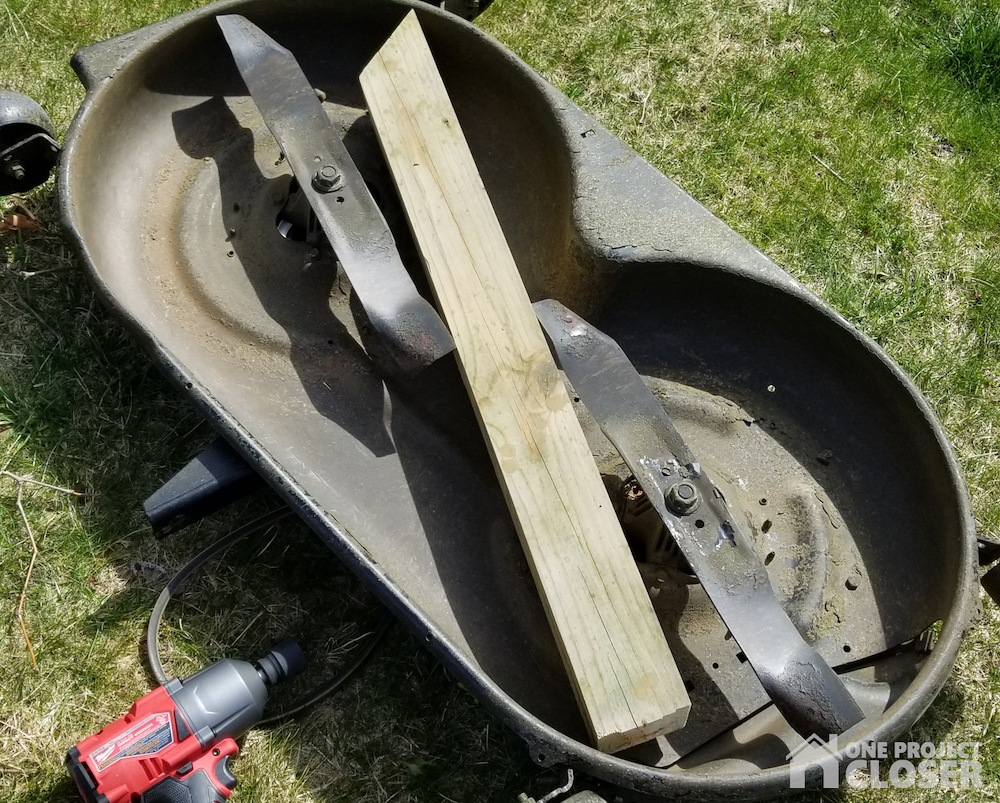
STEP FIVE
Remove the nuts securing each blade to the spindle assembly. Note: High torque requirements and weeks or a season of cutting grass can make these nuts stubborn to remove. An impact wrench makes this painless. I use my Milkwaukee M18 FUEL 18-Volt Lithium-Ion Brushless Cordless 1/2 in. Impact Wrench, but alternatively you can use a breaker bar to loosen these nuts.
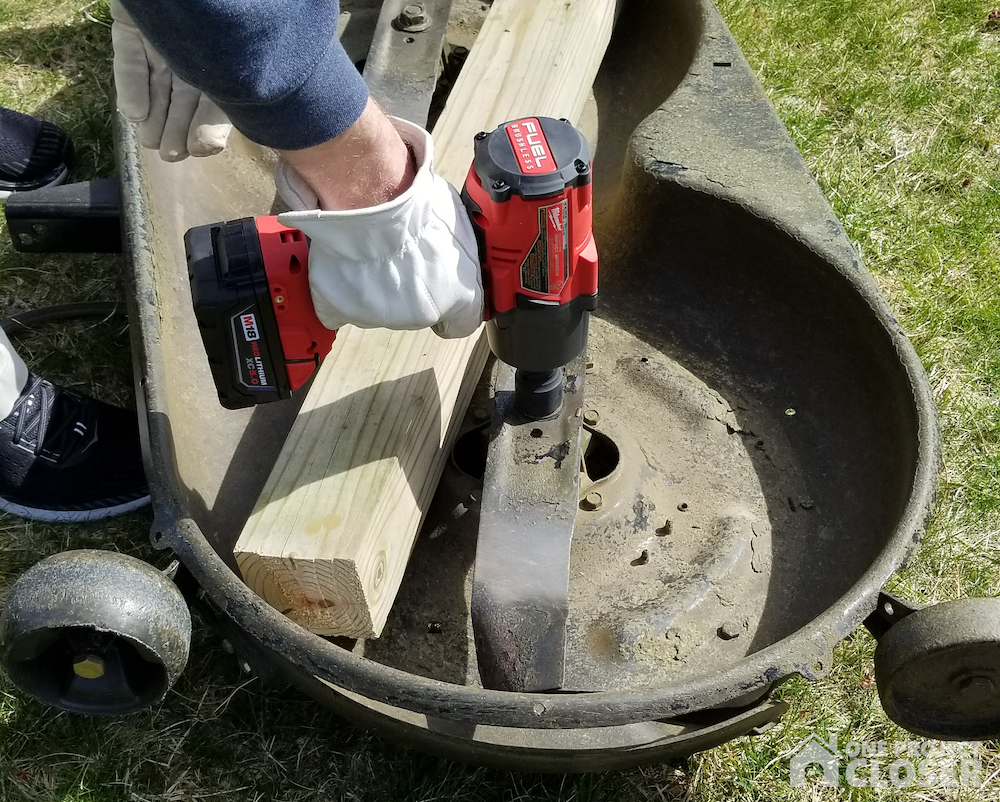
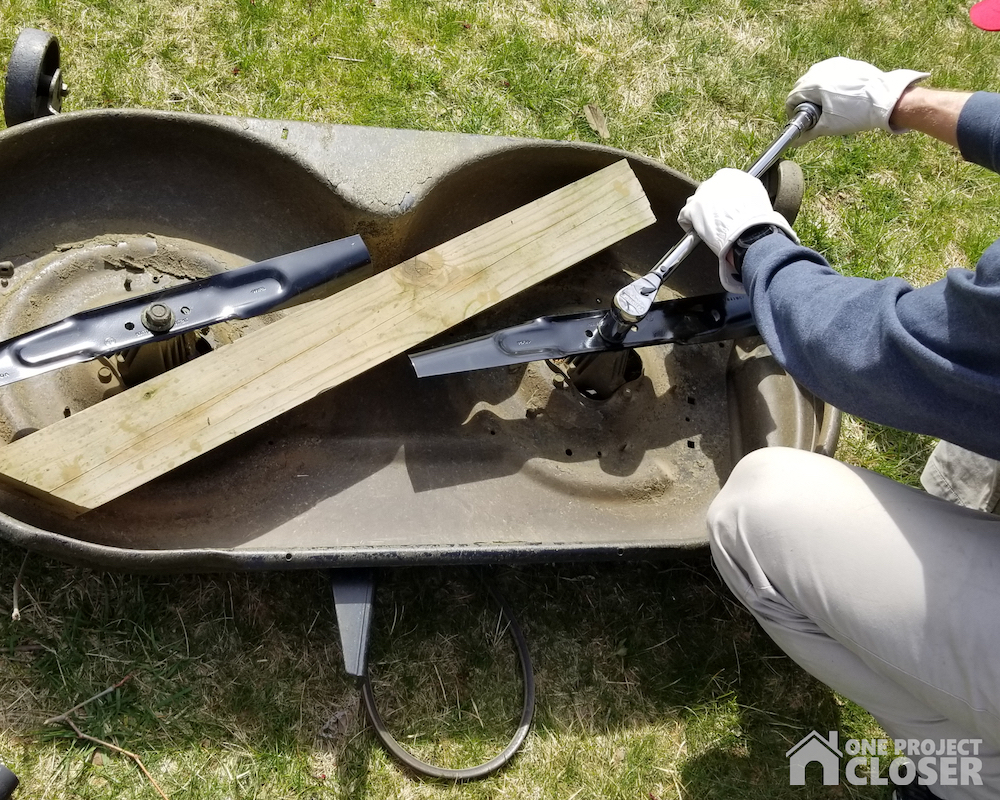
Now replace with a sharpened (or new) set of blades. Hand tighten the nuts and then complete tightening using a torque wrench according to your owner’s manual. This Cub Cadet specifies tighten the flange nut between 70 lbs-ft and 90 lbs-ft. (Tip: Keep a spare set of blades on hand. This way you can sharpen your old blades on a rainy day or have them professionally sharpened at your local small engine service shop, so they will be ready for a midseason swap.)
STEP SIX
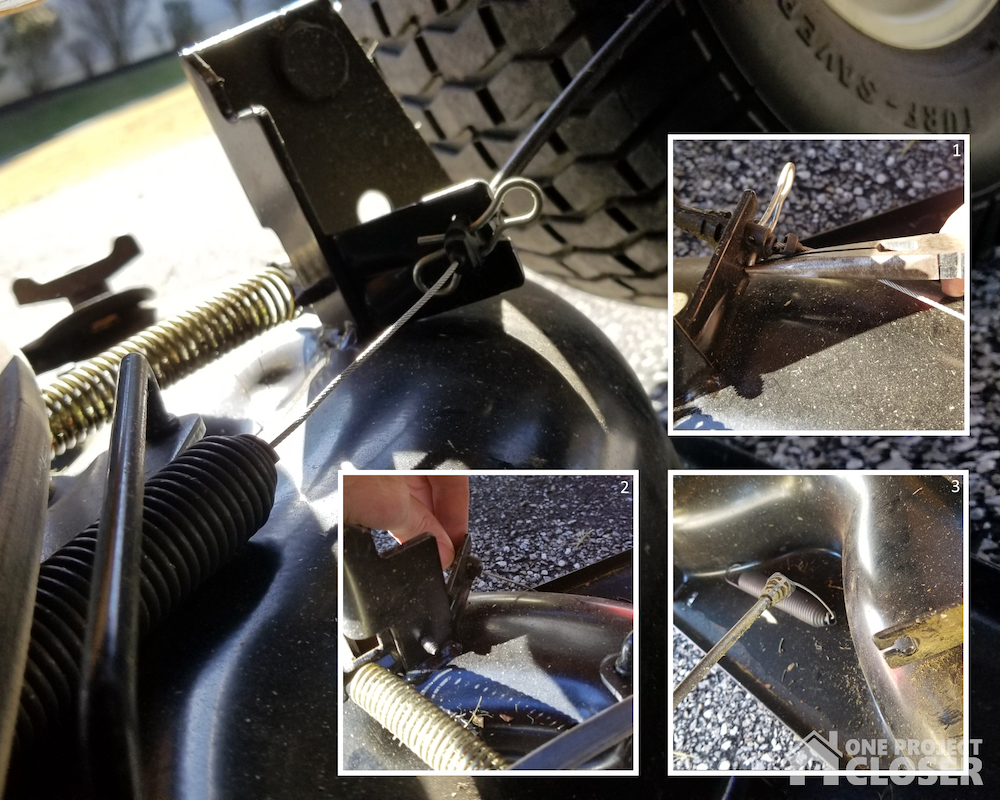
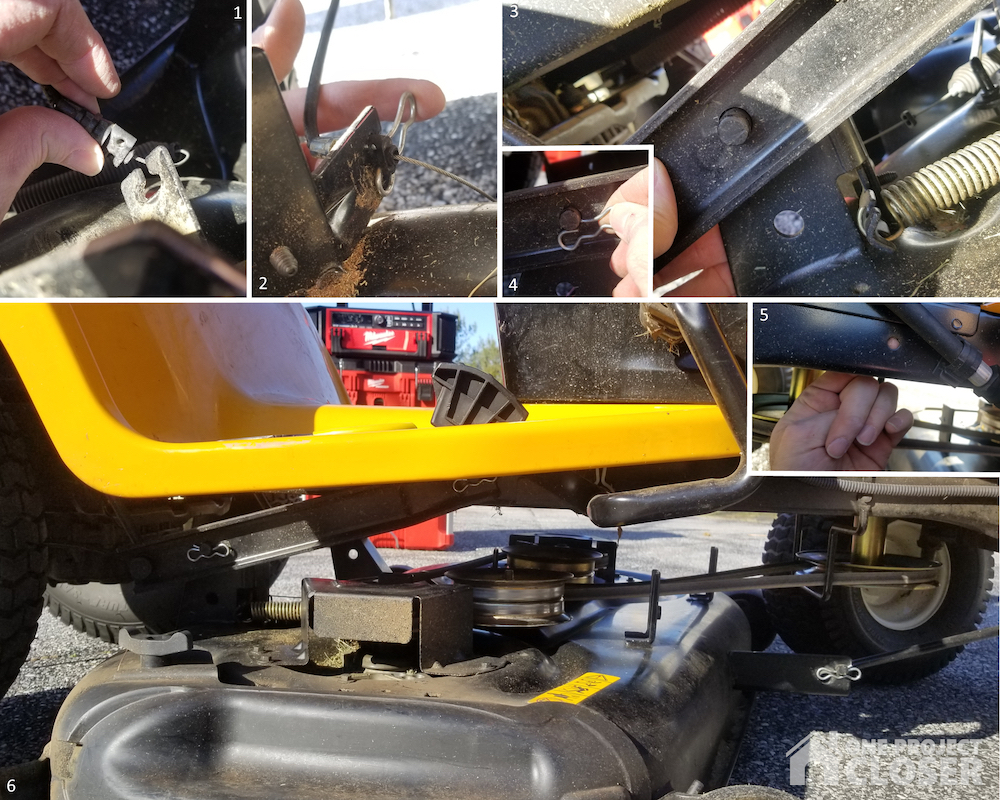
Now reattach the mower deck by completing the removal steps in reverse order.
- When reattaching the PTO cable to deck mount eyelet, position cable collar through eyelet and secure the bow tie pin so that the pin’s belly is seated in the collar’s notch (inset image 1 and 2 below).
- Lower the deck lift lever, so that the lift arm’s can be positioned on the deck mounting rods (inset 3 and 4).
- Do NOT forget to reposition the pulley keeper post through the mower’s frame (inset 5) after looping the belt back in place around the drive pulley.
- Finally, inspect all connections and ensure the deck will raise and lower (inset 6).
STEP SEVEN
Congrats you are done. Now go ahead and lay down some big league outfield-styled lawn stripes in that yard!

Hi I’m Jason. I know a little about a lot — which occasionally gets me in a sticky situation. Fortunately, the DIYer community is always there to help get my projects back on track! I enjoy time outdoors, researching and collecting tools, gadgets & gear, as well as craft beer and mixing cocktails.
Thank you so much for joining us at One Project Closer for this tutorial on how to make these DIY storage boxes for dog grooming supplies from guest writer and blogger, Danielle. This post is sponsored by the Home Depot Prospective Campaign. Post may also contain affiliate links. Opinions (and typos) are 100% our own, and we appreciate you supporting our site in order to continue to provide free content to our readers.
I just built our DIY laundry room shelving and renovated the ENTIRE room. It’s glorious. The bottom shelf includes a dog feeding station with storage for dog food underneath. There is a bit of empty space in the back so I decided to build a couple of small storage boxes. These wood bins can hold our dog grooming supplies AND our dog first aid kit!
The best part about these bins is that they have small holes for handles. This meant using a forstner bit to cut the holes out, rather than trying to hack away at this with my jig saw. I think the result looks great!
Be sure to also check out our stress-free, easy dog grooming tips!
How to Make a Storage Box for Dog Grooming Supplies
Project Time: 1 hour
Cost: $22 for two
Difficulty Level: Easy
Materials Needed:
- Wood glue
- 8′ 1×8 pine board
Equipment Used:
- Nail gun
- Kreg Jig kit for Pocket Holes + 1″ coarse screws
- 1″ fortsner bit
- Miter saw or circular saw
Cut List:
- (3) 10″ cuts per box
- (2) 8.75″ cuts per box
Featured Products:
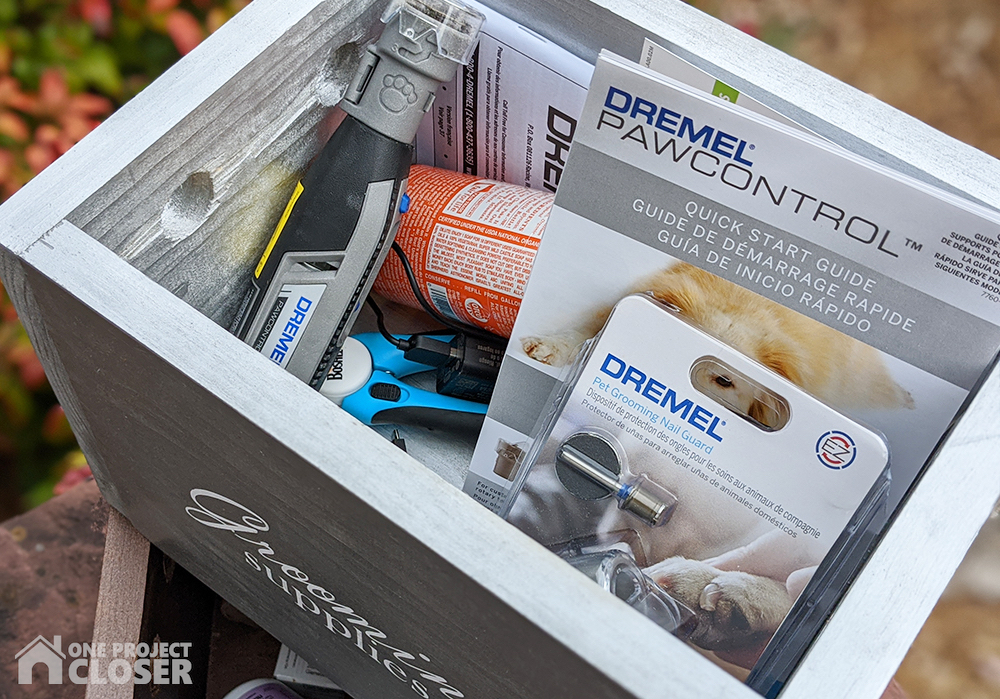
- Dremel Cordless Pet Nail Grooming Rotary Tool with Charger and 5 Accessories
- Dremel Pet Grooming Nail Guard Kit with 4 Grooming Discs and EZ Lock Mandrel
Be sure to check out our amazing Home Depot Coupons before you buy to save yourself some money!
STEP ONE
Cut out your wood. You need (3) 10″ cuts per box for the bottom and two long sides. You need (2) 8.75″ cuts for the short sides.
I made two boxes for my space. It’s easy to make a couple of these at the same time! 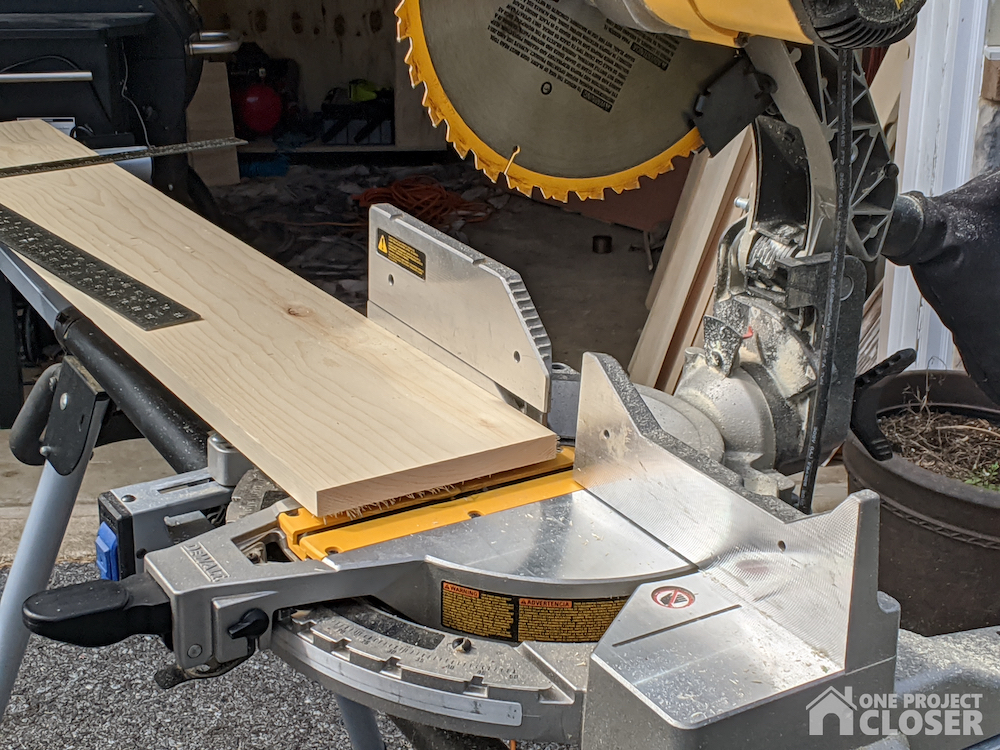
STEP TWO Ideally you want to drill the holes for your handles before assembling your box.
Mark out where you want your two holes per side. I placed the center of each hole 1.5″ down from the top and 3″ from each side.
Place each side on a piece of scrap wood. I centered my forstner bit on my marks and drilled down. The scrap wood underneath will prevent blowout on the other side of the wood.
STEP THREE
One of your 10″ cuts will be the bottom of your box. I decided to use pocket holes to connect my bottom to the sides. I added one pocket hole per side to the bottom. 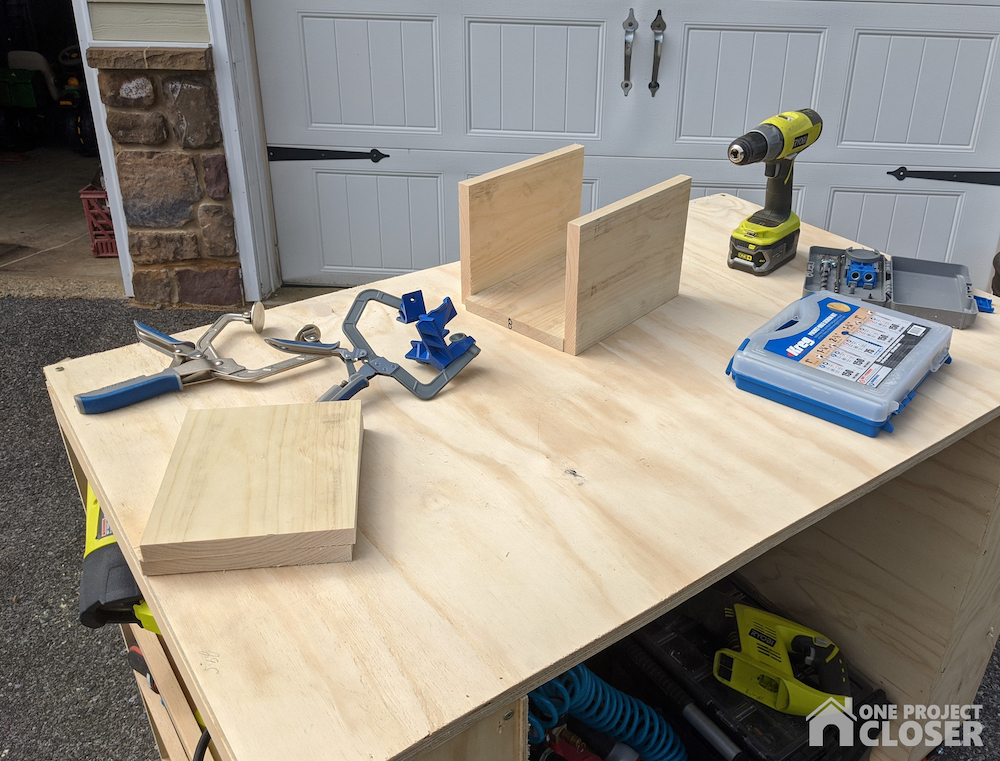
Do not attach the bottom yet.
STEP FOUR
To avoid adding pocket holes to the sides of my box, I decided to attach them using wood glue and my nail gun.
For my first box, I connected the sides first. Then I had to hammer my bottom into place. Whoops! It was a tight fit, as it should be when you get your measurements correct.
With the second box, I added glue to the sides of my bottom. I placed the bottom “pocket holes down” on my work surface. Then I built the sides around it. Each side was connected with glue and my nail gun. 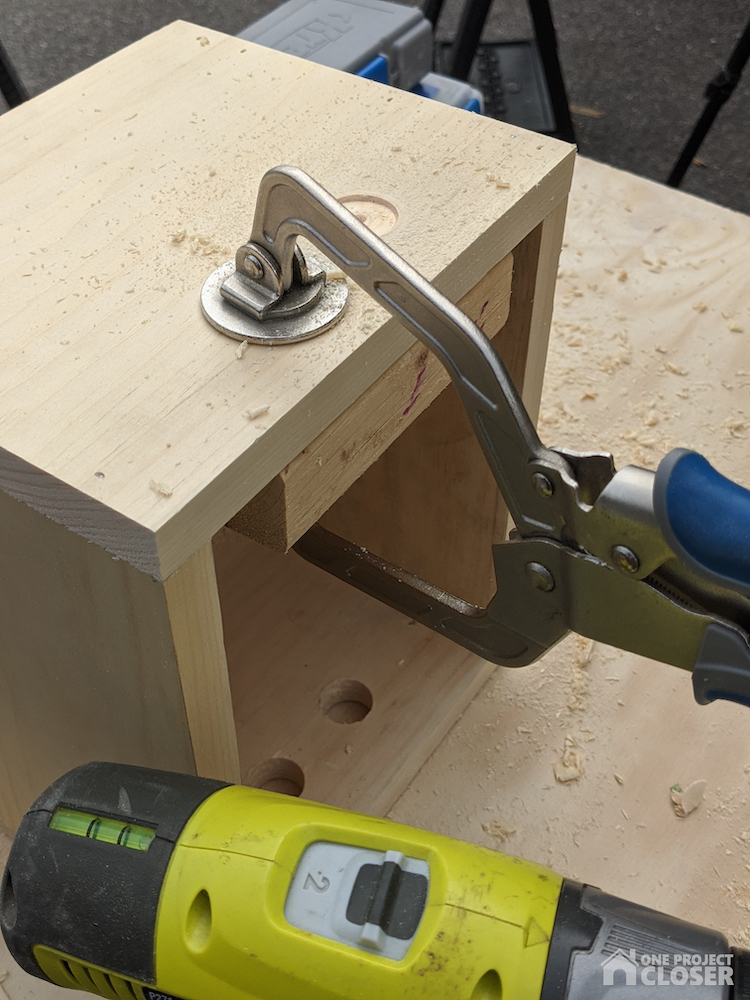

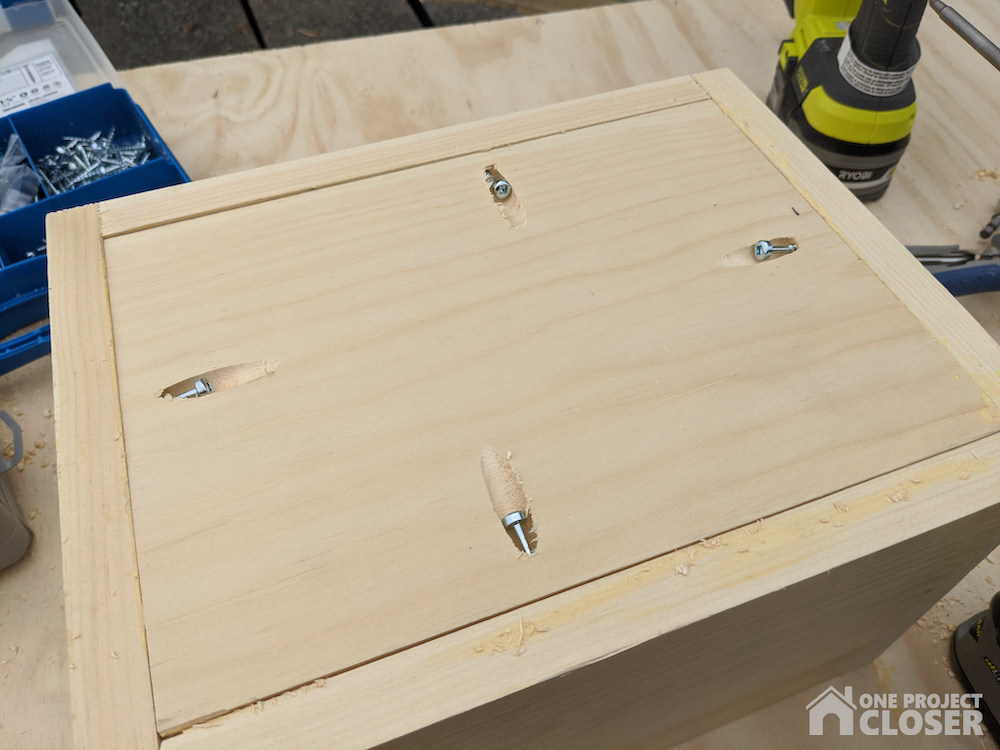
STEP FIVE
Now that the sides are connected, you can screw in the bottom to the sides of the box. I used the 1″ coarse screws that came with my Kreg Jig screw set.
STEP SIX
Sand your box. Fill the pocket holes if desired. 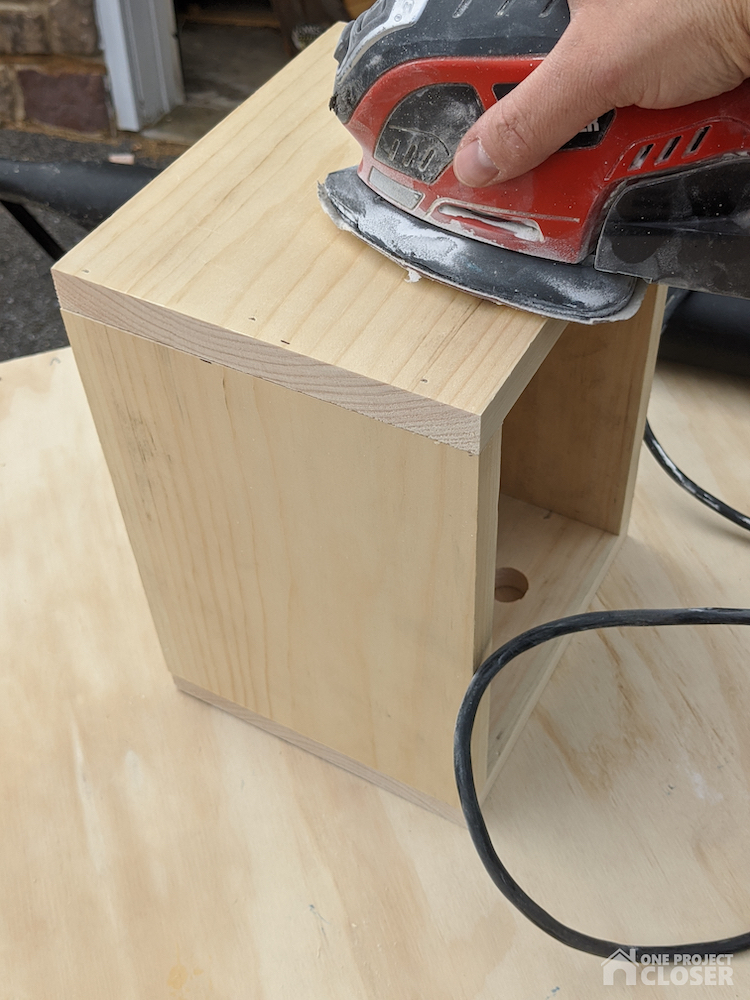
STEP SEVEN
Finish your box using stain or paint. You can also add iron on vinyl to label your wood boxes (permanent vinyl would also work). I initially tried stenciling but the paint didn’t seem to adhere well to the metallic spray paint on the boxes. The SVG I used is available free for subscribers on DIYDanielle.com! 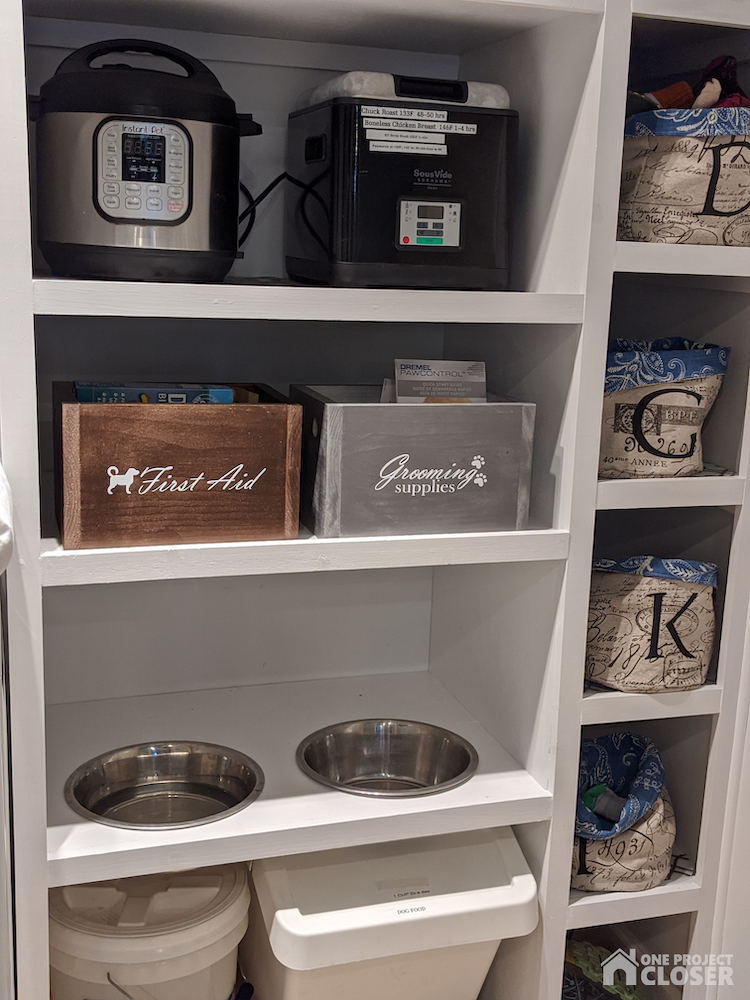
Here’s a video showing how I made it! As you can see in the video, I put the holes in the sides for the handles AFTER I built the box. This wasn’t ideal, but it worked. I just clamped the wood block to the area behind where the holes would go to prevent blow out.
The Dremel 7300 Series Cordless Pet Nail Trimmer
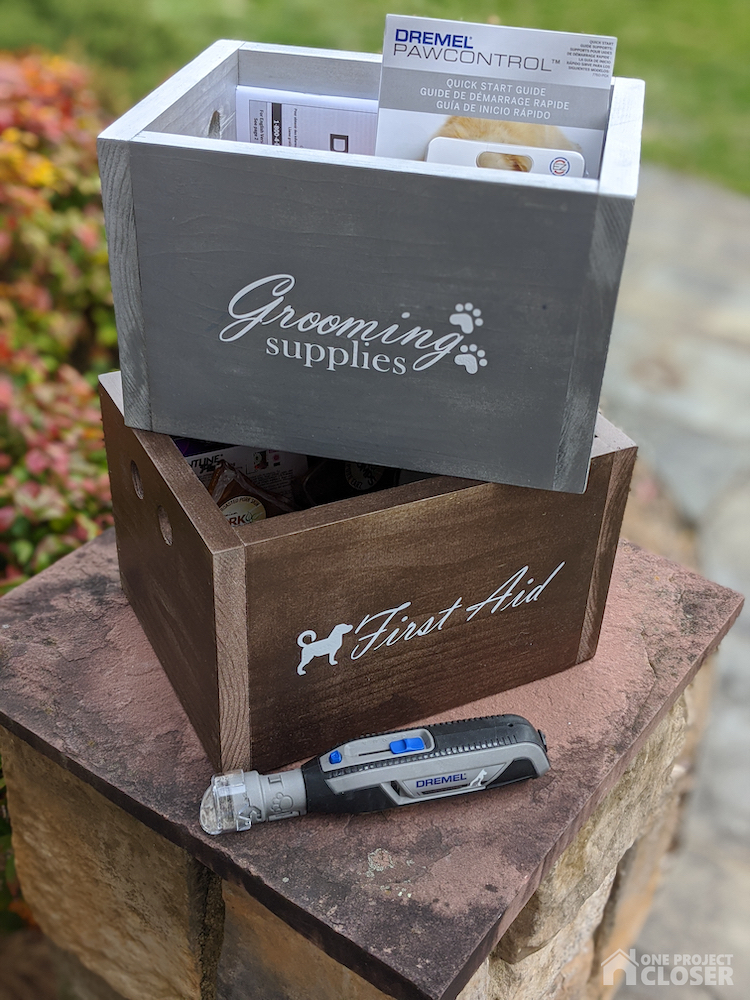
These boxes were the perfect solution for storing my Dremel 7300 series cordless pet nail trimmer AND the charger (we’re always misplacing chargers!). I had the opportunity to try out this nail trimmer on my rescue pup Rocky and it’s AWESOME.
Rocky is super anxious about nail trimming so I was worried he wouldn’t like it. He was still nervous, but I loved how quiet the Dremel was. I worked on a few different nails, gave him a treat to reward him, and let him have a break.
Training your dog to sit nicely for nail trims is important, but it’s also important not to do too much at once if you have a nervous dog.
The Dremel allows me to sand a little at a time, without worrying about cutting off too much nail. Repeated nail trims with NO pain or bleeding are important to build trust with your dog. It’s really hard to avoid cutting too much off with normal nail clippers if your dog moves a lot.
The best part is that the Dremel leaves Rocky with more rounded nails. He normally has sharp nails with normal clippers. We love giving our pup attention, but hated getting scratched or having his nails cut through our clothing! This trimmer essentially sands his nails so they aren’t so sharp. It’s a great option if you struggle with trimming your dog’s nails (or even if you don’t!). 
Danielle Pientka is the DIY, sewing, and craft blogger behind DIYDanielle.com. She lives in Maryland with her husband, three sons, a dog, three guinea pigs, four goats, ducks, and chickens. While she thrives on plumbing, electricity, and a good WiFi connection, she also considers herself “homestead lite;” she loves raising animals, gardening, and making things from scratch. Danielle is the author of How to Sew Cloth Diapers, Sewing for Guinea Pigs, and Sewing for your Kitchen. She also has a mobile app for Android and Apple devices called Sew Organized.
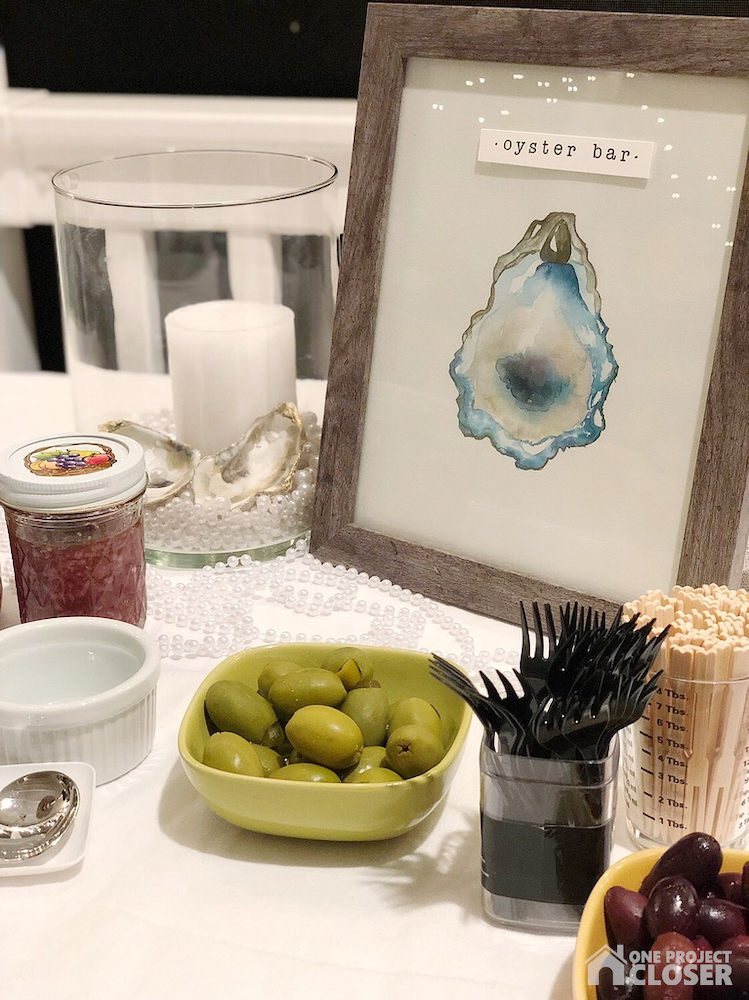
Several months ago, we attended a fundraiser for Voices for Children with some friends — it’s a wonderful organization that works to advocate for families and children in the foster care system! At the fundraiser, our little group of 6 (okay, really just the three husbands) won 200 oysters in a silent auction. With those 200 oysters comes a guy who shucks the oysters in your home. I’m not at all an oyster lover, but I do love a reason for a party. On Friday, Mike, “the oyster guy,” (our affectionate nickname) brought his oysters and we invited everyone we know who likes oysters to have one EPIC oyster party. And in case this inspires you, here are a few fun oyster party ideas for your next event!
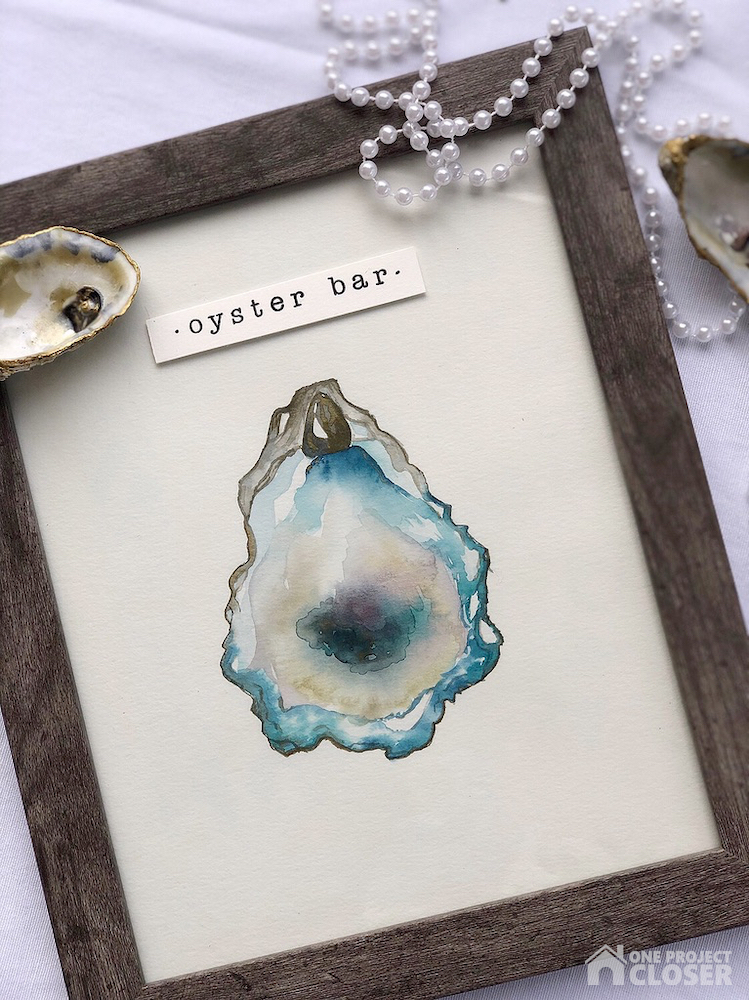
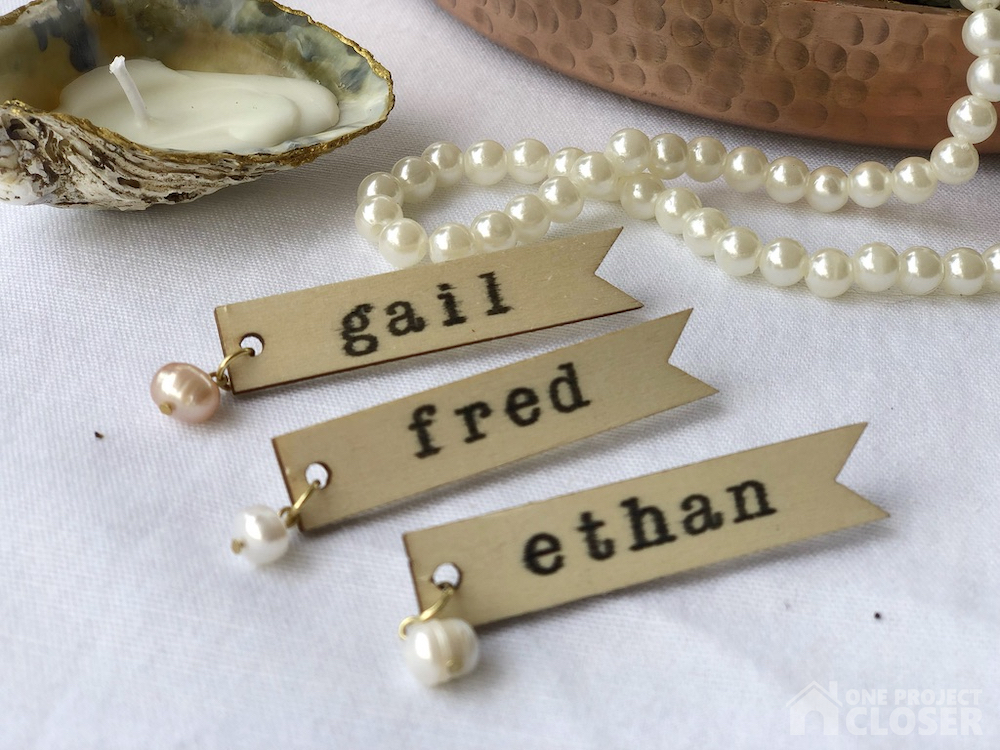
Wood and Pearl Name Tags
We had LOTS of people coming to the oyster party, and three different hosts, so many people did not know each other. I made these simple wood and pearl name tags, which were practical, inexpensive and cute.
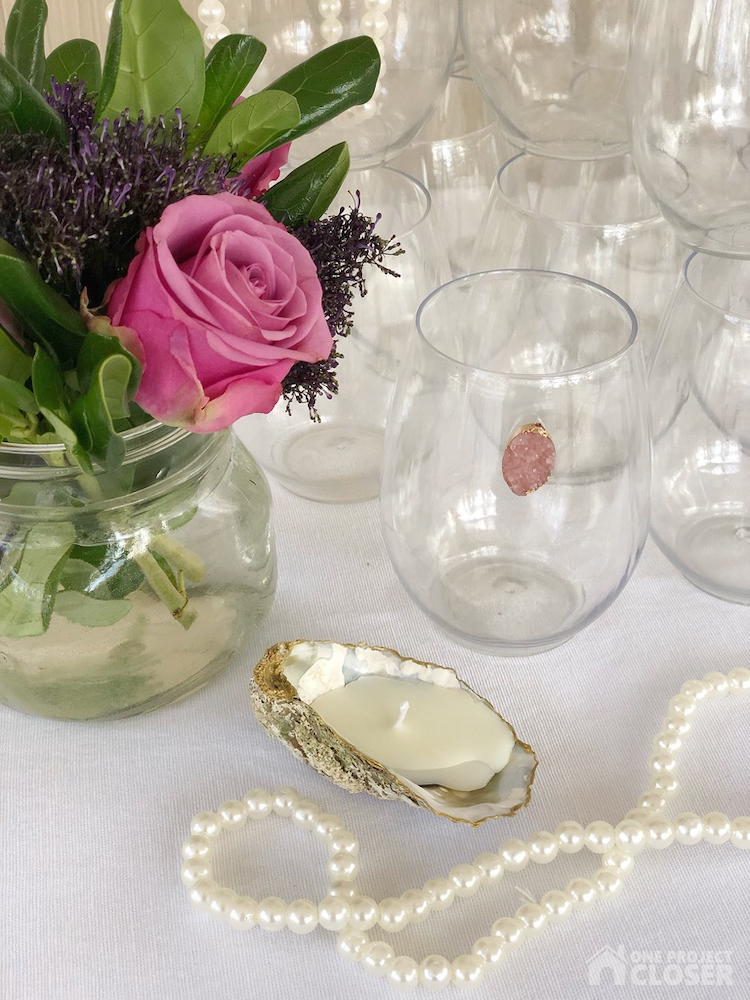
Party Favors: Oyster Shell Tealights
What party is complete without party favors? I contacted Mike, the Oyster Guy to see if he had extra shells I could use to make tealights and he was generous enough to drop off 50 or so before the event. It took a couple of hours but WOW, what a big impact they made. I used the extra shells and tealights for table decor as well.

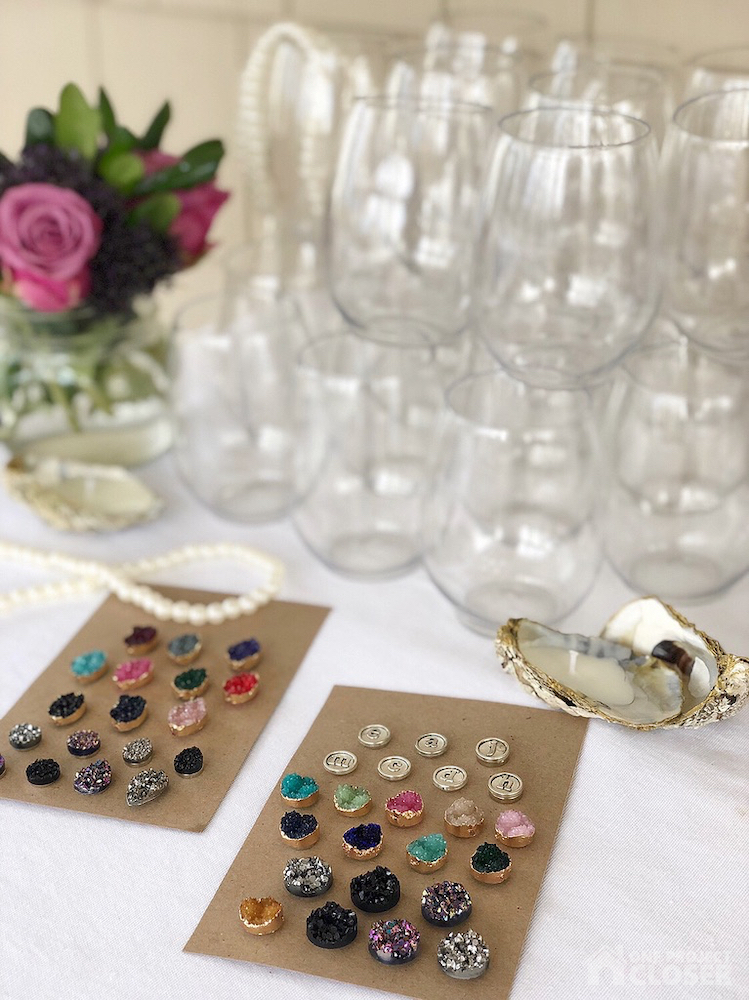
Wine Glass Markers
Post coming soon on these! My friend and co-host, Jess had a ton of reusable plastic wine glasses that we used for the party. It was wonderful that they looked a bit classier than disposable glasses, but weren’t going to get broken. With so many people attending we needed a way for people to differentiate their glass from everyone else’s glass. So I made these really easy and adorable magnetic wine glass charms!

FOOD!!
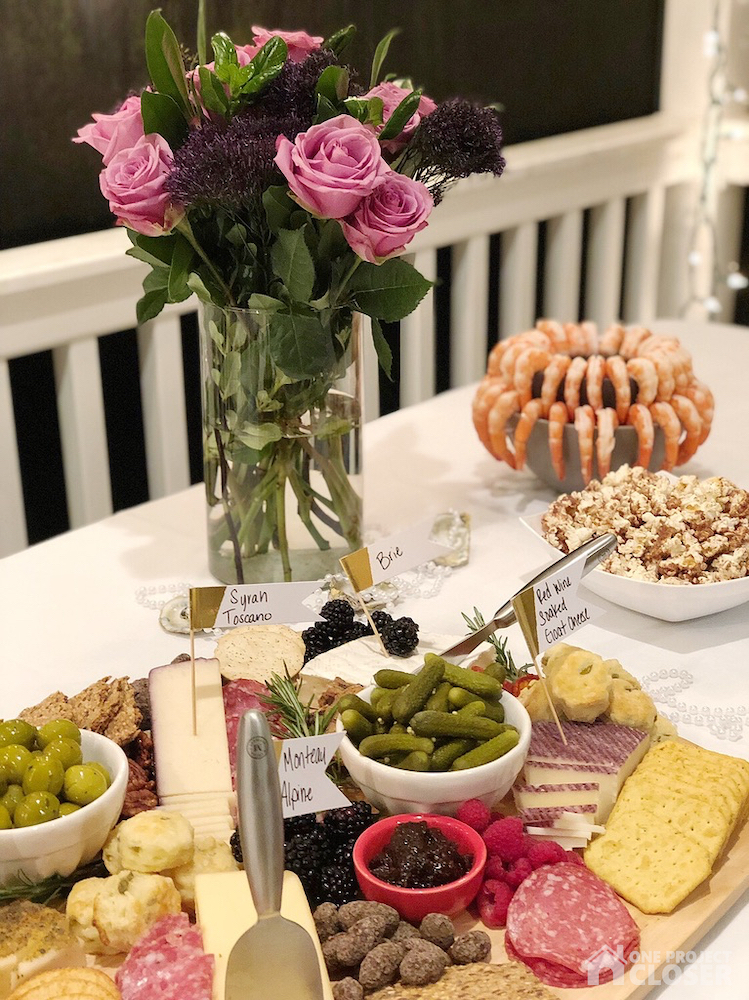
Obviously, the main event for food was the oysters! Mike, our amazing oyster guy is from Sapidus Farms in VA. He was so very knowledgeable and nice, even when my over excited kids asked him waaaay too many questions! We would totally recommend him and his company. Sapidus Farms has environmentally friendly practices that produce plump and happy oysters while preserving the bottom of the Bay and cleaning the water. Gotta love that is a win for the environment and your belly!


Jason and Gail, our co-hosts, made some amazing sauces and mignonettes including homemade cocktail sauce, barbeque cocktail sauce, classic mignonette with red wine vinegar, shallots, black pepper, and tarragon) and an Asian mignonette with rice wine vinegar, siracha, and Korean chili flakes. Oh and of course, lots and lots of lemons and hot sauce!
We also had shrimp cocktail, fried oysters, a GIANT charcuterie board, veggies, fruits, stuffed olives and tomatoes, cake pops, and so much more!
PEARLS
Pearls make oyster parties a bit fancier! So we got a bunch of fake kid’s pearl necklaces from Target and Michael’s and draped them everywhere. My friend Gail also filled a hurricane vase with pearls and oyster shells along with a candle – so pretty!
ENJOY ALL THE WORK!
Once all the planning and prep was done, we poured ourselves a glass of bubbly and enjoyed an evening of oysters and friends!

What do you think? What are some great oyster party ideas for my next big party?
Jocie Hagan One Project Closer
Come say hi on Facebook, Instagram, & Pinterest!
Thank you so much for joining us at One Project Closer for this tutorial on how to make a Simple DIY Star Wars Chalkboard Art Wall. This post is sponsored by the Home Depot Prospective Campaign. Post may also contain affiliate links. Opinions (and typos) are 100% our own, and we appreciate you supporting our site in order to continue to provide free content to our readers.

Difficulty Level: Easy
Materials Needed:
- Chalk
- Chalkboard Paint
- Paint Roller + paint supplies
- Star Wars Prints, Unframed
- 19 feet of 1×2″ pine board,
Tools Needed:
- Bosch Laser Distance Measurer
- Bosch Self Leveling Cross Line Laser
- Brad Nailer
- Miter Saw
- Tape Measure
Be sure to check out our amazing Home Depot Coupons before you buy to save yourself some money!
Bedroom Before!
When we first moved into our home five years ago, our oldest daughter, Isabella had this bedroom and we didn’t do too much with the room. But then, two years ago, we played musical bedrooms and moved my office upstairs from the basement. Lucy moved into this room. While we didn’t do much with decorating, Ethan built her a new loft bed.

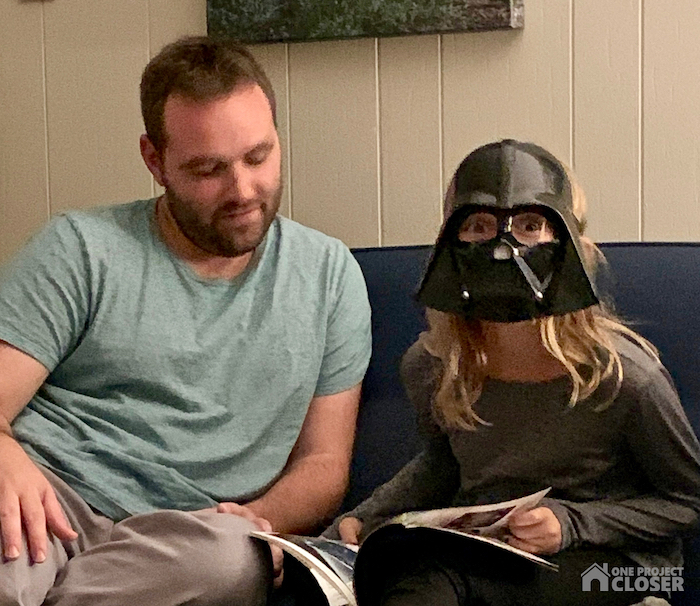
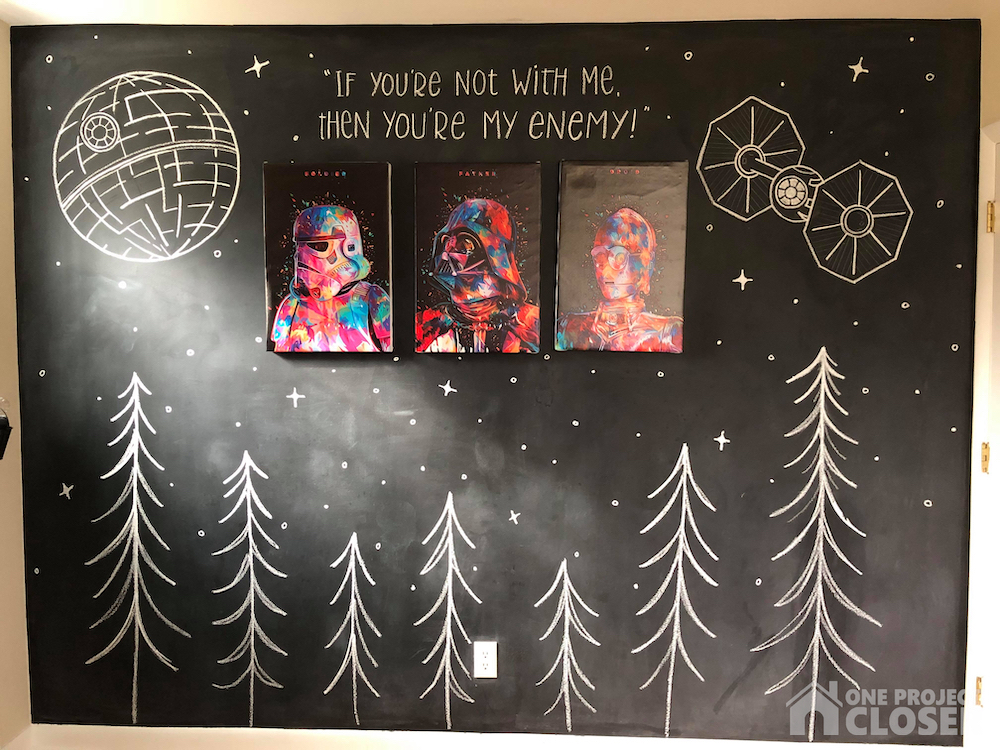
In the past 9 months or so, Lucy has started reading and listening to the Star Wars books, and then we watched all the movies in the past 2 months as a family. To say she loves Star Wars and Darth Vader is an understatement. Her love grew exponentially when gifted a Darth Vader mask from her “Uncle JJ” (good family friend) – this is the two of them reading Star Wars books together.
This is really the first time she has really had a specific enough interest to give her room a theme. She’s been wanting an all black room, which gives me nightmares about painting over one day, but I agreed to making one of the walls a chalkboard wall. Eventually, I’ll also be sewing curtains to go under her loft bed that are Darth Vader sugar skulls. She is a total badd ass, right?
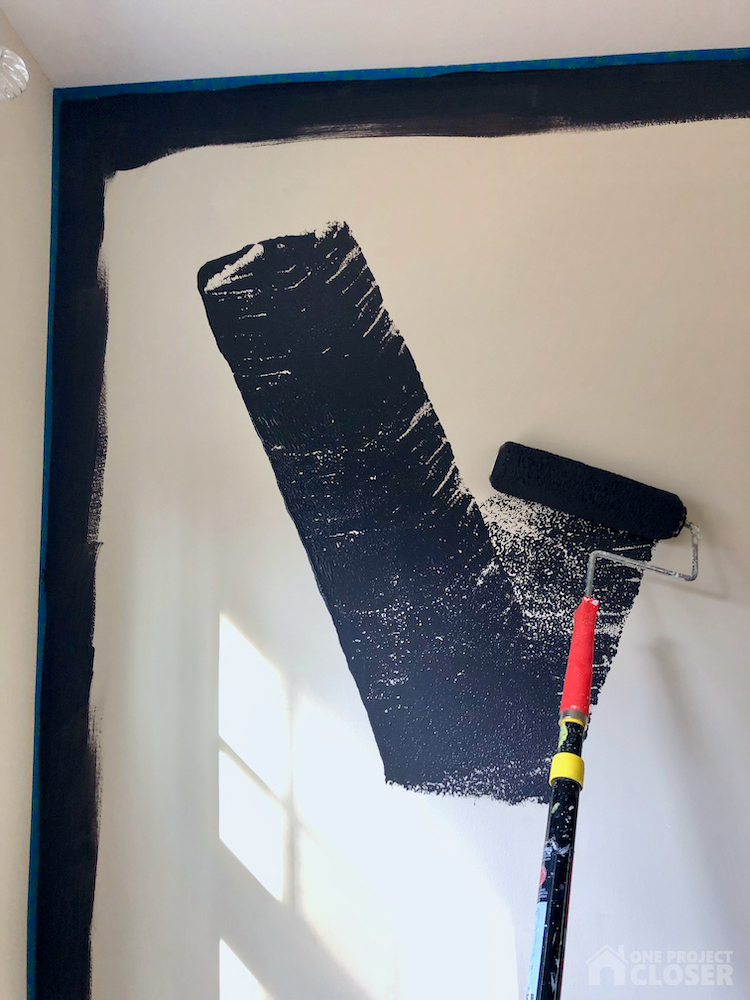
STEP ONE: PAINT
Painting the chalkboard wall was quick and easy, but took two good coats, meaning two quarts of paint. I made sure to prep and lightly sand the walls so the paint would be smooth. Follow the directions on the can, but I waited for the paint to cure a couple days, then covered the wall in a light layer of chalk, and then erased it with a clean cloth. This helps the chalk erase better.
STEP TWO: CANVASES
While the chalk art is the big attraction, I also wanted to add some color to the call, to tie it to the teal in the curtains. I found these canvas prints on Wish.com for cheap, and ordered them in the biggest size they had. They ended up sending th wrong size (16×22) so my money was refunded! Great customer service, and while I was disappointed they were smaller than desired, I was happy for my almost free art. Also, these ship from overseas, so expect to wait a month.
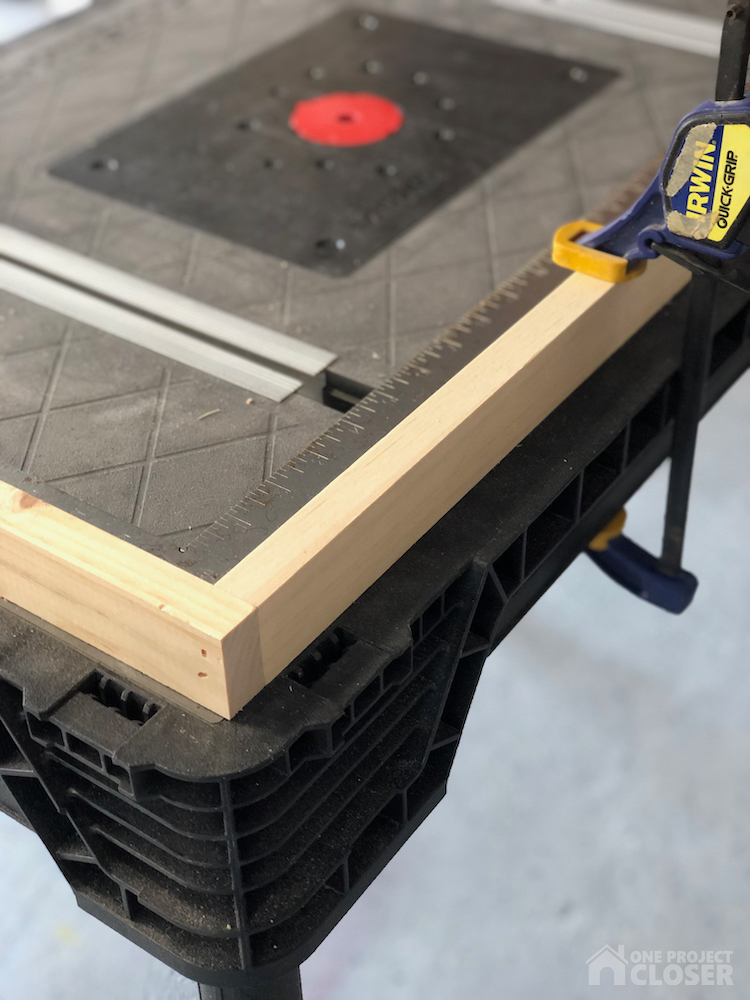
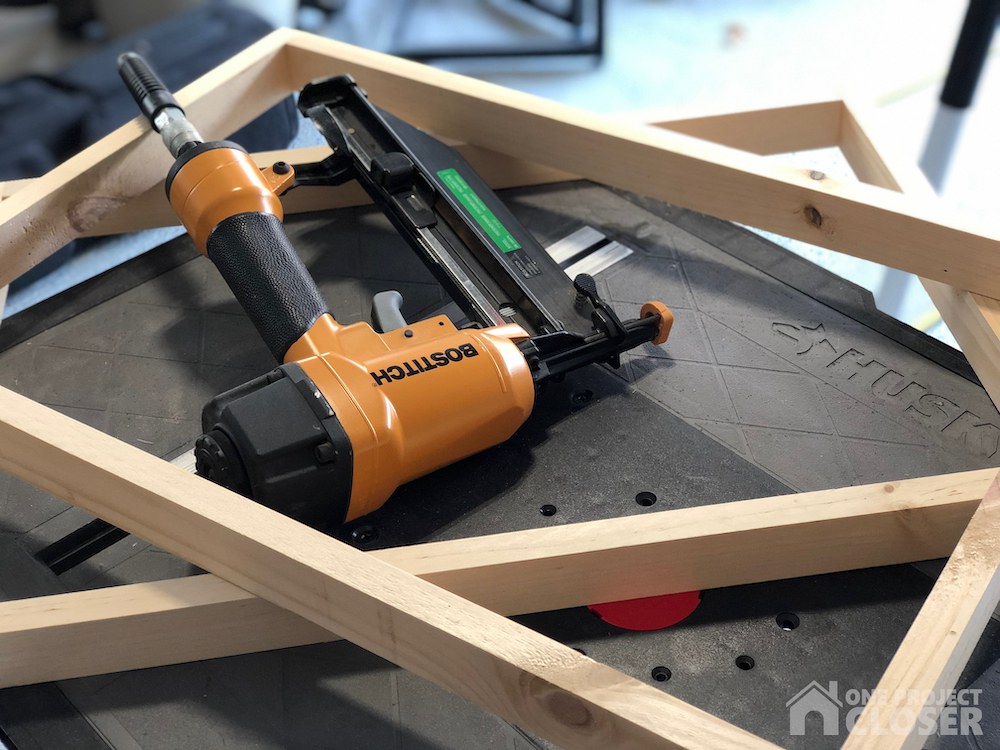
While the chalkboard wall cured, I made frames for these beautiful prints, using 1×2″pine and a brad nailer. The top and bottom measure 16 inches, and the sides measured 22.5 inches, then I nailed them together making sure the joints were square. In all, it cost me about $6!
STEP THREE: HANG PICTURES
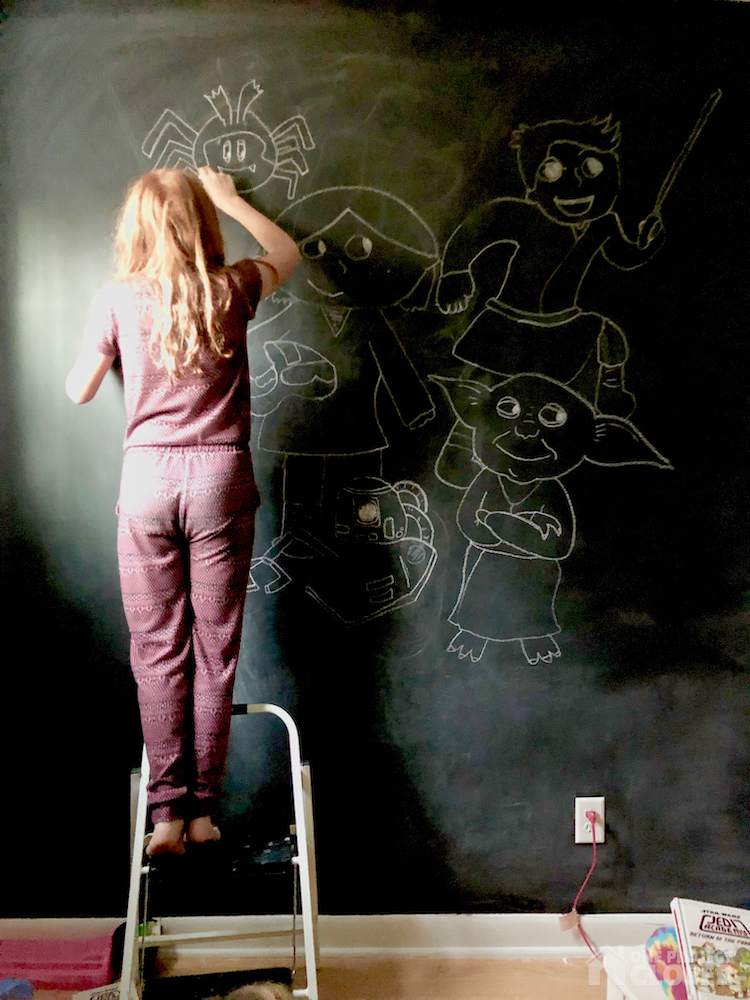
Life got a little busy before I could hang the pictures, so the kids attacked the chalkboard wall to create their own art inspired by the Jedi Academy Series!
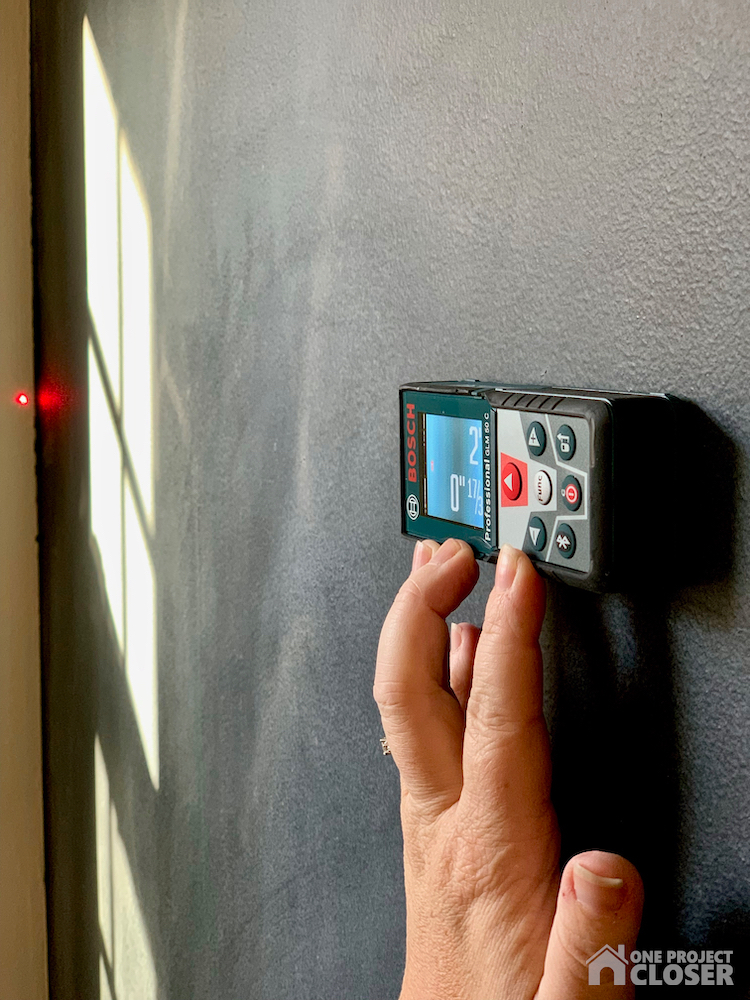
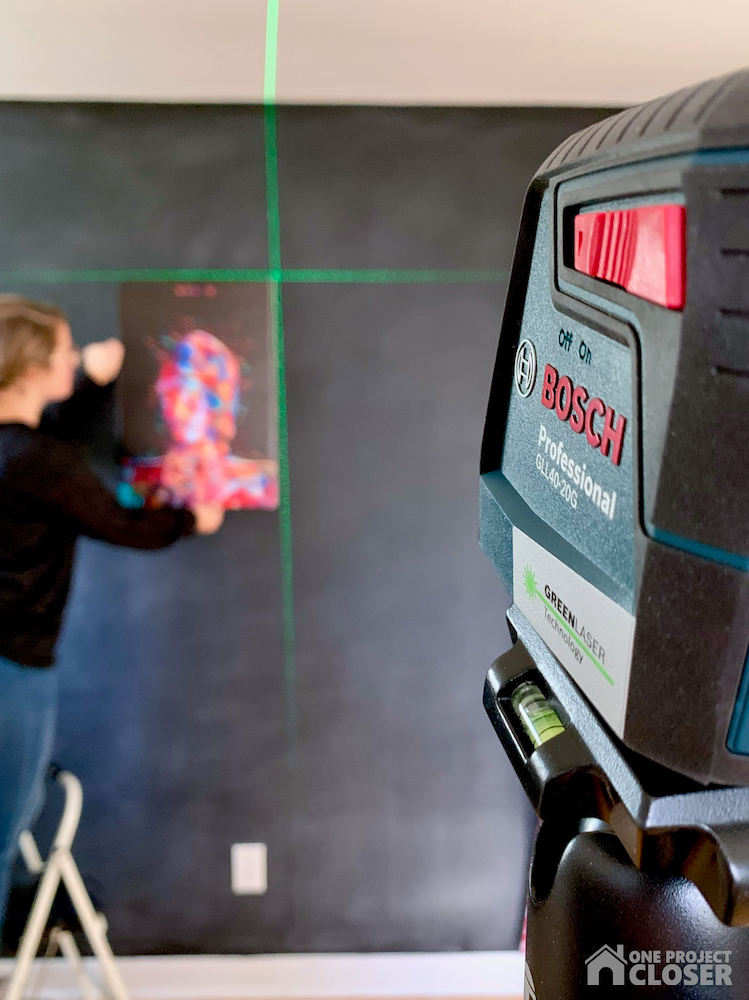
But then they erased it and gave me a window to put up the canvases. For this, I always use my handy Bosch Laser Distance Measurer and Bosch Self Leveling Cross Line Laser – they make the job so much easier and faster. I set up my laser level first, using my tripod (or a nearby piece of furniture if I’m feeling lazy) and then I use the Distance Measurer to find the center point and two adjacent points along the level line. The whole process is under 5 minutes and I don’t end up putting multiple holes in the wall. I really like that both these Bosch products are small, portable and have vibrant lines even in daylight. Well worth the investment if you do a lot of decorating or murals.
STEP FOUR: CHALK
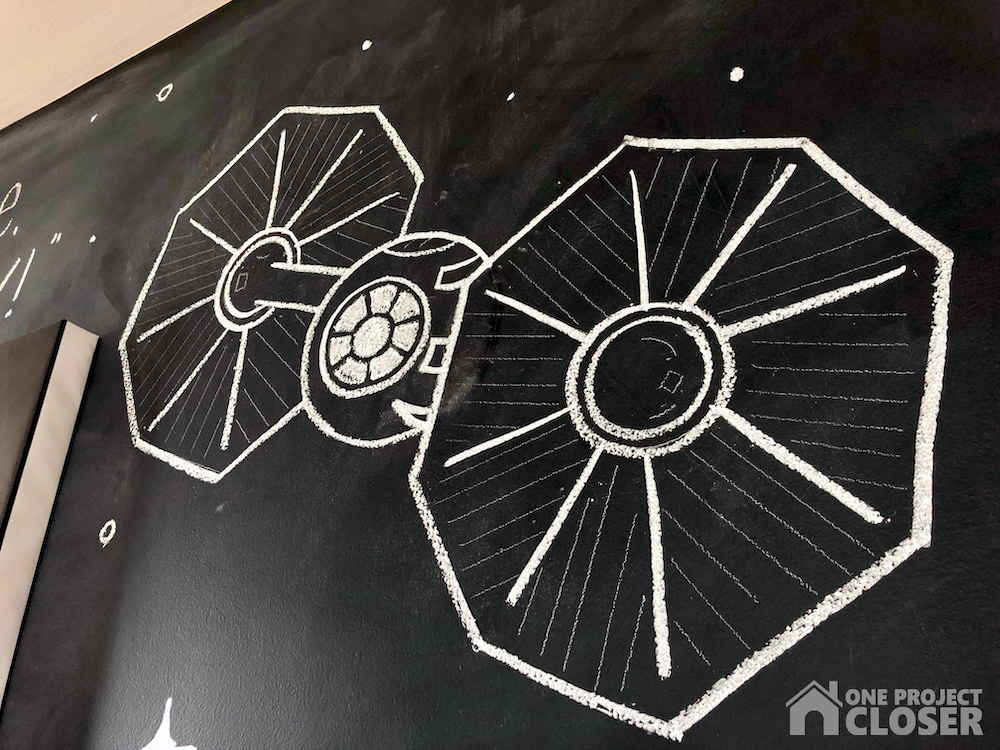
Now I recognize, some people may have opted to hang the canvases AFTER doing the chalk art, but I wanted to know what space I was working with. So I hung them first and starting drawing. Also, by this stage, I was ready to be done and move onto a new project. Not the smartest approach, but that’s the truth. So I didn’t sketch out my design or figure out my lettering, I just went for it. I’m super happy with the Death Star and Tie Fighter, but wish I had put a little more effort into the lettering. Full disclosure: Lucy wanted the darkest quote she could find. We eventually agreed on this one, but it will likely change. LOL


PIN FOR LATER
Love this and want to share it with your friends or just save it to be inspired later? PIN IT!

Jocie Hagan
One Project Closer
Come say hi on Facebook, Instagram, & Pinterest!
Want to learn to hand letter and make amazing, personal decor for your home?
Learn now with Busy Girl’s Guide to Hand Lettering!
**Use the code HAPPY5OFF to get $5 off the course price**
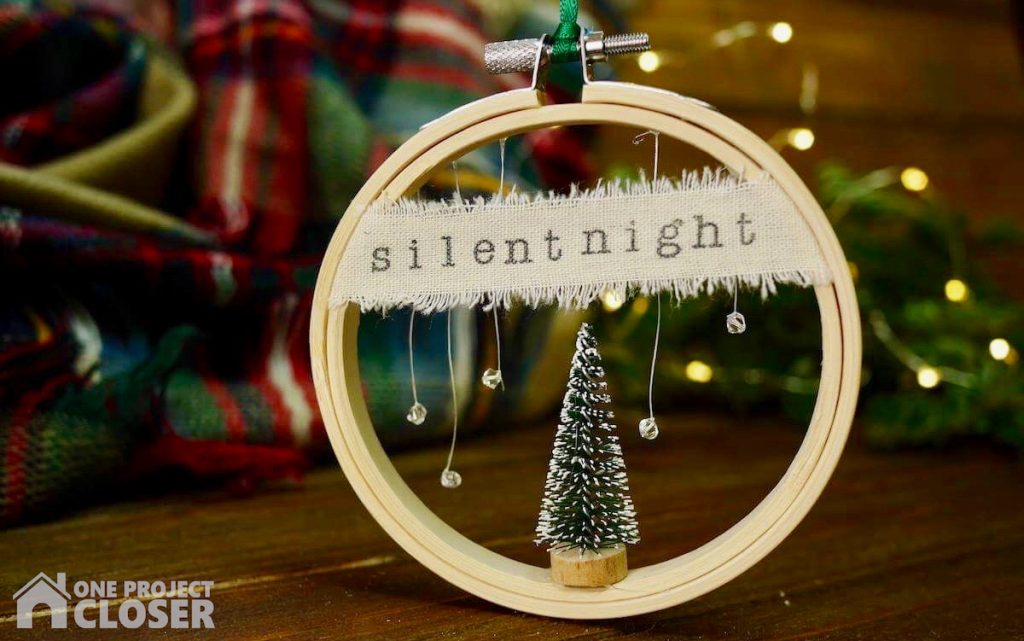
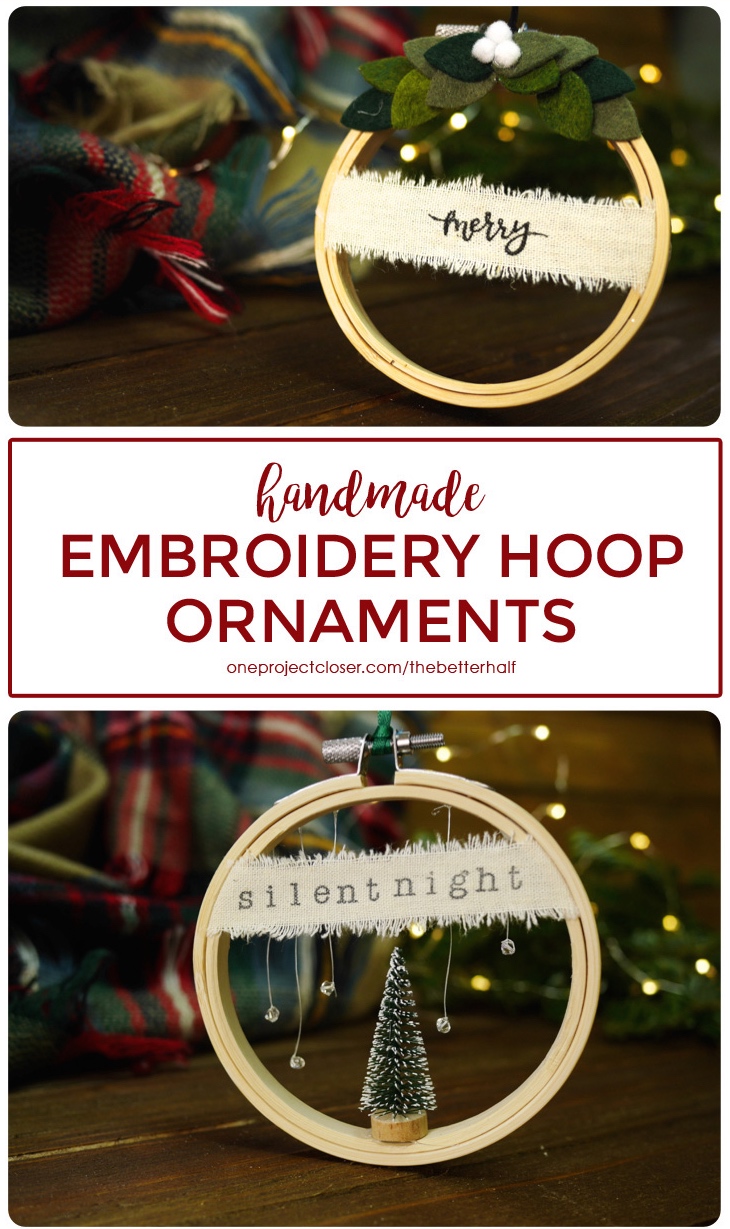
In the past few years, I’ve enjoyed making ornaments for friends and family to go along with whatever gift I’m giving. I like the personal touch…plus, I just really like making stuff. LOL I had planned to make those cute Snow Globe Ornaments with the Bottle Brush tree inside. Well, I ordered the bottle brush trees and found that were just slightly too big to fit in the ornaments. #fail But, like many craft fails, they give way to something even more amazing and original!
Here I was with 40+ tiny bottle brush Christmas trees and not sure what to do with them. So I wandered Michael’s for longer than is reasonable, and came up with the these embroidery hoop ornaments. I was thinking they are sort of like snow globes, but with out the globe! LOL Of course, I added my signature hand lettering touch to many of the ornaments.
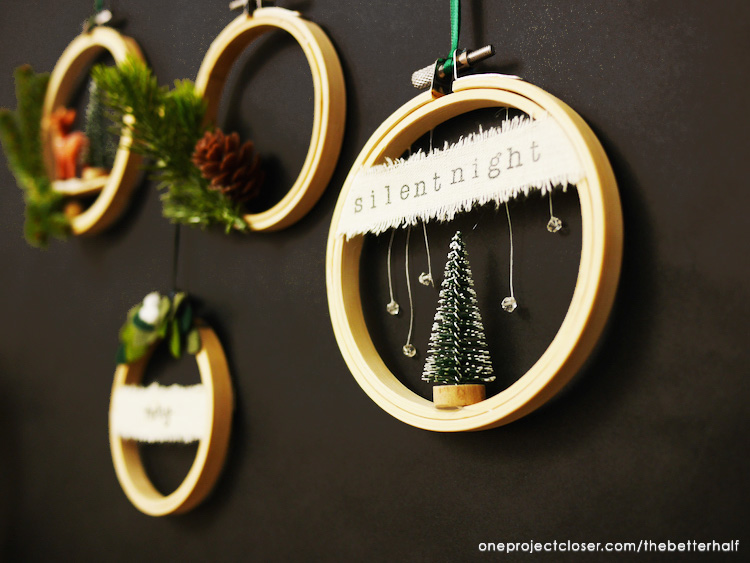
What’s not to love about these embroidery hoop ornaments? They are unique, easy to make, the supplies are easy to find, and you can personalize and change them according to your own taste and creativity!
Hoop Ornament Supplies
- [amazon_textlink asin=’B075ZMTTSF’ text=’Embroidery Hoops, 3 or 4 inches’ template=’ProductLink’ store=’opcwp-20′ marketplace=’US’ link_id=’afae9f91-e299-11e7-8e5a-1326cb62e71a’]
- [amazon_textlink asin=’B01FIJPPN4′ text=’Hot Glue’ template=’ProductLink’ store=’opcwp-20′ marketplace=’US’ link_id=’cd8505db-e299-11e7-ae31-2f6e46bdb0f3′]
- Ribbon (see below for tips in picking ribbon)
- [amazon_textlink asin=’B00K3KRMFI’ text=’Micron Pen’ template=’ProductLink’ store=’opcwp-20′ marketplace=’US’ link_id=’f0935313-e299-11e7-abdf-c14880e4e0ab’]
- Bottle brush trees[amazon_link asins=’B00P1JWQ7A’ template=’ProductLink’ store=’opcwp-20′ marketplace=’US’ link_id=’680665e2-e29a-11e7-a1c0-43cec01ab5cc’]
- [amazon_link asins=’B01NBDCVIH’ template=’ProductLink’ store=’opcwp-20′ marketplace=’US’ link_id=’7f03b5f4-e29a-11e7-ad9e-0bfe54d4c943′]
- felt
- [amazon_textlink asin=’B00FLUFK4U’ text=’Letter stamps’ template=’ProductLink’ store=’opcwp-20′ marketplace=’US’ link_id=’591e1074-e29b-11e7-88d9-315242a9251e’]
- [amazon_textlink asin=’B0056ETF8I’ text=’Archival Ink Pad’ template=’ProductLink’ store=’opcwp-20′ marketplace=’US’ link_id=’460ee974-e29b-11e7-a56f-b35aca4b5661′]
- [amazon_textlink asin=’B01EXH0168′ text=’Crystal Beads’ template=’ProductLink’ store=’opcwp-20′ marketplace=’US’ link_id=’56ac6ffe-e2a2-11e7-90ea-89d236139fc9′]
- [amazon_textlink asin=’B000IGEBSS’ text=’Nylon Thread’ template=’ProductLink’ store=’opcwp-20′ marketplace=’US’ link_id=’6191972c-e2a2-11e7-81cd-43f305cd9991′]
A few notes about supplies. First, its important to pick a ribbon (or fabric scrap) that is fairly smooth in order to minimize bleeding and fraying the tip of the pen. Using archival ink for both the pen and stamp pad with prevent bleeding and will not fade over time. You can cut your own felt leaves, but I ordered some, just to make it easier and more uniform. Lastly, the click together stamps are amazing – GAME CHANGER!
DIY Embroidery Hoop Ornaments
I love that these ornaments are so easy (and quick) to make! ENJOY!
I think my favorite ornament is the waterless snow globe with the crystals hanging down. Isn’t it the cutest? What about you?? Another variation I didn’t include in the video: paint your hoop black and add a single white sisal tree. Simple and elegant! The variations are endless!
Pin for Later!
Did you enjoy this project but don’t have time to make it today? No problem! Pin it for later. 🙂
Jocie Hagan
One Project Closer
Come say hi on Facebook, Instagram, & Pinterest!
