
How to Paint Pegboard (And Give Your Workshop Some Much Needed Style!)
April 9, 2012 | by Fred (email) |When Ethan and I set out to convert my garage into the OPC workshop, I knew from the start that I wanted the large back wall to be donned with two 4×8 sheets of pegboard. When I was growing up, my father’s workshop had sported a large sheet of pegboard, and I remember how cool it was that dad could find just about anything he needed on his pegs or inside one of his two large tool chests.
Since Ethan and I knew we’d be using the shop as a backdrop for our blog photography, we thought we needed to make our pegboard a bit more dramatic than the typical Masonite brown or white options available at every home improvement store. So we devised a plan to paint it black for a dramatic contrast to our planned light grey walls and stylized red conduit boxes. We think it came out pretty sharp.
Materials Required for this Project
- ( qty. 2 ) 4×8 sheets of finished pegboard
- ( qty. 8 ) 1x2x8 select pine furring strips
- Box of 2″ #12 drywall screws (for mounting furring strips to the studs)
- Box of Decorative round-head stainless screws (for mounting the pegboard to the furring strips)
- 1 gallon paint (we recommend semigloss for future clean-ability)
Tools Required for this Project
- Paint Sprayer (optional, but it makes the job much easier)
- Drill Driver
Step 1: Paint the Pegboard and Furring Strips (Outdoors)
We thought a glossy paint would look good with OPC’s theme, so we picked up some Glidden semigloss black from Home Depot. We used a manufacturer-supplied Graco TrueCoat Paint Sprayer to apply the semigloss to the pegboard. Had the Graco not been available, we could have used a brush and roller for the job, but the sprayer makes even, thorough application a cinch. We liked the sprayer a lot, although we found that its small reservoir had us refilling the tool with paint very frequently (three times to get through just two 4×8 sheets).


We also used the Graco to blacken the eight, 8-foot strips of 1-1/2″ x 7/8″ select pine. You’ll have to use your imagination as I didn’t snap pictures of this step. The most important part of painting the furring strips is to ensure to get full coverage on all sides, except the back.
Step 2: Mount the Furring Strips, Then the Pegboard
We used the furring strips to create a mounting surface for the pegboard. (Pegboard needs about 3/4″ of open space behind it for the pegs to go through, and so 1×2 finished select pine worked well for the task). You could also mount pegboard with traditional 2x4s, but that would create a much larger gap than necessary.
We used a stud finder to locate the studs behind the wall, and then checked and rechecked our first set of strips for level before fastening them with drywall screws. Mounting the first set of strips properly is extremely important, as they provide the reference for the rest.
Space the furring strips on 16″ centers, ensuring that the distance from bottom-to-top does not exceed 4 feet.


We decided to use some bright, large-head wood screws we had available, using 16 screws for each board. That’s way more than what would be required to provide a tight hold, but we think the screws actually add to the look.

Step 3: Marvel at Your Handiwork
With the pegboard hung, we couldn’t resist hanging our first tool… our eight foot level, for which we’ve never had an ideal storage solution. In this picture, it’s actually hanging a little higher than it’s ultimate resting place. We’re going to use the top foot (or so) of pegboard to write “one project closer” in white letters, and possibly to put up “bumper stickers” of some of the advertisers who are kind enough to help us keep the lights on.

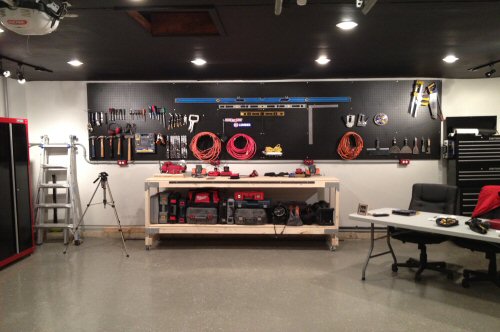
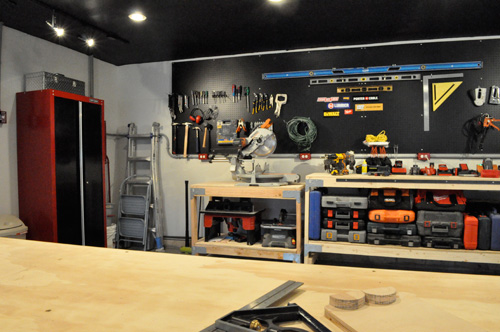
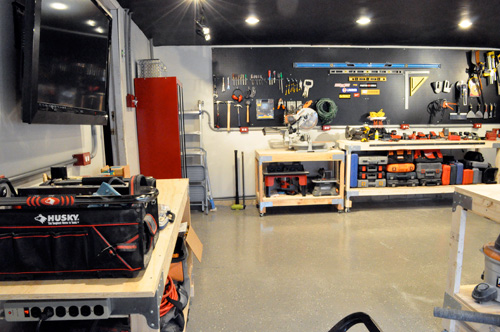
…And a Few Short Months Later… The After Pictures
Several months after hanging the pegboard, we finished the rest of our workshop. Our painted pegboard adds an awesome dramatic flare to this space, and makes our blog photos here in the workshop that much better!
(Pssst! If you look carefully in the next picture, you can see one of the bodies and two of the feet for Jocie’s wooden owl craft!)

More from our Workshop
Check the Related Content section below this article for a few additional tutorials straight from our workshop.

I gotta see this place in the flesh some time. This definitely takes home the cake!
Thanks Simon! We really enjoy the space. Sometimes I just sit out there even when we’re not working on a project.
Had you guys seen this done before, or was it an original idea? I’m going to copy it one day, but with Sherwin Williams Kem Lustral Wrought Iron Flat Black.
William, sometime a while back I had seen a blog or print article with a sheet of pegboard that had been painted red. I knew that at some point I’d want to hang some type of painted peg board because I thought the look was so cool. I want to say I saw that maybe five years ago, and haven’t seen it much since. However, I’ve noticed that the pegboard at Home Depot and Lowes tends to come with a paint-able surface, so I assume that many people have been painting this stuff.
Did you purchase the paint sprayer? With what other projects could one use a sprayer? I’ve never used one and am afraid I would make a mess of things!
Graco supplied that to them. Here’s a more in depth review. https://www.oneprojectcloser.com/graco-truecoat-plus-paint-sprayer-review/
Probably the most popular diy project for a sprayer is fences. With a name like paintergal I bet you would have no trouble knocking out a fence-line without making a huge mess. Maybe just pay attention to the wind when you get close to things you don’t want paint on.
I echo everything Jeff says here. Most people can live without a sprayer, but if you were whitewashing a fence, it is a worthwhile investment for sure!
when you say “the most important part of painting the furring strips is to ensure to get full coverage on all sides, except the back.” is not doing the back simply not necessary or does it impede the ability to mount it to the wall?
I’m going to reword that. I meant to say that its important to get coverage on every side, with the exception of the back because it is pressed against the wall. There are actually five painted sides on each furring strip (front, top, bottom, and the left and right edges).
Look amazing! I highly envy your shop!
#1 -Forget spraying – just roll the paint on the pegboard. Spraying is a waste of paint (1/3 more) and adds a bunch of unnecessary equipment – and takes as long to clean up as the actual painting. Just roll them flat on a plastic dropcloth – lift up to dry
#2 The back side of the furring doesn’t have to be painted – it’s not going to be seen and it has nothing to do with anything (mounting , etc) except appearance. bundle all the furring on -edge – ROLL one edge — turn the bundle over – roll the other edge — then spread them and roll the top face. Painted 3 sides in minutes.
#3 You need solid furring at the ends of the pegboard. Cut and paint them at the same time.
DM – Thanks for weighing in. A few thoughts:
1) I think spraying makes this job easier. The Graco cleans up in about the same amount of time as a roller and brush, and I would opt to use it again given the option. One advantage of the sprayer is its propensity to get deep into the edges of the peg holes. But, I wouldn’t buy a sprayer for this job, and I think if you don’t already own one, it’s probably best to just use a roller.
2) That method would definitely work with a roller, so good add.
3) You do not need the furring strips at the edge of the pegboard. If you care about it aesthetically they can certainly be added, but they are not necessary for strength. The one challenge with vertical strips is that if they are not aligned with a stud, you’ll be stuck anchoring them into drywall alone. I’ve had pegboard for ten years anchored in the manner shown here and never had an issue.
Looks good are you going to get One Project Closer stenciled on the peg board?
We have been meaning to for months, but its a project that we just haven’t gotten to. Jocie is our resident freehand letter drawer (she has talent!), and we just haven’t had time to have her over to do this. It’s a fair amount of effort now that the sheets are hung. Had timing worked out better, we should have had her do the writing before hanging them. Unfortunately, we were really crunched to get Ethan working in the workshop (rather than at the local Panera Bread)….
Fred,
The shop looks great, and as for Ethan, any day in any shop is better than a day at Panera Bread….lol, well at least for us.
Keep up the good work, word of your site is spreading !
Blair, thanks for the encouragement! It is good to have Ethan in the shop (or even better–out following our contractor friends!)
We have a few cool finished How-To’s coming soon. Ethan thinks he has enough for a complete basement wiring article, so that’ll be coming out soon. We also are going to be following a contractor through the installation of radiant floor heat, which will generate a nice How To!
Appreciate you commenting. Comments are the fuel that keep us motivated!
Wow. Your shop looks amazing.
Putting up pegboard is going to be my next project in the garage. I need more tool storage and this will save me from spending a lot on another tool box. Now i just need to decide what color to use…
This is an awesome article!!! I can’t wait to start something like this
Thoughts on how to install the pegboard to a cinder-block wall?
How about some type of glue or apoxy?
I wouldn’t go with glue. You have a few options:
1) Attach 1×3 furring strips to the concrete block using block anchor screws or a RamSet tool (a ramset tool is a powder charge nailer.. you can find them at Home Depot). Then screw the pegboard to the furring strips as shown here. I would tend towards block anchors. You could use some liquid-nails type adhesive for added strength.
2) Attach a board to the ceiling above and drop down studs from that board and install the pegboard on that. Basically you are creating a half-wall at the top of the wall on which you can attach the pegboard.
Thanks for the ideas. I’ll have to see which would be easiest.
That shop area/ pegboard is enough to make a gourmet cook want a nicer kitchen! Sharp looking job, guys!
Looks great guys!
The main reason I’m posting on here, though, is that the quantity you list for the cutting strips got messed up by your plugin for emoticons. I’m guessing it should be an 8 but the combination of the 8 right next to the close parenthesis turns it into the smiley face. Thought you’d want to know
Good catch! Fixed it!
what size do the decorative screws have to be? Do you think a #6 2 1/14″ will provide enough strength?
I would think that would be sufficient, especially if you are installing as many as we did.
Man this is awesome. Just finished building your guys workbench now time to add this!
I have used peg board for some time and soon will be moving into my retirement work area and house (for the wife). I am searching to develop the best area I can afford/build. I appreciate your site and comments from readers.
What color are your walls and ceiling in the shop? It looks like a black ceiling….