
Properly laying the first three boards in a hardwood flooring installation is essential to a quality install. The first three boards set the tone and direction for the floor. They must be absolutely straight and laid without gaps or bends. Since wood is a dimensionally-imperfect material, this can be a challenge to get right, but the extra effort is worth the time investment. After all, no one wants to spend thousands of dollars on hardwood floors and have the installation lead to a sub-par surface.
We’re laying 1100 square feet of Brazilian Walnut hardwood floors across the first floor of our colonial home. This is the third in a series of more than a dozen articles that describe how to install wood flooring. Subscribe by using the buttons at the right (RSS or by e-mail) to keep up with the project.
Determining the Best Starting Point for Hardwoods
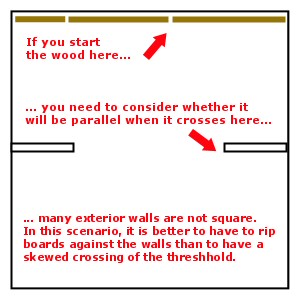 Every hardwood installation has to start somewhere. In a simple rectangular room, the starting point will be against one of the walls. In more complex rooms, you will want to pick a starting point that eases the installation.
As a first step, identify starting points that allow for the least number of complicated rejoining efforts. Rejoining efforts occur when the field of hardwoods is broken for some reason (such as to go around a stair case in the center of the room through two doors on both sides of it). Rejoins require you to work carefully in separate sections, ensuring the hardwoods remain tight and even, so that the rejoin on the other side of the object doesn’t require special cutting or routing steps.
It is also ideal to choose a location that requires the fewest groove-to-groove joins, as these will require a extra double-tongue splines. While not at all complicated to install, it is an extra step.
No matter where you decide to start the floors, you want to consider visual elements throughout the space that will be affected by the very first board you lay. For example, look at the picture in the upper right. Let’s say that in the middle of two rooms there is a doorway. You want the wood to cross the doorway accurately parallel to the horizontal walls. If you start at the end of one room on a wall that is not perfectly square, the wood may cross the doorway unevenly. It is better to have the uneven boards hug an exterior wall than to have the boards cross the doorway out-of-line.
In the installation we’re sharing with you, we’re dealing with six different rooms on the first floor (the floor layout is below). We decided to start the wood at the front of the house in the dining room and study because it provides a contiguous, full-length perspective on the house.
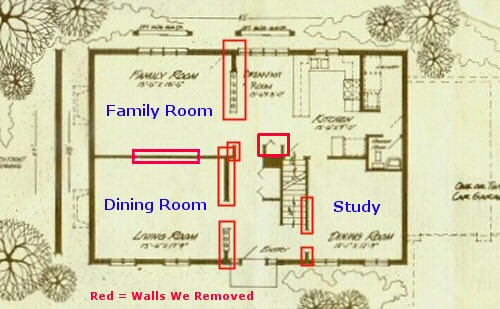
In this layout, we have three doorways to get through. It is more important in our installation that the wood cross each threshold parallel to the doorways. We decided to start at the front of the house, but measure our starting line based on the doorways. Indeed, the front exterior of our home is about 1/2″ out of square from side-to-side. It isn’t noticeable to the naked eye, but it would be noticeable if the hardwoods crossed the thresholds out-of-square.
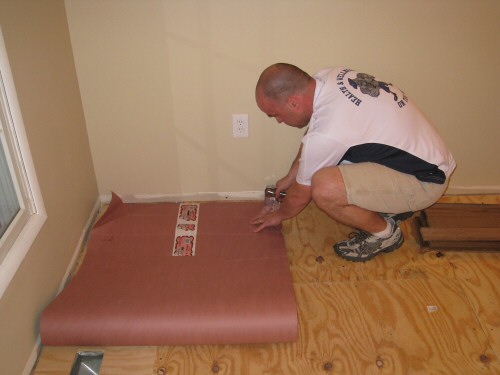
Step 1: Before measuring a starting point, lay red rosin paper over the subfloor. Red rosin paper reduces squeaks between the subfloor and hardwoods and serves as a partial moisture barrier to prevent moisture wicking from the subfloor below to the hardwoods. (Note: some people prefer 15 lb. roofing felt for this step. Roofing felt isn’t necessary, and it is much messier than rosin paper).
You only need to lay one sheet at a time as you can lay more as you work through the floor, overlapping the paper by 3 inches each time. A simple manual staple gun is sufficient to hold the paper down. There’s no need to go nuts with the stapler either – a few staples here and there are sufficient.
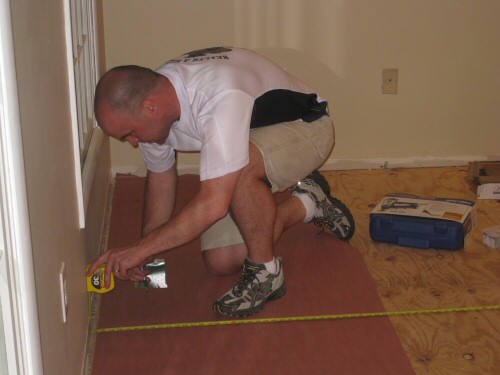
Step 2: Measure and mark the starting point for the first board. We took several measurements from the middle of the room (where the doors are into the neighboring room), back to the starting point. We found that our exterior wall was out of square with the interior wall, and so used the interior wall as a guide, even though our preferred starting location was against the exterior wall. The goal is to make the boards start about 1/2″ from the exterior wall on both the back side and edge. Since the wall was out of square, this varied as much as 1/2″ along the perimeter.
In every hardwood installation, you should leave 1/2″ expansion joints between the flooring surface and the exterior wall. These will be covered by molding and allow the floor to expand and contract with changes in humidity and moisture.
It is possible that a wall varies so much you may have to rip parts of boards to ensure full coverage on the floor while still leaving a 1/2″ gap. This is not difficult to do and is covered in another article in this series.
Step 3: Once you have several reference points for your starting line, snap a chalk line down your red rosin paper connecting the lines.
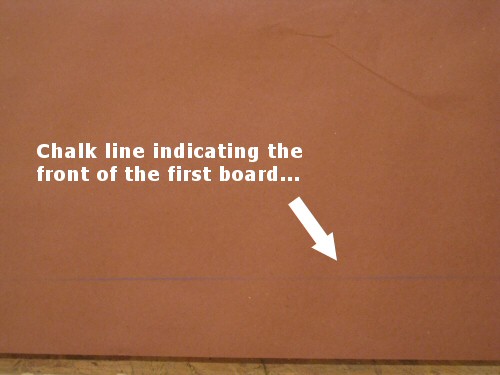
Step 4: Place the first board on the chalk line, ensuring perfect alignment with the line. I generally lay out the first 2-3 boards horizontally on the floor end to end and visually “check” to make sure everything appears to line up.
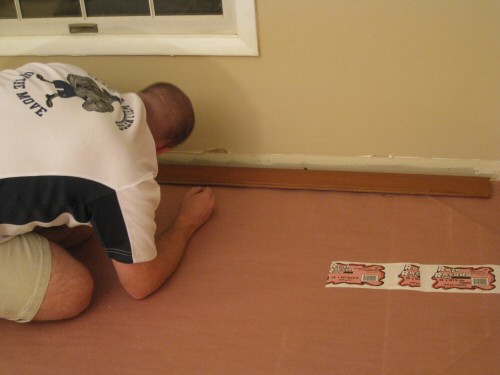
Step 5: Blind nail the first board into place, using shims or an assistant to ensure the board doesn’t move during blind nailing. Blind nailing means using a finish nailer to insert a nail above the tongue of the board down through the board into the subfloor at a 45 degree angle. This way the nail remains hidden by the next board installed. We used a Duo-Fast Floormaster 250BN for this task (review to come later in the series).
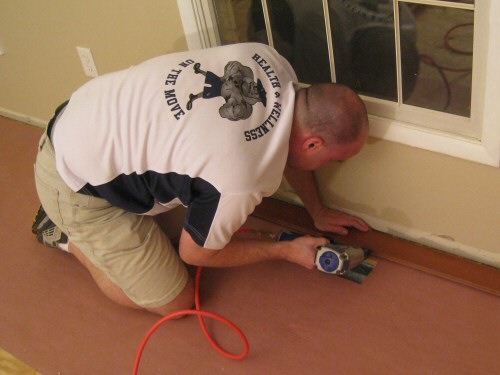
Some installers will top-nail the back edge of the first board since it will likely be covered by baseboard and shoe molding. This can prevent the board from slipping out of place as you add second and third boards. We don’t like to do this because it can split the board. Instead, for the first board, we blind nail about every 4 inches to ensure sufficient fasteners in the subfloor. We sometimes shim the first board away from the wall temporarily to avoid it moving when nailing subsequent boards.
Step 6: Work your way down the floor, ensuring boards stay square edge-to-edge and in line with the chalk line. If you’ve done it correctly, you should be able to drag a 4 foot or 8 foot level down the edge of the boards with no deviation in straightness.
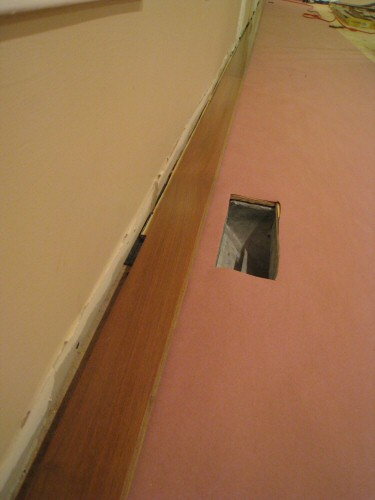
Step 7: Install the second hardwood flooring row across the house. It is imperative that during this step you ensure the first row does not move. We recommend temporarily shimming between the wall and the first board, ensuring sufficient fasteners in the first board, and regularly rechecking the measurements to ensure no movement.
Step 8: Install the third row of hardwood flooring. If you’re using 2.25″ traditional boards, you’ll likely still have to blind nail as a hardwood flooring nailer will not fit yet. If you are installing 3.25″ boards or larger, the third row can be installed with a flooring nailer/stapler. We used and recommend the DuoFast 15-gauge Hardwood Flooring Stapler for this job.
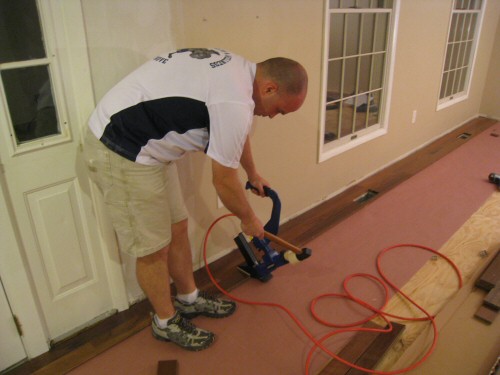
Once the third board is installed, you can remove the shims between the wall and the first board. It is unlikely that the floor will move at this point, even under the shock of a flooring stapler.
Summary of Tips for Installing the First Few Boards
- Consider room obstacles and layout to determine starting position.
- Lay red rosin paper before beginning installation.
- Snap a chalk line and follow it religiously for the first board.
- Make sure the first board doesn’t move when installing the second and third boards–consider shimming against the wall, installing more blind nails in the tongue, or top nailing the back of the board under where the baseboard and shoe molding will be.
- Use the hardwood flooring nailer/stapler as soon as you get far enough away from the wall for the tool to fit.
- Don’t rush! The first few boards are the most important to get right. Everything else practically lays itself 🙂
What do you think? Feel free to add your own tips below!


Fred,
Very nice job! Some flooring guys and manufacturers will recommend changing direction of the wood when you have large/wide open floor spaces like yours. For example, working from one exterior wall to the center of the room, then installing a double sided spline and reversing direction. Some say this helps prevent buckling of wide floors due to temperature and humidity changes.
I myself have always done it the way you did without incident though.
Todd, I’m not sure what you mean. If you work from an exterior wall to the center of the room, the tongue will be facing towards the center. Did you mean work from the center out to the exterior and use a reversing spline from the center? I’m not sure how this would reduce buckling tendency, since generally speaking the tongues are only somewhat tightly joined in the grooves (the wood is most closely tightened on the surface).
I am interested in tips on dealing with extremely large floors. I know that with ceramic its a good idea to put expansion joints every 16 feet or so if your room is larger than 16×16. We’re going to be dealing with that in this house in the basement.
Fred,
There are two ways to do it. You can start at the center and work towards both exterior walls, installing a spline in the two “female” butting pieces. Or you can start at an exterior wall and cut a groove in the last piece at the middle.
By installing a “spline” at mid-floor it will act more as an expansion joint. Again, I’ve never done it, just read about it and heard flooring guys talk about it.
I don’t understand the expansion concern. You nail down the flooring strips to the subfloor every foot lengthwise and every few inches across….so you must be saying that the subfloor expands with the flooring strips? Of course, the subfloor is (typically) nailed to joists–perhaps every foot along the joists and every 16 inches……so you must be saying that the strips+subfloor+joists are expanding?
If, on the other hand floor expands–1 inch (half inch on each side)–necessarily, most of the nails must be pulled out–at the edges–by 1/2 inch.
Clearly I’m confused. Could you enlighten me?
Hi Fred (great name by the way),
The short answer is that the fasteners do not completely abate movement of the wood members, and even a 1/8″ move of surface wood where it hits the wall can cause buckling. Humidity absorbtion by surface wood, joists, subfloor, and walls will be different. (The surface wood will absorb the humidity first). This creates significant tension on the fasteners while the wood on the surface expands. The general consensus from flooring installers is that 1/4″ to 3/8″ is generally accepted. Where you get into problems is where there’s basically NO expansion room up against the wall, and then you can get buckling. The biggest problem is that once a floor buckles, it’s very difficult to get it looking right again.
Hope that helps.
Fred
In the installation guide for the hardwood I got it says:
“Always install flooring from the left to the right side of the room.”
In the pictures above it looks you are doing the opposite direction.
Does it really matters?
Thanks!
It probably would have been better to say “always start with the slot side against the wall and work towards the tongue side” … If you hold a hardwood board with the long slot towards your body, the tongue is always on the left. Hopefully that makes sense.
My contractor only leave the expansion gap on one side. They always do the opposite side right against wall. I wonder if this is right.
This isn’t right. An expansion gap should be left on both sides.
We’re having a heck of a time finding individual nails to put the first few boards in by hand. Where can you buy them? Or what kind of nails do you use? Where do you get them?
I would recommend using a finish nailer rather than trying to finish nail by hand. However, if you choose to do it by hand, you can find the nails at Home Depot or Lowes or any other place. You may need to pre-drill the wood to make it work, which is tough to get right.
I usually put door threshold at 90 degrees from the flooring run, its a little more work but puts a nice separation between rooms
Ken, this indeed can look very good. For those folks looking to do this, you should work to get the boards perfectly even against the perpendicular board.
I have a doorway on my starting wall. The wood, I believe should come halfway (subtract 1/2 in.) into the doorway. This would mean that I have to rip all boards on the starting row just for the doorway’s extra space? I’d rather not do this. How do you deal with doorways and starting walls?
thanks, Eric
You are correct, you have to rip the boards. Alternatively, you could use a ripped half-board in the doorway, but that probably won’t look as good and may not be as stable.
Have a question. I have 3/4″ red oak hardwood floors throughout the first floor of the house and just absolute love it. This was done some 15 years ago. I would like to place some 3/4″ red oak hardwood floors in the basement. We live in Wisconsin and naturally the temperatures differ from -30 degrees during the coldest time of winter to 110 degrees in the hottest part of the summer. The basement is very well insulated and never once had I had any water issues. I keep the humidity down via dehumidifiers (50%). I have laid a 1/4″ hard plastic barrier down aka Platon. Platon® is made from tough, durable, high-density polyethylene (HDPE), Platon is a waterproofing membrane that provides superior moisture protection for all types of foundations and basements in residential basement applications. It is a dimpled 24-mil. wrap which separates water from the foundation wall / floor and permanently bridges foundation cracks, preventing moisture from entering the basement of a home. See website: http://www.certainteed.com/products/foundations/waterproofing/311508. On top of the Platon, I have laid two layers of 7/16″ OSB (overlapping). My question is, in your professional opinion, am I being an idiot putting down a 3/4″ tongue & grove oak (short boards) in this type of a setting? I haven’t done it yet. I have read never install this type of wood in basements, but I am thinking there must be a way to accomplish this; it may be more expensive, but none the less a means.
Your thoughts?
Hi Fred
Your precise step by step instructions are great!
I have one question. I have oak hardwood floor through out hallway and kitchen installed when we built the house. Now i am looking to add hardwood floor for remaining part of the 1st floor. I brought couple contractors for estimate, but each of em said differently about type of oak i have. Some are saying red oak, while others red oak. In the meantime i decided to install the floor myself. How do i determine what type of oak wood i have. I want to make sure, after i instAll and refinish existing floor, there is no difference.
THanks
Alex
This is a good question and I’m not really certain. I can generally tell if I sand the wood whether it’s red or white oak…. What I would do is get a few sample boards of each and lay them next to the existing floor, seeing which ones look more identical. This problem is near and dear to my heart since I once had the same situation – I laid a white oak floor next to a red oak floor. I did a dark stain and it was almost unnoticeable.
If you look at the end of the board you will see pores in the growth rings. White oak has wax filled pores, which is why white oak is used for barrels at distilleries. Red oak has open pores. On a short piece of wood, you should be able to blow through the board end to end.
Hi James, I am sorry I am answering this question so late as I suspect your project is already underway. I would not lay traditional tongue and groove in this situation, but would opt for an engineered hardwood. Engineered hardwoods are different than laminate projects. Engineered hardwoods have a real hardwood surface, but their substructure is made of essentially plywood. They do not expand and contract at near the rate of traditional wood. The problem I see in a basement is not just moisture wicking from the slab (which you may have controlled), it’s also the fact that moisture in houses falls to the basement. This is just my opinion – your prep work seems better than others I have heard of and so you may be OK with straight hardwoods.
Solid Hardwood Flooring is not recommended in any below grade application. See NWFA guidelines. You would be better off with an engineered product are designed to be more dimensional stable than solid wood. Engineered wood floors can be installed above grade, on grade, or below grade. Where as, solid wood flooring can only be installed on grade or above grade. For most manufacturers if a solid wood floor is installed below grade it will void any warranty. The National Wood Flooring Association has a wealth of information on these topics.
Great site. I am getting ready to install 3/4″ x 3 1/2″ solid maple and I have two questions. First, when you laid the first row, what part of the board did you line up with your chalk line? Sometimes the tongues are not as true as the rest of the board plus they sit off the floor, so I was thinking of using the bottom edge of the board on the tongue side. Does this make sense? Secondly, what did you use in front of your front door to hide the expansion gap? I don’t have enough clearance for quarter-round, so I was considering using baby threshold. If I use that, does the baby thresh extend under my vertical door casing moulding on each side? Thanks
Mike, I aligned the front of the actual board, not the tongue, so that should work.
Honestly, right now we have a problem with a small gap between the door and the floor. We had to raise the floor so much with the plywood leveling that was a part of our project that we new we would have to address the door separately, and we didn’t have the money for that.
I want to lay a floating laminate throughout a single level ranch home. It has three hallways that flows into the main area of the house (family, kitchen and breakfast room) like a “T”. The front door hallway is in the center of the house junction with the center hall that runs the width of the home with bedrooms at each end.
I want to install flooring in the hallways and main areas of the house.
Where should my starting point be?
Which direction should my boards run?
Thanks
Dennis
Start against a wall – won’t matter too much where. You can run the boards any direction you want since they will not be fastened to the subfloor.
Your project caught my attention because I have a center hall colonial as well.
Our first floor is the exact same layout as the picture you have above, so I’m going to ask what may be a very specific question to center hall colonials – hoping that your upstairs is similar.
I’m really struggling with a starting point for hardwoods upstairs. The upstairs has the center hall with essentially four bedrooms and a bathroom emanating from it. If something is off, it is going to be really noticeable in the hallway. In a way, it would almost be “easier” to start in the hallway and then work into each room separately – and then deal with any misalignment up against the outside of wall of each room.
But it seems like you need to pick one direction and always lay the wood in that direction. In other words, you cannot really work backwards into a space. Or is there a technique to handle that? Any thoughts?
I guess you could use the technique of putting a threshold at each door – which would eliminate that. But you also lose the look a precision laid floor.
Im getting ready to install a 3/4 x 3 1/2 hardwood floor. The direction I want to install the flooring will mean it will not run perpendicular to the floor joist. Is this a problem, and if so is there anything I can do so I can run the flooring the way I want to?
In most cases, subfloors are sufficient to lay hardwoods parallel to the joists. You get a stronger bond between the hardwoods and the floor if you go perpendicular, but it isn’t required.
Question for finishing-we want to refinish our first floor the problem is between the kids and the animals- doing a room at a time would be more ideal.. Can this be done or do you have to do it all at one?
On new hardwood floors on one side of the room nails are showing on top of the boards one and some planks out. These are 5 inch hickory floors. Is there ever a reason for this to be done???
When you lay your boards, where do you staple? on the tongue or the groove?
Thank you for your assistance.
My question is about leaving an expansion gap when your wood floor butts up to the riser of a stair that has a circular end to it? If I leave a 1/2″ gap my riser which is most likely going to be only 1/4″ thick due to the curve. I would end up having to have a put a piece of cove molding which I really don’t want to do as I do not like the look. Is it ok to leave a smaller gap, something that would be covered by a thin riser?
When doing a hardwood flooring install, should a leave an expansion gap at the front entrance doorway threshold? Or, should I try to get that first row of boards tight up against the threshold? Thanks!
Will 3/4 in walnut fasten to linoleum adequately. Beneath is two layers of 1/2 in plywood, between those is felt paper, supported by wooden floor joists. Thanks
Hello,
This is a great explanation about how to lay out a floor. One question I was left with is how are you measuring for the starting row? In particular, in your install, you mention that you are measuring back in several places from the opposite wall where you will be laying your first row… I assume you are measuring from wall to wall at first to get measurements of how square the wall is. But from that point, are you still measuring back from the opposite wall to the starting row and just subtracting the width of the board plus an expansion gap (at several places) and then snapping the chalk line on that point? Or are you just measuring out from the wall you start on (the width of the board plus gap) and snap that line? Hope that makes sense. Thanks for your help.
I always start layout of hardwood with a 8 inch wide strip of plywood run the length of the room and screwed to the chalk line. This is a solid easy to set start for the run. You’ll have to spline the flooring when filling in the space taken by the plywood. Glue the spline.
I as a journeyman carpenter think most would agree, that when talking of floors expanding, I feel the laminates/ flouting floors or snap lock, what ever you wish to call them , would move and expand more than the old style hardwood nail and glue down type. Grizz
Hi Fred,
I’ve done a fair amount of hardwood over the years – and then LIVED in the houses. Currently 2700s.f. of quartersawn white oak. I’ve read a lot of websites about laying hardwood flooring, and I have to say that your articles are the best and most comprehensive I’ve seen when dealing with those nagging little issues like double tongues, working around walls, how to compromise fit to make critical areas look straight, etc. This is the stuff EVERYBODY else seems to ignore on their web posts…and I find that these are the make-or-break details that spell excellence vs. “average” for an installation. THANK you for getting into the nitty gritty details! Great site. I would suggest that you post an expansion chart for common woods. Those figures and the ways to calculate expansion are fairly well established now and the info is public domain. It would enrich an already GREAT hardwood laying site. (maybe you have it somewhere that I’ve missed – again, this is just a suggestion)
Thanks again!
Keith