
This how-to guide is a compilation of several articles from 2010 when we were going through the process of removing a load bearing wall. It was a big project that took place over the course of several days and required the help of professional contractors and engineers. This article will walk you through the process, step-by-step so you can see how the pros completed the job.
For any of you who weren’t with us in January 2010, this was the last wall to be removed in the conversion to an open floor plan in our home, as indicated by the blue box in the floor plan below. We removed the non-load bearing walls identified in red at the very end of 2009.
In addition to the removal of the wall (blue box), we also removed the pantry (green box below), faux-paneling in the family room, and took care of a couple of other small items to make this job big enough to dignify a bid from each of our general contractors.

Here’s a picture of how the family room looked before work began (which you can identify on the floor plan above).

This is a picture of the other side of the same wall, in the living room. (Actually, this became the dining room after the conversion).

The drywall work shown in the picture is from the non-load bearing wall removal project in December 2009. We never got around to patching the drywall so this was one of the small projects we added to the contractor’s scope in 2010.
The first step in this job was for our carpenter to open up the wall for the engineer to inspect the job, and then give his stamp of approval on the plans and materials (including which kind of lumber to buy for the header).

What we also learned:
- That the location of our ductwork was going to mean that our opening needed to be smaller than our original 8′ plan and also will be a little right-of-center on the wall. We could have shrunk it further to keep it totally centered on the wall, but we’re talking inches. I’d rather have the space, so I asked our contractor to frame it from the far left stud to the far right in the above picture (you can see where he drew the original opening lines there too).
- We have 14′ joists supporting the 2nd floor of the house, so temporary walls were built on BOTH sides of the wall before the removal happened. If we’d had 16′ joists, they would’ve built the temporary wall on one side only because there would’ve been a greater overlap area under which to support the whole weight of both sides of the house.

Removing Part of a Load Bearing Wall
In a single day, the contractors removed the drywall section, framed out the doorway, and also partially removed our pantry. Here’s the step-by-step on the load bearing wall removal.
Step 1: Remove Drywall and Molding
The contractor removed the baseboard on both sides of the wall, the sections of paneling in the family room that overlapped the opening, and the remainder of the drywall on the Dining Room side (where they’d cut the exploratory hole).


Step 2: Construct Temporary Walls
They constructed temporary walls on both sides of the area to be opened, in order to support the joists holding up the the second floor of the house. Like I mentioned, we needed two temporary walls because we have 14′ joists. Had we had 16′ joists, we would have only needed one temporary wall on one side of the opening.


Step 3: Replace Framing with LVL Header
Next, the contractor removed the original studs and added a new laminated veneer lumber (LVL) header and jack studs supports. One of the guys mentioned that their 3-stud-width support structure is actually more than required, but we support over-engineering when it’s this inexpensive! The studs are sitting on blocks which sit on the steel I-beam down in the basement.


Step 4: Nail Jack Studs
With the new header in place, they cut away the drywall from the other room and nailed the jack studs together.


Step 5: Deconstruct Temporary Walls
At this point, the guys took down the temporary support walls. The drywall people came later, since we also had lighting we decided to install at the last minute in the Family Room, and we were mid-project on the pantry removal.


Electric
Before they closed up the walls, there were a few electrical details that needed finishing up. We mentioned that we decided to add recessed lighting in the Family Room ceiling while the walls were opened up. We had that done, added a junction box for our chandelier in the Dining Room, and the electrician even mounted our thermostat in its new location. The latter had been sitting on the floor ever since we removed the wall on which it had been hanging in December.
If you’d like to learn more about recessed lighting, check out our walk-through for wiring recessed lighting.


Step 6: Add Support Strapping
To keep our tripled-up support studs on the right side of the new opening from twisting in the future, our carpenter fastened a strap between them and the header. Had there been a longer “king” stud there, as there is on the left, strapping would not be necessary.


Step 7: Hang and Finish New Drywall
This picture shows the drywall progress before they started finishing. If you’d like to learn more, check out our complete guide for finishing drywall.

Finished Pictures
After our wall was finished, it took several more projects to get this room into it’s finished shape. But it was all worth it, because in the end, it looks like this.
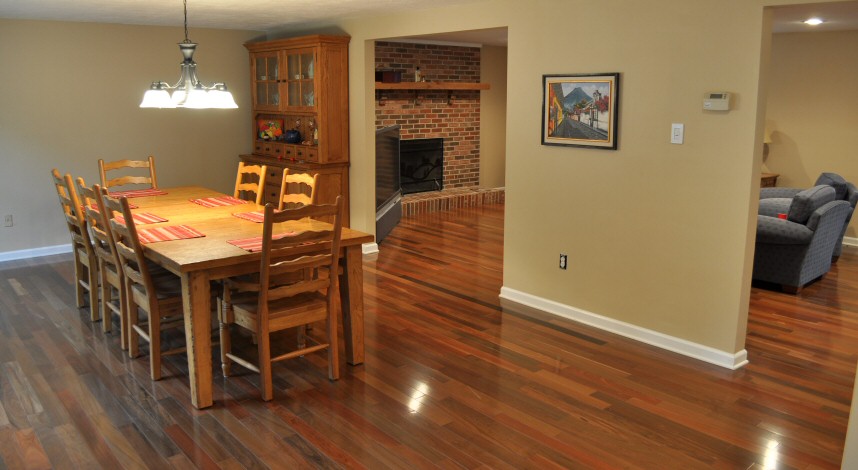
Here’s a link to more pictures of this space after we finished the hardwood flooring.

Kim,
Looks good so far! Glad to see you’ve got an engineer involved. Also important to all your readers that every project must expect to spend some contingency money. Being prepared for an additional 10% is a safe rule of thumb.
Well, we’re still under that 10%, so I guess that’s success, yes? It’s exciting to see our first floor finally coming together. For 4 1/2 years, we’ve been just excusing our place as “well, we knew we were buying a fixer” and all of a sudden this summer, it”s going to look like we’ve actually planned it!
Why is it that projects never stay as small as you intended? I just asked a contractor how much it would be to rebuild some rotting wood in one panel of our porch enclosure, and somehow it turned into a full tear down and rebuild of the enclosure! I don’t know how that happened…..
Oh wow, that’s worse than our situation – thanks for putting my perspective back into place Sara! (and good luck with that job!)
The water damage you can see, whether it’s to the wood and drywall of your house or rust on your car, is always just the tip of the iceberg. I’ve done both (many times) and it’s never failed to be the case. Be advised before undertaking any water-damage project – It WILL be much more involved than you expect.
GREAT ARTICLE AGAIN ALWAYS LEARNING HERE AND ALWAYS COMING BACK THANKS
Thanks for the post. So exactly how long has your house been under construction?
Well we moved in November 15, 2005, so since November 16th, 2005. 🙂
HA HA! Well, it looks great! Thanks for including the links to all the projects that led up to this point. It is so much easier for those of us who are new to OPC when they are included.
Such helpful info for future reference!
We live in the Columbia, MD area… about how much does this project cost? We would never approach this project ourselves, but wondering what general contracters are asking for (additional info, load bearing wall on the first floor of a two story house- from kitchen to dining room). Thanks for the help!
Hi Lindy – I believe we paid about $1500. We used Merrell Building Enterprises (http://merrellhomeimprovementsmaryland.com/) and loved them and all their subcontractors. We recommend them! Give Moses Merrell a call on his cell (443) 506-6106 for a quote at least, and let him know we sent you!
The rooms look great! It seems there is always a fair amount of bravery, if not adventurism, required when tearing down any wall in a home, especially a load-bearing one. The results speak for themselves, though! Any issue on the sub-floor levels when putting the hardwood down between rooms?
Nick, no issues on the subfloor… It ran right under that load bearing wall, so when it was removed, we were able to lay hardwoods right over it!
Looks so much bigger with the wall open and the wood floor through out.
Sure does! And we especially appreciate that because our house was built when builders thought they could save a little on materials by making the ceiling height 7 1/2 feet instead of 8. That, and they stippled. ;( So what we lack in “up” we’re making up for in “around.”
Depending on the size of the span and how tight the quarters, the beam may have to be moved into the area before the temporary walls are put up. It would be a bummer to erect the temporary walls only to find they are in the way.
True!
Jeff, these walls were about 1.5 feet off of the target wall. What scenario do you envision where the beam could get in the way? Just curious… I was trying to think of one and couldn’t.
If you were planning on removing the whole target wall and were replacing with a beam, the beam would be so long that it would have to be placed in the room first because there would be no way to lace it between the temporary walls. If you were in that scenario and it was before removal of all the walls in red on your drawing above the beam may have even had to come in through the window.
Well, wow! There it is! Why does it feel like this scenario isn’t completely a hypothetical?
I’m working up the nerve to get the engineering and the bids on removing 2 load bearing walls, and remodeling our boxy den/kitchen/dining rooms into one big, useful room. Thanks for the detailed article and all the pics.
Good luck! It’s messy while you’re in the middle of it but totally worth it when your rooms open up and your house feels bigger!
We are taking part of a load bearing wall the problem is the wall is between the kitchen and living room we are wanting a open floorplan there is stairs that leads down to the basement were wanting to build a island ove the biggest part of the stairs. we have barn post total of 4 is there anything else we need to do since we are using barn post and not 2×6. Can you help us?
The four of us here don’t have experience with that, but I’ll leave your comment here, and hopefully one of our other readers will have some insight. We’d say “check with a structural engineer!”
Hi, It is wonderful that you have created this site. It is just exactly what I needed to get my projected started. Thank you so very much. I do have a question. Is it absolutely necessary to have an engineer involved and what kind of cost would you estimate. I have a contractor and he talks with the people at the supply store. Is that sufficient? I am removing a 14 foot space in a 20 feet wall. I do have a second floor on this load bearing wall. Your site makes it seem pretty simple but time consuming. It always looks like it is a breeze on the tv home shows and I realize that it is not. Thanks for any infomation you might have to share.
Hi Anita – If you’re really confident in your contractor, no, it’s not absolutely necessary to have an engineer involved. We opted to hire out the work (at about $1500 cost to us) because we wanted to be totally sure our 2nd floor didn’t end up in our first. 🙂
But all the steps for how to do this project are here. Use your best judgment. (And as Todd advised above: set aside a little extra money for unexpected contingencies.)
Let us know how it goes!
Hi Kim,
We have a wall with a window in it that separates the kitchen in the living room. Its about 4 feet long. how much would this cost to remove and replace with support beam? There is an electric plug and a cold area return in the wall as well.
Thanks,
Jen
Hi – you said that your original plan was for an 8ft opening – when all was finished – how big is the opening between the 2 rooms?
It’s right about 6 feet wide.
I know this post is 6 years old now, but it’s still very interesting and useful info — and it looks like you still check for replies! 🙂
I am crying at your price. I am having PART of a wall removed between my kitchen and dining room — the opening will be about 8’6″ on a 12’6″ wall — and I just got the first quote today. $5,500.
🙁 🙁 🙁