Today marks the half way point in our series on hardwood flooring, and we thought it worthwhile to address some of the concerns as you lay hardwood throughout the “field” of the floor. Laying in the field is usually the most rewarding and fastest part of a hardwood flooring installation. In fact, in our article on laying the first hardwood boards, we noted that once you get past the first three strips, the rest of the floor practically lays itself. That really is the truth, especially in rectangular rooms without an extensive amount of areas to work around. But if you have dogs as pets in your house, you will have to reconsider laying hardwood floors, as per My Pet Needs That, it is one of the worst flooring if you have dogs and it is never recommended for pets.
As you work in the field, there are a few key points to keep top of mind to avoid diminishing the quality of your installation.
This article is part of our series on how to install wood flooring, where we’re laying 1100 square feet of Brazilian Walnut flooring throughout the first floor of our home. To follow along with the series, select from one of the two subscribe options on the right (RSS or e-mail).
1. Keep the Hardwood Boards Tight (Avoid Gaps)
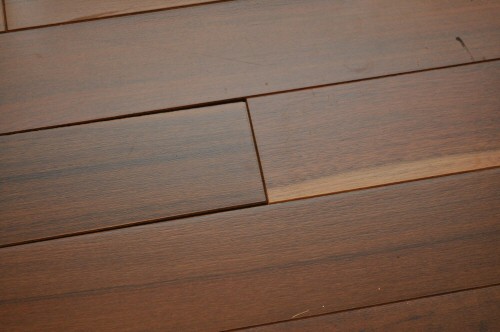
First and foremost, when laying in the field, don’t settle for gaps along the way. Gaps can be created by a number of things including, most commonly, imperfect hardwood boards. Some boards will be narrower at one end than the other. Other boards may actually be narrower the whole width than most of the rest of the lot. Most “select” grade hardwoods will have a minimum number of these boards, since select woods are checked for deviation at the factory. But, even “select” hardwoods will have .5 – 1% of boards with imperfections somewhere on the board. When you find these boards, remove them from the room to ensure you don’t use them by mistake. Below is an example of a board installed in a floor that fails this visual inspection.

Gaps can also be caused by warped boards that are otherwise perfect. This is especially true with the longer 6′ and 7′ boards. In this case, you should tighten the board on one end, staple it firmly, and move slowly down the board, stapling more often than on non-warped boards. The board can be “tightened” again the prior board as you move down the field.
Make sure to cinch each board to both the prior row and the prior board in the current row using a rubber mallet. If gaps are allowed in any section of the floor and create an uneven install, these gaps will likely appear in different places in later rows to compensate. It can be very frustrating to remove a gap from a room.
2. Open and Use Multiple Boxes Simultaneously
One common mistake for new installers is to install one box at a time. Because hardwoods are natural products, they will contain natural variation. Also, different lots stained or finished at the factory may have slightly different hues. Rather than grouping these boards in a section of the floor, it is better to spread them throughout the floor.

Whether you’re working with 5 boxes or 50, its best to open all the boxes and inspect them for any obvious differences. While uncommon, it’s not impossible for a hardwood vendor to give you 48 boxes of Brazilian Walnut and 2 boxes of Brazilian Chestnut by accident. You should make sure all the boards look reasonably similar, and then mix them throughout the installation to avoid grouping woods in a noticeable way.
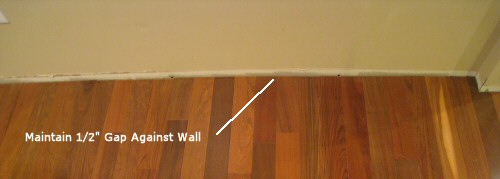
3. Maintain 1/2″ Gaps at Floor Edges
As you work through a floor, it’s easy to get lazy about ensuring tight edges against the walls. The edge might wander out to 3/4 inch, and then to 1 inch. At 1 full inch, most baseboard and shoe molding combinations will not completely cover the gap, and you’ll be left with a difficult path (or worse, a need to caulk or hide a significant gap).

4. Stagger Joints Between Rows by at least Five Inches
When you lay hardwoods, it is visually more pleasing if the joints from one row to the next are no closer than 5 inches. Simply choose pieces of wood as you work that maintain these distances. If you end up with 3 or 4 inches every once in a while, it’s probably not the end of the word.
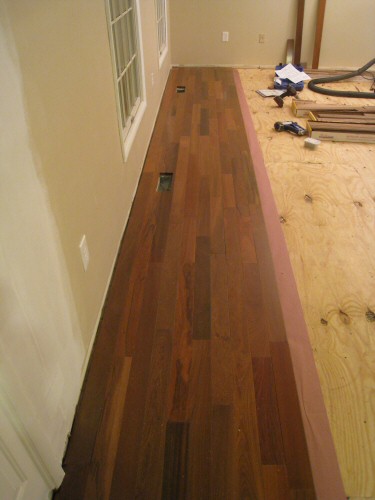
Joints than are as close as an inch may look bad visually, and depending on where they are in the floor you want want to remove a board if you notice it before installing a subsequent row. The picture below shows the wood staggered from one row to the next. You’ll see that on the right most two boards in the lower right, there is a joint that is about 3.5 inches. It doesn’t look bad at this angle, but we wouldn’t want to do this all over the floor.

5. Use Adequate Fasteners Throughout the Floor
Throughout the floor, continue to install adequate hardwood fasteners and make sure to never accidentally skip a row. We generally install one fastener every 12 inches and within 5 inches of the end of each board, leading to more than an average of 1 staple per square foot per board.
Note that if you fasten right at the edge of the board you are more likely to split the tongue. Throughout the job, our Duo-Fast Hardwood Stapler made fastening the floor a snap.
What do you think? Feel free to chime in with your own tips for laying hardwoods in the field.


Mixing and matching from boxes is absolutely crucial, it’s like mixing and matching tile for a bathroom job. Solid tips Fred!
Thanks Jim! (Hey, don’t forget that our comment policy requires you to put your Name @ Your Site Name – so we know what to call you when we respond.
Hello!
Thank you for posting these useful advices. Installing the hardwood throughout a floor is not an easy task, but with certain efforts can be achieved a great result, and the beautiful look of the hardwood floor will bring the warmth to the house. Agree, the little imperfections in the boards can cause really noticeable gaps.
Skipping a row during installing adequate hardwood fasteners can cause problems. It is always better to double check than make some small mistakes which later will create troubles.
Best regards
How to make the transition to the new flooring natural avoiding the straight line that merges the two floors. Do you advise to remove the entire row of the old floor or do you recommend to only remove few of the old pieces? Any advise on how to make the transition natural with the minimum effort would be appreciated.
Jose, you have a few options. One is to extract a few of the existing boards and insert longer ones. This is pretty hard to do well and make look good. You also can’t fasten the inserted boards well, and its hard to extract existing boards without damaging them.
When we’ve run into this situation before, we run a single board between and perpendicular to the other sets boards on each side. It creates a visual divide, but as long as its in a logical place, that’s OK. This happens all the time when, for example, you have a hallway that already has hardwoods and you want to lay hardwoods in the bedroom off the hallway. Simply place a perpendicular board in the threshold of the door and butt everything up tight against it.
what do u do when a run of boards gets a bow in it, say quarter inch in 16 feet?
If you’re in the middle of laying the floor, you tear up that row and start it over. There’s really no good way to correct it once it’s laid.
We are in the process of having hard floor (oak) flooring installed and there is noticeable gaps where the wood butts up (no gaps side by side). Is this normal or is it a bad install?
Good advice for a DIY project. Hardwood or laminate installation can be installed properly even by someone without experience by following some basic rules.