
Before laying tile or installing a tile underlayment like Schluter DITRA, it’s important to check the subfloor to ensure a flat, even surface. At its worst, a very uneven floor will result in broken or loose tiles and cracked grout joints. Slightly uneven floors can cause tile corners to protrude, especially on larger sized tiles (18″ x 18″ or larger). Professional installers with whom I’ve spoken estimate that 90% of all remodel projects require evening out a subfloor. They stress that failing to properly prepare a subfloor is the most common mistake beginners make when laying tile.
Keep in mind that the goal is not a perfectly level floor. Instead, the goal is to eliminate peaks and valleys (called “evening” or “flattening”, or commonly “leveling”, although the latter term isn’t 100% right). This is achieved by spreading a thin layer of mortar over the floor to fill in the valleys. In the pictures below you’ll see this project is taking place in a basement. However, the method I describe here is suitable for any level of a house and over a variety of subfloors including concrete slab, gypsum, plywood and oriented strand board (OSB).
Pro-Talk: Among tile contractors, “flashing the floor” means to flatten the floor by filling in valleys with a leveling compound.
This article was produced with the help of Jim and Rich from Diamond Tile located here in Baltimore, Maryland. Jim and Rich are professional tile installers with decades of experience. They take a lot of pride in a job well done.
Tools and Materials to Level a Concrete Slab
You won’t find these materials at your local DIY center. Instead, head to a local tile supply shop. If you’re not a contractor, call to make sure that they will sell to directly to consumers before making the trip. You can find links for product info and availability in the Related Content section at the end of this article.
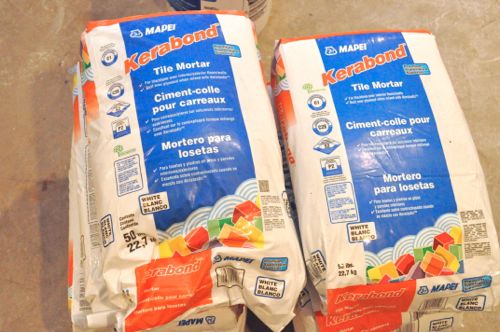
- Mapei Kerabond mortar
- Mapei Keralastic latex additive
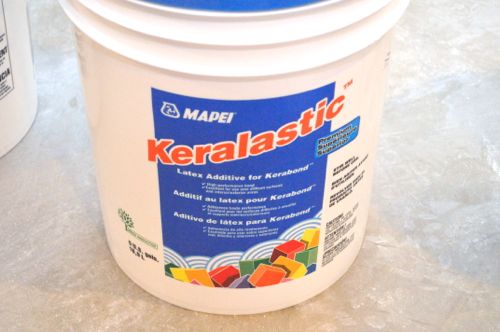
Pro-Talk: Latex additive is often called “milk” because that’s what it looks like.
- Contractor line or chalk line
- Scraper
- Foxtail brush
- Sponge
- Buckets (for water and mortar)
- Corded drill & mixing paddle
- Square notched trowel (1/8″)
- Screed
Step 1: Check Floor for Flatness
With over 27 years of experience each, Jim and Rich can often walk a floor and feel high or low places. To know where to expect problems, they assessed the floor in a few different ways.
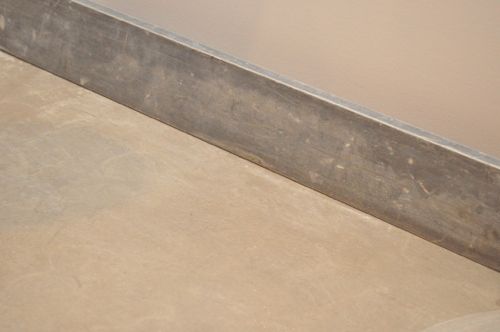
For smaller jobs, the guys will often setup a straight edge (i.e. screed or level) in various locations. If the straight edge rocks back and forth, that indicates a peak in the floor. If there’s any gap underneath, that indicates a valley. Pictured below is a simple iron straight edge.
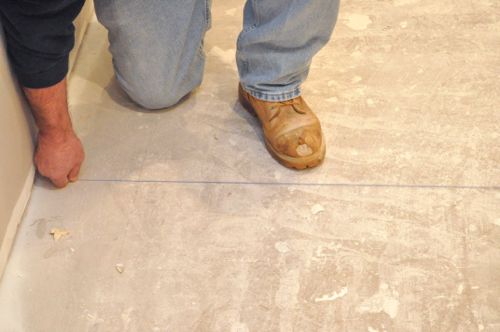
For larger jobs the guys run a taut string or chalk line across the floor and look for variations in floor height.
Pro-Tip: Sometimes it’s useful to hold a spacer (like a contractor pencil) between the floor and the line on both sides so that peaks don’t interfere.
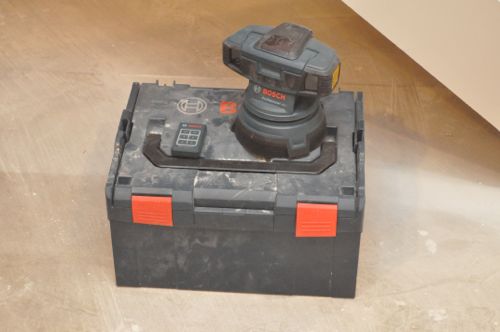
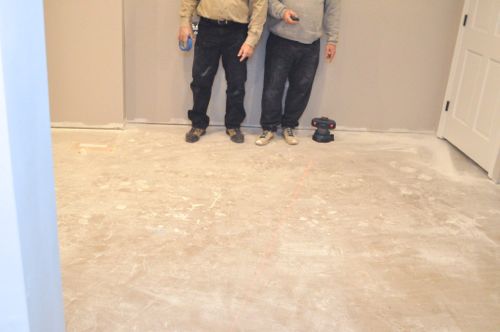
The Bosch GSL-2 Surface Laser is a handy tool for scanning a floor. The GSL-2 emits two lasers and where they overlap, the floor is level and even (relative to where the GSL-2 is set up). If the lasers diverge, the floor is uneven.
Step 2: Scrape Away Dirt, Debris
It’s important that the subfloor is free of dirt, debris, paint, drywall compound, etc. Jim and Rich meticulously went over the floor with a scraper and brush. If this had been a plywood or OSB subfloor, the guys would have been on the lookout for protruding screws, nails or staples too.
Pro-Tip: The guys recommend using a foxtail brush to sweep fine particles that would escape a push-broom.
Pro-Tip: Paint must be removed from the floor because it can prevent the mortar from creating a strong bond with the subfloor. Paint can be scraped or ground away, or it can be removed with chemicals. Scraping paint off a floor is labor intensive. However, paint should be tested for lead before grinding and chemicals often require a cleaning solution afterward.
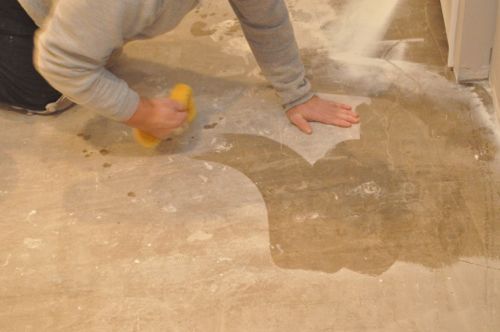
Step 3: Sponge Clean
Next, the guys sponged the entire floor to further eliminate any dust!
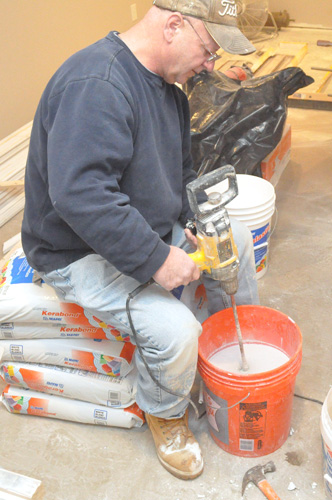
Step 4: Mix Mortar
To flash the floor, the guys are using Kerabond mortar with Keralastic latex additive because it bonds so well. The mortar has an open time (work-able time) of about 1 hour.
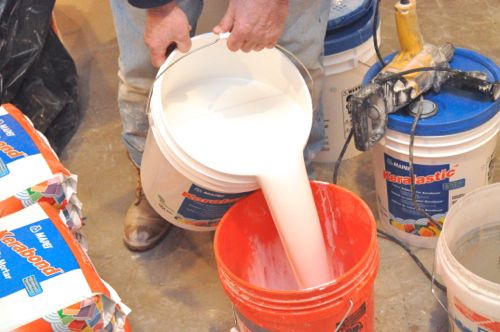
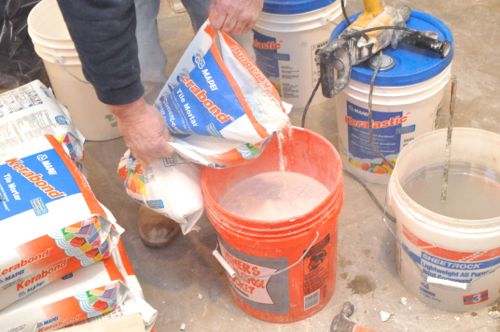
Rich mixed up a 5 gallon bucket according to the directions and let it slake for 5 minutes before mixing it again.
Pro-Talk: Slaking is the process of leaving the mortar undisturbed to allow the latex to completely penetrate the dry ingredients.
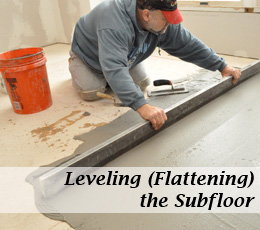
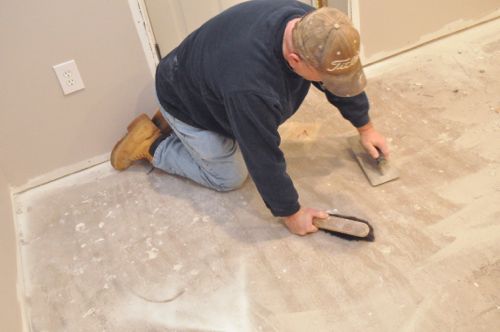
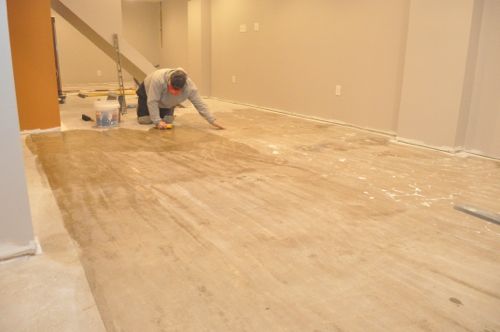
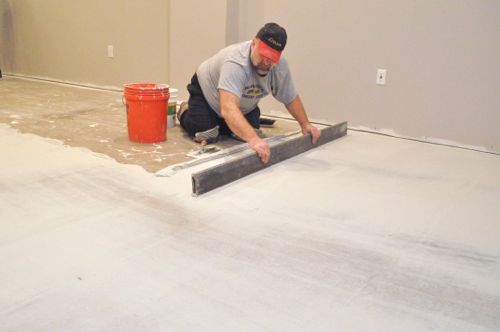
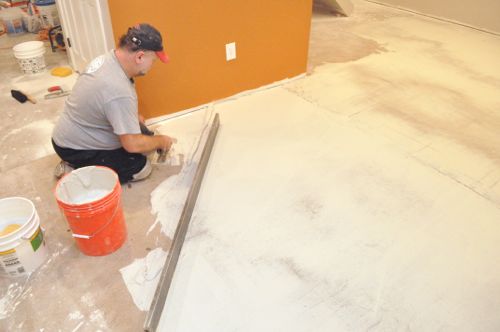
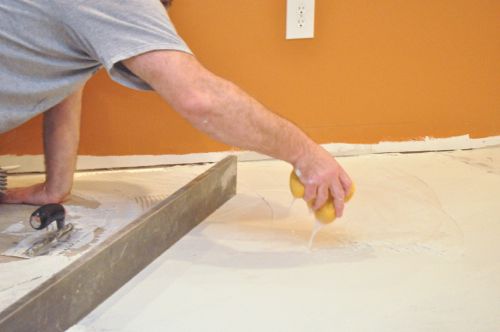
Step 5: Spread Mortar
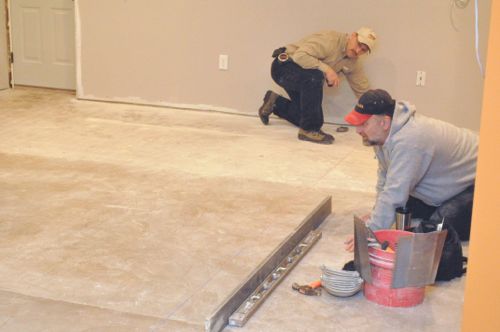
Jim used a 6′ screed board so he divided up the room into 6′ (or less) sections. Starting in the middle of the room, he quickly rechecked the floor to be sure where the peaks and valleys were located.
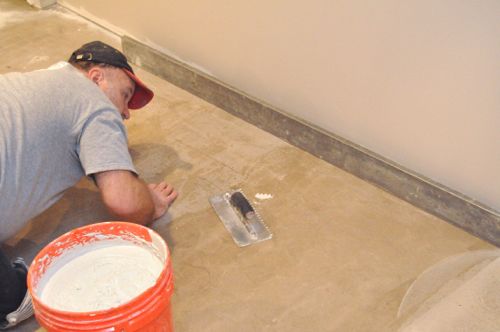
Jim spread a small portion of mortar over the floor using a small notched (1/8″) trowel.
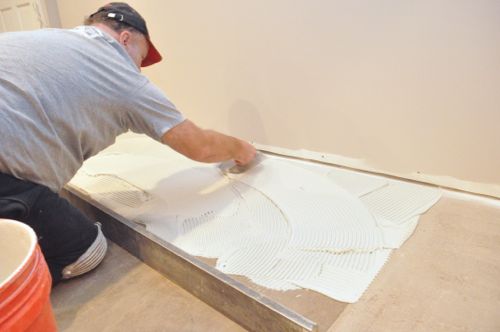
Step 6: Screed Floor
Next, Jim moved the screed over the floor, often making more than one pass. If there was an area the screed didn’t touch (meaning the mortar wasn’t high enough), Jim would go back and add more mortar and repeat the process.
Jim and Rich advised that the mortar can only be applied about 3/8″ thick. If an area needed to be built up more than that, the guys flashed the area, let it dry overnight and then re-flashed the area again.
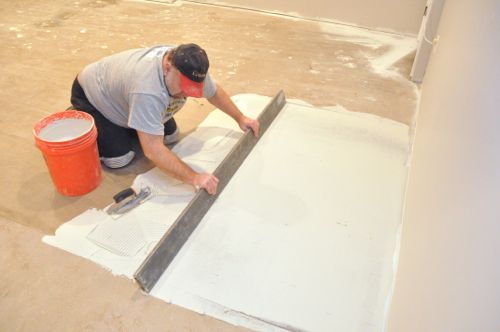
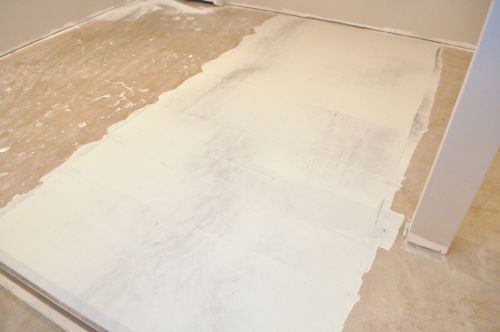
Jim overlapped adjacent areas, and you can see where the mortar was thicker or thinner depending on the contours of the floor.
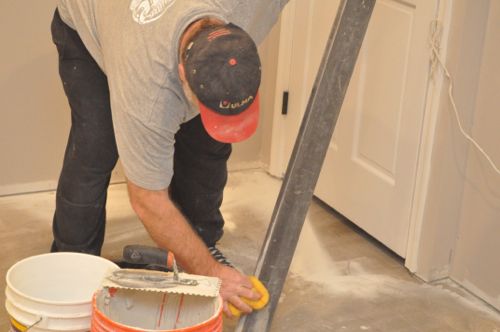
Step 7: Clean and Repeat
Periodically Jim would clean off the screed, and that little bit of water made it easier to achieve a smooth finish.
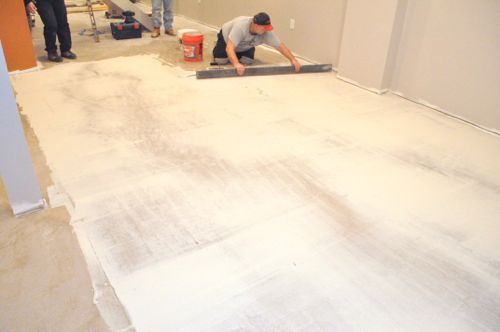
The main area of the basement was flashed in four, parallel runs.
Step 8: End of Run / Tight Corners
At the end of a run or in tight spaces, it was difficult to maneuver the screed. In these areas, Jim would use a flat trowel to smooth the mortar.
He would often add a little extra water to make it easier to trowel the mortar.
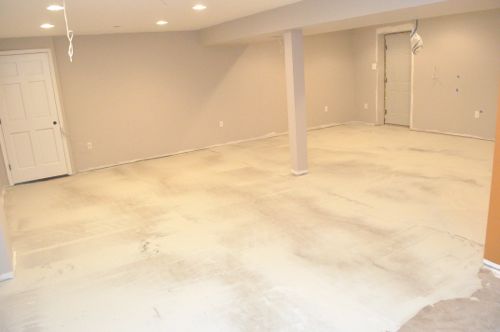
Finished
Jim and Rich completed the flashing in two days, and you could walk on the floor after about 24 hours (depending on temperature and humidity). When everything was dry, they setup the Bosch laser and rechecked the floor, and everything looked good.
What About Self-Leveling Mortar (SLM)?
SLM is a viable option for leveling a floor. In fact, this basement floor has radiant heating element embedded in self-leveler, and you can see how to pour self-leveling mortar at that link. However, self-leveler is most effective when the entire floor is covered with at least 1/2″ of product, and that can be expensive for a large area like this basement. The method described in this article is much more cost effective for flattening a floor in preparation for tile.

I’m assuming they are prepping to lay ceramic tile? Would the same leveling process need to occur for vinyl tile? I’m really not a fan of ceramic tile. My feet can’t take standing on it for any length of time.
I would imagine that vinyl is MUCH more forgiving of an uneven floor, being flexible. Though if you wanted your floor nice and flat, you could still do this.
This was in prep for tile (ceramic or porcelain), and I don’t think you’d need all this for vinyl. However, you may be able to feel and see some of the unevenness if not addressed.
Somehow I get the impression that if I tried this task, it wouldn’t come out looking so perfectly flat and level. I guess practice (for 27 years) makes perfect.
I think the long screed board makes a big difference, since it will just ride along the high spots and push the mortar into the low spots. I am sure it still requires practice though 🙂
I have a question about what it’s like to try to lay tile in a room where the previous tile installation used this method. It seems like this is a great thing to do if you want a really solid floor, but it also seems like it will make demo nearly impossible the next go around. If an OSB or plywood subfloor has been leveled like this once, can you ever reasonably remove the tile and tile over it again, or do you wind up having to replace the subfloor?
Interesting question, Rueben!
The application of the Ditra will make disassembly in the future easier although it will get destroyed and probably leave a fleece layer. Depending on the tools used parts of the floor may have to be reflashed if some divots are taken out by the tools.
On a recent bathroom remodel I embedded the radiant heating cables in a self-leveling flashing layer to fully encase and protect the cables so that if necessary I can still replace a tile without damaging the cable.
I think this is the way to go – encase the radiant wires and put the DITRA on top with a thin layer of thinset. Did you have any trouble holding the wires to the subfloor to keep them flat? What radiant product were you working with?
I talked to Jim about this, and he expects it to be very difficult to remove the tile without damaging the DITRA. That means that at least the floor would have to be removed down to the OSB (if not more).
Demo isn’t really a high priority for these guys. They’re working to create a floor that will last, and thinking about the next floor doesn’t really factor in.
I’m confused why there was so much work and attention to detail when checking the floor when the whole thing was leveled the same way anyway. It seems like the real work is done with a good long, flat leveling tool…I’m just not understanding the investigation part.
Rereading that I sound really negative…that wasn’t my intent haha. Jim obviously knows what he’s doing…I don’t
It’s important to know where the high and low spots are so the whole floor is even. Just counting on the screed board isn’t enough, especially when working the floor in sections (like Jim did).
Why this approach instead of just pouring a layer of self-leveling compound?
SLM is another option. However, it’ll require more material ($$) and result in a higher floor. Flashing the floor is usually their first choice.
how thick does the Keralastic get/feel like when it is ready to be used?
It’s easy to spread with a trowel and is thick enough to hold a notch.
I had to do this a little bit in my bathroom remodel. I used Versabond with the latex already added. It was a pain and he makes it look easy. Granted, it was my first time using thinset.
Would this technique also work for leveling a floor for laminate snap together wood flooring? We have a modular home and where it joins together is is very uneven and the flooring we put down already is not doing so good on the uneven floor so we are going to pull it up and try leveling it better .
Let me round back with the tile guys and find an answer for you.
Finally caught up with my tile guys and they said this method would be fine for the scenario you describe.
thankful for how helpful you guys are here at OPC
Were the waves in the floor so bad that they would not have been able to even the floor out when they installed the tile? I can see from the last photo the uneveness in the floor, but what kind of difference was present from the high and low points?
In my experience it’s very hard to level a floor when tiling. You end up trying to pull tricks with the thinset instead of just scraping the trowel over the floor and laying the tile. I think the challenge is made worse with DITRA, which only gets a 1/8″ trowel, meaning there’s very little ability to level. Since this is my floor, I’m personally glad they did it. My parents’ floor in a new addition has visible waves in the tile. It’s not that it’s that noticeable with furniture, but they are there. The tile isn’t going to delaminate or anything, but I’d rather have the installation be as perfect as possible, even if that means paying the tile crew a little more for the leveling effort.
Great instructions. I’m planning to install laminate wood flooring.
How well does this product work for a basement slab that has some fine cracks due to shrinkage and settling. Will the Mapei product seal the cracks, or should I do that first with some other product and then apply the Mapei?
Hey Jim,
DITRA (the next step in this process) will act as a moisture barrier if you seal the seams. Another alternative is to use a crack isolation membrane like Mapelastic CI. That’ll create a flexible, waterproof membrane that can move up to 1/8″ in-plane.
Mapei have got mentioned alot here, ishould probably use them aswell
We have a small area of concrete foundation that we need to patch and level prior to ceramic tile installation (12×12 tiles). It is concrete that we chipped the old tile mortar off of, so there are some places where there are small holes and there are some uneven places. I’m trying to determine which Mapei product we need to use. It is a small job and the whole floor doesn’t need leveling, so we don’t want to spend a fortune on large bags of things and expensive additives, so I’m trying to find the most economical option that will work for us. I’ve look at Self-leveling compound and Planipatch, but as far as I can tell they both require liquid additives. What would be the best choice for our situation?
These are the products I’ve looked at so far:
http://www.lowes.com/ProductDisplay?partNumber=13831-1295-17850136&langId=-1&storeId=10151&productId=3743843&catalogId=10051&cmRelshp=req&rel=nofollow&cId=PDIO1
http://www.lowes.com/ProductDisplay?partNumber=3174-1295-0080025&langId=-1&storeId=10151&productId=1180155&catalogId=10051&cmRelshp=req&rel=nofollow&cId=PDIO1
Would the same mortar we plan to use the tile with be acceptable to use for filling things in and smoothing them out?
So true. It is important to ensure that the base of subflooring is lvel- if the subfloor isn’t level your new floor may squeak or have waves in it. Another thing, no matter how good of a flooring product your purchase it only look feel good as it’s intalled. So learning how to level your subfloors shouldn’t be neglected.
http://hardwoodflooringburbank.net/discount-hardwood-flooring-burbank/
Hi Guys
Sorry if these are stupid questions.
My first question is on the mixing ratio. How much Kerabond mortar is mixed with the Keralastic latex additive to obtain the 1 hour work-able time?
Secound
Do you have any suggestions for a beginer?
When choosing to opt for the steel mesh subfloor prior to laying floor tiles, this can actually be the cheapest method by far, and also the easiest to install, but it can be time consuming and laborious. So thank you for your tips.
http://hardwoodflooringburbank.net/discount-hardwood-flooring-burbank/
We have ceramic tile that has cracked and we would like to know if you can lay ceramic tile over ceramic tile if you use the Ditra over the first layer of ceramic tile?
Thanks
I just had a building built and one of the 4×8 subfloor boards is not down level with the rest of them. It is like they over lapped it a hair or something is under it so it sticks up on one edge about a 1/4 th of an inch, can this be sanded down or how should I level it? I will be putting cement board over the subfloor before tiling so maybe I could chisel it down or something?
Hi
Great post!
Going to lay 18X18 porcelain tiles in my kitchen and I’m going to spend a little extra and use the orange DITRA membrane
Two question…
1. Should I run my screed board parallel or perpendicular to the joist?
2. After my modified thinset to flatten my plywood floor has cured should I use a modified or unmodified thinset to lay my DITRA?
I ask because now my DITRA won’t be going directly on plywood but on a cement based material. When DITRA is going on plywood a modified is used to help it adhere and also it can cure well over plywood. Going on a cement based product like my modified thinset used to flatten my floor the DITRA may not cure well. But, laying DITRA with modified thinset gives a stronger bond and good flex.
So you can see my dilemma. Oh what to do, what to do.
I just want to make sure I do everything right to avoid failure in my new porcelain floor.
Thanks for your input.
Frank.
Hello,
I have 2000 sq feet of 2′ by 2′ tile to put down on a very out of level and hilly floor. I have two sheets of ply and 1/4 inch Hardiebacker down to make a solid 1 1/2 subfloor. a 6 foot screed board wouldn’t work in my case because the hills and valleys are further apart than that, in some cases 12 feet between hills. Is there another method to do the job or should I just find another screed board to gap the hills. Also, the house is 4 inches out of level so I can’t use a self leveling compound, at this point I’m looking for flatish not level. Any help would be greatly appreciated.
Thanks
Thanks for the tutorial. I’m currently pulling particle board off an osb subfloor in the kitchen and many pieces are taking a thin layer (and a few deeper) off the osb. Will this be ok for ditra/tile? And secondly, I have a couple spots where I found mold. Would covering the mold with the self-leveler and thin set do the job? I’ll have sprayed it with concrobium after removing a thin layer of the osb.
how do I leval a floor for prefinished hardwood and vinal
does anyone know if there is a code for who is responsible for clearances when a tile floor is installed?
As a designer, I was called in on a job that was well under way and had major mismanagement.
Bottom line: DISHWASHER CANNOT BE INSTALLED, CLEARANCE IS 33″H
– cabinet installer set cabinets on concrete subfloor and shimmed only to level rather than to raise to potential new floor level.
– floor tile installer most likely did not level the floor by grinding 1/8 in high areas and filling 1/8″ in low areas. He simply filled low areas. Which could raise the floor substantially.
tile installer says it is code that the counter top installer is responsible if there is not enough clearance for a dishwasher to be installed and this is CODE. Really? Quartz top was last to go in. Clearances were set long before she arrived to set tops.
Classic case of finger pointing.
Thank you for any CODE information you may offer.
P.
Hi. I have one question, and I realize it’s an old thread. Hope it is still active. You mentioned an iron screed. Where, exactly, did you get something like that? Can’t seem to find it in the big box stores, though I’m probably in the wrong spot.
Thanks for your time.
The subfloor in my bathroom where I’d like to place tile is partially concrete and partially 3/4″ plywood (flush with the concrete). The plywood portion is only a 3-4′ span with 16″ oc supports, so there’s not much deflection, if any. What underlayment should I use under ceramic tile? Or are there other flooring options that might work better.
hmmm…about time to turn the lights out here, no? No replies since 2013, which I think was before tile-clips were invented. Please email me if this is NOT a ghost-ship.
Self leveling cement can be poured as thin as 1/8th inch. It could have been poured in a couple of hours. But these guys took 2 labor intensive days to level it by hand. What is time worth vs SLC cost. I would bet SLC would have bee cheaper and better and easier and faster.