
This past weekend, we took a few hours to install a new Kenmore Elite dishwasher. We’re really pleased with it thus far, but we thought we’d give it some more time before writing a full review of the dishwasher itself. The installation of a dishwasher is actually a very straightforward matter. It’s a great project for DIYers of all skill levels. Read on for our instructions for removing and installing a dishwasher in your own home.

Tools and Materials
We grabbed a handful of tools from our workshop. Here’s the minimum tools and materials you’ll need.
- 6-in-1 Screwdriver (actually, any screwdriver will do, but we like this one)
- Drill/driver (any will do; we used our hammer drill without the hammer feature turned on-overkill for this job)
- Multimeter (we used this Ryobi Tek4 model)
- 6.5″ Channellock pliers (any locking pliers will do; these Channellock pliers are a favorite)
- Plumber’s Tape (you can find this at any big box hardware store or plumbing supply shop)
- Level
Most new dishwashers have a 3/4″, threaded inlet; while most supply lines are 3/8″. If this is the case in your situation, you’ll need an additional part called a 90° dishwasher adapter (or dishwasher elbow, like that one) to connect the supply. Some dishwashers come with this part, so check the installation manual.
How to Remove an Existing Dishwasher
Step 1: Shut-off the power to the dishwasher.
Your main electrical panel or fusebox should have a dedicated breaker or fuse for the dishwasher. Flip the breaker to the off position or remove the fuse.
Step 2: Shut-off water to the dishwasher.
The water supply for a dishwasher is commonly joined with the hot water for the kitchen sink. Close the valve under the sink headed to the dishwasher. If you do not have a valve under the sink dedicated to the dishwasher, you may want to install one during this installation. Instead of plumbing an entirely new valve (which will require sweat soldering a new T-joint and valve), you may be able to install a dual stop valve on the existing line, which replaces the existing stop and adds a new valve outlet for the dishwasher. These valves avoid additional sweating, which is a nice plus.
If you are having trouble getting the water to turn off, you may need to turn off water at the main for the house, or you’ll need to turn it off at the street as a last resort. If you are in this situation, we recommend replacing the main water valve for the house before you start.
Step 3: Remove the access panel cover.
At the very base of every dishwasher is an access panel. The cover to this panel is held in place by two screws, one at each end. Use a screwdriver to remove the screws and the panel, revealing the underside of the dishwasher.
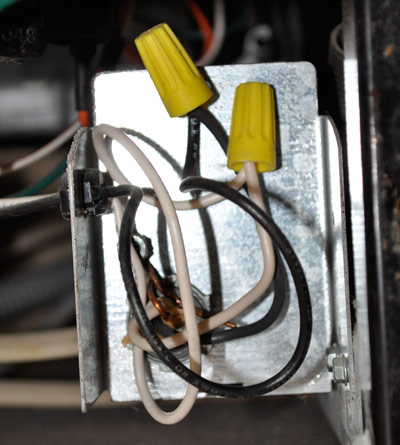
Step 4: Unwire the existing electric.
Most dishwashers locate the power junction on the right-hand side, often within a small box. Remove any screws necessary to gain access and verify that the power is off with your multimeter (or other testing device). Remove the wire nuts securing the black and white wires. Loosen the ground screws and disconnect all the wires. There may be a de-tensioning device on the back of this junction box that you will also need to remove.
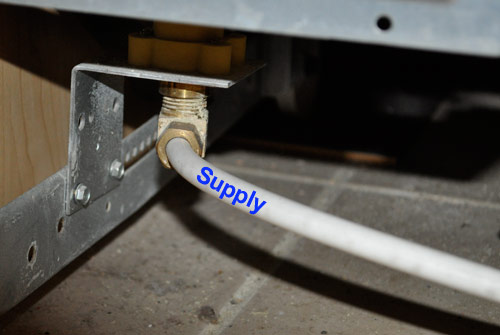
Step 5: Disconnect the water supply.
The water supply connection is probably located on the left-hand side of the underside of the dishwasher. Look for 3/8″ tubing (flexible plastic, steel-reinforced rubber, or copper) that resembles the line you shut-off underneath the sink. Use the pliers to loosen the compression fitting. Have some paper towels or rags on hand to soak up any water that spills out.
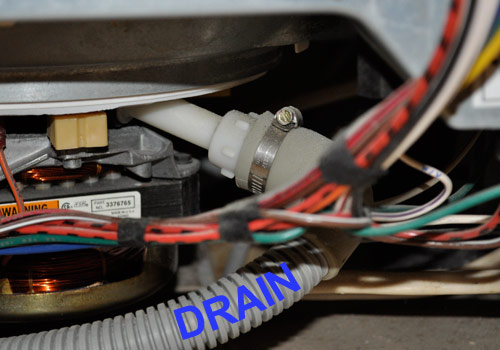
Step 6: Disconnect the dishwasher drain.
The next connection to remove is the drain. This is a flexible plastic tube that will connect to your kitchen garbage disposal. It’s usually held in place with a band-clamp or spring-clamp. Use the nut-driver or pliers to loosen the clamp and disconnect the drain. Again, have paper towels or rags nearby for any water that spills out. In most cases, you will get some water draining from this connection.
Step 7: Remove the dishwasher.
The dishwasher is anchored to the underside of your countertop (or plywood underneath granite, quartz, or other stone countertops). Look for two screws that hold the dishwasher in place. Remove the screws and move the old dishwasher out. Your dishwasher probably has adjustable feet in front and wheels in back making it easy to move. You may need to work the dishwasher carefully out of its spot.
Install a New Dishwasher (Kenmore Elite shown)
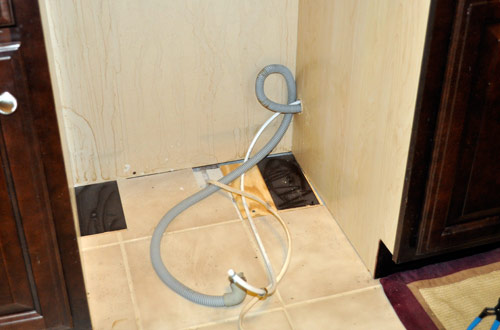
Installing the new dishwasher requires following these exact same steps in reverse.
- Fish the drain, supply and electric underneath the new dishwasher as you wheel it in place.
- Connect the drain, but don’t over tighten the band clamp or it may crack.
- Install the dishwasher adapter using plumber’s tape and connect the water supply, also using plumber’s tape. Snugly tighten both joints but do not over-tighten. Too much force can strip the brass fittings.
- Connect the electric with wire nuts according to the instruction manual (usually black-to-black and white-to-white) and secure the bare ground wire to the ground screw.
- Level the dishwasher by raising or lowering the adjustable front feet. Make sure the mounting brackets are appropriately placed underneath the countertop before screwing them in place.
- Turn on the water and look for any signs of leaks. If not, turn on the breaker and run a test cycle. Check that the drain line is not leaking.
- Re-install the access panel.
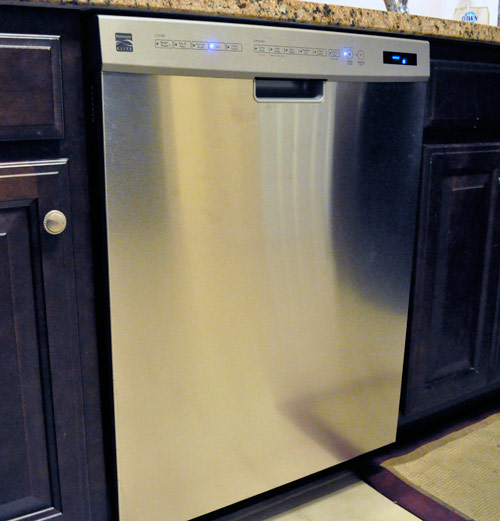
That’s it! Installing a dishwasher is actually a very easy process, and all new dishwashers will come with instructions similar to what we’ve laid out here. If you’re comfortable with basic DIY projects and following instructions, you can definitely do this job without reservation.
How Long Does It Take to Install a New Dishwasher?
This installation took us about 1 hour. For beginners, set aside 2.5 hours for the installation and you won’t feel rushed. If you need to replace or add a dishwasher valve, that could take some extra time.


Ya missed the part about the bushel of crap under the old dishwasher.
Hey Alan, very true. I spent a couple minutes cleaning things up / scrubbing the tile. It was a bit nasty but I didn’t think anybody would mind if I glazed over that portion. 🙂
alan herrell – LOL
Ethan,
Sorry but things like the dishwasher dust bunnies are important to note especially when describing projects that regular folks may want to tackle.
Only on HGTV do they have garbage faeries with magic wands so you never see the crap that piles up, the surprises that jump out like the plumbing lines in Fred’s front hall, and other bits that are part of any remodeling project.
The more information we can supply, the better folks will be prepared and it will show in how their projects will turn out.
And as an added bonus there will be more Before and After entries:)
Just stumbled upon this. Very useful as our dishwasher is a extremely OLD Maytag from 1986(came with the house). When you wash dishes it sounds like our kitchen is a train station.
I can’t imagine how gross it looks under ours since its from the 1980s and its never been moved out. Hope no missing family pets are found.
Thanks for the great tutorial. I’m hoping we won’t need this, but with six people in our household right now I’m thinking we need to either get our current nonworking dishwasher working or purchase a new one.
This is a terrific article, with very helpful shots of the access points. I have a new Kenmore Elite dishwasher I’m trying to install. For the life of me, I can’t figure out how to get at the electrical hookup. Is that step 3 above “Step 3: Remove the access panel cover”? Are you saying I should remove the kick-plate at the bottom – the piece facing forwards at the bottom of the front door?
Thanks, Gord
Gord, that’s exactly what we’re saying. Behind that plate you’ll find a small metal box (say about 4 inches wide by 2 inches tall). That will also have a cover that needs to be removed. Did you buy this dishwasher new or used? It should have come with some decent instructions!
I have a bad case of dishwaher envy…even for MissFixIt’s 1986 Maytag. We currently do not have a dishwasher, or any space to install one. We are looking into the countertop styles. Anyone have any experience with them? They will take up the same amount of space as our drying rack currently does so even with the small amount of countertop space we have we won’t be losing any.
Just stumbled upon this post. When we replaced our dishwasher, I was surprised to find that it didn’t have any protective shell on the sides, but now that i think about it, why would it. I know I’m not describing that right.
Awesome tutorial – thanks very much for posting! I’m going to replace our dishwasher in the future – but in the meantime – I’m going to use this as a how-to for pulling out my existing dishwasher (only 5 yrs old) and installing a small backer piece between the studs in the peninsula. I had replaced the 1/4″ plywood on the peninsula with 1/2″ because it vibrates like crazy when the machine is running – but turns out – there’s just no where for the plywood to fasten in the “middle” of the sheet to the framing – so that’s where my buzz is coming from. Rather than carefully ripping that paneling back off and installing a thin cross piece – I’m going to instead pull the dishwasher.
Thanks!
Greg
Thank you for sharing this article, I have bought a just new dishwasher, if in future it not works, then your idea is useful to me.
Thanks for this! Most people will probably call for an appliance repair company when they need to install and replace a dishwasher, but you’ve laid out all the steps nicely if someone wants to go the DIY route.