
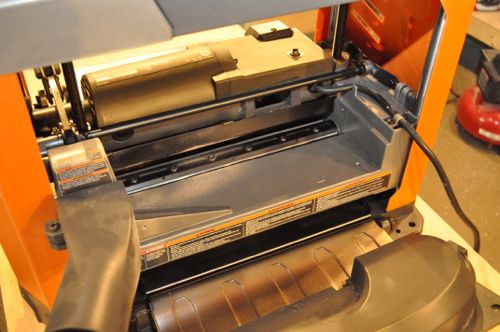
The 13″ Ridgid thickness planer is a new addition to the OPC workshop, and it fills a huge void in our tool arsenal. This planer enables me to process rough-cut boards and true-up lumber before starting a woodworking project. It can handle stock up to 13″ wide and 6-1/8″ thick, and the resulting finish requires very little sanding afterward. Best of all, it’s about $100 – $200 cheaper than comparable models!
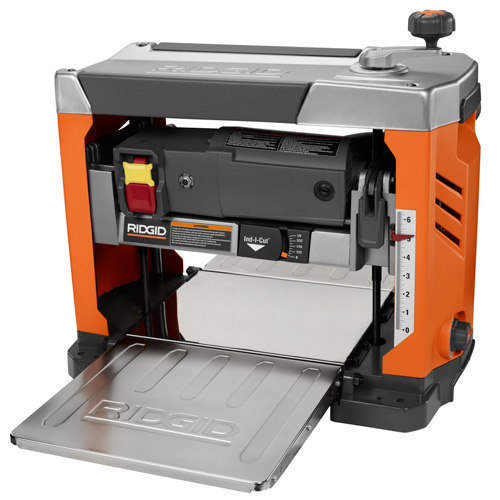
Ridgid provided the R4331 Thickness planer for review, and I’ve already put it to good use for some small projects. So far I really like this planer, and I wish I had it when I was building my Pottery Barn knock-off dining table. If you’re looking for a planer, this is a great choice. You can find the R4331 at Home Depot for $399.00 and a pack of extra blades costs about $30.
Features
The Ridgid R4331 features a three-blade cutter head with high-speed steel (HSS) blades. The blades are self-indexing for easy alignment, and they are reversible which means replacing the blade less frequently. There’s some debate over HSS blades versus carbide blades. From my research online, carbide blades are more expensive because they are stiffer, making them a good choice for very hard woods like Teak or Ipe. For other species (walnut, cherry, maple), the HSS blades result in a better finish.
The R4331 is equipped with a 15 amp, 9,000 RPM motor, and this is right in-line with competitors products. This planer cuts 96 cuts per inch (CPI) and a moves material through at 23.5 feet per minute (FPM).

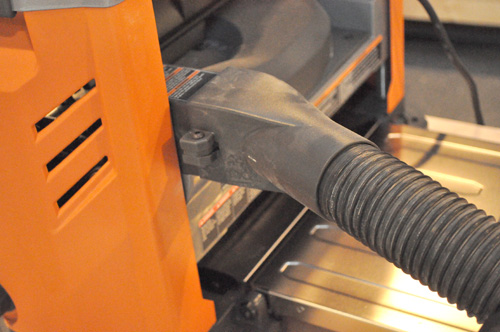
Ridgid positioned a 2-1/2″ dust port above the out-feed table. There’s no need for an adapter for connecting to a shop vac like some competitors’ models, and the chip impeller helps keep the cutter head clear for better cut quality.
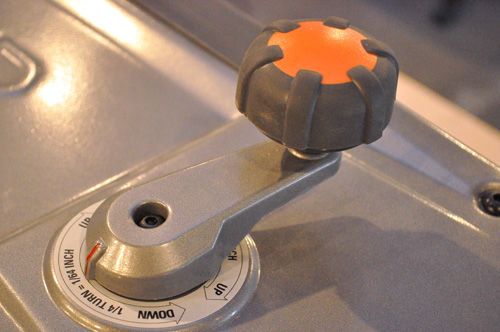
The depth adjustment handle is on top of the planer and 1/4 turn results in 1/64″ height change so you can dial it in to the exact height required.
The R4331 Ridgid thickness planer features the Sure-Cut carriage lock to securely lock the cutter head in place. This is an expected feature on bench top planers to eliminate movement and thereby snipe (more on snipe below).
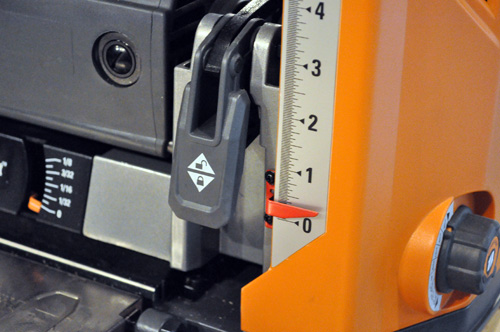
The Repeat-A-Cut feature is an 8-position preset to set the plane to an exact height. It’s really helpful for planing multiple workpieces down to the same height, and it ranges from 1/8″ to 1-3/4″.

Using the Planer
I’ve had this planer for about a month, and I’ve used it for a few small projects. I was pleasantly surprised with the easy setup, and the quality of the finish. After running boards through the planner, they only require minimal sanding.

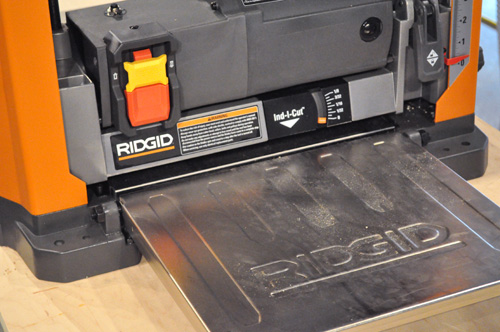
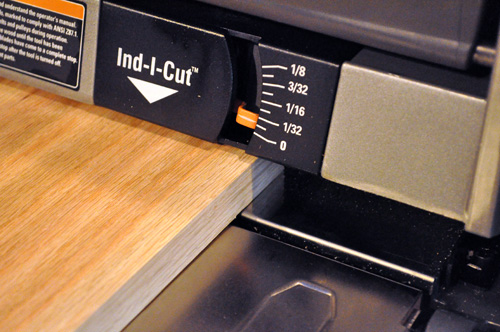
The Ind-I-Cut is a gauge that reveals how much material will be removed from a workpiece before sending it through. It’s helpful when you know the difference between two boards, and it prevents me from trying to plane off too much in one pass.
Ind-I-Cut works when a small ball bearing comes in contact with the board. Unfortunately, that only occurs in the middle of the planer. I would have preferred a full-width gauge that would have allowed me to position my workpiece anywhere across the planer.
Eliminating Snipe
Snipe is a term commonly used when discussing planers and jointers, and it refers to a slightly deeper cut usually found at the beginning or end of a workpiece. Snipe usually occurs when a board isn’t fully supported and the weight puts additional pressure against the cutter head. You can see a very faint line on the board pictured below, and that is snipe.

To eliminate snipe with the R4331, Ridgid makes it easy to adjust the in-feed and out-feed table supports. After a few tries, I was able to run boards through without any noticeable snipe. The tables measure 13-1/4″ wide x 12″ deep, and I may build a mobile workstation with bigger supports in the future.
If you’re experiencing problems with snipe, check for dull cutter blades and try to butt workpieces end-to-end as they are fed into the planer. Alternatively, you can cut boards longer than necessary and trim the snipe after planing.
Blade Changes
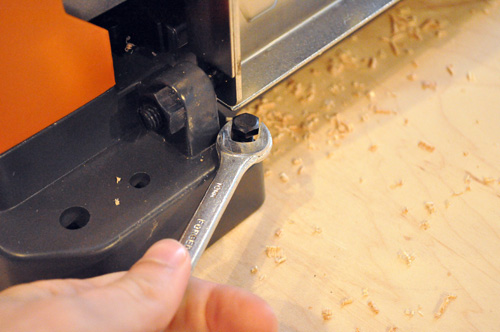
Ridgid provides convenient, on-board storage for the magnetic blade wrench.
To change or rotate blades, all you have to do is remove the dust hood (2 screws), make sure the cutter head is locked and remove the screws securing the blade. It’s very simple and only takes about 5 minutes.
Overall
Overall, I’m really excited about this planer. It has a powerful motor and can handle large stock. Ridgid included a great feature-set, and the planer works intuitively. I haven’t had any problems with the planer. It does come lubed up with lots of shipping grease so it needed a good cleaning. Whenever I get around to making that workstation, I’ll update this review.
Specifications
- Motor: 120 V, AC only, 15 Amps
- No Load Speed: 9,000 r/min. (RPM) 27,000 CPM
- Cuts per Inch: 96 CPI
- Feed Rate: 23.5 FPM
- Capacity (W x H): 13 in. and 6-1/8 in.
- Maximum Depth of Cut: 1/8 in.
- Weight: 73 lbs.
- Assembled Dimensions: 21″h x 24″w x 18″d
Every year tool manufacturers fight for even the tiniest advantage, and that often translates into millimeters off the tool size or ounces off the total weight. These upgrades, while beneficial, are not earth-shattering. However, advancements in battery technology are moving at a rapid pace, and I’m very excited about the new, higher amp-hour (Ahr) batteries that are starting to come out. If you keep up with OPC on Facebook, you know Milwaukee recently sent us their new 4.0 Ahr extended capacity and 2.0 Ahr compact batteries, and I put the 4.0 Ahr battery to the test in the OPC workshop.
Why Do Amp-hours Matter?
Stuart from ToolGuyd recently wrote a great article about what does Ahr mean and how is that an important metric for cordless tools. The take-home message is that Ahr is a measure of the total charge capacity of a battery pack, and that affects power and/or runtime (depending on configuration). As you might expect, higher Ahr ratings are better, and I’d encourage you to check out the article for a full explanation.

The Test
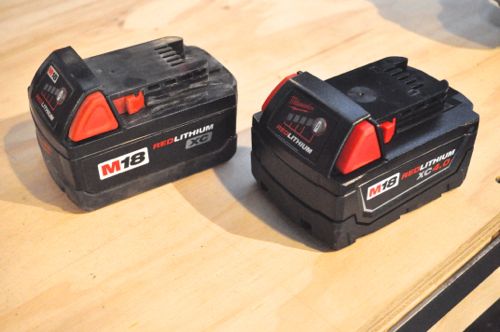
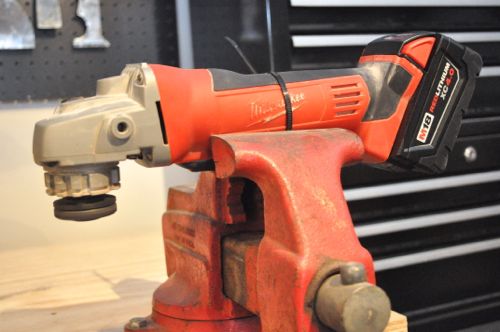
The new Milwaukee batteries claim up to 2X more runtime, 20% more power and 2X more recharges than standard lithium-ion batteries. I’m not equipped to test power or recharging capabilities, but it was easy to set up a runtime test. I rigged up my Milwaukee cordless 4-1/2″ grinder without an accessory, and pitted the M18 XC high capacity REDLITHIUM battery (3.0 Ahr) against the new M18 XC 4.0 extended capacity REDLITHIUM battery (4.0 Ahr) to see how long each battery lasted.
Fresh off the charger and at a no-load speed of 9,000 RPM:
- 3.0Ahr battery lasted 31 minutes and 37 seconds
- 4.0Ahr battery lasted 49 minutes and 0 seconds – a whopping 55% increased runtime!
Looking to Upgrade?
At the time of this article, Milwaukee is jumping out in front of the competition. While most manufacturers have announced 4.0 Ahr batteries, Milwaukee is actually distributing here in the USA. You can find the new batteries at your local Home Depot and various online retailers for about $129.00.
Also, now through March 31, 2013 participating Milwaukee distributors have a promotion going. When you trade in a 14.4V or greater professional grade cordless tool with 2 or more batteries, receive $100 off instantly when you purchase a qualifying M18™ XC Kit. The new M18™ FUEL products with the 2.0/4.0 batteries are included in this promotion.
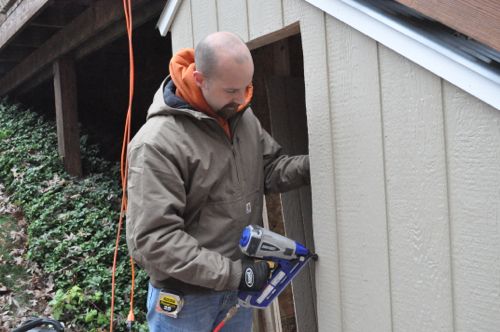
Months ago Carhartt asked us to check out their new Quick Duck jackets and vest, and I agreed with my usual “no promises” disclaimer. If you’re a regular reader, you know that OPC is all about the Project Guides and not as much about the products, and we like to keep it that way. However, I’ve been wearing the Quick Duck Active Jac everywhere: work, home, job sites, even church, and I was so impressed that I thought it was worth sharing.

The unique Carhartt Quick Duck fabric is made of 8.5-ounce, 60% cotton/40% polyester canvas with a durable water-repellent finish. It really is a beautiful thing to see rain, snow and sleet just run right off me. The quilted lining is composed of nylon and mid-weight polyester insulation, and it does a great job keeping me warm.
The Active Jac has a hood, and I was glad to see concealed draw cords rather than the dangly pull strings. Pull strings are annoying, and a safety hazard when you’re leaning over a table saw.

The Active Jac includes a left-chest map pocket, two large lower-front pockets, and two inside pockets. There’s also a media port to run headphones to a cell phone or media player. That’s not something I’d ever use (especially on a job site), but it’s available.

What impresses me most is the quality construction, and I’d expect nothing less from Carhartt. With the heavy-duty zippers, durable canvas shell and triple-stitched main seams, the Active Jac is going to last a long time.

The Active Jac costs $130, and you can find it and other Quick Duct products online or at a local retailer.
In June of this year Bosch unveiled the new TC10 Wet Tile and Stone Saw and folding stand, and this saw marks Bosch’s first foray into the wet saw market. About a month ago I gave you an initial look at the TC10 with the promise of a full-on review. Here at OPC we like to get tools out in the field before passing judgement, and Jim and Rich from Diamond Tile were kind enough to test it out for us. Jim and Rich are professional tile installers and each have over 27 years experience so I was very interested to get their opinion on the TC10.
Setup
Setting up the TC10 at the job site was very simple. The body of the saw rests on the stand, and the three collection trays slid into place. The extension hooks onto the side of the table, and there’s a release lever on the underside to free the table. The weight of the saw is on par with other professional tile saws, and Jim and Rich typically remove the table to make it easier to clean and carry. That extra step requires removing one screw, and it’s quickly done.
The tray holds about a little under 5 gallons which makes it easy to fill and empty with a 5 gallon bucket. Most tile saw trays are plastic and so is the tray on the TC10. Manufacturers chose plastic to keep the weight down. However, Jim and Rich have seen the trays crack from extreme cold (not from water freezing in the tray).

Overspray Deflectors and Run-Off Collection Trays
The first thing Jim and Rich noticed about the TC10 was the run-off trays and overspray deflectors behind the blade. The guys typically setup a tarp underneath the saw and plastic sheeting over nearby walls. The trays and deflectors eliminated the need for protection on the walls, and that is a great time-saver. Jim and Rich said that a lot of tile saws don’t include the side run-off tray, and that leads to a lot of water on the ground. They’re glad to see it on the TC10.


Sliding Work Table
The guys have been using a Target brand tile saw (no, not the Walmart retail competitor), and it included a sliding table too. The difference is that the TC10 table is much smoother, and it’s not just because the saw hasn’t seen much use. Bosch incorporated 4 sealed ball bearing casters that ride on stainless steel rails. The guys found the table to be really useful for straight cuts, odd angles and even just to steady the workpiece while they hold it.

A limitation with this style of saw is the clearance between the blade and the arm. Jim and Rich are seeing more homeowners request bigger tiles, and to make cuts it sometimes means awkwardly flipping the tile around. The guys previous saw had about 9″ of clearance while the TC10 provides roughly 13″ of clearance. That’s important because the TC10 can handle a wider range of cuts even on big, 24″ tile.


The table extension is another welcome feature. Porcelain tile is much heavier, and it tends to chip near the end of a cut. The best way to avoid chipped tiles is to make sure the entire work piece is fully supported, and that’s what the table extension provides.

Powerful 1.5 HP Motor
Horsepower is an easy differentiator amongst tile saws, and you’ll notice the more heavy-duty tile saws feature at least 1.5 HP. The TC10 hits that mark with a 1.5 HP and 4200 RPM motor which can power through porcelain, granite, and other dense materials.


Adjustable Plunge Cutting
Plunge cuts are necessary to work around fixtures like shower controls, and typically Jim or Rich would go outside with a small grinder because of all the dust. The TC10 is a great time-saver for the guys because now they can make plunge cuts inside and without the need for a separate tool.

Cleanup
Easy cleanup is another important consideration for Jim and Rich. The TC10 tray slides out for draining, and the wide channels on the table make it easier to remove bits and pieces of tile.


Price
I asked the guys how much they would pay for a saw and stand like this, and they expected something in the $1200 – $1500 price range. They were really surprised to learn that the saw with stand retails for only $1049.
Final Thoughts
Jim and Rich said that Bosch got a lot of things right about this tile saw, and they’re really pleased with the performance. The price is lower than they expected, and the Bosch TC10 is a great option for professional tile installers. When I asked if there was anything they’d change, the guys said an integrated work light near the blade would be useful because a lot of locations don’t have good lighting and sometimes it’s tough to see lines.
Pro-Follow Update: Joe Bianco and his crew have passed the plumbing, electric and framing inspection on the basement remodel. The guys will be hanging and finishing drywall the next few days and hope to be finished by Sunday. I’m still keeping tabs on the in-law addition with Steve Wartman. His guys are painting and tackling the odds-and-ends associated with completing the project. Look for final pictures when they’re finished.
About a month ago I shared a first look at the all new Rockwell Sonicrafter X2, and I think it’s an impressive oscillating multi-tool (OMT). It has one of the most powerful motors currently available, tool-free accessory changes, universal accessory fit and a waterproof hard case with storage.
Rockwell recognizes that not everyone needs all these “bells and whistles” so they’ve also introduced two other models at lower price points. The good news is that both the Shopseries Sonictool and Sonicrafter feature the Universal Fit System that allow these tools to take advantage of competitor’s accessories. Here’s how the three units compare.
Sonictool SS5120 | Sonicrafter RK5139K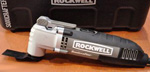 | Sonicrafter X2 |
|
|---|---|---|---|
| Motor | 2.3 Amp | 2.5 Amp | 3.0 Amp |
| Oscillations per Minute | 11,000 - 20,000 | 11,000 - 20,000 | 11,000 - 20,000 |
| Universal Accessory Fit | Yes | Yes | Yes |
| Hyperlock Quick-Release | No | Yes | Yes |
| Hard Case | No | Yes | Yes |
| Vacuum Port | Yes | No | No |
| Included Accessories | Bi-metal end-cut blade, HSS semicircle saw blade, sanding pad, (3) sanding sheets | Bi-metal end-cut blade, HSS semicircle saw blade, rigid scraper blade, sanding pad, (3) sanding sheets | Bi-metal end-cut blade, HSS semicircle saw blade, rigid scraper blade, sanding pad, (3) sanding sheets, carbide semicircle blade and Sonishear |
| Weight (lb) | 3.20 | 3.60 | 3.30 |
| Warranty | 2 Yr Limited | 2 Yr Limited | 2 Yr Limited |
| Price | $49.99 | $119.99 | $149.99 |
ShopSeries Sonictool
The Sonictool is the economy model, and it looks to be a direct competitor with SKIL’s 2.0 Amp OMT which also features a dust port. However, at $30 cheaper, Rockwell blows SKIL out of the water.
Aside from the lower amp motor, the main disadvantage of the Sonictool is the lack of tool-free accessory changes. Rockwell incorporated a holder for the Allen wrench near the dust port for blade changes. Again, this unit is compatible with Rockwell accessories and every competitor’s accessories too.


Sonicrafter
The Sonicrafter is very similar to its big brother the Sonicrafter X2. They both feature the same case, Hyperlock tool-free accessory changes, Universal accessory fit, and nearly identical specifications. The Sonicrafter is a great option if you want to save a few bucks, and you can sacrifice a little power. I expect this generation of the Sonicrafter to be very popular.


Rewards Center
If these OMT’s look like something you’d be interested in owning, keep an eye on our Rewards Center. For anyone new to OPC, create a free account and start earning Project Points that you can use to bid on items like these. Read all the details here.
I’ve often felt like studs finders are the snake oil of home improvement, and I could do just as well knocking on the drywall to find a stud. I’m sure you’ve been there too, driving a screw through sheetrock only to find there’s nothing behind it. Well Bosch is working to change all that, and today we’re taking a look at the GMS120 Wall Scanner. Although this tool came out early last year, it’s a new addition to the OPC workshop, and I’ve rigged up a test for the GMS120. Let’s see how it performs.
Our GMS120 came to us courtesy of Lowe’s, and you can find it in-stores and online for $79.98. Here’s a link to the Lowe’s site where you can see all the product details.

The GMS120 is a wall scanner that can locate wood studs, metal studs, copper pipe, PEX tubing filled with water, rebar, live wires (110-230v) and more. Plus, the wall scanner can operate over drywall, cured concrete, and plaster and lathe.
To operate the GMS120, you press the red power button and select between Wood, Metal and AC Wiring mode. The best measurements are achieved by selecting the appropriate mode. Next, you slide the tool over the surface to be scanned. The light ring, audio signal and display indicate the results, and you can mark the wall through the marking hole.


The Test
To test out the GMS120, I setup a sheet of 1/2″ drywall and anchored a 2×4 stud, live wire (extension cord) and a segment of copper pipe behind it. I cut that little window so the accuracy of the GMS120 would be easy to see.


I covered up the window while I was doing the scanning to ensure I didn’t “cheat”.

Using the GMS120 in each mode, I looked for the center of each test object and marked the results on the drywall.

In my testing the GMS120 did an excellent job locating the copper pipe and found center every time. The wall scanner also found the live wire very quickly. Unfortunately, the scatter plot made it a little difficult to pinpoint the exact location. However, I knew a live wire was nearby.
The real test of a wall scanner is how well it detects studs because that’s primarily how most users will employ the GMS120. I took a lot of readings, and the found center was actually more like the left edge. I also tried out the GMS120 in the house to detect known studs (around switch and outlet boxes), and it performed better. Ultimately, I feel like the GMS120 is more reliable than many other stud finders available.
I found it was really tough to see the display with the backlight turned on. If I wasn’t looking straight at the scanner, the display was just about invisible, and that was a bit disappointing.
Again, if you’re looking to purchase the Bosch GMS120, check out your local Lowe’s or Lowes.com.

Specifications: GMS120 Wall Scanner
- Max Detection Depth Copper Wiring: Up to 2″
- Max Detection Depth Ferrous Metals: Up to 4-3/4″
- Max Detection Depth NonFerrous Metals: Up to 3-1/8″
- Max Detection Depth Wood Substructures: Up to 1-1/2″
- Operating Temperature: 14°F / -10°C ~122°F / 50°C
- Battery: 9V
- Weight (lbs.): 0.6
Includes
- (1) – Protective Case
- (1) – Hand Strap
- (1) – 9V Battery
In case you’ve lost it, I found the manual available at that link.

Editors Note: If you’re interested in learning more about the Bosch TC10, check out the full review, and see what a pair of professional tile installers had to say.
I just received the new Bosch TC10 tile and stone saw and folding stand yesterday, and I’m really excited to get this into the hands of my tile contractors. I saw this saw for the first time a few years ago at a Bosch media event, and was blown away with the smooth action of the sliding table. Plus, this saw can do it all- 24″ rip capacity, bevel cuts and plunge cuts. Here’s a first look at the TC10, and you can expect a detailed review to follow.


Bosch positioned 4 sealed ball bearing casters on the underside of the table, and these casters ride on stainless steel rails. I’m curious to see how consistent the table moves after cutting a bathroom worth of porcelain tile.

The top of the table is rubberized, and with the extension, the large work surface is perfect for supporting large dimension tile.

Bosch includes a quick-adjust guide for angled cuts with detented stops at 22.5° and 45° angles.

By the motor housing are two knobs. The larger one is a depth adjustment knob for making plunge cuts, and the smaller knob is depth stop knob for setting the maximum depth.


On the backside is the bevel adjustment lever for making 0°, 22.5° and 45° bevel cuts.


The guard unlocks with a knob providing easy access for blade changes.

Bosch integrated a GFCI into the power cord.

The table has a small, spring-loaded catch on the underside that will lock the table for transporting the saw, and the extension can be secured with a pin on top.


If you’ve been a regular reader here on OPC, you probably know how much I love painting. In other words, I hate painting, and that means I’m always eager to try out products that make painting easier, faster and less cumbersome. For that reason paint sprayers are right up my alley. A while back I reviewed the Graco TrueCoat Plus, and when Wagner reached out I was more than happy to give the Control Spray Max a try.

Wagner’s Control Spray Max is intended for homeowners and do-it-yourselfers, and suggested uses include decks, wood trim, kitchen cabinets and more. It is a high-volume, low-pressure (HVLP) sprayer powered by a two-stage turbine, and the Control Spray Max features variable pressure control. HVLP systems use compressed air to atomize latex paint, lacquers and stains. Some of the challenges for this type of sprayer include reducing overspray, producing a smooth finish and ease of cleanup.
In addition to the sprayer and turbine, the Control Spray Max comes with a 1 qt. metal cup for woodworking, 1-1/2 qt. plastic cup for larger projects, 20′ flex hose, viscosity cup and user manual.

Setup
Wagner designed the Control Spray Max for easy and quick setup. The handle locks in place with the spray gun, and a hose runs between the turbine and handle. The fill cup screws onto the underside of the spray gun.


Thinning Material
Unlike the Graco, Wagner requires the user to thin the spray material, and they include a chart in the manual. The chart outlines how fast material should move through the viscosity cup. For instance, varnish should empty the viscosity cup in 20-50 seconds. However, the chart does not have directions for latex paint, and instead directs users to follow manufacturer’s recommendations.
Spray Patterns
The Controls Spray Max can achieve three different spray patterns depending on how the air cap and nozzle are aligned. A diagonal air cap (pictured) produces a circular spray pattern, a vertical air cap produces a wide, ovoid fan and a horizontal cap produces a tall, ovoid fan.

Variable Pressure Control
Adjusting the variable air pressure control reduces overspray of thin materials like lacquers and stains, and it enables a user to “fine tune” how the spray material is atomized.

Performance
I used the Wagner’s sprayer to paint a spice rack that I made for Fred and Kim. I used Glidden paint, and they don’t have any info (that I found) for thinning latex paint so I used generic instructions. In the end, I thinned the paint several times because the paint came out too course, and even then the finish was a bit rough.
The turbine is connected to the spray gun with a hose, and that lessens the weight I had to carry. This is a great design choice because it reduces fatigue especially for big projects.

Overspray was minimal, and that’s great because it allows you to be more detailed and reduces waste. The suction tube is angled, and by pointing it in the right direction, you don’t have to fill the cup as often.


Cleanup and Maintenance
The Control Spray Max is composed of a few parts, and that makes cleanup simple. For latex paint, you empty leftover material, run soapy water through the sprayer, and then thoroughly clean the spray gun, fill cup, air cap, nozzle and suction tube. It’s very quick and very easy (better than Graco). Maintenance is also minimal. The turbine has two air filters, and dirty filters should be replaced.
You’ve probably seen the press releases and stock photos of the new Sonicrafter X2 making the rounds. I’ve found it’s tough to get a real sense of a tool and how well it performs before it’s in your hands. That’s why I’m excited that we have the new X2 in our shop, and so far I’m really impressed.

The Sonicrafter X2 (model #RK5139) is one of four new offerings from Rockwell that will be available in October 2012, and the X2 has several key features that I really like.
Tool-Free Accessory Changes
I hate keeping track of those Allen keys to swap out accessories so I’m a big fan that more and more OMT’s are offering tool-free accessory changes. To change blades on the X2 you flip the top lever and rotate it in the unlock direction, insert the new accessory and lock it in place.
Rockwell takes it one step further with their Hyperlock design delivering “one ton of clamping force”. I’ve found that some OMT’s (like my Dremel) have a hard time holding onto the blade especially when I’m cutting through dense material. The Hyperlock clamp seems very secure so I’m hopeful that won’t be a problem.


3.0 Amp Motor
Previously only Bosch and Ridgid offer a 3.0 amp OMT (unless I missed one?). I was glad to see Rockwell upgrade the motor to 3.0 amps compared to the prior generation’s 2.3 amp motor.


Universal Fit Accessories
I’ve gathered quite a collection of OMT accessories from Bosch, SKIL, Ridgid, Rockwell, Dremel and Imperial Blades to name a few. Rockwell’s new X2 is compatible with just about all competitors’ accessories. However, depending on the tool interface they may not be as easy to use.
Plus, Rockwell Universal Fit accessories are designed to fit on any multi-tool you already own.
The X2 comes with 8 typical accessories for cutting, sanding, scraping and grinding. Rockwell also includes another accessory called the Sonishear Scissor attachment which handles materials up to 5/16″ thick.

Hardcase
Rockwell has a new case for the X2 for storing the tool and accessories. It’s compact, waterproof and features two storage areas on top for easy access.


Specifications
For details on the new Sonicrafter X2 and Rockwells other new OMT offerings, check out the Rockwell site.
Sonicrafter X2 (RK5140, $149)
- The most powerful and fastest cutting Sonicrafter
- 3.0 amp motor (compared to previous model’s 2.3 amp motor)
- Hyperlock tool-free (quick-release) system
- Constant speed control, which electronically maintains speed-of-cut under load.
- Variable-speed dial for precise control
- Oscillations per minute (OPM): 11,000-20,000
- Oscillating angle (degrees): 3.2”
- Weight: 3.30 lbs.
- Cord length: 10 ft.
- Nine (9) Universal Fit accessories include (1) 1-3/8” bi-metal end-cut blade, (1) 3-1/8” HSS semicircle saw blade, (1) rigid scraper blade, (1) sanding pad, (3) sanding sheets, (1) carbide semicircle (grout) blade and (1) Sonishear. Plus hard case.
- Warranty: 2 yrs.
Project Rewards: Before I launch into this review, I wanted to make sure everyone knew about the awesome new items in our Project Rewards center. Check it out for a chance to win stuff like a Bosch 12v drill/driver, a Ridgid pneumatic JobMax, a Kwikset handle set, a Martha Stewart paint set and more! All you have to do is register for a free account to start earning Project Points that you can use to bid on these sweet prizes. Check out how it works here.
I got my first look at the new DeWalt 12v Max Pivoting Reciprocating Saw (DSC310S1) back in early February of this year, and I thought, “Wow. It looks like the Porter Cable Clamp Saw (that was introduced in 2010).”


Indeed, most of the specifications are very similar. The DeWalt offers a 0-2,700 strokes per minute (SPM) with a stroke length of 9/16″. Compare that with Porter Cable’s 0-3,000 spm and 5/8″ stroke length. Both feature a 3-position pivoting handle, safety lock, variable speed trigger, bla bla bla. Despite all that, I like the DeWalt saw better, and here’s why.


Runtime
In a head-to-head runtime challenge, the DeWalt Pivoting Reciprocating Saw outperformed the Porter Cable Clamp Saw by almost 25%! Using zip-ties and fresh batteries, I ran both saws until they quit. The DeWalt saw ran for 22:01 min. and the Porter Cable ran for 16:46 min. That’s important to me when I’ve wedged myself in an attic trying to cut ridiculously large 6″ PVC for my dust management system.

Battery
These results make even more sense when you compare the batteries. Even though both saws work off the 12v platform, DeWalt provides a 1.5 amp hour (Ah) battery while PC provides a 1.3Ah battery. I still can’t understand why PC refuses to upgrade their batteries when it’s obvious that they are sacrificing performance.


In the power tool world, size, weight and runtime are usually the deciding factors, and for me, runtime is king. Bring on the brushless motors and the 4.0 Ah batteries because I hate going back to the charger.

