
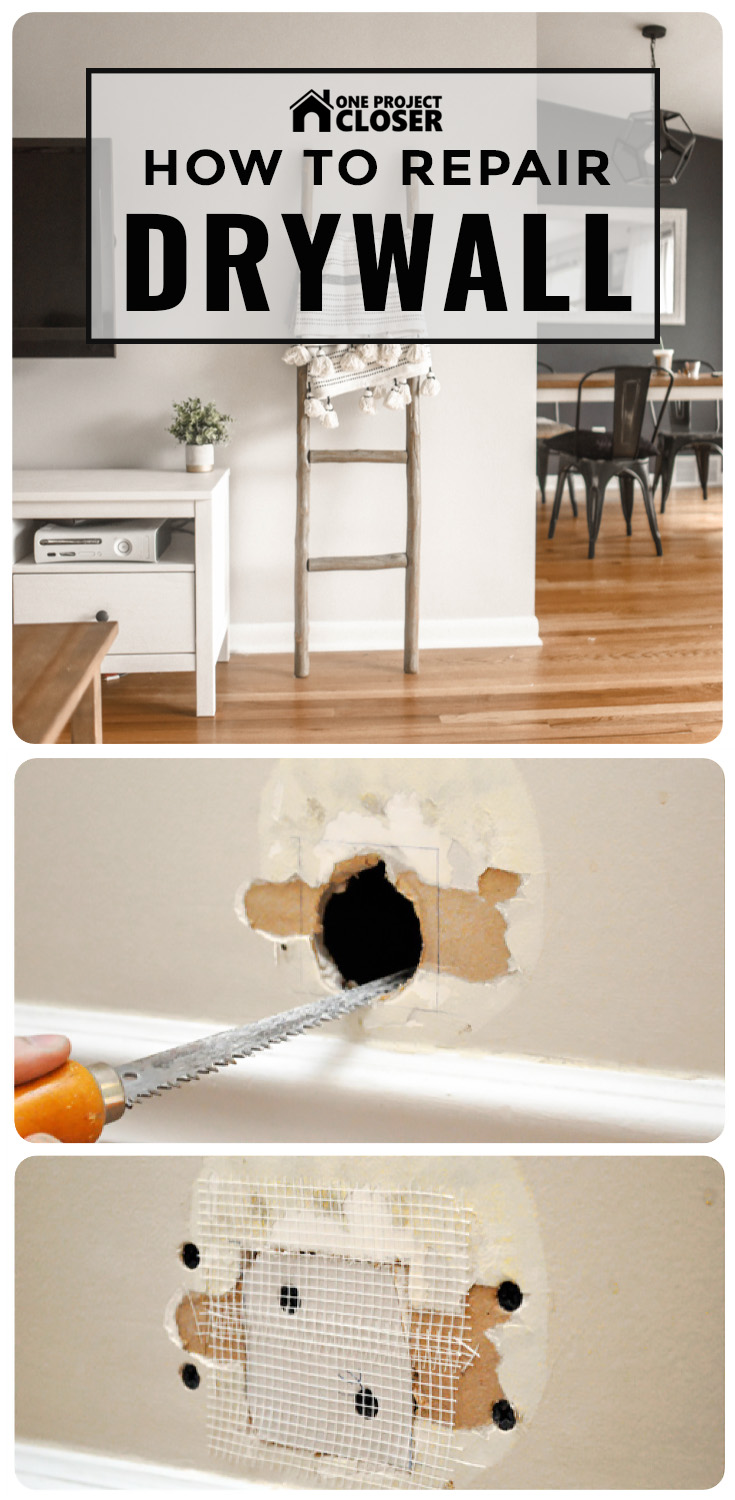
This is a great tutorial that I put together in March of 2012 on How to Repair a Medium-Size Hole in Drywall, and you can find this along with other top-notch articles in the Best of OPC section found in the right sidebar. If you read through the comments, you’ll find some alternative drywall repair suggestions, and some of them are valid options. However, the method I describe here is tried-and-true, and it results in a flawless, durable patch every time. Furthermore, a number of drywall contractors confirm that this is how they tackle a medium sized repair.
Repairing drywall is a great do-it-yourselfer task because tools and materials are cheap, and there’s very little risk (to you or the house). Plus, if you can master the repair, it’s a skill that will serve you well no matter if you own or rent. So before you call the local handyman next time, give yourself a chance to tackle this basic, home improvement project.

Materials List
- Drywall (see below)
- Mesh tape (see below)
- Setting compound (see below)
- Backer boards (see below)
- 1-1/4″ Drywall screws
Drywall: Also called sheet rock or gypsum board, drywall is available in several sizes and thicknesses. Purchase a piece bigger than the hole because you’ll be squaring it out (and making it slightly larger). Home improvement centers often sell 2 x 2′ sections which are great for making repairs. Drywall is commonly available in 1/4″, 1/2″, 3/8″, 5/8″ and 3/4″. Most interior walls have 1/2″ drywall, and ceilings are typically 1/2″ or 5/8.” The thickness of the new piece should match the existing drywall.
Mesh tape: I used a fiberglass mesh tape for this repair. Paper tape is another alternative, and it results in a stronger joint. If you expect any sort of movement or stress on the joint, paper tape will better resist cracks. If you use mesh tape, I recommend avoiding the pre-mixed joint compound (more on that next).
Setting Compound: Setting compound (or hot mud) is a powder that comes in a bag and needs to be mixed with water. Unlike joint compound which dries through evaporation, setting compound dries through a chemical reaction, shrinks very little and dries very hard. Setting compound is differentiated by drying time (in minutes), and you’ll find 5, 20, 45, 90, etc. Setting compound is nice because you’re able to apply a second coat without waiting too long. I purchased an easy-sand, 5 minute compound. If you’re a novice to patching drywall, go with a longer drying time.

Backer Boards: Repairing a medium-sized hole in drywall calls for adding a new piece of drywall. To secure this new piece, you’ll need some sort of backer boards, and I used small pieces of 1/4″ plywood.
Tools
- Utility knife
- Drywall saw
- 6″ Drywall knife (pictured)
- Drill / driver
- 100 grit Sandpaper

Step 1: Square the Hole
This is the hole right by my front door. I’d guess the previous owner opened to door too hard, and instead of repairing the damage, covered it with a plastic wall bumper. Cutting a circular (or other oddly shaped) piece of drywall is tedious. Instead, I like to widen the hole into a square or rectangle.

I recommend scoring the edges with a utility knife before you start sawing.


Step 2: Secure the Backer Board
This is a medium-sized hole, and it’s impossible to simply fill the void with compound. I need to add a new piece of drywall, and to fasten the drywall, I need some sort of backing or furring strip. To accomplish this, I slide a piece of 1/4″ plywood into the hole.

Carefully, I start a drywall screw that allows me to easily hold the plywood across the opening.

Next, I put in four drywall screws to hold my backer in place.

Screws should be countersunk just below the surface of the drywall.


Alternate Method
It just so happens that I have a second hole in my basement. For this hole, there is a stud nearby so I cut the drywall to expose half the stud. This gives me a nice nailing surface of the left side. Now I just secure my backer board to the right side.


Step 3: Cut a New Piece of Drywall
Use your utility knife and/or drywall saw to cut a new piece of drywall that fits into the hole.

Step 4: Cover the Joints with Tape
I covered the entire new piece of drywall and all the edges with mesh tape. Often you’ll see people cover the screw heads too (which is fine but I didn’t).
Step 5: Mix Compound and Apply First Coat
It doesn’t take much compound to cover a hole like this. I mixed a little powder and water until the compound had a thick, “mashed-potato” consistency. This is important because if the compound is too wet, it’ll result in a poor bond. Sloppy mud is also a pain to work. Keep adding powder (or water) as necessary until your satisfied.
Using the 6″ drywall knife, I applied the first coat. Make sure you embed all the mesh tape, and try to eliminate any air pockets.


Step 6: Second Coat
While the first coat dried, I mixed up another small batch of compound. I didn’t bother to sand in between the first and second coat, using my knife to check for any high points. If you’re really good at patching, you can finish everything off in two coats. I fully expected to need a third coat. After the second coat dried, I used 100 grit sandpaper to feather the edges. The goal is to create a seamless transition so you’ll never know the wall was damaged.

Step 7: Final Coat
When you apply the final coat, try to make it as smooth as possible. It’ll save you from having do a lot of sanding.

Step 8: Sand Smooth
Feather all the edges by sanding them smooth, and give the rest of the patch a once-over to eliminate any dimples or ridges. Feel everything with your hand to make sure it’s all even.

Step 9: Prime
It’s really important to prime your drywall repair because compound will absorb paint differently, and even if you did a good patch job, without primer it’ll be obvious.

Step 10: Paint
We keep a little leftover paint for each room for just this purpose. I like to roll the paint because I can notice brush strokes, and again that’s a giveaway that you patched the drywall. Rolling the paint gives it the same texture as the rest of the wall.
If you enjoyed this project, why don’t you check out the other home improvement how-tos available in the Project Guides section.
I’m excited to let you know that today’s Pro-Follow is the work of a new contractor named Chuck Thompson. Chuck is the owner of County Comfort LLC and an experienced HVAC specialist. Look for his information to appear on our Meet the Pros page soon and more Pro-Follows to come. Chuck received a service call that a homeowner’s air conditioning wasn’t working, and he let me shadow him on the job.
The Symptoms
A homeowner’s A/C can quit for several different reasons. In this case, the homeowners realized that there wasn’t any cold air circulating, and on further inspection, they found the indoor air coil wasn’t even cold. This is the information Chuck had when he arrived.


Diagnosing the Problem
Chuck performed a few diagnostics to determine what the problem was. Here are the steps he took (most of which homeowner’s can do too).
Step 1: Check the Air Filter
Chuck started with the easiest diagnostic of examining the air filter. The homeowners was using a 3-month filter, and it was almost due to be changed. As you may expect, it was quite dirty which hampers air flow causing the unit to work even harder to regulate the temperature.
Instead of trusting the manufacturer’s instructions, Chuck suggests visually inspecting the filter periodically or simply changing it monthly.
Pro-Tip: Inexpensive filters, changed monthly work just fine to protect your HVAC equipment. Consider upgrading to pleated filter to better remove allergens.
Step 2: Check HVAC Fuse
Since the outdoor unit was attempting to cool air, it was unlikely that the fuse had gone bad. Even so, Chuck grabbed his multimeter and checked the fuse and the fuse box.


Chuck checked the fuse by setting the multimeter to the ohm function and touching the probes to either side of the fuse. A good fuse will read zero (or about that) resistance, and a bad fuse will read infinity or OL on some multimeters. He did the same for the fuse box and found both were functional.

Step 3: Check Freon Levels
The next diagnostic Chuck performed was a coolant pressure check to look for any leaks. He connected a pressure gauge to the high-pressure and low-pressure lines.
Pro-Talk: The small diameter line is called the high-pressure or liquid line, and the large diameter, insulated line is called the low-pressure or suction line.

Next, he compared the readings to the pressure charging table found on the side of the unit.

Chuck found that all the readings were within the normal range.

Step 4: Check High-Pressure Line Temperature
The next step was to check the high-pressure line temperature and compare that to another chart. He placed his temperature probe along the high-pressure line and wrapped it with an insulated tape. Chuck found the temperature was within range too.

Pro-Tip: The new freon, R410A, is actually composed of three different types of freon.
Step 5: Check Air Temperature Change
Back inside, Chuck measured the temperature of the air after the coil and the temperature of the air in the return, and ideally the difference should be 18° (16° – 20° is acceptable). He found this temperature difference was 17°.
Pro-Tip: You can check these temperatures with a simple, digital cooking thermometer.


Step 6: Check HVAC Drain Line
The last thing Chuck examined was the HVAC drain line to make sure it wasn’t clogged and that the trap wasn’t too large (inhibiting drainage). While a little nasty, he found it working properly.
Pro-Tip: During the winter months, water in the drain line can stagnate and create a blockage. That’s why it’s recommended to pour a little bleach through the line.
Pro-Tip: In some areas, an emergency drain line is required, and if you ever see your HVAC draining through the emergency line, you know there’s a problem with the primary drain.
Pro-Tip: Some drain lines feature a float that will automatically shut off the unit should the drain line get backed up.

The Problem and Solution
Ultimately, the dirty air filter was the culprit, and after changing it out, the HVAC system functioned properly. It doesn’t seem like such a mundane thing could be the source of the problem, and hopefully this is a reminder of how important simple maintenance can be.
OnTime Air Filters is a subscription service that delivers replacement air filters. All you have to do is pick your air filter type and how often you’d like them to ship. When OnTime sends a new filter, that signals it’s time to replace the old one. Find out more at the OnTime Air Filters website.
The saga of our front door continues! I mentioned yesterday that our storm door was in our sites for repainting. Well another problem we faced was the old storm door closer had broken. As you’ll see in the pictures, where it was anchored to the door jamb was in poor shape so it came as no surprise when the metal bracket broke. For this project, I tried something new. Since I was skeptical about the condition of the door jamb, I picked up some DAP Plastic Wood. It worked well, but I hit one snag along the way. Maybe you’ll see the problem before I point it out.
DAP Plastic Wood is a wood filler that acts like real wood after it hardens. It can be sanded, stained, cut, drilled, and painted just like real wood. Most importantly, it can hold screws like real wood too.

Our door closer is mounted at the top of our door, and I’m actually surprised it held on for as long as it did. Check out these pictures to see why.

Not all the screws are visible in this picture but I counted 11 all together (securing the metal plate and the closer bracket). For that reason I wasn’t sure what to expect when I pulled the metal plate off.


Using my Dremel MultiMax, I cut away some of the questionable wood. The surface layer sort of flaked. Fortunately, I quickly found solid wood underneath.

Next, I borrowed a tip from Peter over at Dover Projects and put in a few screws hoping they’d provide the wood filler with some extra grip. Has anybody else done this?

The instructions for DAP Plastic Wood state that you should apply it in thin layers, and let each layer dry before adding another. I didn’t think my door jamb needed that much so I smeared a big glob in place.

I was wrong. I’ve learned that if you apply too much filler at one time, it will take days to dry. Even after I thought it had hardened and attempted to mount the door closer, I quickly realized the error of my ways (because the bracket started sinking into the filler!). I gave it some more time and cut out the small, damaged section. Here we are on attempt numero dos after drying and sanding.

After some painting, I installed the new door closer. You might notice that the storm door has some fresh paint too. More on that tomorrow.


I’m pretty pleased with how it turned out. I still need to perfect my wood filler technique, but that’s mostly because I can be a bit of a perfectionist.
Drip… Drip… Drip… It really can drive you crazy!
Fixing a leaky kitchen faucet can seem like a big job, but even if you are not much of a plumber, there are some simple things you can try before calling the cavalry. Replacing a faucet can cost upwards of $250, and a simple repair might be all that’s needed to return you faucet to like-new condition.
The most common cause for small leaks is mineral deposits building up over time inside the faucet housing. A simple cleaning is the right fix. This post shares the steps to disassemble a kitchen faucet, give it a good cleaning, and put it back together. We’ve got a Delta brand kitchen faucet from about 6 years ago for the instructions, but these same steps with a few variations work on just about any modern faucet.

Steps to Fix a Leaky Faucet
Step 1: Shut off the water supply; drain excess water from the lines
Start by shutting off the water supply and turning on the faucet to drain any excess water from the lines.
Step 2: Find and remove the set screw
Delta hides a little set screw behind the blue/red button on the lever handle. Gently pull off the button with a small screwdriver, and remove the set screw with an Allen wrench. The handle lifts up and off.


Step 3: Remove the Chrome Handle
See that? That’s called a V-Ring, and the stick poking through is part of the valve assembly. All of this is held in place by the chrome cap with the small grooves around the perimeter. Use a large wrench or pliers to remove the cap- preferably something without grooves (aka smooth). Try not to damage or scuff the cap.


Step 4: Remove Inner Components
Pull up on the V-Ring, and it will lift straight out. Check out the notches on the sides for alignment. The ball valve also lifts straight out, and has a small knob used to align the ball valve.


Step 5: Remove the rubber seals and springs
Beneath the V-Ring and ball valve are three holes, two of which are occupied by small springs and rubber seals. Hot and cold water enter the faucet through the left and right holes. The third hole leads to the spout. Using a small screwdriver, gently remove the rubber seals and springs behind them.


Step 6: Scrub all components. Replace components that are too worn
Take all the parts and scrub them in warm water. Remove any build-up and water deposits. Be sure to check around the rubber seals, and both sides of the V-Ring. Clean up the hub assembly (rest of the faucet) including the cap threads. Sometimes it’s necessary to replace the rubber seals and springs. Examine the ball valve for any defects too. Replacement parts can be found at most Big-Box stores.
Step 7: Reassemble inner components. Take care on alignment
Begin reassembling the faucet by working in reverse order. Make sure to align the long hole in the ball valve with the small knob. Likewise, align the V-Ring with the small notch.

Step 8: Reassemble outer components
Finish assembling your faucet and turn on the water. Presto! Our faucet is working, and hopefully yours is too.
The long holiday weekend gave me a chance to tackle a project that’s been on my to-do list all year. This past winter, we had a particularly windy snowstorm that ripped one of the decorative shutters off the front of our house. Thankfully that’s all it ripped off- no shingles or doors. I’d guess the shutters are original to the house so I’m a little surprised that they’ve lasted this long. Here’s a picture of the damage and the lonely remaining shutter.

Step 1: Purchase a Matching Shutter
I ran off to Lowes and picked up a similar black louvered style shutter. You’ll notice the awesome flower bed beside the walkway. It’s the same one I weeded a couple weeks back, and I’m happy to report the flowers are still alive. There haven’t been any weeds so I’d say the landscape fabric is doing the trick.

The shutters are only available in pairs, and I couldn’t find an exact match. Hopefully no one looks too close since I wasn’t prepared to replace all the shutters on my house. The most obvious difference is the new shutter has more of a semi-gloss sheen (and it isn’t broken like the old one).

Step 2: Remove Old Clips and Clean the Area
The project began with setting up the ladder and removing the old clips. I’ve got a Purdy painters tool and it’s amazing how often I use it. If you don’t have a painters tool, pick one up because they’re crazy-helpful. I used mine to remove some liquid nail and help pull the nails securing the metal clips. You might notice what looks like tape, but it’s actually plastic strips. I’m not sure why the plastic was there, but these anchors were holding strong.


Step 3: Check Holes and Re-drill as Necessary for the New Shutter
The new shutters required a 1/4″ diameter hole, and I decided to make the existing holes larger rather than drill new ones. I grabbed a masonry bit and my Porter Cable hammer drill. Marking the right depth with tape is a good trick to remember. It’s an easy way to ensure you don’t drill too deep or too shallow. Shutters longer than 55″ should have six anchors all together.


Step 5: Drill the Shutter and Add Glue
Next, I went about measuring the right spot to drill through the shutter. This was tricky because the holes on the shutter had to align with the holes in the mortar and hold the shutter in the appropriate location. I double checked my measurements a couple of times, and it payed off because all the holes lined up perfectly.

I added two thick beads of adhesive along the length of the shutter for good measure. I don’t want to be replacing this shutter the next time a heavy wind blows through.

Step 6: Anchor the Shutter to the Exterior Wall
Back up on the ladder, I got the shutter in place and drove the anchors through. It was a glorious moment when everything went according to plan.


I taped all the spare hardware to the extra shutter and stored it in the basement. I’m sure I’ll need it sooner or later.


We recently installed a Frigidaire Gallery wall oven (model# FGEW3065KFA) from AJ Madison as part of our ongoing kitchen remodel (review of the oven itself is forthcoming). While branded Frigidaire, this model is actually manufactured by Electrolux, according to the manual.
We used the oven 3-4 times for baking, and then ran the self cleaning cycle to make sure everything was in order, and to clean up some of the mess from baking.
Immediately after running the self clean, the oven stopped working properly. Pre-heating the oven to 350 degrees took as long as two hours, and as soon as you opened the door, the temperature would drop 40-50 degrees and take another half hour to return to normal. This was a real bummer since it occurred just seven days before Christmas Eve when we were expecting the whole family for dinner!
We called Frigidaire’s warranty hotline and they directed us to three local repair shops. Of them, Metro Factory Service was the most helpful. Metro sent a guy out within 24 hours to take a look. He surmised the problem immediately: a blown thermal fuse in the back of the oven… or it could have been a relay in the control panel, but since he could hear the relays firing, the fuse was the most likely culprit.

He ordered a new part from Frigidaire/Electrolux and scheduled a follow-up for the morning of Christmas Eve (great service from Metro, by the way!!). It turns out that the part he ordered wasn’t actually a fuse, it was a breaker and could have been reset just by pushing the button on it. The manual wasn’t clear on that point (he said many of them aren’t). The breaker is located under the metal housing in the very back of the oven. The repair man decided to replace the switch with the new one in case the other was too sensitive.
Remember, always turn power off at the main breaker panel when working on an appliance. 220 volts can be lethal.
He replaced the switch, reset it, flipped on the main breaker, and a working oven was restored.
In case you’re wondering why the oven heated up slowly as opposed to not at all, the reason is that the thermal breaker sits on only one leg of the 220v line. When it blows, you still have 110 volts coming in from the other half of the circuit, but this isn’t enough power to heat the oven up to really high temperatures. The 110V line that remains also powers the front panel and the circulating fan, so the oven “appears” to be working fine, even though half of the heating capacity is shed. We were somewhat surprised that Electrolux didn’t include some type of error code on the panel when this happens.
Here’s a close up shot of the switch in the back of the oven. (Sorry, angles weren’t good for a great picture here).

And here’s a real close up of the switch itself.

Hopefully this helps someone out there on the ‘net one day soon. I searched all over for an answer to the problem and couldn’t find a clear, concise one anywhere. If you end up in this situation, you can indeed turn off the breaker, pull the oven out, and press the button to reset it. Just be careful (and, as always, follow our advice at your own risk!)
 I love this week’s Before and After because it shows us a really dramatic deck transformation. Michael from Better D.I.Y. had an old, rotting deck. It was dangerous and liable of collapsing at any time. Michael took the time to research decks and rebuilt it from the ground up with a stunning result.
For being this week’s Before and After winner, Michael gets a $50 gift card to Lowes, Home Depot, or Amazon. Plus, we will also make a $100 donation to Habitat for Humanity in Michael’s honor. Check out this great story and this week’s Habitat Quick Fact.
A Better D.I.Y. Deck
This past spring my wife and I tore down the original deck that was attached to our house. It was 8×10, large enough to fit a table and chairs but no grill and not much else. While this isn’t a reason to tear down a deck, the rotting wood, untreated lumber and Carpenter Ant infestation really put the proverbial nail in the coffin (or in this case – the deck).
It was really bad. I am thankful that the person that previously built it did not attach it to the house for many reasons.
- They used untreated wood and sat it directly on the ground, thus creating a feeding area within easy reach of the wood eating insects.
- Supports (if you can call them that) sat directly on the ground, not below the frost line (which would be fine for a free standing deck, but not when you use wood not rated for ground contact)..
- After the Carpenter Ants ate through the main supports (2×12), they sistered some 1×6 blocks on the bottom of the supports. Which provides no support, but gave them an area to paint and “look” nice.
- I was really scared that it was going to just fall apart that I never let anyone on it except myself. The only thing holding it together was the 2×12 decking boards.
Here are some pictures of deck and destruction. That lean is not supposed to be there. If you look in the background, you can see that the insects have gotten to our fence as well (a future project).
Before Pictures and Deconstruction.

My philosophy is to build it right so you only have to build it once. This means going above and beyond “minimum code”. I really dislike the idea of attaching the deck to the house through the use of a ledger board, but because of the concrete pad (2” thick) attached to my house, it will be more trouble and work to build it freestanding. If I cut up the concrete, then I could create a problem with water in the future which the concrete holds back. If I make a hole large enough in the concrete to put my concrete form (12” diameter), then water may get around the seam where the old concrete meets the new form; thus creating a possibility of frost heaving or other problems in the future.
That leaves only 1 choice of ledger board. After reading this article entitled “Don’t Build Decks that Rot” , it gave me a great idea of using composite decking as blocks for my ledger board. This would create a drainage point as well as keeping the ledger board away from the house by about an inch but still providing the structural strength of a ledger board. It also gave me the idea of using a roofing membrane on every joist and at the post connection to prolong the life of my wood structure.
I also downloaded quite a bit on code for deck building. This includes span charts, joist sizing, beam sizing, etc… Can’t forget about the StrongTie handout for deck building connections that has all of the connections with pictures and uses.
AWC Code
Multi-Level Decks
Strong-Tie Deck Fasteners
The Lowe’s Deck Designer is GREAT for an overview and parts list. It allows you to do some great designs for decks with multi-levels and then shows you what your deck will look like with beams and everything. It was great and saved me a lot of time. Of course I tweaked the design a little bit and played with different joist sizes to see if the Live and Dead Load changes.
Lowe’s Deck Designer (Need Account) .
We removed the electrical and water spigot until we have reinstalled the ledger board.
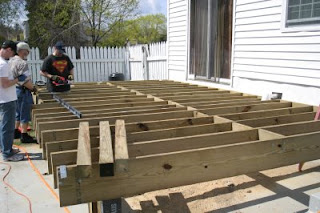
We removed the vinyl siding and cedar siding and then the sheathing After that, I saw the inevitable it seems for my projects. Carpenter ants decided to eat out some of my rim joist. I prayed that they didn’t cause too much damage. Luckily they only ate out about a 2 foot section of the rim board. They never touched any floor joist or even the sill plate.

I removed 6 feet of the rim board and replaced it with a PT board. I used (3) 3/8” Lag Screws per floor joist to secure it. It shouldn’t go anywhere J. I then put some Ice & Water Shield over the top of that.

We dug our 3 sonotube holes with a post hole digger 4 feet deep, 12″ wide and laid 6 inches in the holes. We put in our sonotubes and used 5000 psi concrete. We waited a couple of hours for the concrete to start curing before we could put our ½” x 12” anchor bolt into the form.


For those that are interested in soup-to-nuts information. Here is the information needed to submit for a permit to add the deck to the house. I have removed all information distinguishing location and address, but you get the idea.
You need quite a bit of information. Then there are the fees. My city charges .01 times the cost of what you are building. In the case of my deck, the cost of materials is $2500, so it is a $25 permit fee plus a standard $25 application fee.
We installed the first 2×12 where the ledger is to be installed as a spacer board to bring the wood up to the same level as where the vinyl siding currently attaches. On top of that we installed ice and water shield. We went up about 12-18”, even behind the vinyl siding and down about 12” below the bottom of the sill plate just to keep things tight. Don’t see a need to cut off the bottom, it will be behind the deck anyway.
On top of the ice and water shield we installed vinyl flashing. On top of that we installed composite decking spacers every 16” on-center.
Then we attached the ledger board. We used 5” LedgerLok’s in a staggered pattern.
I have never had to pull a permit for a deck before. I hadn’t realized that the first inspection was after digging your post holes…OOPS! Lucky for me, the inspector was VERY understanding and just made me dig down the side of one of the posts to verify depth. He approved my posts on Tuesday and so we are officially ready to go! The next inspection will be at the completion and then hopefully we get the Certificate of Completion!
This weekend, it actually started to look like a deck!!


Next, I ran a string to a batter board so that I could figure out the height of my post. I leveled the string with a string level and then measured down 22 3/8” which was the actual distance of my 2×12 joist and 6×12 beam added together. The first 2 posts were almost the same at 5 5/8”.
I originally was going to go with the composite decking, but decided upon cedar. I found some at the local big box store for $1.22/linear foot! Nicer looking than composite, safer than Pressure Treated and naturally insect repellant. Of course, that means maintenance, but sealing the deck every year is not that difficult. I can roll it on relatively easily.
I refuse to use anything but vinyl railings because painting every spindle is ridiculously time consuming…and pressure treated railings are more likely to splinter and I don’t want to worry about that with children…even if they don’t use Arsenic/Formaldehyde anymore.
We cut the 6×6 posts and attach them to the post bases. Then we stack the first half of the beam and cut it to length (about 12 feet long). Then the 2nd to be stacked on top of that one. Then we use ½” x 12″ lag bolts to tie the beam together. Then we do the same for the 2nd half of the deck at about 7 feet long. We ice and water shield the posts and attach the beams to the posts. We then cut 2×6 boards to keep the beam from rocking front to back. The beam is SOLID!
We attach the joist hangers at 16” OC (on center) along the ledger board and hang the joists and cut them down to size We attach our Rim Board with ¼” x 3” lag screws. We install the railing posts with 2-Deck Post Ties per post. We install ice and water shield on top of our joists, square up the stringers and block the sides of our posts to reinforce the connection. The final thing to do before we were finished framing was to install our dryer vent. It is located in the middle of the ledger board, so we had to use a 4″ hole saw to cut a hole so that we would still have our dryer vent.

We finished half of the decking boards. We started in the middle of the deck. You are probably wondering why. Well, we were going to start on one of the ends, but we couldn’t tell if the board was straight. I am more worried about the board looking straight to the eye, than of it being square.
So, we started in the middle at the middle post and it looked perfectly straight. The problem we ran into is because it is wood, as it dries it warps, bends, etc. We started with the straightest board we could find. Then we used clamps to persuade the other boards to stay straight. We had to do some minimal shimming to make the boards even.
The problem with the clamp is that we started overtightening it and causing our spacers (8d nails) to cause impressions on the sides of our cedar decking. We used some laminate flooring spacers which helped, but they kept getting stuck. We finished about 5 rows in about 5 hours…not good progress at all!
So, I decided the clamps had to go and since they are 4 foot clamps, we were going to reach their limit very soon. I use ratchet straps in the truck all the time to tie things down, so I figured it was worth a shot. I set up 4 straps across the length of the deck and we ratcheted the boards down and it worked like a charm. Plus, we didn’t have to move the straps which moved things along quite nicely.
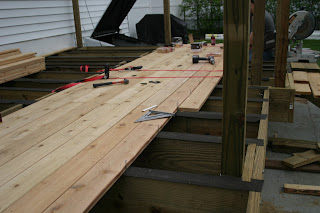

We finally completed the decking. This totally transformed the deck into a new beast. It made all of the previous pain worth it. We finally had a 260 sq. ft platform to walk on. After finishing the decking, we moved to adjusting the stairs.
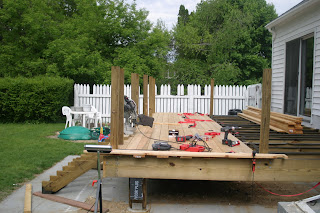

Railings:
I purchased 100″ vinyl post sleeves because I knew that I would be able to cut them in half and therefore buy half as many. We cut them all at 43″ so they would all be the same height. Then we started unpacking the railings. Since the railings had been out in the rain the past couple of weeks, the labels were pretty much stuck on there. We spent an hour with goo gone removing the labels. We didn’t get them perfect because we didn’t want to be stuck doing that all day. We then started the first railing closest to the house so that we could make mistakes and they wouldn’t be as noticeable. Things went pretty smoothly from there and by 1PM we were finished the railings on the main part of the deck. We took a break for lunch.
Then we started the stair railings. Since I am obsessive about perfection, it took us about 5 hours to install the 2 stair railings…constantly making adjustments. Since this is finish carpentry, it takes me longer. This is the part that people will see no matter how much time and energy you spent on the subframe. If it looks funny, it will haunt me the rest of my life.
After completing the railings, I was happy with the deck.
Besides being safer since we have little ones; the finish height of the deck in some areas is 32″ so code says we need to have railings (anything over 30″). Since it was a holiday weekend, I waited until Tuesday to call the inspector to tell him I am ready for the final inspection. He comes by while I am at work and leaves. Tanya finds the paper inside the door.
It says, “failed”. The 2 reasons are:
- Deck not adequately attached. Needs to be attached every 3-4′.
- Stairs not uniform.
Ok…let me talk about #1. The ledger is attached every 16″ with (4) 5″ LedgerLoks as all of you know from my previous post. I e-mail him and asked him to clarify what he meant. He responds “Due to the limited angle for viewing I was unable to determine your means of fastening to the house.” And that he would check upon reinspection of the stairs. So…because you couldn’t see how the deck was fastened to the house, you failed it!!
Let me talk about #2. I knew the stairs were not uniform, but they are only off by 1″. I have walked them numerous times and I don’t see a problem. But I looked up the code and it says that the smallest rise to the highest rise shall be maximum of 3/8″ difference. Well…they are definitely not that. And I guess he needed to come up with something wrong with the deck to justify his position (just a little bitter*).
But there are only 4 stairs and to me they don’t feel that much off. But I don’t make the rules and when you pull a permit you are at the mercy of the inspector.But this whole thing could have been avoided (#1 and #2) by having a framing inspection. The most important part of the deck is the framing.
He would be able to:
- Measure the spacing of the joists.
- The attachment of the ledger to the house.
- Fastening of joists to ledger and to beam.
- Beam connection.
- Stair uniformity.
So…although they aren’t going to change the way things are done, I think they would have much safer decks if they did a framing inspection.
Well…this past weekend we spent quite a few hours fixing the stairs. We chiseled the concrete about 3 inches by 5 feet so we could sink the stairs a little further. They are now only .5″ off. Hopefully he will say it is ok.
Well, I purchased the 2009 International Residential Code (IRC) book. It costs $90, but I probably could have avoided this by having the code book easily accessible. It will be useful in the future. And since my city is still using the 2000 IRC book, I think I should be safe with whatever I do.

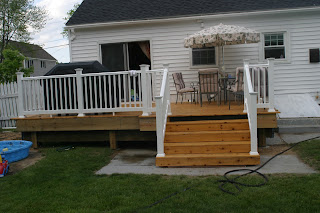
HERE Is the Completed Masterpiece (before the lattice work was installed). My wife and I love it. My wife, daughter and son use it daily in the summer.


Thanks from One Project Closer!
Michael, this is a really great story- full of information and how-to! Building a deck is a great project and re-boarding my deck is on the to-do list (maybe next summer).
Habitat for Humanity Quick Fact
From the HopeBuilder Page:
HopeBuiders are the foundation of Habitat for Humanity’s housing ministry. Through monthly donations, HopeBuilders provide Habitat with a consistent and reliable source of funding that allows us to plan ahead. When you join Habitat for Humanity’s HopeBuilders, you will join a special group of people reaching out each month to provide affordable housing for families around the world. Together, we can eradicate poverty housing and give families decent shelter and the hope of a better life.
Click here to learn more about the HopeBuilders.
How to Enter Your Own Before and After
Want to win $50 and help a good cause? Send your entry to: beforeandafter@oneprojectcloser.com.
Causes and Fix for Frozen Inside Air Handler Coils (Air Conditioning Unit)
July 21, 2010 | by Fred (email) |There’s really nothing worse on a hot, humid Summer day than to have your central air conditioner give out. Unfortunately, that’s just what happened to us about three weeks ago right after our hardwood flooring installation. The temperature in the house started climbing steadily beginning around 6:00pm, rising from a relatively cool 73 degrees up into the mid-80s.
While I’m not an air conditioner tech, I can check the basics of an air conditioning system (air filter, blown fuses, ice build-up, etc). The skill comes in handy when you contact an HVAC technician. It’s much better to be able to tell them, “I’ve got ice built up on the inside unit” than to simply say, “It’s starting to get hot in the house.” They’ll be able to give you some potential causes of the problem and expected costs for repair.
So I started checking what I knew to check. Step one was to pull out the air filter, which was soaking wet and was stuck on something inside the unit. In fact, it was so stuck it wouldn’t come free and I thought continuing to struggle with it might rip it apart. I decided to open the upper access panel that houses the interior air coil and here’s what I saw. Problem identified.

We’re no stranger to frozen outdoor air conditioner compressors. In the Winter, it’s not uncommon for an outside compressor unit to freeze up if the defrost cycle on the unit is set to run too infrequently. Freeze-up can also take place if freezing rain or snow accumulates on the fan blades, or is allowed to sit on the exterior of the unit. Fixing an outdoor frozen heat pump can be as easy as setting the defrost cycle to run a little more frequently, which did the trick for us.
Of course, in the Summer the situation is reversed. The system extracts heat from the inside of the house and moves it outside. In this scenario, the air coils inside the interior air handler get very cold, with evaporated freon moving through them. Air passes over these coils and most of the time, you get cool air conditioning in your home.
Cause of Ice Frozen Air Conditioner Air Handler
So what causes an interior air handler to freeze up instead of operating normally?
There are two common causes for freeze-up, and one is less expensive to fix than the other. The first cause is a freon leak in the system. When a freon leak is present, the coils can cool unevenly with some parts of the coil staying extremely cold for a long time. This leads to build-up of ice on the coil from the moisture extracted from humid air passing over it. Once the ice starts to build up, it easily persists because it acts as an insulator on the coil, preventing air from passing over the coil and warming it up.
The second cause is poor air flow over the coils and fins, usually caused by an extremely dirty air filter or dirt build up on the coils or fins. When air flow is restricted, the coils and fins become too cold leading to ice build up.
Since we had just finished that hardwood project, we figured the dust blown around in the house was probably the culprit, and at least worth checking before making a call to the technician.
How to Fix a Frozen Air Handler
The easiest way to melt the ice is to allow the fan to run without the air conditioning on for 24-48 hours. You must let ALL the ice melt before turning the A/C back on, otherwise the problem will quickly return.
Unfortunately, we were in the middle of a terrible heat wave and didn’t want to wait 24 hours for a solution. So we used the faster method: a hair dryer and two 500-watt halogen lights. The process took 2 hours to get the air handler completely dry.
Note: You should always turn off the breaker to the HVAC unit before working on it. Also, using a hair dryer and/or heat lights could be a fire risk if you aren’t careful. So be careful and do this at your own risk!
It is imperative that you don’t disturb or break the coils inside the unit. One broken coil will mean a much more expensive fix.

The unit dried:

We turned the unit back on and nearly instantly the cold air came rushing through the house.
In the three weeks since the event, we’ve had no recurrence. It looks like the air filter did the trick, saving an expensive HVAC technician call and confirming that we probably do not have a freon leak. Had the unit frozen back up, we would’ve called our local air conditioning contractor to come take a look.
Between six and twelve months ago, we poured four separate 250 sq. ft. quadrants of self-leveling cement (a.k.a. self-leveling mortar, or self-leveling underlayment) onto our basement concrete slab. We selected LevelQuik ES for the job and followed the instructions to the letter… Or so we thought…
Much to my dismay, last week I noticed that a small 3 foot x 8 foot area of the underlayment had an issue. The top 1/16″ of the self leveler was partially crumbling and delaminating from the surface. There was a significant amount of dust in the area and loose cement bits. The issue isn’t systematic across the whole floor. In fact, this section is in the most recent quadrant poured, while other areas over 12 months old are working out just perfectly. We’re getting ready to insulate the basement and soon after, lay Schluter Ditra and stone tile.

What Causes Self-leveler to Fail?
Before we started the project, we googled extensively for advice on using self leveler on a concrete slab, unfortunately finding little. We’ve subsequently written a great deal about our own experience with self leveler (much of it at that link). Even though information was a bit sparse, we heard repeatedly from tile experts that you must follow subfloor preparation instructions, you must mix the self leveler to the consistency on the package, and you must follow application instructions. We did all that, so what caused the issue?
Unfortunately, we’re not sure. Perhaps one of the last batches of self leveler wasn’t completely mixed, or some contaminate got into the batch, or the water/powder ratio wasn’t quite right. Any of these could have caused the problem. We’re pretty sure the subfloor isn’t part of the problem, since the delamination is limited to the top 1/16″ layer.
Our Solution: Prime the Area with LevelQuik Primer
LevelQuik Primer is a latex-based primer designed to prepare a surface for pouring LevelQuik on top. We noticed in using this primer on other sections of the subfloor and existing SLU that it tends to bind up any loose dust on the LevelQuik and create a smoother surface. We applied full strength primer to the 24 square foot area and, for now, all is well. This solution seems to have worked. The surface layer appears to be stable, and we’ve noticed no further delamination.

Other Self Leveler Problems & Solutions
We’re lucky that this problem isn’t systematic across the floor, or all the way to the slab. If that were the case, the only solution would be to remove the SLU as much as possible, correct the issue (if it is subfloor related), and re-pour the area. Since we’ve got radiant heating wire in the way, that would prove very, very difficult.
For those of you out there considering this project, remember: subfloor preparation and following application instructions is absolutely essential.
What do you think? Ever had a problem with self-leveler, or looking for advice on working with the material? Leave a comment here, and don’t forget to use the site’s search function. There’s a lot of good information available.
All my recent indoor HVAC problems started with one little symptom. There was a tiny bit of water pooling in front of my furnace. If you have a similar problem, it doesn’t necessarily mean costly repairs, but you should act sooner than later.
Diagram of Indoor HVAC System
It’s important to understand the different parts of your HVAC system before you begin poking around. You don’t want to accidentally make any problems worse. Here’s a labeled picture mapping out the main parts, using my HVAC system as an example. Arrows indicated the direction of flow.

Air flows from the house into the air return. This air travels past burners (to heat air in colder months) and an indoor air-conditioning coil (to cool air during warmer months), then back out through duct-work to different parts of your home. My home features a gas furnace and has gas supply lines. Electric heaters won’t have these gas lines.
Water Pooling from HVAC
You can see in the picture a small pool of water on the concrete slab just in from of the furnace. It’s not much water but after removing the front access panels I could see more water leading all the way up to the indoor AC coil. I speculated that the leak was condensation that wasn’t making it out through the drainage pipe.
Fix a Clogged HVAC Drainage Pipe
Most HVAC issues are not really within the realm of most do-it-yourselfers and I strongly recommend hiring a contractor. Better yet, make a friend in the HVAC business. These are the steps I followed with the help of a buddy.
 Open up any access panels and check internal drainage lines. They are probably flexible tubing with plastic collars securing them in place. Makes sure all the lines are well-connected and feel around for any drips. If you don’t find anything amiss, you may have a clogged drainage pipe.
- Your drainage pipe is probably PVC. Setup a pan below and cut the line. Make a smooth, clean cut in a place that you can repair later. Straight-aways are best because you can glue a PVC sleeve around both sides restoring the line.
- Examine what (if anything) comes out. If water rushes out, the clog may be farther down. You can attempt to “snake” the line or swap it out. PVC is inexpensive making it easy to simply replace the rest of your drainage line.
- In my case, a small trickle of water came out, meaning the clog was further up the line. We used a bent coat hanger to poke around and dislodge the clog. Be very careful not to damage your coil. The coat hanger worked well and a lot of water poured out.
- I love using my flexible fiberscope and this was a perfect opportunity. I fed the scope in and looked around. We discovered a lot of rust! Small chunks were actually clogging the drainage line causing water to pool (and ultimately find another way out).
Indoor Air Conditioning Coil Drainage Pan
Your indoor air conditioning coil sits on an angled pan. This pan collects condensation and directs it to the drainage line. Gravity takes effect and the water goes about it’s merry way. Over time, my pan lost it’s angle allowing water to pool. It still drained but only when the water level got high enough. This went on long enough for my coil to rust and ultimately cause the clog.
What do you think? Ever work on your HVAC system?
