
We first ran this article in 2010. It provides detailed instructions for installing hardwood flooring over a wood substructure. It chronicles tutorials for each step of the process, derived from our installation of 3/4 inch solid, tongue-and-groove Brazilian Walnut hardwoods in our own home!
At the bottom, we provide links to posts on the tools we use and frequently recommend for hardwood installation. Below is one picture of the final product. Here’s the rest. This project was a lot of fun. We hope you enjoy the tutorial!

While each hardwood job has its differences and subtleties, this series covers many of the common challenges and pitfalls inherent in every hardwood installation, from leveling the subfloor to installing baseboard and shoe molding. Just follow the links in the steps below, and don’t worry – no spam here. This is just straight-up content!
We hope you enjoy the series as much as we enjoyed publishing it! We also hope it’s helpful to you in your project. Before we get started though, just a reminder that the content is provided without warranty, and as with everything on our site, use this information at your own risk. We always take care in describing the steps and precautions for a job–and hardwood is a relatively safe subject–but there is always the possibility we’ll omit something important.
Not Doing it Yourself?
Before we get started, if you aren’t doing this job yourself, we partner with Home Adviser for free quotes. They match homeowners with screened and approved local contractors who can get the job done right. Here’s the link:
Steps to Install a Hardwood Floor
(hover over the links to learn more about the article)
Step 1 : Planning Your Floor
Consider what subfloor material you have (plywood or OSB) and its width, which may influence the direction you choose to lay the hardwoods in the room – either perpendicular or parallel to the joist substructure. Note: for concrete slab installation, engineered lumber is a better choice than solid hardwoods. Hardwood installations are most stable when they are installed perpendicular to the joists; but if your subfloor is sufficient, a parallel installation is acceptable.
 Step 2: Preparing the Subfloor
Ensure the subfloor is sufficiently level for installation–there should be no rises and falls more than 3/16 over a 6 foot span. There are several ways to level an uneven subfloor for hardwoods.
For systemic problems, a good alternative to complete replacement is leveling the plywood or OSB subfloor using asphalt shingles. This method relies on shingles and an additional layer of plywood to get uniformity across the floor.
If a subfloor is high in a single or few locations, you can pull the subfloor up and plane the crowning joist to level the floor. If a subfloor is low in a single spot, you can pull the subfloor up and shim the floor, using a similar approach. If you decide to plane a joist, remember that this could have an affect on the structural integrity of the floor and it is important to get the opinion of a structural engineer. In any case, reattach the subfloor with screws and construction adhesive.
Step 3: Acclimate the Wood
With the subfloor sufficiently leveled, acclimate the hardwoods in the space where they will be installed. Leave the hardwoods in this location for 7-10 days. Make sure not to stack the boxes, and run the A/C or heat normally. The best time to install hardwoods is the Spring and Fall when the humidity and temperatures are at yearly averages, but Summer and Winter installations are possible with the proper precautions. Never store the hardwoods where they can get wet.

Step 4: Laying the First Row
When the hardwoods have been properly acclimated, it’s time to lay the first few hardwood boards. The first board in an installation sets the tone for the remainder of the installation. Take time and do it carefully. That article covers every step precisely.
If installed properly, the rest of the floor will practically lay itself. If installed unevenly, gaps will develop as you lay subsequent boards and you will be frustrated with the result. It is here that the technique known as blind nailing is first used.
Step 5: Laying Hardwoods in the Field
Continue laying hardwoods throughout the floor. While the bulk of a hardwood installation is tedious but uncomplicated, there are a few areas that can be challenging, and we have articles to cover these situations:
- (working around vents) Most modern homes have at least a few HVAC vents located on the floor. Laying hardwood around vents is simple, involving only a few measurements and cuts with a jigsaw.
- (working through doors) When maneuvering through an installation, you will likely have times where the hardwoods go through a door. When this happens, you should cut the door trim and stops just high enough to rest at the new floor level.
- (working around walls and obstacles) When laying hardwoods around a wall or when going around an object, you may have to start a new first board against the back side of a wall. When this happens, you should follow all the steps involved in laying the first board.
Step 6: Laying the Last Board
When you get to the last few boards of the hardwood installation, you will need to blind nail and then face nail the wood because the hardwood flooring stapler or nailer will not fit (article coming soon).
Step 7: Flooring Transitions
After the floor is laid, you’ll likely need to transition to adjacent rooms and flooring surfaces, or install stair nosing. We discuss the proper place to transition in a doorway in our article on working through adjacent rooms. (other articles coming soon).

Step 8: Trim, Baseboard, and Shoe Molding
Install baseboard and shoe molding around the perimeter of the floor to ‘frame out’ the room. This involves scarf joints, inside corners (which can be cope cut), and outside corners. Quarter round can be an acceptable alternative to shoe molding if you have large gaps.
In fancier designs, three or more baseboard components are used, but in the typical installation only two (base and shoe) are installed. There are been a lot of discussion on our site on whether shoe molding and quarter round should be stained to match the floor or painted/stained to match the baseboard. If you are installing an exotic hardwood, you’ll find that the trim components are expensive. One alternative is to stain pine quarter round or shoe molding to closely match the floor.
If you’re laying next to kitchen cabinets, you should pick a shoe molding that matches the cabinets as opposed to the floor.
Tools to Install a Hardwood Floors

For a job this large, we were happy to have DuoFast sponsor the primary tools, providing their DuoFast Floormaster 200-S Hardwood Stapler for the bulk of the floor. In our 1100 square foot installation we fired nearly 3000 staples, or an average of just under 3 per square foot. The Floormaster 200-S performed flawlessly, with no jams.
DuoFast also provided their new DuoFast Floormaster 250BN finish nailer for the first and last boards and to facilitate molding installation. Both of these tools performed very well across our floor and we’d highly recommend them to folks installing flooring in their own home.
Where to Purchase Hardwood Floors
The flooring used in this installation is Lumber Liquidator’s Bellawood Brazilian Walnut Flooring. Bellawood is an excellent product sealed in many layers of aluminum oxide, the best surface coating for hardwood flooring. Aluminum oxide is far superior to polyurethane; it has better scratch resistance and does not fade or yellow over time. If you haven’t purchased your flooring yet, we highly recommend Lumber Liquidators online web site. Their site features really good deals and they can ship the product directly to your front door.
Hardwood flooring is offered by several other big box retailers and can be a significant investment. If you don’t choose Lumber Liquidators for your purchase, consider Lowes. We’ve written about a free Lowes Coupon that can save you 10% off a major purchase like hardwoods.
Did You Find This Guide Useful?
If you found this guide useful, we’d really appreciate it if you’d click the Facebook “Like” or Google “+1” buttons over there on the left. They let others know that these guides are helpful! Thanks so much!
What do you think? As with all our articles on this site, help us make this better by adding your own suggestions and thoughts!
Casa de Color Hardwood Flooring Review: Problems with Stain Alignment
February 14, 2011 | by Fred (email) |Whenever we’re about to undertake a hardwood flooring project, we always turn first to Lumber Liquidators. We’ve found them to be helpful, and we really prefer and recommend their Bellawood product. If you’ve been reading here for some time, you probably remember that we installed more than 1000 sq. ft. of their Bellawood Brazilian Walnut product last Summer in our own home.
A good friend of ours is currently remodeling a townhome rental to get it ready for sale. We recommended he check out the local Lumber Liquidators (official site) in person as they have good prices and we’ve found their customer service to be pretty good. He ultimately selected LL’s Casa de Color product line (a less expensive alternative to Bellawood). Specifically, he picked a medium-tone stained maple hardwood that ran about $3.00/sq. ft.
Upon beginning the installation in the rental, he noticed that the butt joint bevels between the boards looked strange. Some of them were really dark, while others were really light. It didn’t look like the uniform hardwood he had expected.
Upon closer examination, it appears that the cause of the problem is a stain alignment issue on the boards. Take a look at these photos.
Casa de Color Hardwood Flooring Pictures

You can see that the board on the left has a deep black bevel, while the board on the right has a white, unstained bevel. Our best guess is that the machine that applies the stain/sealer wasn’t properly aligned.
Here’s another shot with the boards stacked one-on-top of the next:

And here’s how it looks when the boards are next to one another. You can definitely see the unstained edge in this picture:

My buddy took the product back to Lumber Liquidators and explained the issue. He had already laid 5 rows before realizing the quality error in the boards. Unfortunately, the store manager there said that everything looked OK to him, and asserted that he would “install this in his own home”. As a result, he would not take the product back.
I was surprised, since our experience with Lumber Liquidators has been very good, and this is clearly a problem with the boards that will be visible on the entire floor. I would not lay this product in my own home and recommended that he try again with the store or corporate.
Update Feb 16, 2011: Our friend took a series of pictures and forwarded them to Lumber Liquidators, who ultimately offered him several resolutions: (1) he keeps all the product and receives a direct credit of a large portion of the cost (about 1/2); (2) he returns the unopened boxes (less than half are unopened at this point) and receives a store credit for the full cost of all materials; or, (3) he returns the unopened boxes and receives a cash refund only for those boxes.
Perhaps the best resolution would have been a full cash refund for returning all the wood whether opened or not. However, we recognize the balance that Lumber Liquidators must strike in this situation. The question is whether or not everyone would view this defect the same way (is it just an annoyance or does it make the hardwoods truly uninstallable – that’s a question that doesn’t have an easy answer). We think the options they propose are reasonably good.
Ultimately, our friend chose to take the discount and to work through the installation the best he could with the defect… this was the most cost effective option for him given the time constraints he faces.
Examine Hardwoods Before You Start Installation
Hardwoods are a rather permanent addition to a house. If you’re taking the DIY route to install a hardwood floor, we highly recommend inspecting the product before you start to lay it down. Check for board uniformity, and if you’ve picked a stained product, make sure the stain adequately covers the whole top of the board and the bevel edges.
We’ll keep this article updated with the final resolution. I am confident that with good pictures that show the problem, it will be more obvious and LL will make it right!
 Gaps in hardwood floors can be a huge visual annoyance. Not only are they an eyesore, they can also collect dirt and dust. Hardwood gaps are generally caused by one of a few installation errors:
- improperly acclimating the hardwoods prior to installation;
- failing to install the first board perfectly straight in a hardwood flooring installation;
- failing to keep boards straight when working around an outside corner; or,
- installing boards that are not uniform.
Generally speaking, for #2, #3, and #4, you know the gaps are there immediately after installing the board and you can pull the offensive board out and correct the problem. If you don’t correct the problem during installation, it’s going to be there forever. In best case scenarios, these types of gaps are isolated to a single area, and hopefully are out of sight. Unfortunately, some types of misalignment errors can propagate across a floor, creating gaps that alternate from side-to-side going from one board to the next. If you’ve done a number of hardwood flooring installations, you know what I’m talking about — it can be very annoying to try to correct this type of alternating error during installation, and you may have to decide of a judicious location to leave a countering gap.
For #1 — the most common reason people get gaps in their floors — the problem is much more insidious. It has to do with moisture content of the hardwoods during installation and the change in relative humidity throughout the year. Most people first notice gaps in their hardwood boards the first winter after installation.
What Causes Hardwood Gaps in Winter?
Gaps first occur in winter because this is the first time humidity is very low, which draws all excess moisture out of the wood. During installation, the moisture content on the surface hardwood wood is usually higher than the subfloor, which has been through many seasonal cycles.
If you properly acclimated your hardwoods during installation (by letting them sit in a conditioned space for at least 10 days), the likelihood of large gaps is greatly reduced. You may still see small gaps open up between boards, but these will likely close during the next spring and summer when humidity levels rise.
If you did not properly acclimate the woods, the winter may have pulled a very large amount of moisture out of the boards – an amount that will never fully return to the wood in the spring and summer. In this case, gaps may become smaller in spring and summer, but they will persist, and may get even larger in the following year. After two full seasonal cycles, the hardwood will reach an equilibrium with the subfloor and environment and the gaps in the wood will be minimized.
It is useful to note at this point that some web sites will suggest that if you have perfectly matched subfloor and hardwood moisture levels at installation, you will not get any gaps. This is not entirely true. Not all wood types respond the same way to moisture, and it is possible that when moisture levels drop, your subfloor could contract at a slower rate than the surface hardwoods, leaving gaps.
Fix Gaps between Boards in a Hardwood Floor
You generally have three options for fixing gaps in a floor:
- To avoid seasonal gaps, you can limit the variation in humidity in the house. In the winter, this can be achieved with a whole house humidifier that connects to the furnace. Note that these systems can have drawbacks if they put too much humidity in the air, including promoting mold growth in vents. You will want to make sure your ductwork is very clean before installing a whole house humidifier, but once installed, they can work wonders. During the summer, make sure to run your air conditioner system to draw humidity out of the air, keeping the hardwoods at a relative constant point all year. A good target humidity level is 40-50%.
- For non-seasonal gaps, the only non-rip-out solution is to sand down the floor and fill the gaps with matching wood putty, and then refinish the floor. If you have a lot of gaps, wood putty can become an eyesore if not done well. For a systemic issue (across the whole floor), we recommend calling in a professional for this type of work. Once you’ve reached this point, it’s a tough call whether it would be better just to tear out and replace the floor. Which leads us to option 3:
- Tear up and re-install the floor (ugh!). You might consider installing engineered flooring, which is much more dimensionally-stable than solid wood.
How to Avoid Gaps in Hardwood Installation
- Properly acclimate the floors. See this article for some help on that.
- Install hardwoods in the fall and spring when humidity is moderate, rather than in the summer or winter, when it is extreme.
- Make sure to lay the first board straight. When laying boards in the center of a room, make sure to keep a consistent, tight pattern.
- Consider engineered flooring, which is more dimensionally-stable than solid hardwoods.
Over the summer, we spent two weeks telling you about our installation of more than 1000 square feet of Brazilian Walnut flooring in the first floor of our colonial home. We compiled the entire experience into a series of more than a dozen tutorials for installing hardwood floors that cover all the details of a typical wood floor installation. The series was a resounding success, and one of the most extensive we’ve ever produced here at One Project Closer. Below is just one of the “after” pictures from the installation. Click here for all the Brazilian Walnut flooring pictures.
Throughout the series, I omitted a discussion of the actual hardwood product we selected or the store where we purchased it (although you can see the branding in some of the pictures of the boxes). I did this primarily because I wanted the articles to stand on their own without becoming a two-week-long endorsement of a particular vendor’s product line. But I would be remiss if I didn’t at least write one article on our experience with the vendor where we purchased the product and the specific brand of hardwood we selected.

As I’m sure you guessed from the title of the article, that vendor was Lumber Liquidators, one of the largest discount hardwood flooring retailers in the U.S., with headquarters based in our neighboring state of Virginia. The product is LL’s flagship brand: Bellawood, and more specifically, 3/4-inch thick by 3-1/4-inch wide tongue-and-groove, solid Brazilian Walnut.
We sunk more than $6,000 into the flooring we installed, and without a doubt, we’re very pleased with the installation. You can see detailed pictures of the final product here.
Our overall experience with Lumber Liquidators was very positive, but not perfect. Read on for our objective review of our purchase experience with this vendor.
Lumber Liquidators Review

The Highs: Beautiful, quality Bellawood product; excellent price; free delivery to the local store; wide variety of hardwoods to choose from; reasonably knowledgeable in-store staff.
The Lows: Product stock status not always up-to-date on web site; Product stock status not always fully known by phone-based customer service.
The Verdict: A product and price point that are second to none. We’ll be back for our next hardwood purchase.
Detailed Experience
Before getting into our personal experience with Lumber Liquidators, I feel compelled to point out the obvious: this review represents a single, large purchase of a single product with this vendor. As with any vendor, the range of experiences could be very large depending on the specific people you encounter on the days you place and take receipt of your order or make customer service requests.
As with any review, this article will better serve others if you add your own experiences with this vendor in the comments section at the bottom. I hope you will!
Bellawood Product Review: This isn’t the first time we’ve installed Lumber Liquidator’s Bellawood Brazilian Walnut product, so we knew what to expect. We have found that the aluminum oxide sealer on Bellawood is excellent (LL offers a 50 year limited warranty). It is not prone to fading or hazing like many polyurethane-based sealers and it resists normal wear very well. Note, though, that Bellawood doesn’t have some kind of “miracle” sealer that will prevent gouging. If you drag the claw side of a hammer across the floor, it will indeed scratch, and quite noticeably. There is no sealer that will prevent that type of abuse from marking a real hardwood floor–it’s why laminate flooring options have become more popular in recent years.
The Brazilian Walnut hardwood boards were extremely uniform and consistent. We had less than 3% scrap out of the box (Brazilian Walnut is a very consistent wood to begin with – other species will have higher waste factors – check the product pages for the individual species for details).
It is important to realize that Lumber Liquidators does offer more than just Bellawood, and that some of their brands don’t enjoy as positive of a reputation. However, I feel confident in recommending the Bellawood product after installing it in three homes.
Price Review: When we set out to find hardwoods for our house, I combed the web for other hardwood vendors that offered the key features I wanted in this installation: 3/4″ solid tongue-and-groove hardwoods, a thick aluminum oxide-based finish, 3-1/4 inch width planks, good photos of the installed product, etc. What I found, without exception, is that Lumber Liquidator’s Bellawood product came in about $1.00 – $1.25 / square foot less than the competition for the higher-end exotics in “select” qualities. We ended up paying $6.49/sq. ft. for the Brazilian Walnut. The next best among the competition wanted $7.50/sq. ft. for an almost identical product.
Shipping: We requested the product be shipped to our local store (a free option) and we picked it up using a 1/2 ton pick-up truck (it took 5 truck loads due to weight limits). The staff at the local LL had the boxes waiting for us at the door after we called 1/2 hour early letting them know we would be buy to pick them up.
Customer Service Review: While our overall experience with Lumber Liquidators was pretty good, we ran into one significant challenge: phone-based customer service did not have a good grasp on future product ship dates.
When we first got into the market for exotic hardwoods, we were planning to install Brazilian Chestnut floors. We actually placed an order for Brazilian Chestnut on LumberLiquidators.com in late May and were told that while the product was out of stock, there was a batch at the factory that would be able to fill our order within 2 weeks. A week later, I had a gut feeling that I should re-confirm that the batch at the factory would indeed be available to fill our order, since we were lining up time off work and sequencing contractors for the effort. When I called back, I was told that the first customer service rep had made an error and that our floors wouldn’t be available for at least 6 weeks, and possibly not until even later.
At this point, we decided to switch to Brazilian Walnut (for which Lumber Liquidators had more than 6,000 square feet in stock at the time). The price was comparable, the look was similar, and they were able to ship it virtually immediately. Ultimately, we received our floors in time to meet our build schedule. Of course, had I not made that call, we could have ended up in a very bad situation where we didn’t have the flooring in time to get the first floor remodel completed. The customer service representative was very apologetic and said that this is not normally an issue for the company; someone may have read an inventory/order report incorrectly.
The remainder of our customer service and sales experience was great. The support staff in the local store were very helpful, and everyone (even the customer service rep mentioned above) was always polite and courteous, never calling into question whether what I was telling them was, in fact, the truth.
Overall Review
We’ve been living with our newly-installed floors for 4 months now. We’re very pleased with the product and frequently recommend Lumber Liquidators to friends and colleagues. As I noted before, we’ve installed other Bellawood products in 2 other homes with great success. Those installations are now more than three years old each and both still look fantastic.
Where to Buy
Lumber Liquidators has put considerable effort into making ordering through their web site pretty simple and painless, even for large quantities. There are also stores in many parts of the nation that you can visit. Lumber Liquidators will ship their product to any of their national outlets for free, or you can get the product delivered right to your house for an additional freight fee.
We’ve reached then end of our hardwood flooring installation! We’re thrilled with the results and we hope you found our two weeks of tutorials helpful if you decide to tackle this job in your own home. We wanted to share some “after” pictures of the remodel with you as inspiration for your own hardwood job!
This is the final post in our series on how to install hardwood floors. Thanks for reading, and visit that link for all the information you need to install hardwood flooring in your own home!
Before we start, recall that back in December we started this remodel taking down walls in the first floor of our home. The result was a much more open space. We then hired a contractor to remove a section of a load bearing wall, remove an oddly-placed pantry, re-route plumbing, and install recessed lighting.
After the contractor finished, we started our Brazilian Walnut wood flooring project, installing 1100 square feet of beautiful flooring throughout the first floor. This completes about 1/2 of everything we want to do with this floor. The other half is the installation of a new kitchen, bathroom, and laundry room. Those are coming in late Summer and early Fall, with plenty of pictures to share.
Brazilian Walnut Hardwood Flooring Pictures
(pictures can be enlarged by clicking)


Stay tuned for more “how-to” articles, stories, and pictures of the kitchen, bathroom, and laundry room as they get reworked later in the year. Also, keep an eye out on Tuesday for the complete “How-To” round up on hardwood flooring where we tie together the last 2 weeks into a single article that you can bookmark for the future!
Baseboard and shoe molding dress up a new hardwood flooring installation. After you’ve put in the time installing the new floor, trimming it out frames the floor, showcasing the hardwoods just like a quality frame showcases quality art.
Baseboard comes in many different shapes and sizes and should be picked based on a balanced approach to style and money. The simplest builder-grade primed white baseboard can be purchased at Home Depot or Lowes for around $0.30 / linear foot, while stain-grade elaborate baseboards can cost as much as $4.00/linear foot.
While most baseboards consist of a single board, elaborate baseboards can have 2 separate components installed on top of one another to give a deeper look, with shoe molding tacked on top of that. Of course, most modern homes will have the traditional–and ubiquitous–single board 3.5″ molding that we cover in this article.
This article is part of our series on hardwood flooring installation. To follow along, subscribe using the RSS and e-mail buttons on the right. For a complete list of the articles in the series, see this main article on installing hardwood floors.
Measuring For Baseboard and Shoe Molding and Selecting Size
 In most installations, baseboard will cover every linear foot of wall space with the exception of door jambs. Measure the wall space and add 20% to your calculation for waste–less if you are purchasing precise lengths.
Baseboards are available in 12 foot and 16 foot lengths, and the big box stores will allow you to cut pieces of baseboard to exact lengths. You’ll notice that contractor packs of baseboard available at the big boxes (usually containing 120 linear feet — ten 12-foot boards) are significantly cheaper than buying piecemeal–as much as 50% less. The disadvantage of these packs is that (1) you must buy in bulk; and (2) you are limited to 12 foot lengths.
When considering whether 16 foot lengths are worthwhile, you should assess whether any of the walls in your house are between 12 and 16 feet long. The reason being, if the walls are 12 feet or less, 12 foot lengths will do just fine. If they are larger than 16 feet, but smaller than 24 feet, you’ll have to use two pieces regardless of whether you purchased 12 foot or 16 foot lengths. (A similar rules applies between 24 and 32 feet, where 16-foot lengths can reduce the number of joints — but at 33 feet you’d need 2 joints regardless of 12 or 16 foot selection). In any case, even for 14 foot walls, a good joint will be invisible to the casual observer, so 12 foot boards can be used throughout.
Simple Joints – Along a Long Wall
When a wall is too long to use a single piece of baseboard, two boards must be joined end-to-end. The right way to do this is to cut opposing 45 degree angled mitre cuts. To ensure the baseboard stays tight against the wall, find a stud and end the top mitre cut just beyond it, sinking a finish nail near the end of the board. This ensures the baseboard stays tight against the wall. In the drawing below, the left piece of baseboard will hold the right piece snugly against the wall.

It is helpful to find a spot on the wall that isn’t particularly bowed to do the join. Here’s a quickly done joint in our installation. For maximum results, it could be sanded and painted to make the joint virtually invisible.

Inside Corners: Coping with Pain or Mitre and Run
Inside corners are the most common in a home. Most regular rooms have four inside corners. There are two ways to cut molding for inside corners: coping and 45/45 mitres. Let’s start with the easier of the two: 45/45 mitres.
 Method One: 45/45 mitre cuts join baseboard by cutting opposing 45 degree angles into the baseboard. These joints can look perfect if the wall makes an exact 90 degree angle or is really, really close to it and you have a very good mitre saw.
If the wall isn’t 90 degrees, a 45/45 cut will leave a big gap, or it simply won’t fit. It is possible to use a sliding protractor to measure the exact angle of a wall and adjust the mitre angle to compensate, but this can be tedious.
With this method, paintable caulk (elastomeric sealer) is used to close any apparent gaps. Note that since caulk is a primary ingredient in this method, it isn’t the best approach for stained baseboard. For stained baseboard, cope cutting provides better results. Read here for more thoughts about painting vs. staining molding.
Here’s a picture of a 45/45 cut going into place on an inside corner.

If you use the 45/45 method, it can be helpful to cut the wood just slightly long and bend it into place (this is easier if you’re using contractor grade materials built from MDF.
And finally, here’s the finished product (with shoe molding):

Method Two: The harder method for joining inside corners is cope cutting. Coping consists of laying one baseboard flush against the wall and cutting the other baseboard to match the curvatures of the first. True carpenters will argue that coping produces better, longer lasting joints. We’ve already written extensively on cope cutting baseboard in the article linked above. If you’re interested in this method, start there for instructions.
Outside Corners: 45 Degree Joins

Outside corners work similarly to inside corners and are joined at 45/45 degree angles. They are functionally similar to inside 45/45 mitres except that they work in reverse. Again, when a wall is 90 degrees square, these work great.
When the wall is out of square, some adjustment may need to be made to get the boards to look current. If you’re planning to stain baseboard, extreme care should be taken with the outside mitres as there is no room for error.
Here’s a picture of an outside corner in our installation.

Fastening Baseboard to the Wall
Most baseboard can be fastened to the wall on the studs using a 16 gauge finish nailer with 1.5 inch nails. We used the DuoFast Floormaster 250BN for this job. A stud finder comes in handy for locating the studs.

Tip: Baseboard should not be fastened to the floor, which inhibits floor expansion beneath the baseboard.
Installing Shoe Molding
Shoe molding follows all of the same principles as baseboard in terms of cuts and placements. The only difference is that the measurements are shorter because shoe sits inside the perimeter of the baseboard.
Note that while baseboard is dimensionally stable vertically, shoe molding is designed to be very flexible in 2 dimensions, allowing it to “hug the floor”, closing any visible gaps due to dips in the subfloor that are transmitted to the surface. This is one major advantage of using shoe molding along with baseboard — it hides both vertical and horizontal gaps.
You should fasten shoe molding using an 18 gauge finish nailer with 1 inch nails. 16 gauge nails are likely to split shoe molding and will be more easily visible on the small surface.
Tip: Shoe molding should be tacked to the baseboard, not the floor, which inhibits floor expansion beneath the shoe molding.
Tool to Cut Baseboard and Shoe Molding
For most baseboards, a simple 10″ mitre saw that can make 45 degree cuts is sufficient. For baseboards taller than 4.5″, you’ll likely need to lay the baseboard flat and use a compound mitre saw (and preferably a dual-compound mitre that can rotate 45 degrees toward either side).
We used our Kobalt Sliding Compound Mitre saw for the entire job, but we didn’t make use of either the compound or sliding features.

What do you think? Do you have any baseboard or shoe molding tips to add?
P.S. Stay tuned tomorrow for the final “after” shots of the entire installation!
In our review of the DuoFast Floormaster 250BN we make substantial reference to the term blind nailing when describing fastening the first few and last few hardwood boards in place. If you’ve never heard the term blind nailing, you’re probably wondering what exactly it means.
Blind nailing is setting a nail into the hardwood flooring board at a 45 degree angle, just above the tongue of the board and driven down into the joist or subfloor surface. In olden times, blind nailing was done with a hammer to start the nail, then as a woodworker got close to the wood, a nailset was used with the hammer to countersink the nail into the material. The technique hides the nail as the next board is installed.
In hardwood installations today, we’re blessed with pneumatic tools that take much of the hard manual labor out of the job. Just about any finish nailer can be used for blind nailing. One of the notable features of the Floormaster 250BN that DuoFast sent us is that it comes pre-loaded with a 45-degree angled tip to support accurate blind nailing. (You’ll immediately recognize this as a nice feature if you’ve ever tried to blind nail hardwoods using a flat tip).

It’s worth noting that technically an entire modern-day floor is blind nailed, but not all with the same tool. Most of the floor is installed with a hardwood flooring stapler or nailer, specifically designed for blind nailing boards. This tool is sometimes called a toe nailer. Hardwood installers generally reserve the term blind nailing for the first few and last few boards that must be installed with a finish nailer because the larger hardwood flooring tool won’t fit.
Other Meanings for Blind Nailing
Beyond working on flooring, blind nailing can refer to hiding a nail beneath a chip of wood, as described in this article, which is a pretty slick woodworking trick.
More Information on Hardwood Flooring
This article is part of our How to Install Hardwood Flooring series – a set of articles that describes all the steps necessary to install wood floors. Click that link for more information.
Many modern homes have heating and air conditioning vents located on the edges of floors in the room, as opposed to ceilings or walls. When this is the case in a hardwood installation, you must remove wood in the shape of the vent.
In every case, except with the widest hardwood boards (5 inches or greater), this will involve cuts in at least 2 of the boards to accommodate the flooring. If you get lucky, one board may end exactly on the edge of the vent, but this isn’t the usual circumstance.
Perhaps the most difficult situation is when only 1/2 inch of a board will fit around one side of the vent. In this case, you must take great care in cutting the board to ensure it doesn’t break during the cut. Let’s walk through the steps to see how it’s done.
We’re installing Brazilian Walnut flooring across the first floor of our home. If you’d like to follow along with the series, subscribe using the RSS or e-mail buttons at the right. For the complete list of articles, see the main How to Install Hardwood Floors article at that link.
Tools Required for Working Around Vents

- Jigsaw with wood blade*
- Drill Driver with 3/8 inch bit
- Tape Measure
- Vice or clamp-downs to prevent the wood from moving while working
- Pencil
*It is possible to substitute a table saw for the jig saw if you must cut the floor without a jigsaw; however, jig saws offer the optimal solution for working with boards. See the bottom of the article.
Working Around Vents in a Hardwood Flooring Installation
Step 1: Start with a hardwood board the spans the vent at least 6 inches on both sides.

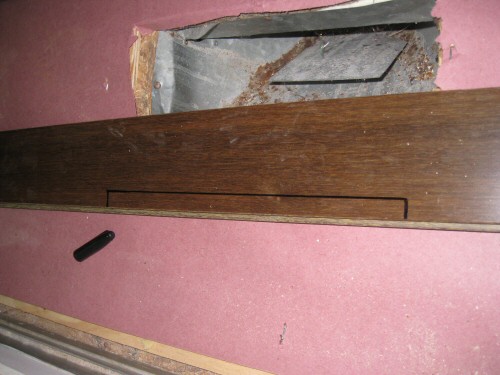
Step 2: Mark the edge of the board at the left and right edges of the vent. Note that you want to use the actual inside wall of the vent as the measurement point. Most vents will have a flange that covers a part of the floor. You want the hardwood flooring to cover that flange. (Kim is skilled with a Sharpie and knows to use the outside edge of the Sharpie mark for cutting; but you may want to use a wood pencil to get a more precise mark).

Step 3: Remove the board and measure the distance from the last installed board to the edge of the vent. This will tell you how much depth you need to cut out of the board. In the picture below, we need 2-3/4 inches of wood, so we’ll be cutting off about 1/2″ at our marks.

Step 4: Mark the hardwood flooring board for the vent depth. Again, Kim used a Sharpie for the pictures. We’ll be cutting at the outside edge of the Sharpie mark.
Step 5: Secure the board on a work surface. We used a clamp down on the side of our Skil Hardwood Flooring Saw and allowed the board to hang over the edge. A similar clamp on a mitre saw or a vice may work as well.
Step 6: Use a 3/8-inch bit to drill a pilot hole inside the corner of the board for the jig saw blade. Jig saws have great difficult making plunge cuts or turning sharp corners. If you don’t have a drill-driver available, you can use other strategies to work the jig saw to make perfect right angles (for instance, cutting in at a sloped angle and straightening up). We find this method to be quick and easy.

Step 6: Insert the jig saw blade into the hole and follow the board marking accurately. Note that you can use masking tape over the cutting location to help avoid tear out. We had a good blade on the jig saw and since we aren’t using flush mount vents, the vent edges will cover gaps.

Step 7: Dry fit the board in place. If your cuts are accurate and successful, fasten the boards on both sides using a hardwood stapler or nailer. If you’re too close to the wall, you can also use your hardwood flooring finish nailer.

Step 8: Check to see if another full board can fit on either side of the installation without special cuts. In our case, this was possible. Kim cut a single board and stretched it across each side of the vent. Fasten these boards into place.

Step 9: Follow the steps 1-7 for the outside board, carefully matching the cuts and location on the original board.

Step 10: Fasten the final board in place. It’s worth noting that in our installation, the final board is beyond the area where toe nailing is possible because it is so close to the non-opening side of the sliding glass door. Accordingly, we had to top nail this board into place using our DuoFast Floormaster 250BN.

Vent Cover Types
The method described in this post works very well for 97% of homes that use surface-mount vent covers. In very exotic installations, the hardwood vent covers are flush with the floor and manufactured from the same species wood as the floor. In this case, high-precision cuts are required.
Matching Vent Covers on the Cheap
We’re installing Brazilian Walnut floors, and as such the trim components tend to be very expensive. We considered using black vent covers, but they seemed to detract from the brilliance of the floor. At a trip to Home Depot, we landed on these stained American Cherry vent covers that get pretty close to the color of our floor – and at $14/each are a steal compared the same made from Brazilian Walnut, which run > $30/each + shipping online.
In many hardwood installations you can ‘cheat’ with the trim components. In another hardwood installation we matched stained pine quarter round to Brazilian Walnut successfully. This works well for installations-on-a-budget where the looks are important but the “authenticity” of every component is not.

Using a Table Saw Instead of a Jigsaw

If you absolutely don’t have access to a jig saw and cannot borrow one, working around vents can be accomplished with a table saw.
See the drawing to the right. Essentially, instead of routing out a board to the shape of the vent, you use two boards on each side of the vent. In most cases, this doesn’t result in as clean of a look, but if done carefully it can be virtually invisible to a casual observer.
If you don’t already own a jig saw, the can be useful on a wide array of projects. Perhaps your hardwood installation is a good time to pick one up!
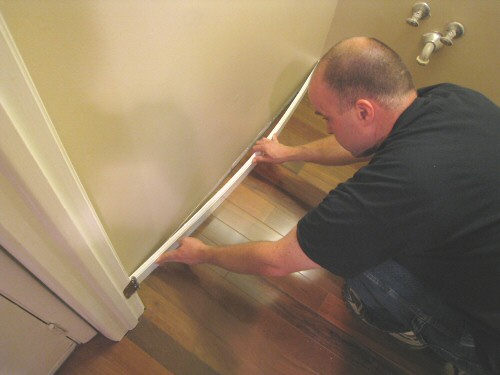
Laying Hardwoods Around a Wall or Cabinet Peninsula: Laying a “New” First Board
July 7, 2010 | by Fred (email) |Many hardwood installations require you to transition from one room to another, sometimes around a dividing wall that has an outside edge that will require a new first board. An outside edge occurs when you install hardwoods around an object and are effectively left creating a new starting row along the outside edge of the object. Take a look at this picture from our installation for tw0 example locations:

Note that which walls display this phenomenon is a direct result of the direction you choose to lay hardwoods in the room. Since we’re laying from the front of the house to the back of the house, the load bearing wall across the center creates outside edges the whole length of the house.
We’re laying 1100 square feet of Brazilian Walnut flooring across the first floor of our home. If you’d like to follow along with these articles, please subscribe using the buttons at the right (RSS, E-mail). For an index of all the articles in the series, see this article on How to Install Wood Flooring.
The Challenge with Outside Edges
Each of the two locations above presents a set of challenges. In Location (A), the hardwoods must be gapped at least 1/2 inch from the center wall and back wall near the fireplace, but must stay perfectly straight relative to the rest of the floor. This is challenging because there is no support against the center wall when nailing, and wood is an imperfect building material. The picture below is a close-up of Location (A).

Without care, it is easy to bend the board back towards the wall, or forward towards the brick fireplace hearth, which will create gaps in subsequent rows of the installation.
In Location (B), the challenge is similar to Location (A), except that you must also ensure a clean rejoin with the existing hardwoods. In many ways this makes the job easier, especially if a single board can be used to span the entire gap. A single board is more likely to prevent the boards from being installed concave or convex relative to the rest of the floor.
How to Work Hardwoods Around These Walls
Working around these walls is simple. We cover all the steps in our instructions on laying the first few hardwood boards, so refer to that article for the pertinent How-To steps.
What’s important to realize is that in these situations, you are essentially laying a new first board and all the rules for laying that board apply. A highly accurate 8 foot level can be helpful in this step, since you can align the first few feet of the level with the existing floor, and allow the rest of the level to show you where exactly the boards should be laid.
Other tips that we discuss in the instructions for laying the first board include:
- Snap a chalk line guide for the first board.
- Shim the board against the wall once you have an accurate starting location.
- Use plenty of fasteners with your hardwood finish nailer to ensure the board doesn’t move as you work forward from it.
Today marks the half way point in our series on hardwood flooring, and we thought it worthwhile to address some of the concerns as you lay hardwood throughout the “field” of the floor. Laying in the field is usually the most rewarding and fastest part of a hardwood flooring installation. In fact, in our article on laying the first hardwood boards, we noted that once you get past the first three strips, the rest of the floor practically lays itself. That really is the truth, especially in rectangular rooms without an extensive amount of areas to work around. But if you have dogs as pets in your house, you will have to reconsider laying hardwood floors, as per My Pet Needs That, it is one of the worst flooring if you have dogs and it is never recommended for pets.
As you work in the field, there are a few key points to keep top of mind to avoid diminishing the quality of your installation.
This article is part of our series on how to install wood flooring, where we’re laying 1100 square feet of Brazilian Walnut flooring throughout the first floor of our home. To follow along with the series, select from one of the two subscribe options on the right (RSS or e-mail).
1. Keep the Hardwood Boards Tight (Avoid Gaps)
First and foremost, when laying in the field, don’t settle for gaps along the way. Gaps can be created by a number of things including, most commonly, imperfect hardwood boards. Some boards will be narrower at one end than the other. Other boards may actually be narrower the whole width than most of the rest of the lot. Most “select” grade hardwoods will have a minimum number of these boards, since select woods are checked for deviation at the factory. But, even “select” hardwoods will have .5 – 1% of boards with imperfections somewhere on the board. When you find these boards, remove them from the room to ensure you don’t use them by mistake. Below is an example of a board installed in a floor that fails this visual inspection.

Gaps can also be caused by warped boards that are otherwise perfect. This is especially true with the longer 6′ and 7′ boards. In this case, you should tighten the board on one end, staple it firmly, and move slowly down the board, stapling more often than on non-warped boards. The board can be “tightened” again the prior board as you move down the field.
Make sure to cinch each board to both the prior row and the prior board in the current row using a rubber mallet. If gaps are allowed in any section of the floor and create an uneven install, these gaps will likely appear in different places in later rows to compensate. It can be very frustrating to remove a gap from a room.
2. Open and Use Multiple Boxes Simultaneously
One common mistake for new installers is to install one box at a time. Because hardwoods are natural products, they will contain natural variation. Also, different lots stained or finished at the factory may have slightly different hues. Rather than grouping these boards in a section of the floor, it is better to spread them throughout the floor.

Whether you’re working with 5 boxes or 50, its best to open all the boxes and inspect them for any obvious differences. While uncommon, it’s not impossible for a hardwood vendor to give you 48 boxes of Brazilian Walnut and 2 boxes of Brazilian Chestnut by accident. You should make sure all the boards look reasonably similar, and then mix them throughout the installation to avoid grouping woods in a noticeable way.
3. Maintain 1/2″ Gaps at Floor Edges
As you work through a floor, it’s easy to get lazy about ensuring tight edges against the walls. The edge might wander out to 3/4 inch, and then to 1 inch. At 1 full inch, most baseboard and shoe molding combinations will not completely cover the gap, and you’ll be left with a difficult path (or worse, a need to caulk or hide a significant gap).

4. Stagger Joints Between Rows by at least Five Inches
When you lay hardwoods, it is visually more pleasing if the joints from one row to the next are no closer than 5 inches. Simply choose pieces of wood as you work that maintain these distances. If you end up with 3 or 4 inches every once in a while, it’s probably not the end of the word.
Joints than are as close as an inch may look bad visually, and depending on where they are in the floor you want want to remove a board if you notice it before installing a subsequent row. The picture below shows the wood staggered from one row to the next. You’ll see that on the right most two boards in the lower right, there is a joint that is about 3.5 inches. It doesn’t look bad at this angle, but we wouldn’t want to do this all over the floor.

5. Use Adequate Fasteners Throughout the Floor
Throughout the floor, continue to install adequate hardwood fasteners and make sure to never accidentally skip a row. We generally install one fastener every 12 inches and within 5 inches of the end of each board, leading to more than an average of 1 staple per square foot per board.
Note that if you fasten right at the edge of the board you are more likely to split the tongue. Throughout the job, our Duo-Fast Hardwood Stapler made fastening the floor a snap.
What do you think? Feel free to chime in with your own tips for laying hardwoods in the field.
