
If you don’t frequent The Better Half, you may not have heard about our Before & After series. Every year for the past four years we host a series to raise support and awareness for Habitat for Humanity. Each week a winner is selected, and at the end of summer voting opens for the grand prize. Today is World Habitat Day, and it marks the first day readers can vote for their favorite transformation. Voting only takes a moment so I hope you’ll stop by. You can see a recap and cast your vote here.


Have you wondered what happened to the Before and After contest supporting Habitat for Humanity? Well, in case you missed it, the contest has been going on for the past 14 weeks. People were given the opportunity to link up their before and after home projects or email them in to be entered. We had so many really cool projects entered – bathroom renovations, backyard upgrades, furniture upcycling, and room redesigns. Some projects were more hard-core home improvement oriented (like One Project Closer) and some were more decor and design (like The Better Half)- all were AMAZING!


Then, throughout the summer, 14 different fabulous blogs chose 1 winner each from the link party and featured their winner on their blog. Check out our Before and After link party with over 170 entries – our biggest Summer series yet! Thanks to everyone who linked up and all our hosting judges!
All together, we donated $1400 to Habitat for Humanity on behalf of our winners, gave away $700 in gift cards and helped raise awareness of Habitat’s mission!
Even if you haven’t been following along, the fun isn’t over yet. In fact, this is my favorite part…
Each of our 14 weekly winners will compete for the grand prize: a $150 gift card to the home improvement store of their choice! Check out each entry below and then, starting October 1st place your vote.
Now that our summer link party is over, make sure to come back every Friday for our weekly DIY projects link-up party – The Humble Brag!


The Contenders!


Cast Your Vote!
Voting will open right here on this page for 1 week, starting October 1 through midnight on October 8, 2012. Have you heard that October 1st is also World Habitat Day?!? Check out how you can continue to support Habitat for Humanity and help make adequate and affordable housing a priority worldwide.
Vote for Your Favorite Before & After!
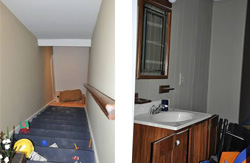
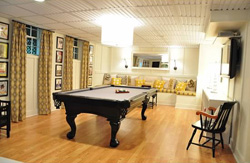
- Fabulous Basement Renovation (48%, 298 Votes)
- Fireplace Turned Fancy (19%, 116 Votes)
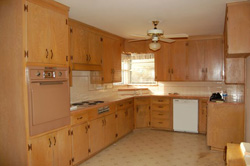
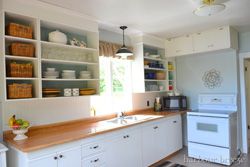
- $159 Kitchen Makeover (12%, 74 Votes)
- Before & After: Master Bathroom Edition (4%, 25 Votes)
- Steps to a Complete Kitchen Remodel (3%, 20 Votes)
- Outdoor Patio Kitchen (3%, 17 Votes)
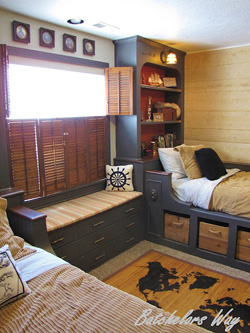
- Pirate Bedroom! (2%, 15 Votes)
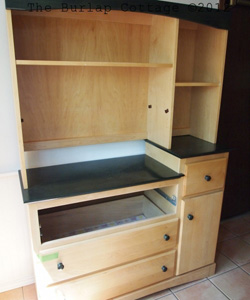
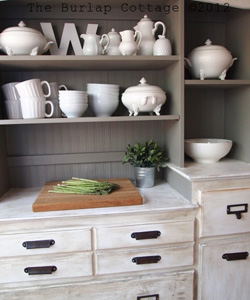
- Baby Changing Table into Kitchen Hutch (2%, 15 Votes)
- Chalk Painted Cottage Kitchen (2%, 14 Votes)
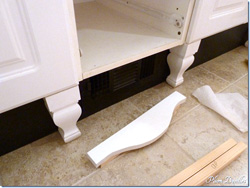
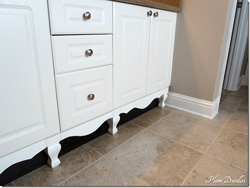
- Giving Standard Cabinet Furniture Style (2%, 10 Votes)
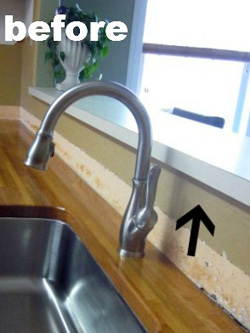
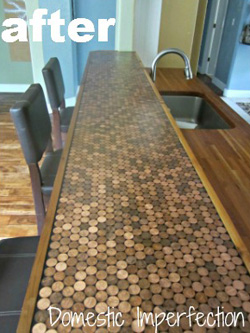
- The Penny Countertop (1%, 7 Votes)
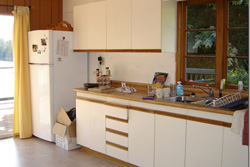
- Rustic Country Kitchen (1%, 6 Votes)
- Whimsical Nursery Reveal (1%, 6 Votes)
- Beautiful Kitchen Remodel (0%, 1 Votes)
Total Voters: 624
Home Improvement Coupons
Every do-it-yourselfer I know always enjoys a good coupon, and we keep a few pages that are worth checking out before your next home improvement project. Every week Kim updates the list (not some automatic aggregator), and she makes sure the links are good. You won’t find a better resource for Home Depot Coupons or Lowe’s Coupons anywhere else on the web!
The Before and After Summer Series on One Project Closer, our “other half,” has long been my favorite time of the blog year. It brings things into perspective for me. When we started the blog, we wanted to have fun, work on our homes, and maybe make a little money in the process. But, at the end of the day, Ethan, Fred, Kim, and I all felt a calling to make the blog something that matters. Part of that was making the blog as much of a user service as possible. Another part of that calling was ensuring that we help others and not just work for fame or money.
As a result, Habitat for Humanity (H4H) has been our favorite way to give of our time and money in the community. We’re so glad you have joined with us in helping H4H by reading, linking, sharing with your readers. We hope that this series will encourage people to share our joy of do-it-yourself home improvement and also spread as much information and passion for helping H4H as possible!

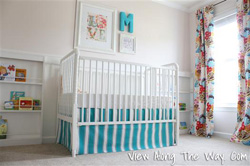
This is the first year, I (Jocie) got to pick a winner! There were so many before and after stories that were submitted and it was a difficult decision. At the end of the day, I chose a project that spoke most to my own style and stage of life. Kelly at View Along the Way transformed an empty room into first her son’s nursery, and then finally a nursery for her daughter. It is bright, whimsical, and creative. I love this room so much and it inspires me to redecorate Lucy’s room in a similar style.
Since Kelly is a weekly winner, she will receive a $50 gift card to either Lowes, Home Depot, or Amazon, and we make a donation of $100 to Habitat for Humanity in her honor! She will also have a chance to be the grand prize winner. At the end of the Summer, the best submission, as voted on by readers, wins a bonus $150 gift card to one of the three stores above.
Kelly is the first weekly winner in a 13 week series, so there is still time to win and be featured on one of twelve other big DIY blogs. Check out how to enter and contest details, joining us in celebrating DIY and H4H! If you don’t want to enter but would like to show your support, feel free to grab a button and tell your friends.
Without further ado, here is Kelly’s Before and After nursery reveal as written by her on her blog, View Along The Way. She has lots of other great posts and projects over on her site, so feel free to head on over and show some love!
THE NURSERY REVEAL
Capital letters for this one, because it’s finally (mostly) done! The only thing remaining is a fantastic little chandelier which continues to elude me, but enough about that, right? Let’s see the pics!
Here’s the room when we bought the house:
And here it is when we redid it for my son:

And here’s the room now:
If this baby comes out male, I’m sending him back.
The crib skirt is Premier Prints Lulu Stripe in True Turquoise – the same fabric that you all agreed to love whether you really did or not for the sake of my tender, pregnant sanity. Making the skirt was a stupidly easy DIY project (crib skirt tutorial here).
The beautiful LOVE print is by the incredibly talented Katie Daisy on Etsy*. I seriously love every single thing in her shop. The frames were $1 yard sale finds. Here are the rest of the details on the art.
(If you’re wondering what the “M” stands for, as of writing this post, it stands for “Maybe there’s a Minuscule chance this girl will get an actual real name before she turns 5.” We don’t know what we’re going to name her at ALL, but our top favorites right now start with an M, so we’re going with it. UPDATE: She’s here!)
The wall color is Olympic Irish Lace, and it’s low odor/no-VOC! Love that. The front-facing bookshelves were a DIY project when we were preparing this room for my son – see that post here.
The curtain fabric is Anna Maria Summer Totem in Tart, and it was the jumping-off point for the whole room. They’re black-out lined back-tab panels and um, I made them myself (WHAAAT?! For reals!). Here’s the full tutorial on that. Can I say this again though? I made them myself. With a sewing machine.
Enough, you guys! Quit asking about that.
(Some people avoid drapery panels in nurseries because supposedly their tarzan children swing from one panel to another and smash into the wall or something? I’m not sure. But we have them all over our house and our two-year-old has never had a problem with them. We used valances + blinds for his nursery, and could never get the room quite dark enough, so I think this will be MUCH more functional. But I’ll probably still have a tarzan child.)
Let’s take a quick stop in the closet, which was another DIY project (details here).
I picked up that snazzy little dresser on craigslist in a brutal hunt-and-kill game. The amazing white upholstered rocker which is going to change my life was another craigslist STEAL. Total steal. It’s the Pottery Barn Dream Rocker.
I whipped up that little pillow, and it’s kinda wonky but we’re ignoring that. We’re so thankful for the little blanket on the chair which was made with love by
Mildred’s Millicent’s Maude’sbaby girl’s talented grammy.And that stuff flying away above the dresser/changing table?
It’s a little DIY pinwheel art installation project which was so easy, and by the way? The pinwheels WORK. I’m planning on this being super-entertaining for
Marjorie Mabel Minniethe littie one while she’s getting her diaper changed. Here’s the tutorial for the pinwheel art installation.
Total cost for this room is disgustingly cheap. The furniture (crib, dresser, chair) was $275 total. Curtain fabric was the most expensive thing, about $100 total – $25 per panel. I already had the curtain rods from our last house. Another $30 for paint, less than $20 for the art over her crib (most of the stuff I already had on hand), $15 for crib skirt fabric, $6 for the fabric and filling for the wonky pillow, and about $5 for the supplies for the pinwheel art that I didn’t already have on hand.
Total cost for this redo? About $450 for the whole room. I’m pretty happy with that, especially considering that upholstered rockers usually start at around $350 alone.
I still want to add a chandelier and a floor lamp to read by, and I’ll probably want some kind of footstool, but it’s as close to finished as it will get for now. I’m pretty happy that
Minerva Mavis Marthathe baby girl will have a place to call her own, and that it’s finally just about finished!And PS – I think this is my favorite room in the house now. I usually get about halfway done with a room redo, and start to loathe everything in it and regret it with all my soul, but not this time!
Thanks for all your help and input in the comments section while I’ve been working on it. You guys are brilliant!


Thanks, Kelly for that beautiful and inspiring Before and After!
Fun Fact
Did you know that “in addition to a down payment and monthly mortgage payments, homeowners invest hundreds of hours of their own labor into building their Habitat house and the houses of others?” So you could volunteer along side the homeowner! How amazing is that? Since I’m not the heavy construction type and have kids to care for, the OPC kids and I have made lunches and brought them to the volunteers. Check out how you can get involved.
Who’s hosting next week?
Next week, our friend Brittany at Pretty Handy Girl will be featuring another Before and After winner! Wonder what other awesome blog are hosting? Check it out!
If you love this series and you love H4H, tell your friends, share of on facebook, scream it from the rooftops! We would love your help spreading the word and we will be your friend forever too!
As Always, thanks for reading!

Habitat for Humanity is a non-profit that’s near and dear to us at OPC and The Better Half. The work Habitat does is tremendous, and they’ve had a huge impact in our local community and all over the world. It’s only fitting that we support the cause (since we too love home improvement), and that’s the reason for our annual Before & After series. We started this event four years ago as a way to help raise awareness for Habitat, and support their mission to provide decent, safe and affordable places to live.
This year, our Before & After series is going to run a little differently than in the past, so read on to learn the details of how you can participate.

Fred volunteering with Habitat Sandtown
How it Works
If you’re not familiar with the series, here’s the basics: you submit pictures and a story from a home improvement project you worked (no contracted jobs) sometime over the past year. Every week of the summer (June 20 – September 21), a winner is selected and their story is published online. Each winner gets a $50 gift card to either Lowes, Home Depot, or Amazon, and we make a donation of $100 to Habitat for Humanity in their honor! At the end of the Summer, the best submission, as voted on by readers, wins a bonus $150 gift card to one of the three stores above.
This year is different and even more AWESOME because we’ve asked 13 other sites to get involved, each hosting a week, picking that week’s winner, and featuring the Before and After article on their site. We’ve got a great group lined up, and here’s the schedule so far:
| Week of: | Host: |
|---|---|
| June 17 | OPC's The Better Half |
| June 24 | Pretty Handy Girl |
| July 1 | Beneath My Heart |
| July 8 | ten june |
| July 15 | Southern Hospitality |
| July 22 | Charles and Hudson |
| July 29 | House of Hepworths |
| August 5 | the space between |
| August 12 | Remodelaholic |
| August 19 | DIY Showoff |
| August 26 | My Blessed Life |
| September 2 | Home Stories A-2-Z |
| September 9 | Bear Rabbit Bear |
| September 16 | Burlap & Denim |

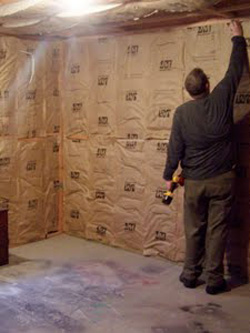
Ethan volunteering with Habitat Sandtown

Ethan volunteering with Habitat Tuscaloosa
How to Enter
If you want to submit a before and after story, email us your submission at beforeandafter@oneprojectcloser.com. Your entry can be in the email itself or attached as a Word document. Make sure to number pictures in order so it’s easy for us to reconstruct the story, and please attach the pictures as JPEGs even if you also embed them inside the Word document.
Keep in mind that good before and afters include interesting pictures (before, during, and after) and a descriptive story. Here are some great examples from last year.
Alternately, we’re letting people enter via link party to show off their great transformations. Select one of your best makeover projects to share with us below, and don’t be surprised if Jocie pins her favorites to Pinterest.

Please link back to this article | Link directly to your B&A submission | Don’t link to a shop, store or giveaway
Email in your Before & After story
|
|
|
|
|
|
|
|
|
|
|
|
|
|
|
|
|
|
|


Tell a Friend
This series is only a success because of the great submissions we receive, and telling your friends and readers about it is the best way to spread the word. Please consider writing an article on your site letting everyone know about the contest. Remember, the more submissions and comments, the more fun!
Grab a Button!
<div align="center"><a href="https://www.oneprojectcloser.com/2012-before-after-series/" title="Supporting Habitat for Humanity"><img src="https://farm8.staticflickr.com/7228/7352794492_4ac9511b8e_m.jpg" alt="Supporting Habitat for Humanity" style="border:none;" /></a></div>

<div align="center"><a href="https://www.oneprojectcloser.com/2012-before-after-series/" title="Supporting Habitat for Humanity"><img src="https://farm8.staticflickr.com/7216/7167584773_786b728bf8_m.jpg" alt="Supporting Habitat for Humanity" style="border:none;" /></a></div>
<div align="center"><a href="https://www.oneprojectcloser.com/2012-before-after-series/" title="Supporting Habitat for Humanity"><img src="https://farm9.staticflickr.com/8160/7167584787_0d998cfa36_m.jpg" alt="Supporting Habitat for Humanity" style="border:none;" /></a></div>
<div align="center"><a href="https://www.oneprojectcloser.com/2012-before-after-series/" title="Supporting Habitat for Humanity"><img src="https://farm8.staticflickr.com/7231/7167584807_d32b4957d7_m.jpg" alt="Supporting Habitat for Humanity" style="border:none;" /></a></div>
Follow us on Facebook to get updates on the contest and find out who each week’s winner is!
As Always, thanks for reading!
If you love DIY projects and a good deal, check out our awesome coupons for all your local Home Depot and Lowes needs!
I spent last week in Tuscaloosa, Alabama helping build new homes with Habitat for Humanity. It’s been six months since the tornado, and I wasn’t sure what to expect. I had no knowledge of current conditions, and I didn’t know how quickly a city could rebuild after such devastation. It was also surprising to learn of some of the unexpected challenges people face when they go to rebuild.
As we drove through the city, the path of the tornado was still so evident. It was eerie to be able to see exactly which buildings got hit and which survived. Some places have been demolished but many are still just as they were after the storm.


One challenge people face when rebuilding after a major disaster is meeting new codes and requirements. It’s not always enough to simply replace what was there. For instance, some older homes were built on very small lots. Since then, the minimum allowed lot size has increased. Those homeowners are out of luck because insurance companies only cover what was lost, not what is needed to bring an old property up to the latest standards.


This whole area was filled with buildings, billboards, and trees before the storm, and now there’s nothing. You can also see how close the tornado came to destroying the hospital in the background.

Most homes in the area were damaged beyond repair, and Habitat for Humanity has focused on new construction rather than trying to rehab homes. The first day we spent at a new site with many other volunteers pouring concrete, installing floor joists, and getting the subfloor down. Our team was only on this site the first day, but by the end of the week the other volunteers were starting on the roof trusses.

Every new home Habitat is building will have a safe room that is completely independent from the rest of the house.

Most of our week was spent at a second location installing flooring and molding, laying tile, hanging doors, blowing insulating and painting. The homeowner for this house is Camilla. We got a chance to meet her, and it was a real honor working on her home.


We all know the importance of staying hydrated, and thankfully Anheuser Busch made a donation….. of water.

Each day was as exhausting as it was rewarding. It was a joy to see the progress on the house, and I felt really privileged to have been able to help.

The votes are in for the 2011 Before & After contest, but before we announce the winner, we’d like to extend a humongous, gi-nourmous, epic THANK YOU to everyone that shared a project, spread the word, tweeted, voted, left comments or anything else related to our series. It’s obvious that the success we see each year is only a result of your participation. We hope you’ve enjoyed the inspiring DIY projects and learned a few things about Habitat for Humanity. Again, thank you for another great Before & After series!
We ran the voting a little differently this year, and you responded with 1064 total votes- only 2 less than last year! In the end, Traci from Beneath My Heart won with a tremendous mud room transformation. It’s obvious that Traci put a ton of hard work into her before and after, and I’m pleased to declare her the grand prize winner! For her efforts, Traci will receive a $150 gift card to the home improvement store of her choice. Congrats!


Bum-Bada-Da! It’s the moment we’ve all been waiting for- the 2011 Before & After vote! Summer is at an end, and so is our Before & After series. All that’s left is to select the grand prize winner!
Every year we have some truly fabulous before and after stories, and I’m very grateful to everyone who helped make this year another success. All together, we donated $1300 to Habitat for Humanity on behalf of our winners, gave away $650 in gift cards and helped raise awareness of Habitat’s mission in our weekly fun fact!
Now it’s time to vote for your favorite before and after story, and we’ll reward them with the grand prize: a $150 gift card to the home improvement store of their choice! Check out each entry below and then place your vote.

Before & After Stories
#1 – Carol @ Paintergal’s Little Cottage performed a total bathroom remodel.


#2 – Angela @ Fixing It Fancy creates an inspiring bedroom.


#3 – Rhoda @ Southern Hospitality shares a dramatic sunroom porch makeover.


#4 – Brittany @ Pretty Handy Girl relaxes on a beautiful screened-in porch.


#5 – Vanessa @ Life at our House shares a brilliant kitchen remodel.


#6 – Melissa @ Living Beautifully performs an office makeover.


#7 – Michael @ Better D.I.Y built a formal dining room.


#8 – Shannon @ Burlap and Lace transformed her dining room.


#9 – David from Montana created a beautiful backyard oasis.


#10 – Michelle @ Ten June remodeled her old yellow bathroom.


#11 – Traci @ Beneath My Heart created a stunning mud room.


#12 – Carrie @ Dream Green DIY inspired us with her new swanky bathroom.


#13 – Lauren @ Meet My Ugly Baby shares her Vancouver home remodel.


Cast Your Vote!
(Voting is open for 1 week, through midnight Friday, September 30, 2011)
Which Before & After is your favorite? Total Voters: 1,064
![]() Loading ...
Loading ...

Charities With Local Pickup (List) for Goods Donations as You Clean House
September 7, 2011 | by Kim (email) |Following along with Jocie’s theme from yesterday, we’re in the process of reclaiming our fourth bedroom this summer. Due to a house-guest overlap coming in August, we need to convert our office back to a bedroom; and we’re taking this opportunity to purge our home of more of those items we’ve been stashing in every closet or corner “just in case we might want them someday.” We’d rather be storing only those things we actually use. Sentimentality, begone! (within reason, of course)
Editors note: This post originally ran in July of 2008. We are committed to providing accurate, relevant information and have updated this post with further details and reader feedback. If you find this post useful, we hope you’ll give it a +1. Conversely, if you see ways we can make it better, we hope you’ll leave a comment.
As I’ve been bagging everything, it occurs to me that a list of charities who will pick up items at your door might be helpful to others of you who are similarly downsizing. If you’re more inclined to haul the donation yourself, see my other post for a list of Charities with Drop Off Locations. We’ve had good experiences with those listed below, and I’ll add to the list, as we find more. They pick up from your doorstep and leave a doortag-receipt which you can use for writing off the donations on your taxes.
National Charities with Local Pickup
Local pickup isn’t just for heavy stuff like appliances and furniture. These national services are happy to collect clothing, household goods, books, electronics and more right from your home. Before scheduling a pickup, make sure everything is in good working order. Electronics should function, clothes should be clean and include any manuals if possible. Don’t donate broken or spoiled goods. Some services require the donation to be outside before 8 am and clearly labeled so check the requirements.
- AMVETS (American Veterans National Service Foundation): http://www.amvetsnsf.org/stores.html
- Goodwill: http://www.goodwill.org/page/guest/about/howweoperate/donate, OR http://locator.goodwill.org/
- Purple Heart: http://zc.purpleheartpickup.org/
- Salvation Army: http://www.satruck.com/donate-goods
- Vietnam Veterans of America (see map for [many] participating states): http://www.clothingdonations.org/service.htm
Charities with Limited-Location Local Pickup
Limited local pickup is usually reserved for larger donations and high value items. It is often dependent on the quantity and quality of your donation, your location, and the availability to perform the pickup.
- The Lupus Foundation (Maryland, Virginia, DC & New Jersey only): http://www.lupus.org/webmodules/webarticlesnet/templates/new_donateotherways.aspx?articleid=1190&zoneid=47
- National Children’s Center (Maryland, Virginia & DC only): http://www.nccinc.org/index.php?module=CMpro&func=viewpage&pageid=15
- Habitat for Humanity ReStores: http://www.habitat.org/cd/env/restore.aspx
- National Kidney Foundation (South Carolina area): http://www.kidney.org/site/209/clothing.cfm?ch=209
In Canada:
- Canadian Diabetes Association (Canada only): http://www.diabetes.ca/get-involved/supporting-us/clothesline/howto/
- Habitat for Humanity (limited pickup): http://www.habitat.org/cd/env/restore.aspx?place=can
The best part about these pickup-charities is that they tend to call back whenever they plan to return to the area. While I hate getting “junk calls,” I’m glad that THEY call ME every few months, instead of my needing to take the initiative. It motivates me to scramble about the house and gather together at least one bag of items we’re honestly not using, get a tax write-off in the process, and most importantly, make our unused items available for use by someone who can benefit from purchasing them at a reduced price.
If I’m not sure about an item, I hold onto it till the next call comes. If I still haven’t used it, out it goes. And as our children outgrow toys or receive toys as gifts, and I notice toys that are ritually ignored, I can make those relatively-new items available to lower-income families who can be blessed by our being blessed with generous friends and family. Same thing with their clothes.
We can’t keep everything, and I’ve been convicted more recently that we SHOULDN’T hoard a whole bunch of “stuff,” just to “have” it. We want to teach our boys that Things are for using, and that People are where we should be making most of our investment. To be consistent, we need to share what we have – stuff that is JUST STUFF to us – with people who will actually make use of those items.
On a related note, if you do contact the charities above, please do make sure that what you donate is in good condition, so they’re not spending unnecessary overhead sorting through and weeding out items that should have gone into the trash.
And one final word of warning: we’ve found cleaning out to be addicting. It’s so nice to have a clean, uncluttered house. While we started out a bit hesitantly (“What if we give this away, and then we want it again?”), we’ve found that we’ve almost never even thought about those things again. So now we have more of an attitude of “What can we give this time?” It’s worth the effort getting started, and since we live in an area where we mingle across the socio-economic spectrum, we know some of the people who benefit from the donations made by families like ours.
And, heck, that’s how I afforded “new” clothing as a college student, myself!
What do you think? Do you periodically “clean house” and donate goods to charity? Is there something in your house that you find yourself hanging onto, even though you don’t know why you do it? Any good charities I should add to the list above?
Can you believe there’s only a few weeks left for our Before & After series?! In case you didn’t notice all the back to school sales, summer is flying by, and that means time is running out. Send your B/A story to you BeforeAndAfter@oneprojectcloser.com.

This weeks winner is Michelle from Ten June, and yes the color on your screen is accurate. Her bathroom really was that yellow. For sharing this “epic saga” with us, Michelle will receive a $50 gift card , and we’ll make a $100 donation to Habitat in her honor. To find out how to enter your Before & After story, check out the link above.
The Little Yellow Bathroom
Once upon a time, there was a sweet little yellow bathroom.
I mean… really, really yellow.
The room had this layout.
Then David and I took one of these…
(who are we kidding, David took one of these)
and did some demolition to the sweet yellow bathroom.
(see, I helped some!)
My bubble boy door.
Then, all of the trash and construction debris went into here.
And yes, David and I (alone) got all of the junk in there (plus the old railroad ties that were in our backyard… but that’s another story for another day!). Except for the cast iron bathtub. It got to sit in my front yard for a few
monthsdays.
Next, we redesigned the room so that it was customized to our style. You know, just plain awesome. Here’s the layout.
And design plan.
Then it was time to re-build the room from the floor up.
Literally.
The plumber came and did his magic.
And I helped up the ante on the insulation in the room. We took out the old, tiny window and added a new, bigger window.
The electrical work was rerouted to make way for our new lights and sockets.
And, in one of my favorite moments in the room… we added a pocket door and water closet. Just for a little privacy when the time calls for it, ya know what I mean?
(before)
(after)
(or in my vision- after)
Then we had the tile guy come out and lay allllll the tile. And I heard angels sing (or was that Justin Bieber?). Oh and the drywall was finally completed. (I am never, ever, ever touching drywall, ever again
unless you pay me in pitchers of margaritas).
And I painted the new walls.
We installed a toilet- highlight of my year.
Then we waited a month for our much-anticipated Pottery Barn vanity to arrive.
Got it.
Hated it.
Returned it.
Waited another month for Pottery Barn to pick it back up.Then decided to DIY our own vanity. Finally finished the vanity project and breathed a big sight of relief.
Why? Because… we’re done.
Without further ado… here is a full tour of our (mostly) do-it-yourself renovated master bathroom!
Before I conclude this epic saga, I have to give major props to David, my man with the plan. And back up plans! And the back up plans for when the back up plan falls through….
But seriously, this bathroom rocks. All the hard work has paid off!
COVER DAVID’S EARSNow it’s time to move on to our next project!


Thanks Michelle!
Thanks Michelle. I really liked how you were able to envision the bathroom you wanted and make that happen. You (and David) did an excellent job!
Habitat for Humanity Factoid
From the Habitat website:
Interior Redesigners team up with Habitat ReStores to create beautiful rooms for shoppers who want to “go green,” save money and still create the “wow” factor when updating their homes.
The idea of working together developed last year between the National Capital Area chapter of IRIS and Habitat for Humanity of Northern Virginia, which operates ReStores in Chantilly and Alexandria, Virginia. Recognizing that both organizations promote reuse, recycling and repurposing, the two teamed up to exhibit at the 2010 Home Show at the nearby Dulles Expo Center.
“We completed two rooms for our area’s home show last year: An urban-chic loft room and a British Colonial/West Indies-inspired master bedroom suite,” said Bridgett Wilson, publicity chair of the National Capital Area Chapter of IRIS. The spectacular results can be viewed at ReDesign with ReStore on Facebook.
The exhibit raised awareness of Habitat and its 700 ReStores around the country that sell new and gently-used donated goods at a fraction of retail prices. ReStores carry furniture, appliances, building materials, countertops, windows, paint, shutters, doors, art, mirrors and just about anything else one puts in or outside a house.
Where’s Your Before and After Story?
We hope you’ll consider submitting a Before & After story. Email your pictures and a “how to” description to beforeandafter@oneprojectcloser.com to join in.
Help Us Spread the Word
Are you a blogger? If you’d like to support us, please write an article on your blog about the contest, and consider adding one of our buttons to your sidebar. You can find the buttons and more information on our main Before and After article.
If you enjoy watching The Office, I hope you got my “Bears, Beets, Battlestar Galactica” reference. A more accurate title would be something like “Holy Crap That Looks Like a Lot of Work” or “I Want To Trade Backyards.” Anywho, this week’s Before & After comes from Big Sky Country- Butte, Montana where David (author of The Quivering Pen) pulled off a very impressive backyard makeover. Just reading through all the heavy labor makes me feel exhausted.
For all his back-breaking labor, David wins a $50 gift card from OPC, and we’re make a $100 donation to Habitat for Humanity in his honor. If you want in on the action, click that link above to find out how to enter you own Before & After project.
A Backyard Built From Scratch
The garage had to go.
The garage was attached to our 1920’s Craftsman home in Butte, Montana and like a playground bully it dominated our back yard. It extended all the way to the alley, rudely dividing the lawn into two halves: right off our back door, a postage-stamp-size square of grass (which we never used because, frankly, who wants to sit on a yard no bigger than a sheet of toilet paper?) and another nicer, larger stretch of lawn on the other side (which we never used because, frankly, we didn’t want to take the long walk all the way around the house just to sit in that isolated spot of grass, either). So, down it had to come.
One morning in June, we took a deep breath, crossed our fingers, then plunged forward with the Bobcat—mangling and chewing and crushing the old wooden structure. The garage had stood for 40 years but it came down in less than 40 minutes.
Then my wife Jean, our daughter’s boyfriend Dave, and I really set to work. We hauled away scrap, jackhammered the concrete floor, and smoothed a layer of dirt over the blank space in the yard which now felt so wide and empty.
Dave had some experience building decks, but Jean and I had never so much as poured a footing in our lives. Over the course of the next three weeks, we not only poured footings, we framed, we hammered, and we bolted. We squared-up composite-material boards, we measured equal distances between balusters, we cut boards for steps, and we made sure we cut a new hole for the gutter’s drainpipe along one wall.
We bought piping and valves and laid out an automatic sprinkler system all across what would eventually be the yard. We bought what seemed like half a ton of sod and, one mosquito-laden evening, we rolled it into place, neatly kissing the squares of dirt against each other.
We built a privacy fence along the alley and we built (from scratch) a storage shed for all the lawn-and-garden tools.
We bought deck chairs, end tables, and a table for four with an umbrella sprouting from the middle. As a final touch, we bought half a dozen solar-powered lanterns and placed them around the railing, imagining how they would glow at night as we sat out on the lounge chairs sipping our wine under a sky of dazzling stars.
When the deck was finished and the lawn was coming in thick and green, we wiped the sweat from our brows and surveyed all we had done. It was finished and it was good. And we have never once missed that old backyard bully, the garage.


Thanks David!
The backyard turned out terrific, and it’s got to be very satisfying to sit on your deck and enjoy the pay-off. I’m really impressed with your hard work and tackling a very challenging DIY project!
Habitat for Humanity Factoid
AmeriCorps is a network of national service programs that engage more than 75,000 Americans each year in intensive service to meet critical needs in education, public safety, health and the environment. AmeriCorps is not a job; it is a service opportunity. In large and small communities, AmeriCorps members are taking responsibility, learning valuable skills and fulfilling their pledge to serve their communities and their nation.
The AmeriCorps Build-a-Thon is an annual event that brings together AmeriCorps members and alumni in a weeklong blitz build to provide Habitat affiliates with the capacity and resource-building help to aid in their mission to eliminate substandard housing. The event highlights local community needs for affordable housing while celebrating AmeriCorps members’ service with Habitat.
Click here to learn more or apply to join the Habitat for Humanity AmeriCorps National Direct Program.
Where’s Your Before and After Story?
We hope you’ll consider submitting a Before & After story. Email your pictures and a “how to” description to beforeandafter@oneprojectcloser.com to join in.
Help Us Spread the Word
Are you a blogger? If you’d like to support us, please write an article on your blog about the contest, and consider adding one of our buttons to your sidebar. You can find the buttons and more information on our main Before and After article.
